Our Wonderful Followers who come back again and again to read about us...

Saturday, September 29, 2018

MOTORHOME MODIFICATION - Laying Carpet Tiles in Bedroom

To recap: (or you can go back to the last two blogs to read about it)  We had a leak coming in around the power port for the 50amp cord. Rainwater and dew would stream down the side wall and enter by the flap door around the port where the main power line enters the motorhome.  It is a Twist-Lock connection type of port under a little flap that is screwed onto the rig with 4 screws and a big hole cut for the power connections behind the port.  On the inside, the water would seep in and we never noticed it because it was under an enclosed panel inside a cabinet with a false bottom.  That cabinet is down low on the far side of the bed on the driver's side. 

The water seeped underneath the carpeting and was growing MOLD in our bedroom! After being closed up in the hot humid weather for a few weeks while parked in our backyard, Steve was shocked with horror at mold growing in our bedroom!   He yanked out all of the  bedroom carpeting, fixed the leak where it entered the rig, and we sealed the floor with Minwax Wood Hardener after it was completely dried out.  Then we sealed the entire floor with a thick coat of porch and floor enamel paint as well.  (that is in detail 2 blogs back)

Around the base of the bed (which is where our diesel engine is) he also removed the carpeting that was vertically glued to the sides.  We covered that the other day with a sheet of soft flexible cream vinyl flooring, glued to the sides. (that is in detail one blog back)

The next step was to get some new carpeting on the floor around the bed.

The other night we picked up 14 interesting carpet tiles on sale.  They are pretty thick and rigid and the edges are treated so they don't unravel. We picked out a kinda blotchy grey pattern with no real true direction.  We only needed 12 tiles but thought grabbing a few extra for mistakes or damage would be a good idea.

We picked a color that also somewhat blended with the flooring in the rest of the motorhome. The main section of our motorhome has grey/cream berberish carpeting which is 22 years old. We take our shoes off at the door, clean it once a year, and try to vac it often to keep it nice.

Here are the new carpet tiles laying out in the livingroom area until we get started.


We shop on a budget, and these ended up being only $1.77 per tile after rebate/sale at Menards. We bought 14 tiles and a roll of double stick carpet tape, so we were good to go for under $30.00! 


Steve was chomping at the bit early this morning
 to get on task and start laying the carpet tiles
 in the motorhome bedroom!   

 I wanted to snuggle into bed 
and stay warm and cozy for a little while longer.  
Sigh. 

See how cold it was here this morning in Wisconsin? 

Hard to believe last week we were running the central air! 


He lured me out of bed with a hot steaming cup of coffee.  I tugged on some sweatpants and a sweater, donned my wool socks, and stumbled out to the motorhome. He already had the heater going and my tools laid out on the table.  I guess we were ready to work?


We had a plan to use my rotary cutting tool with a new fresh blade.  That worked, but it was tough.  There are three layers to these thick tiles, the bottom one is felt, then a rubbery jute layer, and then actual carpet fiber layer.  

Then I had an idea!   I have this great tool I use to cut up multiple layers of denim fabric when weaving rugs. Many years ago, my friend Norma showed me how well it works for weaving. I bought this about 10-12 years ago I think at Menards for about $20.  I see now they are made in a reddish color by Rockwell and Worx, and sell between $30-40.  I even found them on Amazon:


This worked much better!  It runs on a lithium battery, and has a cord to plug in to charge it up. For being this old, it held it's charge and I can't remember the last time I had used it. Perhaps 4 or 5 years ago?  Sometimes it got a bit gummied up in sections. I think I need a new blade, which is on my next shopping list.


Steve did most of the measuring and I did most of the cutting.  We marked each piece on back with marker as to which direction it was going to lay and which cuts went where....


Once we had the piece measured, marked, cut and ready to go into place, Steve would dry fit it first. Then we would finally press on a layer of the double stick carpet tape.


It went all around all four sides snugly to the edges. 
The yellow layer of plastic then gets pulled off 
to reveal the other sticky side of the tape. 


Steve carefully laid the first piece, after pre-figuring out exact placement for the location of the seams on either side of the platform base and along the other wall.  The last thing you want to do is start with full pieces on one side, then have to cut all little pieces when it runs on the other side of the rig!

Tah Dah! First piece! 


Since it was a narrow route around the bed, Steve worked one piece at a time across the bottom, then up each side after that.  I managed to snap one shot from up overhead.  And no, that is not red underwear hanging out, it's his red t-shirt under the sweatshirt.


Some of the pieces were more intricate cuts... this one we had to cut around a heating vent.  We found the scissors handy to get into the tiny inside corners.  See how we peel away the yellow layer to expose the sticky part of the tape?


We did take a lunch break, and then a nap break too... Plus Steve wanted to get the grass cut before it rains tomorrow. (plus there is a Packer Game on at noon tomorrow so who wants to cut grass then?)

Here is the space across the end of the bed....  
see how the blotchy pattern makes it easy to lay?
Nothing to match up and make even.


We finished up laying along both sides of the bed.
We have to reroute that one cable on the right side yet. 


We came back out after supper and finished up the last few pieces. 
Steve brought out his air compressor and nailed in the threshold trim.
Once that cable is rerouted, we can finish that far edge better. 


Whew... we cut it close!  We thought perhaps one roll of double sided carpet tape would be enough, but we weren't sure.  Look at what we only have left!


Yup, I think this makes a nice clean look, after ripping out the old carpeting around the base and on the floor. By adding the cream vinyl to the vertical box, it really helped to make it blend together with the cream walls and backing over the headboard.


I think it looks better now, 
from front to back.


Oh, around the bed, Steve re-installed the four heavy tie-down devices that hold the mattress deck down over the engine area.  That is also a good closeup of the cream colored vinyl flooring we put on the sides of the box around the engine.


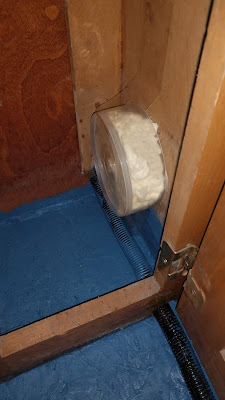
Steve sealed up that port flapper door on the outside of the motorhome completely with silicone and it won't leak anymore. From the inside, in the cabinet, we also filled a CD stack cover with Great Stuff spray foam and stuck it on over the disconnected power fitting. Now nothing can catch on it from inside the cabinet.  It won't be used as a power port anymore because he rerouted that power cable directly to the power compartment below. 


Ahhh yes--- in yesterday's blog I mentioned that Steve would be making some kind of "trap door" to fish the power cord out through the bottom of the rig.  That way the compartment door can remain locked even if the cord is in use.  I was thinking he was going to drill a hole in the bottom of the compartment and put in a flapper door device.

Guess I figured wrong!

He was looking at the compartment today and realized it was vented with three holes already cut into the side wall!   He removed one of the vent circles, and lined the edge with some wire "loom" plastic tubing to protect our power cord from sharp edges.   What a smart guy!


The vent opening leads out into the open compartment where our generator is located.  That section is wide open to the ground. Now the cord can drop down through that space to be used at a power post.


Now both compartments can be shut and locked up, whether we are out camping somewhere or even while parked at home.


~~~~~~~~~~

Oh, I did mention a nap today....

I always pre-wash my fabrics before starting to sew with them, so I know they won't shrink or pull apart during the first washing. But after sewing, I like to wash and dry the quilt right away, to make it soft and comfy and smell great.  

Washing it softens up the newly sewn batting,
and makes it all kinda bumpy and cosy and soft. 


When it came out of the dryer, 
I could not resist. 
I HAD to cuddle up and take a nap with it. 


This busy Saturday went by fast.  We didn't even get the dogs out for a walk, and they let us know this evening they were not too happy about that fact. Maybe tomorrow morning we will get up and get them out and about for a brisk fall walk. 

Tonight we are cuddled up in our chairs, we have HGTV on, and a fire in the fireplace.  Oh, and yes, I am cuddled under my quilt as I type this.  


Friday, September 28, 2018

Working on the EEEK EEEK Leak, and Finishing a Quilt

We got the leak stopped for sure now.  Even during a rain storm the other day, we didn't get a drop of water inside. Whew! Glad we got this thing tackled before it got any worse... or before it did any more damage.

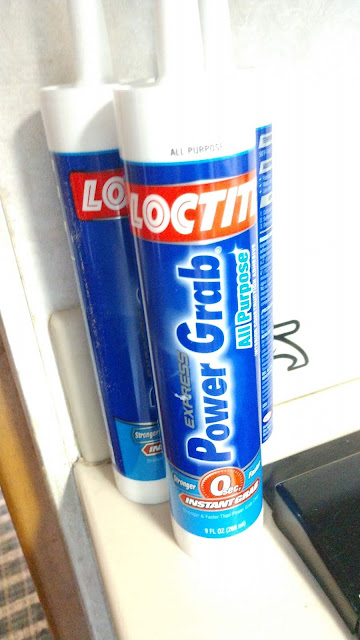
While out and about for errands, we picked up a few tubes of good ole Power Grab. It's adhesive in a caulk tube an easy to use.  We find that it holds most anything to anything.  Wood, vinyl, metal, cloth, whatever.


This is what we were covering.....  around the base of the king sized bed. This is the compartment that holds our diesel engine as well.  The carpeting on it was okay, but we worried about mold and decided if we are changing the flooring, we can change the sides of the box base too. We ripped off the old carpeting... whew!  No mold!   But we decided to change it anyhow to the same cream vinyl soft flooring we did on the back wall over the bed.

Steve did a little squiggle of the Power Grab adhesive on the wood paneled surface.


Then he smoothed it out lightly with a finely notched trowel.  That way the vinyl would hold, but not have big swirly lumps under the surface.


Next tool is from my bag of tricks... yes... my rolling pin from the kitchen cabinet!  hahaha  It worked good to smooth out the vinyl and keep it in place.  The Power Grab sets up quickly. He worked around the entire base and got the pre-cut vinyl on in a matter of minutes.   P.S. this is leftover vinyl flooring from our upstairs bathroom.


Now the base of the bed matches the back wall 
where we removed the mirror last year. ... 


The flooring is painted blue for now, 
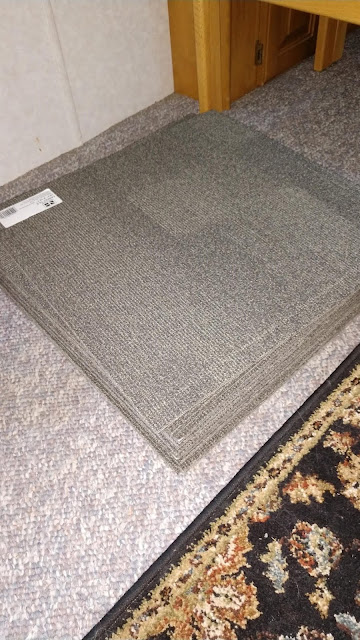
but we picked up some soft grey textured carpet tiles 
that we are going to lay tomorrow. 


In my last blog, I mentioned that Steve re-wired our power supply cord to now directly feed into the Progressive Industries Electrical Management System. For now this will work by just dropping our big 50 amp power cord (a.k.a. The Snake) out the door and letting it drop and partially close.  Later he will cut a hole in the base of this compartment and feed it out through a trap door to the ground below. 


This will work for now in our own yard, but we will get it situated correctly and be able to lock the compartment again when the cord is in use.   Knowing him, he already has the trap door on order and we will hear the buzzing of a big hole saw in the near future?


~~~~~~~~~~~

Steve helped me with a little project last night.  In my sewing room, I have two file cabinets with a large table top spread over the top of them as a cutting/sewing table.  It works well for me, and it previously was to the right of my sewing machine in the corner:  I keep my sewing machine on an old typing table (thanks Linda!) which has it just at the right height.  It has a clear plexi glass table extension called a Sew Steady device to give me more flat sewing surface. 

(this is how it used to look) 


I decided that I needed more table space to my LEFT... not on the right.  That way when I work on big quilts or projects, the heft of the fabric would be better supported if the table were to the left.  Once he helped me move it over to the left and turned it, I put the typing table to the right. Perfect!!


Now everything is in a much better position, and all within reach. And to think I had been thinking that having things to the right side, being right handed, made sense?  Nawwww   But I was glad I was able to figure a way to make it work better.  And glad that I have a husband who interrupted his watching of Hogan's Hero's to come and move it around for me!


This morning I came into my sewing room with a fresh attitude and sunshiney smile on my face.  Ahhhh that works so much better!


All along the wall under the windows is my big quilting frame 
that I use for doing the stitching on the entire quilts once I put the tops together.
(and lots of supplies underneath) 


The last wall to the west is taken up by a closet (also filled with more supplies and quilting batts and tubs of yarn)  and some of my other well-loved things hanging on the walls.  I surround myself with happy things and it sure makes a difference when I go in there to work on my quilts.


Speaking of quilts, I grabbed the newest one and finished sewing on the binding this morning. Steve had to go and drive his Old Fart Party Bus... so I had time to sew and ignore the housework while I did. Heck, I even stayed in my jammies until noon, to finish up this quilt.  LOL  The binding is the maroon fabric folded around the edges and stitched down. 


This is the quilt I started this summer when we took off for a week vacation.  Thus the name I put on the label on the backside. I am glad I got it done before "Fall" weather sets in.   Barely made it, I tell ya.   The back fabric was from a set of sheets that I have from cleaning out my dad's cabin after he passed away.  The color compliments the quilt, and it feels warm and snuggly, like "family".


I hung it out on the clothesline to get a good pic of it all finished. I love the feeling of each quilt as a piece of accomplishment and as a work of art too.  This one almost reminds me of Swarovski crystals with the rich deep jewels flashing in the diamond shapes.


It looks pretty good draped on the old vintage rocking chair
by the fireplace. 


This evening I am putting it to good use as I type this.
Yup, it's curled up around my legs and keeping me cozy warm. 


Stay tuned, we will be finishing up the flooring the motorhome,
perhaps tomorrow. 

Then loading it up to be Campground Hosts for Oct. 1 at 
High Cliff State Park. 

Monday, September 24, 2018

MOTORHOME MODIFICATION - EEEK EEEK It's A Water Leak!!!

Any RV owner would shudder at the sight of this photo. Nobody likes to see a pile of ripped out carpeting, padding, and wood strips.  Laying on the ground next to your RV. It can only mean that something BAD is happening.


 It means: 
EEEK EEEK 
We have a leak!!!

We take great pride in maintaining our twenty-two-year-old motorhome. We are meticulous in it's care, and do everything we can to do preventative maintenance.

But we haven't really been camping in our motorhome since July. When Steve went in there the other day, after being closed up in the hot weather, it smelled kind of musty and mildewy. He looked around and saw some mold on the carpet along side of the bed on the driver's side.

Mold can only mean one thing, water intrusion. And any RVer knows that when water intrudes into a motorhome it's very difficult to diagnose and halt it before does any further damage.

Of course, the first place to look is the roof! Steve examined it all very carefully and there's absolutely no water intrusion coming in on the roof--- not near the back fiberglass cap, the marker lights, the seams, or anywhere.

The second place that he looked was along all of the horizontal aluminum strips on the exterior of the motor home. We regularly check those every year, usually spring and fall. A thin bead of silicone keeps those secure and there is absolutely no water intrusion going on there.


Where oh where is this water getting into the floor of the motorhome?

It's not on the interior walls and it's not around the windows. Everything is high and dry. It's just the floor itself, under the carpeting, that is wet. He examined from back in the engine compartment and he examined from underneath.

Finally he was able to diagnose exactly where the water was intruding from. And you aren't going to believe it if I didn't have photos to prove it.

The moisture running off the roof, whether it's rainfall or morning dew, is trickling down the side of the motor home into this one concentrated area. It makes an exact beeline right down to this flapper door port that covers the 50 amp bayonet connection for our power cord!  It is travelling on the yellow line, not on the outside of that ribbed seam. It is travelling down the smooth flat wall in a stream right over that flap door.


I took these photos this morning of the exact trickle of morning dew coming right down the side of the motor home. You can actually see it in these photos.


It runs right straight down in a perfect line to this flap door. The flap door is held onto the motorhome's side by four screws that go directly to the inside of the rig. The water is running right down inside at this opening and through the wall!!


Here is a YouTube video I made of the entire track that this water has been making:


Once the water gets inside, it's in an enclosed area of a cabinet where there is a false bottom like shelf. It was built up with a false bottom shelf to make sure you don't cram something into the cabinet and touch or move those wires or screws on the inside.  So we couldn't see it at all until we tore out the false bottom shelf of this particular cabinet to get to where the wires come into the motorhome.

The water is trickling in around the screw holes and around the entire large circular opening of the outlet in the port. From there, the water was actually running down the inside of the plastic housing that covers the electrical wires, called a "loom". It's like a slit tubing flexible plastic hose. When Steve pulled the plastic loom away from the wires it was all full of moisture and actual water drops coming out!

(in this pic he already removed the inside power cord from the port connections)

So the water was running down
 and draining all along the floor???

When Steve pulled back the carpeting, the particle board flooring underneath the carpeting in this whole area is wet. This is NOT GOOD!!!!


Steve unhooked the power wires from the inside of the outlet and rerouted them directly to our Progressive Industries power management system unit in the lower compartment. We will bypass using this exterior bayonet port completely.  When we want to plug into power, we will just open our compartment door and run the cord out for now. Later he will make an access hole in the bottom of that compartment to run the cord out underneath the motorhome. That is how many other RVs are made and we will now make ours that way as well.


Now to address the problem of the wet wood. We set fans on it for the last 4 days to dry it out. Today we are coating it with this product from Minwax called Wood Hardener. We have used this before when we had a leak by the washing machine and it works very well. We have also used it on a threshold on our house door and a post on our porch. It hardens up the wood fibers with a resin which makes it firm again, like the original wood.


Once it is dry, we are going to seal the entire floor
 with a coat of floor and porch enamel paint.


Steve said this afternoon that it is dry enough now to cover with paint. I don't know why RV manufacturers don't coat this particle board in the first place with some type of sealer. As soon as you have a leak, it all swells up, rots, and falls apart if left untreated.


Seeing as we pulled out the carpeting on the floor, we also decided to pull out the vertical carpeting that is glued around the box encompassing our engine compartment. The king bed platform sets down on this box.  We don't know how far the mold spread, so we might as well remove all the carpeting back there, as well as wash the bedding at the same time.

We decided to recover the sides of the engine compartment box with a piece of cream colored vinyl sheet flooring. This is the same flooring we put on the back wall over the bed when we removed the mirror. Now it will all coordinate and match. With a bit of vinyl adhesive and some some tacking staples around the lip edge, it will look just fine. Right now we have it rolled out, getting the wrinkles out of it before installation.  I think this evening or tomorrow we will get that installed.


Yes, we had to remove the sliding bedroom door to get to all of the carpeting during the removal process...  so right now the door is laying on the mattress.


Once the paint is dry, we will put new carpeting down over it. We looked at some of the new carpet tiles that you can buy in 20 by 20 inch pieces. They are easy to install with double stick tape. So I think we will go with that idea. Either that or buy some long runner rugs cut to size on each side and across the end of the bed. It's only 15 inches wide on each side of the bed and 21 inches wide across the bottom of the bed. There's not a lot of floor space because the king size bed does take up a lot of room.

Either way, we are glad we caught this now because before it caused any worse damage.

We are due to be the Campground Hosts starting October 1st at High Cliff State Park so we need to get this fixed during the week before we head on out.


~~~~~~~~~~

The paint is drying, 
Steve left to go drive a transport for the county, 
and I am taking care of my coleus.

My friend Connie, whom I wrote about yesterday, gave me some of this coleus plant way back in about 1990 I think. I winter it over indoors every year.  Every Spring I plant it in my yard and let it grow. Every Fall I dig some up to bring indoors. I also snap off little cuttings to re-root in water.

I just love the colors of coleus. Magenta is my favorite color, and next to that burgundy and green. These plants have all of those colors wrapped together in one.  Because the leaves are the color feature, it also adds instant color to spring flowerbeds, instead of waiting for seeds or blooms. 


This year I have a full blooming bumper crop along the south side of the house. Grandson Mason asked us why would we ever put plants that grow all over our sidewalk. He said Grandma is crazy. (Yes, I am)


Yesterday I had a picture of the window box on the front of the house, today here is a picture of the window box along the south side, situated above my row of coleus.


The weather has been kind of crazy lately, with some evenings going down into the high 30's. I'm sure Frost is going to be coming soon --- so it's a good time to start these cuttings.

I snap off about 10 tender stems and put them into glass quart jars. Each jar is filled with water from my rain barrel rather than city tap water with chemicals. I think it helps them root faster.

By putting them in the little wagon, I can roll it out of the garage during the day, and back into the garage at night for protection. 


My work is done now for the day. I will wait for Steve to get home from his transport and maybe we will install that vinyl. In the meantime, I think it's a good time for a nap!