Our Wonderful Followers who come back again and again to read about us...

Sunday, December 31, 2017

Mirror Mirror on the Wall and Merry Christmas Day

Who is the fairest of them all? Hmmmmmm

As soon as I got home from a babysitting trip up north, Steve was mounting the medicine cabinet mirror that our son Dan ordered for us. He works at a commercial glass place and got us a bevelled mirror cut to size.


I think Steve is the fairest of them all! 


Underneath the medicine cabinet, to one side over the sink, we also mounted some glass shelf brackets. Previously there had been a smaller glass shelf in that place, so we reused those brackets.  I found a larger glass shelf in the basement on top of the paint cabinet in my workroom.  Perfect!   (it pays to ask the sellers to leave behind anything they don't want and we decided if we wanted to keep or reuse those items)

The shelf is for our most used things that we liked to keep up over the sink.  Steve isn't too keen on it, but I think it kinda looks old fashioned.


So our gift was all new beadboard,
 trim and baseboard. 
A recycled medicine cabinet and new mirror.
Lace adhered to the window for privacy.
We added a handwoven rug from my friend Juanita that matches well.

As Steve says:
"So there ya have it"  
meaning our bathroom facelift 
Christmas Gift to each other is 
DONE! 


Incidentally, it has now been FIVE years since we bought Our Old House. The anniversary of our closing was 2 days ago, and here is an old blog post about our house purchase: We Moved Blog


Our Christmas was busy busy busy as you can imagine.  We managed to spend Christmas Eve alone at home and made steamed snow crab legs for dinner and had a peaceful evening by the fireplace.  The dogs snuggled up and we enjoyed some good reminiscing about all we have done in our 22+ years together.

On Christmas Day, we travelled down to Belgium for a family celebration with Steve's dad and siblings.  It was a lovely but very very cold day!  Steve's sister Lynn hosted and we were treated to a nice meal and we brought desserts (of which some were the Christmas cookies the grandkids decorated)

On Tuesday, I trekked up to Oconto to babysit for a few of the grandkids because their day care was closed for the holiday weekend.  It was a long long cold day. Steve and his brothers helped his dad move more garage stuff up to the house in Sister Bay, while I was with the grandtots cozy and warm!


It is so much fun to watch the older ones be so thoughtful and careful of their little sister.  And little Claire tries so hard to keep up with the big kids. She wants to be big too! Don''t grow up too fast, little one. You are the last wee grandbaby we will have and we want to keep you as small for as long as possible!

While little Claire napped, we worked on a gingerbread house from a creative kit, and had a lot of fun with stories, snuggles and giggles. 


As you know, the weather is not very nice
the subzero temps are horrible
and our wind chills have been in the 20 to 30 BELOW range. 


It's now New Years Eve, and we just had a long busy weekend up north with all of our kids and grandkids and dogs and grandpuppies!  It was a hectic crazy fun filled visit with lots of silliness, gifts, food and love!  I will do another blog post about that, because I think we are worn out.  We came home and napped and watched the last Packer game of the season ... and are staying in and safe and sound to ring in the New Year. 

Please everyone, stay safe and may your
 New Year
 be bright and beautiful! 


Sunday, December 24, 2017

Christmas Eve and Our Bathroom Facelift is DONE!

Here it is, Christmas Eve...  We would like to wish everyone a blessed and loving Christmas.


I think we have everything done and ready for Steve's family celebration tomorrow on Christmas Day.  We are journeying down to his sister's home in Belgium, WI to be with Steve's dad and all of his siblings.

Then on the 30th we will get together with all of our grown kids and grandkids for an overnight gathering in Oconto.  It is much easier to get them all together on a day other than the actual holiday date. That way they can all be with their own kids in their own homes on Christmas and not running out 100+ miles to other gatherings.

As for our own Christmas for Steve and I, we are cooking up some steamed crab legs tonight for dinner and staying home and cuddling in front of the fireplace, with the tree in the background and soft Christmas music playing as it snows outside. It's a Wonderful Life is supposed to be on NBC at 7 p.m.  It already started snowing and should continue all day!


~~~~~~~~~

I am happy to say that our bathroom facelift Christmas Present to each other is DONE!

Yesterday, we finished the trim around the room and it was a REAL CHALLENGE on the slanted ceiling where it meets the wall with the window. The problem is that not only is the ceiling off by an inch horizontally across the wall, but it also is off close to an inch and half vertically from one corner to the other! (yellow arrows) We needed it to meet up with the beadboard on each side wall (red arrows).


We pondered about four different ways to combat that situation:


  • Short of ripping out the entire ceiling and re-sheetrocking it across where it meets the wall, with shims and creative cutting. Then the wall would also have to be shimmed out and redone as well.  hmmmmm I don't think so.
  • Next was to get a really WIDE piece of trim and lay it on an angle all the way across, but a wide piece wouldn't meet up evenly with the two top cap pieces on each side.  But it would cover the awkward area where the ceiling meets the wall? hmmmmm I don't think so.
  • Third was to build a long "chase" box similar to a soffit over cabinets and cover the entire area with new sheetrock and paint, then go down from there on the walls with the beadboard. But again, that would not meet up with the side pieces of cap trim.  hmmmmm I don't think so.
  • Soooo fourth:  I came up with a really "out of the box" idea!  Our main goal was to make the piece of cap trim meet at both the cap trims at the left and the right corners of the room, for it to be horizontal, and level, and not have to rip out a bunch of stuff.


And after some intense deliberation, Steve decided to say "let's try it!"

He wanted to try my idea??? 
 Little Triangles! 


SEE???  
Triangles of varying sizes in graduated height and depth.

 I think you can see where we are going with this.... 


The triangles will hold up  the trim vertically perpendicular to the room....

By making varying sizes of triangles, going from larger to smaller, all with a right angle cut, we could make the same long piece of trim cap appear horizontal from across the room. Even if the wall below it isn't even, it would appear to meet evenly along the ceiling.


We moved each triangle around 
until we found the right place- 
level and plumb in both directions,
 for each graduating piece of triangle.


Once we got the triangles into place, testing each one with a sample piece of trim cap to determine their placement.  Steve nailed them tight and I ran a bead of adhesive caulk along the edges just for added insurance. Then we were able to scribe a long board to act as a bottom surface of the triangles. I pre-stained the bottom surface of the board so we didn't have to work upside down once it was in place.


Now we were able to nail on the cap trim
 and it was perfectly horizontal!!!


Unless you go right up to the wall and stick your fingers underneath the lip edge, you can't tell if it's off by one and half inches on the left side or a half an inch on the right!


YAYYYYYY!!!

It was done and we didn't have to jump through hoops to do it!


Now we needed to finish the trim around the bathtub.  We have an access panel for the plumbing located at the end of the tub. We weren't sure how much baseboard trim would be left at the end of our job. We didn't want to commit to doing it until we knew what we had left (2 lengths of beadboard, and about 8 pieces of assorted small bits of trim. Pretty good figuring with my cut list eh?)


Steve added the baseboard and quarter round sections after I painted a fresh coat of the white on the main panel.  He had to be so careful to not nail into the floor when doing the bottommost section of quarter round. We have to be able to remove the panel in case of a plumbing situation.

There.... the tub trim is all done! 


Next up was the medicine cabinet.  We found it on Craigslist for $10, already sanded. I stained the outside and painted the inside with white enamel paint.  Our son Dan ordered us a beveled mirror for it, and it's ready as soon as we get up there to pick it up.


The two wall sconce lights are kinda close together, so a small cabinet is just what we needed.  Most of our personal bathroom type stuff is kept out in the linen closet in the hallway. This cute little one is a bit smaller than what we had before.

Steve had to make a support frame in the open space to fit the cabinet into, and allow the surrounding trim wood to be nailed to the support frame instead of into thin air or plaster.


After mounting the cabinet in the support frame, now he carefully cut four pieces of surrounding trim to accent the cabinet and cover the old opening.  He did such nice 45 degree cuts and they all met perfectly in our trial fitting.


Then he showed me a "Trade Secret" of his woodworking skills!!!  Taking a dark brown marker, he had me draw along the edges of the wood where they join at the 45 degree angle. That way at the fresh new cut there wouldn't show any raw wood....  and if there was any slight gap or variance, it would not be so noticeable.


Now for MY secret... A message for the People of the Future from the People Of The Past! I wrote a message in the support frame box with a marker... noting who we were and the date we restored the bathroom with the beadboard and cabinet. Our daughter Heather has written a message to the People of the Future from the People Of The Past in the walls of the house while were building up in Oconto when she was 12 years old.  I had also done this in our kitchen, when we were installed the vintage restored cabinets I found on Craigslist.  I wrote a similar message on a end panel of bare wood before enclosing it.

This bathroom lovingly restored to it's original era with beadboard and cabinet 
by Steve and Karen Pfundtner Dec 2017

Someday, somehow, many many years from now, maybe someone will see it and wonder about us? Maybe if the house was being torn down or some pieces salvaged for another old house? or who knows? I just hope it's many many years after we are long gone and forgotten.


The cabinet was in place even before we made breakfast.  
It sure looked great!!!!


We have to decide if we are going to put up the little glass shelf
that was over the sink. I like it and it's old fashioned.
It held a few of our bathroom toiletries like toothbrushes, etc.


My last project was to add some Minwax Polyshades to the wood around the window.  It was a bit "off" reddish and the beadboard is more brownish.  I didn't want to coat that frame until our other work was done, because I didn't want sawdust or caulk getting on the drying polyurethane.  Polyshades is good because it lets you change the color (slightly) of already stained and varnished wood without sanding it down to start over. It's a colored polyurethane that can be brushed lightly in thin layers over an existing finish until you reach the desired effect.

I had repaired all of the holes with colored wood putty... these were holes from the old curtain rod brackets over the years.


It only took one thin coat of a more brownish color to tone the window frame and sill to match the rest of our bathroom.  Wheeeee! I think it looks great!


 And one final problem... my lovely lace on the glass was starting to curl up! I think it was from the cold or perhaps the sun shining on it?  I thought it might have been from a curious grandkid peeling it off, but more lace was coming off after the sunshine yesterday too. The lace on my downstairs french doors looks fine over the last 2 years, but those are interior doors and not facing the south sun.

Anyhow... I decided to remove the corn starched lace with warm water, and cut two more pieces of lace. (lucky I bought two valances at the thrift shop and had extra material to work with!)  This time I taped off the window frames and used a spray adhesive from 3M called Super 77.


It went on very easily, and had a vertical spray pattern to the nozzle. I almost didn't need to tape the edges of the frame, but with the tape I was able to get nice and close in the corners. , It sprayed evenly across the glass.


I carefully patted the lace into place, lining up the corners first, then smoothing it flat to the glass with a foam brush.  It adhered nicely and no wrinkles or bumps!


I let it dry a little bit before I pulled off the tape and drop cloth.  It came out so pretty!   It is hard to take a photo against the light coming in to show the detail of the lace pattern. I think this will hold with the temp changes of cold winter and warm southern sun. I hope.


So here it is ...
our completed Christmas Present to each other! 
On Christmas Eve.


Our project was accomplished in 2 weeks ... well 15 days if you count the day we picked up the wood.  We would have gotten it done a lot sooner.  It seems that we get busy with Steve's part time job, babysitting grandkids here and there, school concerts, and having a few family commitments to attend to.   But all in all, it was a fun project and we are really really liking the finished product. 


We would like to say to everyone:


MERRY CHRISTMAS 
AND 
HAPPY NEW YEAR


Thursday, December 21, 2017

Our Bathroom Facelift Almost Completed

Our Christmas Present to each other is to redo our bathroom in Our Old House.  We like making things more "original" and less modernized, if we can.  It fits the style of the house to restore it.

To recap.... this is what the bathroom looked like when we bought the house:

Notice:
  • the acoustical tiles stapled to the slanted ceiling
  • the flickering flourescent tube lights on each side of the 1950 chrome medicine cabinet
  • the upper walls wallpapered with a floral blue vinyl glossy print
  • the blue faded plastic tub surround
  • the gold metallic vein linoleum wrapped up the walls in a quasi-baseboard design
  • the different floral printed contact paper covered access hole behind the shower
  • what you can't see is the leaking toilet which caused rotten sub floor
  • and worst of all, the plastic glued on 1960's tile. 


When we first bought the house, the toilet and sink were both of good quality and had recently been replaced. The rest of the bathroom had been untouched since the 1960's. We ripped up the flooring, fixed the subfloor, put in new sheet vinyl flooring called White Concrete.  It has a mottled opaque texture without a pattern. With all those funky tiles in the room, the last thing we needed was a patterned flooring!   We set the toilet and sink back into place. We sheetrocked the ceiling and the upper walls but left the plastic tiles in place. We added a new tub and a standalone shower and added new light fixtures and a vent fan. 


That was good enough for then.... but we always wanted to get rid of the whitish plastic tiles on the walls. They were falling off here and there and we had been gluing them up back into place.

Steve and I were talking about what we wanted to get for each other for Christmas. We decided on getting rid of the plastic tiles and replacing it with old fashioned dark wood stained beadboard wainscoting (like my fiend Juanita's old house).

We bought all of the beadboard and trim wood last week.  I had it all stained and ready in the basement (see my post 2 blogs back about that) blog about staining boards  

Saturday, after our cookie decorators left, we hauled out the paint and brushes and rollers.  We added a nice coat of "china white" paint to the upper walls. Five years ago we had painted it more of a creamy yellowish tone.  We wanted it as light as possible without being stark white. It is much easier to paint before putting up the stained wood.  We added a fresh coat to the walls, ceiling and slanted ceiling as well.  Steve doesn't like painting, but I did all the cutting in with a brush, and he did the rolling. 

He is so tall, he doesn't even need a ladder....


We started with the baseboard, making sure it was level all around the room. That is the good foundation for a great job, even in an old house with crooked walls and floors!


Just having the baseboard in place, not yet attaching the quarter-round and shoe trim, sure cleaned it up and looked nice against the floor.  It was step one, and I was anxious to get moving forward.  We had to work on it in between work shifts, cooking, baking, grandkids coming, and school concerts last week.


Sunday morning, bright and early, Steveio wanted to get some of the beadboard up. YAYYYY We started at the furthest corner that is also the first noticeable wall as you walk into the room. Being an older house, as I said, none of the walls are even. So working from this point in either direction should stay pretty level from here on outwards in either direction. We hope. 

Drawing level lines and working with scribbled measurements, Steve went up and down and up down 2 flights of stairs to cut each set of boards in the basement.  We could only do a few boards at a time as the measurements always changed as we went along to keep the top line even.  


We have the air compressor down below in the laundry room, with the long hose running up the back servants staircase to the second floor and around the corner to the bathroom.  The dogs do NOT enjoy the hissing and motor running and especially not the BRAPP! BRAPP!  each time it nails into the wood! They kinda hide out in the bedroom on their beds and wait till we are done.

Right about now, as we got a few feet worth of the beadboard done.... we BROKE the air nailer!!! ARRRGGGHHHHH!   That stopped us right then and there.  We trotted on over to the hardware store nearby to buy a new one, but they were closed early on Sunday.  We called down to New Holstein hardware store, and they were closed as well.  Oh geesh... we had to buzz over to Manitowoc 25 miles to the nearest Menards and buy one (on sale!) to get back to work.  That is an extra present now from Santa for our bathroom project.

We got back home, fired up the compressor again and got back to the task at hand.  He worked his way around the tub and then across the south wall around the window.  I was the "Glue Girl" with the caulk gun of Loctite Power Grab adhesive. I also wiped off each board of the sawdust from his cutting. It sticks in all the grooves of the beadboard unless I wipe it clean. I put old white gym socks on my hand to wipe it all down in the grooves before gluing the backside.  Steve would then take each board, fit it into place with the tongue and groove meshing ... and air nail it into place. Voila!  Each piece had to be checked for level as well, and adjusted as we went along.  The tongue and groove allowed for a little bit of shifting in either direction to get each piece of beadboard just right.

When we got to the windowsill, he was able to sneak in behind the sill on each side with his oscillating cutting tool to remove a 5/16 section of wood to slide in the beadboard.  The sill was untouched from the front and looked like it naturally was made to fit that way. That worked slicker than snot! hahahahha I have NO idea where that saying comes from, but Steve said it, so it must have worked.


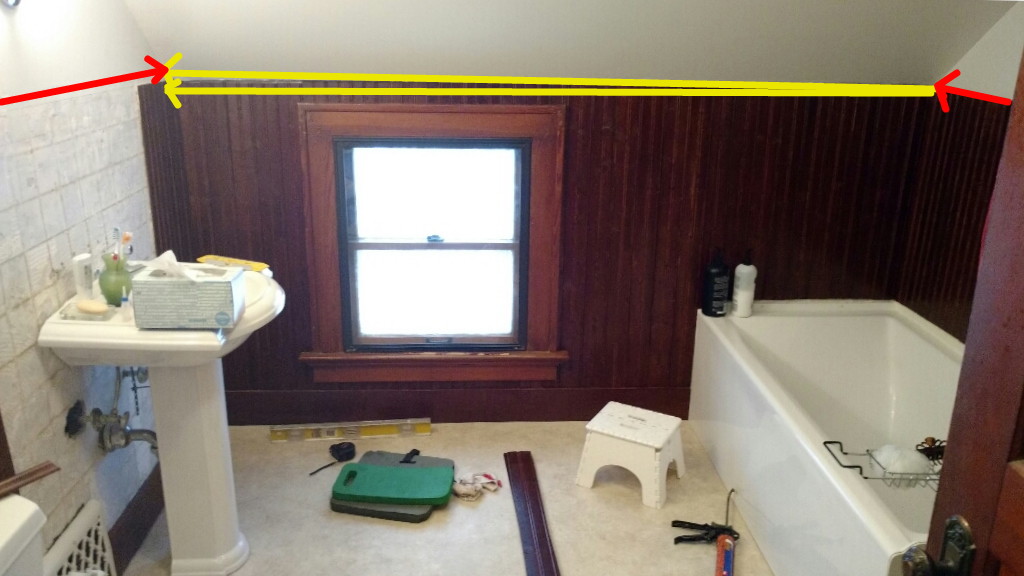
We got this far on Sunday night, and took a well deserved break.  I like how it is coming out, but the top edge looks rough for now. We have a top cap trim that will even it all out. The only problem is the ceiling isn't level in either direction, horizontally nor vertically where it meets the wall.  We have a few ideas of adjusting that and covering it so it all blends together.  More on that later.


The next day, we had a few short bursts to work in the bathroom, in between other commitments.  We got around the window the rest of the way and into the corner. Whew!  It was looking good, but the last wall to go would be the hardest. The sink and toilet, along with all the plumbing fittings and the heat register vent had to be worked around. 


We usually work together well on projects. Remember, we built an entire house together, from the walls and insulation, to the wiring to the plumbing to the tiles to the cabinets and the carpeting and finishing.  But sometimes.... sometimes.....

Each time Steve took a measurement, he tried to keep it in his mind until he got down 2 flights of stairs to the saw set up in the basement.  Sometimes the number slipped his mind. Then he would hollar up the 2 flights of stairs for me to measure it again.  Arggghhh! I finally convinced him to WRITE IT DOWN each time, or else I was going to lose it and move the whole cut off saw and table up into the bathroom! Good Grief!

We tackled the last wall on Tuesday morning...  He didn't have to go to drive for the county job until the afternoon, so we were able to get a large enough block of time to work on it.  First part of the job was to remove the bathroom pedestal sink.  We had taken it off a few years back when we replaced the floor, so it was pretty easy to do it again.


In no time he had the sink apart and on the floor 
so he could work on the wall behind.


Painstakingly, he cut each board for the proper opening for each water line, the drain and remounted the bracket for the sink support.  He even cut tiny pieces of wood to go around the pipes, even though most was covered by the escutcheon flange.  When my guy does a job, he does a Good Job! 


We stood back and looked at our progress with a smile and a pat on the back. This was coming together rather well.  I like the effect of the old fashioned looking beadboard and am happy with our choice. The pitcher is there for an occasional drip drip from the shut-off valve.


We worked our way around the heat register vent and just had the toilet area to get past. This was easy because the toilet is not mounted to the wall in any way, just the floor.  The end was in sight... (well, at least for the beadboard part)


We had enough room to work behind it 
by slipping in the boards from over the top. 


And there it is.. the LAST board put into place!!!  It sure looks good to me!  Next comes the trim cap along the top, as well as the medicine cabinet and trim around it between the two sconce lights.


The sun shining in looks so pretty!  Coming through my lace covered window panes really looks nice.  We were worried it might be "too dark" in there with the stained wood.  Our backup plan was that we could paint it all white later if we found it too dark. But nope, this can stay! 


Wednesday morning, Steve had a couple hours before heading off to drive for the county.  So he decided to do some of the quarter-round along the floor and shoe trim along the top edge of the baseboard. I was busy giving a sockknitting machine lesson to a local gal, so he was on his own to make all the 45 degree cuts and measurements. (and keep them in his mind or write them down himself!)

Yesssss that is looking more polished and finished! 


Look at all of the crazy angles he had to cut to get around the chimney!


Now that the baseboard trim was done, we could put my freshly painted cast iron heat register vent back into place.  We had thought of painting it brown or black. I thought we should try white and see it stand out with a stylish old fashioned flair.  With the white toilet on one side and sink on the other, I think it looks nice! 


Steve had some time after supper on Wednesday to get the trim cut for around the bathtub as well. Wheee that looks so nice now.  The finished look is pretty nice.  


There was some concern from some comments about having wood on the wall by the tub.  Well without a shower overhead, there isn't any splashing going on.  Remember, we have a standalone shower stall in the other corner. We had painted sheetrock wallboard around the tub for the last 5 years without any issues and no splashes.  Even with the grandkids in the tub.  This wood is sealed with polyurethane, so it will be even more protected than the painted sheetrock we had before.  Not only that, but in our last home, we had an entire bathroom all of wood on all of the walls with no problem.  Having a properly operating vent is key, as well as not splashing all over the place.


And here it is .... Thursday night.  We started just a few pieces of cap trim around the chimney section. It sure finishes it off nicely!  WHEEEEEEE!!!! I love how this is coming together! 


You can see out into the hallway to the beadboard linen closet (our inspiration) that ties it all together.  The cap trim to the right still needs to go up, as well as the medicine cabinet.  That is enough for tonight.  Maybe tomorrow. 


Tonight we are relaxing and watching Charlie Brown Christmas and now Saturday Night Live Christmas Special on NBC of vintage Christmas skits.  What a HOOT!   LOL LOL