Grunt grunt ugh ugh me makem blaze of sun on ends of stick!
Heh heh.... Steveio and I have always enjoyed having a fireplace in our homes. The last two homes that we have owned both had woodburning fireplaces. Although it's nice to burn wood, there is always the hassle of staying up late to close down the flue after the fire went out. What happens is after the fire dies down, the room heat escapes right up the chimney all night until morning when you get up to shut the flue. Even with the glass fireplace doors, the room cools off fast with no fire unless the damper is tightly shut. Kinda defeats the purpose?
When we bought this house, we kinda laughed at the little electric fake "faux" fireplace.. but they were all the rage when the street had been electrified as the houses were being built in this area. We are told 5 or 6 houses on this street alone have the same fireplace unit from a local salesman who sold the units and installed the cement fireplace with pretty tiles stuck to it and a nice matching mantle.
This is what it looked like when we bought the house:

It was a fun novelty to show guests and the grandtots got a hoot out of it!
Turn on the switch we have a pretend fire, turn the switch off and it's gone!
Here is a look from behind the log set... it has a little motor with a rotating shaft that has tin foil "flame" shapes on it and light bulb underneath. A section of the logs has a reddish lumpy window that makes it appear as if coals are flickering. The shadows of the rotating shaft flicker on the backside of the fireplace to make it appear as if the flames are dancing. Quite ingenious!

We bought this pretty leaded glass fireplace screen to go in front of it.
It looked pretty with the pretend fire flickering behind it through the glass planels.
It was okay...... for the time being.

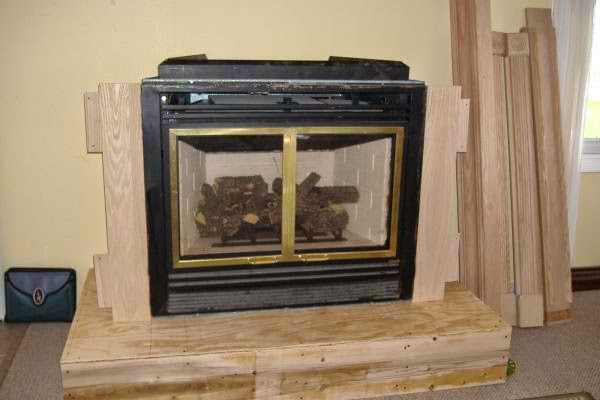
We decided we would like a gas log fireplace instead of a woodburning one. And now we had the perfect home to install one! We bought a large gas log fireplace from a guy who got the unit installed this far in his own home. His wife said she wanted a BIGGER one... so he sold it to us on Craigslist. He hadn't even gotten around to adding tiles or staining the mantle kit etc.
.jpg)
Our plan was to cut out around one row of 6" tiles all around the opening of the fireplace we had. It was such a deep unit from front to rear that we would have to cut straight back out of the house and have to build an outer shroud or box off the back side of the outer wall, with the direct vent sticking out. Of course, we waited until spring to start this project, seeing as we would be having a big gaping hole in our wall during construction!
Here are the cut lines where we would have to sacrifice some tiles....

Well, once we researched a little bit, it seems these are pretty valuable tiles from the Strobl company out of Ohio and are quite sought after. We have 7 spares in the basement that have never been mortared. People frame these tiles and call them "art tiles" and they sell at art auctions for $100-300! Each! Well, there is NO way I want to cut out those tiles now.
Plus, Steve figured we might accidentally crack the neighboring tiles as we saw through the cement between them with a cement saw (not to mention the DUST in doing so)
On to Plan B-----
We searched and searched online and in stores until we found an EXACT width fireplace insert at Home Depot so we didn't have to cut ANY tiles. We had to order it online, but it got delivered free. How nice was that? Plus this unit had less depth than the other unit which means we don't have to cut all the way through the wall. It will just fit.

This is a natural gas vent-free model. Before anyone starts in on me about vent free heating units:
- --- yes, they are compliant in the building code for us in our area
- --- yes, there is an oxygen sensor shut-off device built in for safety
- --- yes, we have plenty of square footage of open area in an older house that is not "air tight"
- --- and yes, we have a vent free catalytic style heater in our motorhome and know how to operate and control the air flow for circulation.
So we put the other fireplace on Craigslist and it sold in 2 days... with three more people inquiring about it after the first buyers arrived to pick it up! They were happy, we were happy.
Now the fun begins!
We wondered what we were going to do for a "hearth"???? The electric faux log unit has been sitting on top of the wall to wall carpeting. We were considering buying a slab of marble... but we also has been told from the daughters who sold us the house that it was all hardwood underneath the carpeting on the main floor. Sooooo Steve started to pull it back to see what was what.
Imagine our utter and total delight to see MORE tiles on the floor...
3 rows of tiles are already set into the floor as a HEARTH!
YEEEEE HAWWW
YEEEEE HAWWW
We have a HEARTH!!!


Sadly the carpet installers had drilled several holes through the edge of the hearth tiles that were right close to the upright tiles to secure the carpeting tack strips! ACK! But I am repairing the holes--- I have already stained them darker reddish brown and will next fill them in with layers of polyurethane until they are level with the rest of the tile.
Steve carefully cut back the carpeting and pad, tucking it under and tacking it down. He succeeded in making a new neat finished edge of carpeting around the outermost rows of the tiles.


Beyond that tile hearth we raised the carpet enough to peek deeper with a flashlight. YES! There is the promised hardwood flooring... sometime in the future if we wish to rip out the carpeting, it will be nice to have hardwood floors. But for now the carpeting is in great shape, so no need to do that now. See the white spots of the holes where he removed the tack strips? That is where I am going to do the repairs once the fireplace installation is complete. If the repair looks too hokey, we will just run two nice trim strips along those edges.
Now it's gonna get MESSY... but not nearly as messy as if we were using a cement saw between those tiles like our original plan was. Steve used a hammer drill and made big holes all of the way around the center portion of the cemented in material. Being VERY careful to not touch a single tile....

I held a shop vac nozzle right by the bottom of the drill bit, catching almost all of the dust and mess. We set the shop vac outside of the window so the exhaust was blown out there, not in the house. It worked out really well, and we had very little cleanup to do. Okay, once he went all the way around drilling the holes .. .and now we started pulling down the cement. It was like a historical excavation.
What was behind the cement?
BRICKS! Bit by bit we got all the bricks pulled out and carried in buckets out to the garage. We figure that they were just a loose layer of odd assorted bricks to take up spaces between the inner and outer walls. Not really anything of substance or part of the house.


Sooo what was behind the bricks?
PLASTER! The thick walls of our house are plastered with a very thick cement type material... not thin plaster you see in newer homes. It's pretty nice because we don't have any cracks like thinner plaster has. Now we were down to the actual wall of the house as it was built. So it took more drilling and scraping away to get to....
BOARDS! It seems our home's plaster is so thick, it's not spread on thin lathes like you see in some homes... this is adhered to solid 3/4 inch thick boards with thin grooves cut into them to grip the cement. Now wonder our house is so easy to heat, those walls are pretty thick. Now he had to get a saw and cut through the boards to clear an opening to the wall behind. And what is behind the boards?
INSULATION! It was messy insulation pouring down and we stuffed up as much as we could back into the wall between the studs. We added some more and a got a board across to keep it up there where it belonged! I think this was the messiest part and we were both wearing masks.


And finally we are down to the ---
STUDS and the back side of the outer wall! Steve cut these studs away with a sawzall reciprocal saw, and added a header along the top of the opening to secure all the construction.


Now it was time to line the entire opening with fire resistant cement board. The clearances allowed in the installation book for the unit are very minimal and it has insulated top, back and side walls built into the unit. We we wanted safety above all, so we added the cement board to be sure. The fireplace insert is a little shorter in height than our opening. Steve made a little platform for it to set on and run the gas line up to the unit through a lined hole in the floor underneath. Using a small oscillating saw tool to plunge down a hole to the basement for the access to the gas piping.


Now it was time to call the inspector before it was hooked to the natural gas line. We are fortunate that the gas service and meter are directly below this unit in the corner of our house. So it was a very short run to the piping. Next, Steve is welding up a metal trim strip that goes around the outer edge of the insert meeting up the metal to the tiles to finish it all off and make a nice transition.
Steve had a dentist appt. at 2:20 today and was home in time for the inspector guy to okay everything and hook us up. By 4 pm we had FLAMES!!!!


(soon it will be finished all around the edges with a metal trim strip)
Ahhhh look at that!
Realistic looking flames with pretty logs, dancing and flickering.

Even though the temperature outside was 78 degrees,
Steve started up the fire so I could take this pic for my blog this evening. LOL
Just think---
I grew up in a home that we heated with wood
and all five of us kids were expected to help
chop, haul, and keep the fire going.
It the fire went out, our pipes would freeze.
It was a never ending chore all winter to burn wood.
It the fire went out, our pipes would freeze.
It was a never ending chore all winter to burn wood.
and then our next 30 years of home ownership we had woodburning fireplaces....
not really solely heating the home with them, but using them a lot to supplement the heat bills.
not really solely heating the home with them, but using them a lot to supplement the heat bills.
Now:
NO firewood to chop and stack and haul and store
NO raiding this weeks newspaper for firestarting...
NO digging for the tiniest sticks in the woodpile to use as kindling
NO sitting up waiting for the fire to go out to close the damper
NO ashes to clean out
Now we can just turn a button and click... flames!

(I can honestly say no tiles were harmed in the creation of this fireplace)


Fantastic job. It's so much fun finding all the interesting things from the past in the older homes. I can imagine your joy when you found the hearth under the carpeting. Wow!!
ReplyDeleteJust hazarding a guess here, but I imagine that original insert has value also... If Stevio could make it into something cute and Christmas-y that would be swell!
ReplyDeleteYou two have great determination! Well done!
Wow! You guys make it look almost easy, but Im sure it was a lot of tedious work. The end result is stunning!
ReplyDeleteWow! That was a chore but sure looks nice now! We have a fireplace in our living room with glass doors but we hardly ever use it anymore--makes such a mess!
ReplyDeleteGood job!
ReplyDeleteI've come to realize there is nothing Steve can't do, and do well. He's an amazing guy.
ReplyDeleteEnjoy your new fireplace, it surely will be a nice touch to those cold WI winter nights!
Can't imagine thinking "Let's carpet over that tile hearth and then set the fake logs on the carpet, it will look fine." I'm sure the house is so happy to have you and Steve to restore her dignity :-).
ReplyDelete