Our Wonderful Followers who come back again and again to read about us...

Showing posts with label reuse repurpose recycle. Show all posts

Friday, November 15, 2019

Finishing Trim and Reuse Recycle Repurpose Mantle to Coat Rack

Catching up here with the last few blogs about working on our she shed.

Now it's time to finish up the rough edges. We need trim!

I had found a gentleman on Facebook Marketplace who was selling a huge bundle of trim, already painted white for $20. There was window trim, door trim, and baseboard trim. Enough to complete almost the entire room.  We loaded it up on the trailer. All it needed was a fresh coat of white paint and it would be ready to go.


It's now too cold to paint outside. We had to spread out tarps under the saw horses in the garage to paint the trim. Since the big garage is pretty new, we didn't want any paint splatters on the cement.  This is going to be "Steve's Garage" soon, so I better be clean and neat out there as his guest when working on projects. LOL .

Steve began to measure, cut, and air nail up the pieces of trim. He had to go around every window and every doorway. This would neatly finish up the inside areas where the window sets, as well as the surface trim that's flat on the wall against the plaster. In the pics below you can see he also went around the doorway that leads into the kitchen.


In taking a hint from a This Old House program on PBS, he decided to frame the trim around each of the three front windows in a method different than normal. 

After careful measuring, he built three box units for each window and attached the trim as well. He pre-built them all out in the garage. Making perfect 45 degree cuts and joining them to make perfect 90 degree corners, he was able to assemble them without any gaps or mis-cuts. Each window trim now was a complete box unit to be brought in and set into place.


It worked very well to level them all off and shim them into place over the irregular jagged openings of the plastered walls. The windows of course are all level, even and plumb.  The newly created box trims are all level, even and plumb. By sandwiching them together this way, the irregular plaster edges are enclosed and completely hidden.


I put my lace curtains into place right away. They are on three little spring tension rods that just fit into the window frames. Do you see that they're cute little chickens and roosters? Appropriate for a farmhouse, don't you think?


After he nailed everything into place, he followed around all of the edges and seams with a thin bead of caulking to make a nice neat even finish. Then I gave everything a final coat of paint after puttying up the tiny nail holes from his air nailing gun.

He was only able to do the trim around one set of the french windows facing out to the east. The other set we will not trim out until the ceramic tile flooring is laid in front of those. To me, adding the trim is like adding a picture frame to this beautiful view, like art work.


~~~~~~~~

Here's the second project that we worked on.
It's a
Reuse Repurpose Recycle
Project!

Back in February when we were first looking at this house, the realtor furnished us with some old photos of what it used to look like inside back in 2015. (They are shockingly horrible pics and shows how beat up this place was from the renters)  It was purchased in 2015 and fixed up and sold to us in 2019.

In these original photos from 2015, it showed two pieces of black mantle wood: a lower one that spanned the entire width of the fireplace and higher one that was shorter.

(oh my look at the poor beat up livingroom and diningroom back then) 

this is now: 


Evidently, somewhere along the line, somebody took down the upper mantle and set it in the garage. That is where we found it now in 2019.

Of course, you know me, I am all in to Reuse Repurpose Recycle. I got out my measuring tape.  I had an idea! My brain got to thinking...  aha!  I had that mantle laying in the garage.

There is a little corner area of the she shed that we are going to build into a triangular closet later on. I wanted some type of a board or shelf there to mount some coat hooks.  We needed a handy spot to hang coats up near the door.


I marked with a pencil where I needed the mantle cut, and Steve helped me add a little chunk of wood to fill in one empty gap. Now it could be mounted in an L-shape for a coat rack in the corner of the she shed!

As it shows in that other picture, the mantle was black. It took three coats of paint to cover it up.


Once the pieces were dry, it happened to be the same day we had the littlest grandchild Claire over to visit. She just turned three years old.

We got out the set of little plastic Grandchildren Tools. We have had this very same set since Jameson was a tiny tot. He is now 11. These are the tools to help Grandpa "fix things". These tools have been played with all the way down the line, from grandchild to grandchild, now the 7th grandchild. It doesn't matter if they are boys or girls, they all need to learn to help Grandpa "fix things".


She helped me measure and mark where 
each of the coat hooks needed to go.


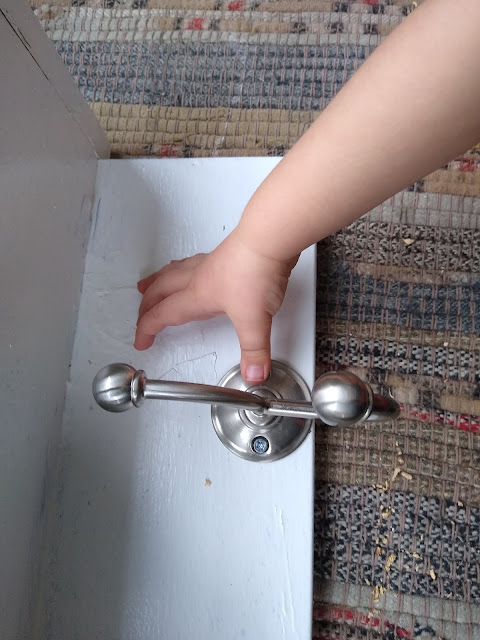
She helped open up each little package of coat hooks and take out the screws.


She held the screws and handed them to me one at a time while patiently watching me pre-drill the pilot holes and screw them in.


She counted as we attached every hook and every screw. Miraculously, we did not lose a single piece and had nothing left over.  It was a good lesson in counting, measuring and learning to keep all of the pieces in order when working on a project.

Helping Hands


Steve mounted the coat hook up on the wall with sturdy lag screws. Tada! A job well done.

Now every time little Claire comes over, she points up to the coat rack and says: "I made that!  I made that! I help."


Even after we make this area into a triangular coat closet, we will keep the rack in place within the closet. Rather than messing with hangers and a hanging rod, I would rather just reach in and hang our most often used coats, right on a hook.


For the cost of $1.99 times 6 hooks, we have a pretty darn cute little coat rack---

---made with the help of a pretty darn cute little grandchild!


Thursday, November 7, 2019

Horizontal to Vertical

As promised, I'm continuing on with the step by step process of creating our she shed. These posts are from some of the work we did in September and October to catch up my blog.

While the plastering guy Paul was here, we had to work on other projects and stay out of his way. Then we had to wait three days for the plaster to cure and dry before we could prime it and paint it!

During those days, we worked on two projects, here is the first one:

Remember back when we first bought the house, Steve closed up the doorway to the laundry room from the dining room?

He created a new doorway leading from the kitchen into the laundry room. While he was doing that process, he had to remove a piece of kitchen cabinetry that was horizontally across that section of the wall. This was the original piece of horizontal cabinet that would have went over a stove.


I had him stash that piece of cabinetry away in the garage because I had an idea of what to do with it. He didn't think it was such a good idea (at first) so it got put on the back burner for a while.

Now that we had a couple days to twiddle our thumbs, I suggested it was time we try it out.

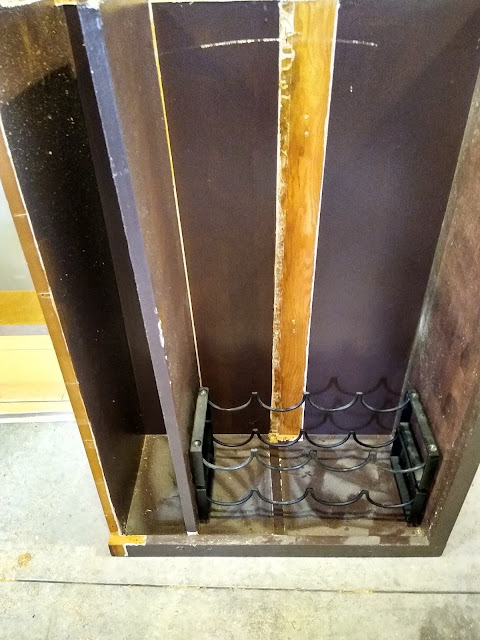
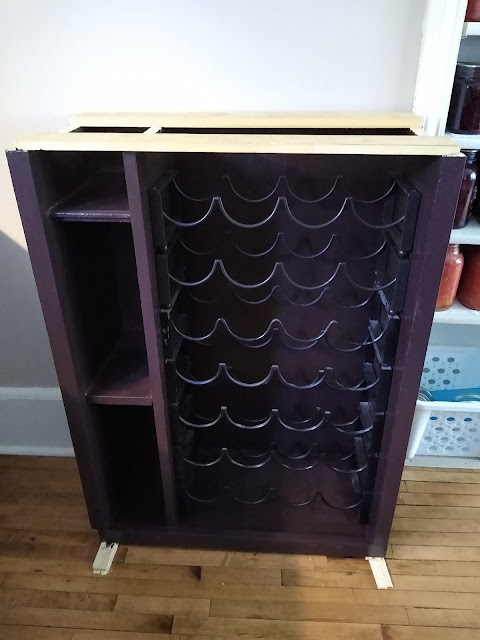
We took that piece of horizontal cabinetry, and actually turned it into a piece of vertical cabinetry!

Steve moved the center shelf over to the left about 8 in and secured it firmly back into place. I had some matching paint mixed up at the local hardware store after bringing in a little leftover piece of shelving to do a color match. So I am able to touch up any of the evidence of the shelf being moved over once it gets installed to the wall.


Why did we move the shelf over? Because I had this creative idea of making this portion of the cabinet into a tall wine rack!

I had originally owned three of these wrought iron wine racks. Since I had this idea in my mind, I have kept my eyes out for buying some more at various thrift shops or rummage sales. I know I could buy them brand new at Target for $24 a pair, but I would rather pick them up here and there for a buck or two. I am always The Bargain Hunter! Finally I had accumulated seven of them, which was just the right amount for what I planned to fill this whole space.


When we were camping two months ago, we had happened to stop at the Menards in Escanaba while we were buying a new pressure relief valve for the motorhome. On their clearance rack was a hunk of matching countertop that matched what we have in our kitchen. It was marked down to $20 and then an additional 11% off. So for about 18 bucks and then maybe another $10 worth of thrift shop wine racks, I had all of the materials needed to complete my project!


Now here's where the project was going to go.

On the opposite wall of our kitchen there was an awkward space on the wall where a refrigerator may have originally been. But we now have a large 2-door stainless steel refrigerator that's located in another spot of the kitchen on the other side of the island. So this awkward space needed something, anything, to not make it look so funny with the overhead cabinet and a blank wall underneath.


Lo and behold, this became the new location for the vertical piece of cabinetry. We mounted it tight to the wall after cutting away a little bit of the baseboard and trim.


It lined up just perfectly tight to the edge of the electrical outlet on the wall. We needed that outlet because the top surface of this wine rack is going to be our new coffee bar!


We have a tall coffee maker from Cuisinart that not only makes delicious coffee, it also grinds the beans fresh for us each morning. I especially like this particular coffee maker because the carafe is insulated stainless steel and keeps the coffee warm all day. We don't have to keep a burner on all day or keep the coffee maker plugged in. The only problem is, it's too tall to fit underneath the regular cabinets on our countertop.


So either we leave it hanging over onto the sink, or instead we've been having to take out each day and set it out on the island to use it, and then stow away afterwards. Otherwise it's in the way of meal prep or while cooking on the stove.


Now with the extra room available on top of this wine rack, this is the perfect spot for our coffee bar. We leveled it out and mounted it into place. He made a top surface to attach the countertop to, and I added the wine racks (after giving them a fresh coat of matte black paint) before the countertop went on. He also made some little shelves on the left, to hold booze bottles and a slide out tray for corkscrews, bottle openers and corks.


Next, Steve cut out a section of the countertop from that big bargain piece and covered the newly cut side with the edging trim from the original piece. He carefully removed the edging by using his oscillating tool with a putty knife blade and took it off in one piece without cracking it. Then using Grab It Adhesive, he was able to seal it onto the newly cut edge.

Steve carefully sealed around the edges of the countertop with caulking and stood back to admire his work.  He agreed, it turned out a lot better than he had originally thought.


(we donated the leftover countertop to the ReStore)


We added a little silver battery operated push light to the underside of the overhead cabinet. We can see down inside of the coffee maker when adding the water and beans in the early morning darkness.


I liked the idea that we re-purposed a piece of original old cabinetry, rather than just throwing it out. By looking at it from a different angle, and turning it from horizontal to vertical, we now have a wine rack / coffee bar! 


Our silly daughter Erin and soninlaw Waylen were near Trader Joes in Milwaukee a few weeks ago. They stocked us up with a couple cases of Two Buck Chuck wine (Charles Shaw).  We live 150 miles from the nearest Trader Joes so this is a real treat for us!  Plus it filled the rack up.  Also, the dog treat canister found a good spot on the coffee bar too.


~~~~~~


One of the other projects I mentioned was something that Steve worked on outside of the she shed.  While Paul was busy working inside doing the plastering, Steve was working on something else.

After working on the french windows in June, he had stacked the old sections of wall that we had removed to install the french windows.  We knew he needed to save those sections for this upcoming project.


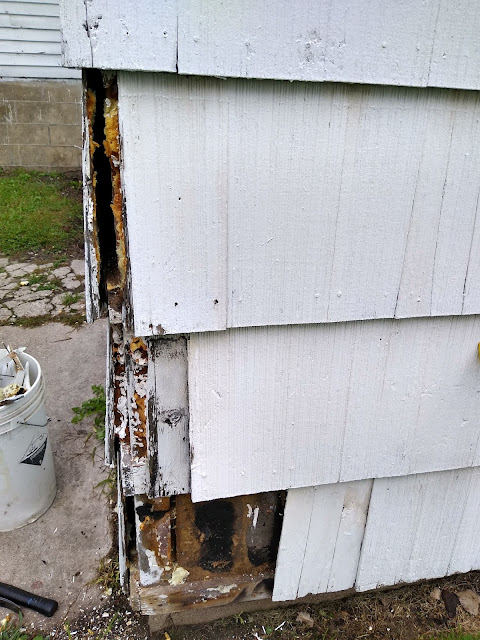
Steve was carefully removing pieces of the original cedar shake siding from these leftover sections. He was cutting each little piece down to exactly fill in any of the gaps of damaged cedar siding on the exterior of the she shed.


All of these little missing gaps 
needed to filled back in 
with pieces of siding. 


The corners were especially hard and had the most damage. This home had multiple renters in and out over the years, with lots of children. The exterior had taken quite a beating.


He painstakingly was taking each little piece off without cracking it. He was busy marking, cutting, and then carefully sliding them into place and nailing them down. If you've ever done siding, you know it's hard to replace pieces when the entire wall is already complete. He was able to work in each little piece and make it appear as if there was never a repair made at all.


Steve did a wonderful job with each little section and carefully repaired all of the corner joints.  This was a time consuming job, but he wanted it done before the winter months set in. The little rodents from the field needed to be sealed out of any entrance into the house.


 I went around with fresh paint 
and touched them all up.


It doesn't even look like it have been damaged at all 
when we were done with the project!


I am so glad that we kept things "original" rather than just ripping off the old cedar shakes. It lends to the cuteness of the little attached building.  If this buys us a few more years of exterior protection before we can afford to reside the entire house (with lap board fibered cement siding) we can save on our meager budget and still make things look nice. 


My next blog post is going to be about the painting once the plaster had dried.

Stay tuned!

Wednesday, October 3, 2018

Fixed Brake Line - Family Fish - Big Storm Coming!

As soon as the auto parts store opened up this morning, Steveio was there at the door, ready to get the proper brake line fitting for motorhome. He also grabbed 3 quarts of synthetic Dot 3 brake fluid with a high boiling point as well.  He is not sure how much fluid leaked out, so he is best to be prepared with enough plus some for bleeding the brakes afterwards.

Before I could start on my second cup of coffee, he had put on his overalls and crawled back underneath the motorhome. I only had to hand him a few things because he already knew what he was doing with his various flaring tools, tube cutters, and wrenches.

Here is a section of the rusted out brake line that he removed, as well as now putting a new fitting on the end of it.


What a grubby looking thing, eh? That's what a combination of age (22 year old motorhome) and Wisconsin Winter Roads With Salt do to the undersides of our vehicles.  Remember, just a few weeks ago we also replaced the rusted out muffler.

Once he was assured that all of the brake lines were good, he took out his air pressure brake bleeding tool. He got that a number of years back from Harbor Freight.  Here is a link:


It has proved invaluable for drawing through the new brake fluid through the long runs of brake lines on a motorhome.  It operates with the air compressor and pulls the new fluid through the lines while sucking out the old stuff into the white chamber.


Steve keeps his air compressor in the motorhome. It is able to handle all of his air tools and stows compactly away in a basement storage compartment until we need it.  I bought it for him years ago for Christmas and it's just the right size. He has a different one now in the garage, so this one can stay in the motorhome all of the time.


He fills the main reservoir of the brake system up to the top with the new fluid. Then he uses this device on each of the bleeders at each wheel. It draws through the new fluid and at the same time removes the old fluid. Of course, in this case we don't have any old fluid because it all leaked out!!

By using this bleeding tool, it also suctions out all of the air in the lines so we never have a bubble. That can be dangerous. He used up one full quart and 3/4 of another bottle of fluid to adequately purge the system of air and make sure each of the brakes has fluid right up to the bleeder.

He had it all done before I could snap a pic underneath.
This is all I got.

Once he was done with that, he went inside and started up the motorhome. He pumped the brakes a few times to feel the pedal return to its normal position. Of course, since we are set up for a week on the campsite, we won't be taking it out for a test drive until we are ready to leave.

But he is confident that we are now "Good To Go"!

~~~~~~~~~~

I spent the rest of the morning working on a project myself. It's a "Repurpose Recycle Reuse" project!  And it has to do with fish???

If you've read my blog during the last few weeks you know that we built a bunch of cute shutters to dress up the exterior of our home. The motif we chose matches the fretwork cutout design of the lattice below our front porch.


The shutters sure came out cute 
and we are happy we did that....


Okayyyyyy 
now you may be asking yourself, 
what do shutters have to do with fish? 
Or recycling for that matter?

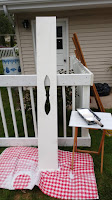
How could you toss these into a scrap pile? Steve was even going to toss them in our backyard campfire. No way. I could see a fun game coming out of these.

Well, just look at those cutouts. Tell me what you see? I saw it. I had an idea. I asked Steve to cut each of the pieces in half, at the center most point.


I tossed them in my handy-dandy weeding bucket from my brother-in-law Pete. I'm done weeding my garden, so right now this bucket can be for the fishing game, okay Pete?

I brought along my electric pad sander, my glue gun and a pack of magnets. Oh boy, when I get creative there's no stopping me.

I sat outside of the motorhome and sanded off all of the rough edges around each fish. There weren't any other campers nearby us, so I wasn't bothering anybody.  Steve said he thought I looked so cute and snapped this pic of me. Awwwwwww


I sanded down each fish and got myself covered in sawdust at the same time. What fun!  I love fun projects and using power tools.  The smell of fresh cut wood reminds me of the fun time we had building our log house together after we first got married.  Ahhh memories.  Anyhow, back to the fish---   I was having fun and not making too much of a mess.


My next step was to grab my wide permanent markers. I wrote each family member's name on a fish. I also included all of their dogs and cats as well.  I added all of the kids, grandkids, great grandparents and the nephew, wife and two cousins who are also coming on Saturday to the park.   I had to make a list to not forget anyone.


Using my hot glue gun, I attached strong magnets to the mouth of each fish. Whatever did we do before the age of glue guns?  I am using the new Gorilla Glue sticks, that really seem to hold better than the older style sticks.  I glued the magnets at bit of an angle to fit the drilled out hole of the shape.  (Steve had to drill pilot holes on each end of the pattern to get the jig saw blade started to make the cutout).


I have a long bamboo fishing pole I found in our garage attic from the previous sellers.  Steve will cut it in half for me tomorrow and sand the edges. I am adding strong cords and two round magnets to the ends of the cords. That way the kids can "fish" by hooking onto the magnets, either from the bucket or from behind a curtain or a panel so they can catch random fish and be surprised by who they catch! 

I started lining them up to cool off the glue 
while the dogs watched me work.


Lining them up was fun,
and I started sorting them out and 
grouping them by family.


This was fun! 


After each one cooled, I lined them all up on the picnic table.  There are 33 in all completed, and I have more unpainted ones to add to the group later.  I might add my own siblings and their grandkids too. 


I can just see our grandkids 
making up games 
and rules for the games, 
and learning to identify family members, 
reading the names, 
teaching the younger kids, 
and 
catching various fish 
from a hidden space behind a blanket 
or out of the bucket? 

We will call it:
"FAMILY FISH"

~~~~~~~~~

This afternoon we got warnings on our phone of bad weather coming across Wisconsin.  The radar didn't look too good.  Since we had a lot of rain the last two days, the ground at the park is totally saturated.  High winds combined with the shallow root systems in the park (due to being on the Niagara Escarpment of rock cliffs)  Trees are known to blow down easily, and we kinda sorta know what to expect. 

SEVERE THUNDERSTORMS WITH DAMAGING WINDS AND TORNADOES POSSIBLE DURING THE AFTERNOON AND EARLY EVENING... THE POTENTIAL EXISTS FOR SEVERE THUNDERSTORMS ACROSS THE AREA DURING THE AFTERNOON AND EARLY EVENING HOURS. THE STORMS ARE LIKELY TO PRODUCE DAMAGING WIND GUSTS. LARGE HAIL AND TORRENTIAL RAINFALL IS ALSO POSSIBLE. 

SEVERE THUNDERSTORMS POSSIBLE THROUGH THE EVENING... STRONG THUNDERSTORMS WITH HEAVY RAINFALL, GUSTY WINDS AND HAIL WILL CONTINUE ACROSS NORTHERN WISCONSIN THROUGH EARLY EVENING. THESE STORMS MAY BECOME SEVERE AS THEY MOVE RAPIDLY THROUGH CENTRAL AND EASTERN WISCONSIN BETWEEN 8 PM AND 11 PM. DAMAGING WINDS WILL BE THE PRIMARY THREAT, BUT ISOLATED TORNADOES AND LARGE HAIL WILL ALSO BE POSSIBLE. 


We made a wise decision to head into town to our house. It's only 15 miles away, so we figured we would hunker down at our house, and leave the motorhome at the park. We rolled up the awning and put away our lawn chairs.  There aren't too many people camping this week, so we are not really needed to be there. We notified the rangers and the park superintendent that we were leaving for the evening.  We popped the dogs in the Tracker and headed back to town.

Things are looking grim, and the winds are kicking up.  We went for a quick walk around the block with the dogs, and almost got blown away down the street.  A few sprinkles were starting as we made our way back to the house, safe and sound.


The rolling and boiling clouds 
look eerie against the night sky
and the church tower. 


Since most of our "cookable" food is out in the motorhome's refrigerator, we decided to order Chinese take-out here in Chilton. We don't often do that. Steve had Spicy Beef and I had Shrimp with vegetables.  The dogs got the fortune cookies!  


Tonight we will sit here and watch some movies, check the weather reports and be safe and sound in our house. I hope all of the storms blow over, and are not as ominous as some of the weather reporters are making it sound.  I just shudder to think of the blowing winds and toppling trees in the park. Our motorhome is insured, but our lives are not. Better to be safe than sorry!


.