Our Wonderful Followers who come back again and again to read about us...

Showing posts with label painting plastic shutters. Show all posts

Sunday, September 19, 2021

Bedroom Ceiling, Shutters and Pic Nic Table

Even though the rest of the room isn't finished yet, I am thoroughly enjoying waking up each morning to this beautiful view!  


We can now sit in bed with a cup of coffee and languish around a little bit longer, since we have this beautiful sunshine coming in.

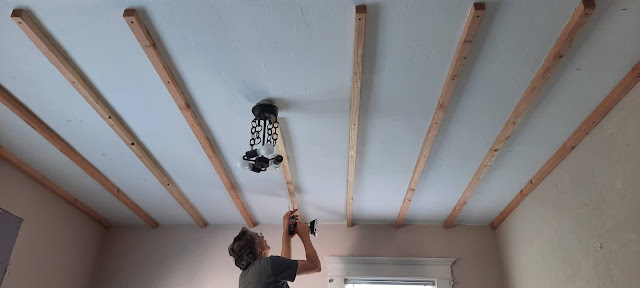
But then it was time to get to work. Steve brought in the wood strips to start reinforcing and leveling out the ceiling to add new sheets of drywall.  At first he tossed them RIGHT ON MY HANDMADE QUILT!!!   ACK!!!!


I quickly grabbed a couple wool saddle blankets and took care of the situation.  It was not a good way to start the day, to say the least.


Steve pre-measured and pre-marked the walls and the ceiling to add these wooden strips. They will bring the ceiling surface down a a bit lower.  These are for the sheets of drywall to be screwed to, and cover over the rough areas of the old closet walls and old attic scuttle hole.

Each wooden strip has a thick bead of construction adhesive running the entire length of the strip before it is lifted up to the ceiling.  Then long screws are put through the pre-drilled holes at 16 inch intervals, right into the ceiling joists.


Steve starts on one end, while I stand on the other end holding the wooden strip into place. Instead of going up and down up and down a ladder, Steve made me this handy board with a y-shaped end made of two screws. I can hold it into place exactly on the center mark until he gets everything fastened at his end.


Even though we have 9-foot ceilings, Mr. Tall Man Steveio was able to stand on the bed to reach the middle sections of the room. When we get ready to hang the drywall, we will dismantle the bed and move everything out of the room.


One strip happens to be located in line with where the light fixture is. So, for that one we had to cut it into two pieces. We will remove the light fixture during the drywall phase, and just have a temporary light socket wired in.


Now we are adding extra strips on the other side of the old support boards from the old closets. They were both removed to make this bedroom bigger, and it pushed the wall over into the other bedroom. That smaller bedroom then was made into the master bathroom. This is the ugly stuff that we will be concealing underneath the new ceiling.


At the same time that we are going to hire a young man to plaster the ceiling, he will also replaster all of the walls in the bedroom. The old wall texture is from a blown on splatter gun texture sprayer that the previous owners had done. This surface will all be covered over with new skip troweling. It will be made to appear much neater and cleaner.  


We hired the same young man that had done all the walls and ceiling in the She Shed last year. He is going to come as soon as we get all of the drywall screwed up into place. 

We got all of the supplies ready for him, and we will dismantle the bed and remove everything from in the room. I have a roll of wide rosin paper to cover the hardwood floor. 

As soon as we borrow the neighbor's drywall lift and a little help from our son-in-law, the sheets of 12 foot long drywall will be attached to the ceiling. 


We are just getting too old to do all of that overhead work anymore... plastering and drywall... taping and sanding excetera. 

I think this is one job that we will hire out again this year. He did such a great job for us in the She Shed, we are happy to get him again, on short notice.  Sometimes we have to know our limitations due to age, and eek out the money to pay someone else.  

In between doing this other work, last night I found a local guy selling some shutters. They were just the right size that I needed for on each side of our bedroom window! He even dropped them off right at our front door, how nice is that? He only charged me $10 each and they are the exact size I needed. The only problem, they are BLUE! 


I got out my can of special primer for PVC vinyl or plastic. It's rather stinky. But this gets painted on first and it helps the paint to cling better.  When we bought the house, I gathered and painted the other shutters red too. By painting these to match, it will be nice to complete all the sides of the house, all of the way around.


First thing this morning, before we were working on the bedroom ceiling, I grabbed out my can of Double Decker Bus Red and started to paint the shutters. Do you see my supervisor making sure that I do a good job?


I wanted to get them done as early as possible, we were going to be up in the 80's and very high humidity. It's so pleasant to paint early in the morning but I had to wait until the dew was starting to dry off the grass.

At the same time, I decided to paint the little picnic table and four benches. They had originally been red when I first got them, down in Chilton. I bought them as a fundraiser from the Wisconsin Sheltie Rescue rummage sale. I had painted them blue to match that house. 

Then when we moved up here, I had only painted the tops red before I ran out of paint. So for the last two years they had blue legs and red tops. It was time to make them all back to red again!


After we were done with the ceiling work,  I popped back outside to finish up a second coat. Tah Dahhhh! 


Imagine my shock when I later saw that Binney's nose was bleeding!!!


Nawwwww

She was just being "nosey"

in my red paint.  Lol! 


Wednesday, July 3, 2019

Our National Folk Farmhouse Updates

Back at it.

Honestly, we have been so crazy busy I haven't been taking any time to blog. And I really should!

Thank you, to all of my blog readers, for still supporting my blog even though I took this hiatus. By you readers taking the time and reading through my past blog posts, especially the ones on motorhome modifications and house projects, you are clicking on my ads and helping out to support my blog. I just got a monthly check from AdSense again and realized that I had better get back to it and do some more blogging.

We have been really busy... 
and this is the result so far:


from this when we bought it in April:


One of the first exterior changes I wanted to make was to remove the funny plastic lattice that was covering the porch rails and spindles. It was really tacky and although I had plans for the lower wooden lattice, I am not a fan of lattice whatsoever.

This is the plastic lattice I am talking about:


Here is how it looked after removing it. We know the spindle spacing on the railings is incorrect and not up to code. We have added it to our building permit and we are going to take care of the railings at a later date. For now they are grandfathered in as they are. We do have some real original two-by-fours that are actually 2in by 4in that we are going to be able to cut up and replace all of the missing spindles that are also exactly 2in by 2in.


As for the exterior transformation, the process took me a couple weeks. I started with painting the red lattice underneath the porch as fast as I could. I wanted to get it painted before disturbing all of the flowers that started growing in front of it.

I started with a white primer spray that soaked into this old and dried out unstained lattice wood. I could never understand why people let lattice turn gray instead of painting it. To me, any of that pressure treated wood looks funny when left to turn gray and look weathered.


Now for the red. I did not want to use a sprayer because of the overspray drifting onto any of the white surfaces. Instead, I patiently set on a bucket --- working section-by-section with a brush --- getting it into all the nooks and crannies of each little piece of lattice.

I had soft Celtic music playing on my little MP3 player and worked my way across the entire 45 ft long veranda and around both corners too.


While I was doing it, all I could think about was that I was giving our Folksy Farmhouse some "love"!


The window boxes were brown but I used this really good Dutch Boy paint called Max Bond Exterior that works on plastic surfaces (Use on properly prepared exterior siding and trim of previously painted or bare vinyl, aluminum, masonry, stucco, wood, galvanized metal, and primed steel.)


We added the window boxes along the porch edge, and the potted plants on the front porch as well as the front porch furniture. I covered my blue and white front porch fabric cushions with red plastic checkered tablecloths for water proofing!  We may have plans to use that porch furniture in another place, so I am not ready to recover them permanently with waterproof fabric. This will "do" for now.

The next major improvement that we have made is that I have scrubbed and painted the front facade of the house, and we added shutters.

The old white wood siding looked awful and grubby and actually even moldy. I sprayed it down with the garden hose, and then I gave it a light misting of Tilex bathroom cleaner. Yep, that's right. Bathroom cleaner! I put a couple bottles worth in a pump up lawn sprayer jug and lightly misted the entire house on the west and north sides.


Within a few minutes all of the mold and dirt disappeared!!  I gave it a light brushing with a soft-bristled brush on an extension handle. We use that for washing our motorhome.


 Then I gave it a spray with the hose 
and all of the dirt just came right off!


What a satisfying project to work on. It was like night and day to see all of the dark gray and black slide off and  leave fresh white siding underneath


Our original plans were someday replacing the wood siding with Smart Siding. But now after doing these two portions of the house that came out amazingly well, I think we will keep what we have.  Best to retain the historic charm of a National Folk Farmhouse with real wood siding.

I let the siding dry for two days and then picked a cool morning to roll on some fresh white paint on the front of the house siding. I worked a little section at a time.  The results were very satisfying to paint something and have it look so much better as you go along. You see your immediate accomplishment as your roller and paintbrush transform the exterior.


The sellers left us brand new shutters for every window. The only problem is they were black. I chose red for our accent color on this house. Up the street there's a white house with black shutters, and down the street there's a white house with black shutters. I repainted these two coats with the red paint.


The sellers also left a 5 gallon bucket of thick gray porch and floor oil enamel paint so I was able to pressure wash and do the porch floor surface --- as well as the side cement of the foundation to spruce that up to look nicer.


The front stairs will be painted too, 
but not until we bring them up to code 
and correct the rise and tread and railings 
with our newly acquired building permit. 


There was a very tall oversized colonial looking front porch light. I really didn't care for the style of it.  The tip of it almost reaches the beadboard ceiling. It didn't look right and was quite large for the space it was occupying.  The red wreath is covering up a funny yellowed outdoor electrical outlet.


I was nosing around at the Habitat for Humanity ReStore the other day. I found this much smaller and more "farmhouse" looking front porch light for only $10. It was a funny mauve/dusty rose color. Out came my red paint and it was soon transformed into an adorable accent light for our front porch.


The grandkids have been coming over a lot and sharing in some of our projects. Here is Jameson helping Grandpa to install the front porch light. He learned Lefty Loosey Righty Tighty. He helped with the bracket part of screwing the light fixture on, but Grandpa did the electrical connections, after turning off the breaker. So Jameson is learning to respect electricity and also that you can recycle and repurpose something to look good.


(and it matches his new hair color)


We will later attach the oversized colonial looking coachlight onto the side of the big garage. It has a motion detector sensor on it which will be nice in that dark portion of the yard. The larger size will look okay on the long tall side of the garage. So nothing is going to waste. Just moving around.

So far, here is what the exterior front of the house looks like. I'm quite pleased that we got it this far along, while working on other projects with Steve on the inside as well.  Most of the painting and cleaning and sprucing up is my doing... because Steve is working on something else I will start blogging about in the next blog.


We really love this front porch now. 
The family comes over and we sit out and visit...
the kids wander up and down the stairs, 
back in the yard and around to the front. 
With 2.5 acres now, they have room to roam. 


I'm very pleased with all of the amazing perennials that are popping up around the house as well. There are flower beds that almost completely encircle the entire house that are chock-full of perennials carefully planted over the years and arranged by the previous owners.

As for the grandkids, they have also been helping me with watering my flowers and hauling around items in the wheelbarrow and the Little Red Wagon to help us out with projects. It is delightful to have them come over and spend time with us.


I think in the next blog series,  I'm going to talk about what we're doing each day .... and also add one project at a time of what we've done since I last posted a blog. That way I can catch it up slowly.

 We have been doing a lot of little jobs and now we are tackling THE BIG ONE!!!

SOOOOO what is the big one?

It's my She Shed!!!

(stay tuned)