
They are not quite fulltimers,
but they travel in a big rig fifth wheel
and have a home in Kansas.

After Steve came home from work, showered, ate supper, then we hopped back in the car and drove right back to High Cliff to visit with Cheri and Dean. We brought out our lawn chairs to sit in around the campfire. PS... my chair is now done too! Please see last week's blog about fixing our chairs:

We sat around a campfire and enjoyed the evening... filled with stories of travels, camping, families and fun. The evening went so fast, and before we knew it, the clock said it was almost midnight by the time we said our goodbyes and headed home!!!
Safe travels to Cheri and Dean.
See ya down the road somewhere!
~~~~~~~~
One of my Newcomb Studio Looms has been "naked" for a while and needed to get warped up. That means getting 360 threads... can you imagine handling 360 individual cotton threads, each 150 feet long, all wound on evenly and neatly, no criss crosses, no snarls, and perfect tension????
With the right tools and preparation and practice, it CAN be done!
PAUSE FOR A MOMENT FOR A COMMERCIAL.....
I have a self-produced and self-marketed DVD of how to do the entire process, complete with hints and tricks learned over the years. If interested in buying it, it can be ordered from:
or
my Etsy Store
or
my Ebay link of
First Step--- is to gather all the materials. I have 24 tubes of rug warp (cotton string) to wind on. Each tube is 800 yards. I have a rack to slide all the tubes on so they can unwind freely without tangling. I have a tension box that lets all 24 threads slide under even tension through little slits in metal combs and onto the loom in each section. I have scissors and blue painter's tape.
And most of all, I have PATIENCE!
This is not a job to be rushed.

The back of my loom has a special beam with little pegs on it. It guides my 24 threads into each section. It's one yard around, so I am cranking 50 turns, thus 150 feet for each section (approximately because as the threads build up, they gain circumference and take up more space)

I tie each bout of 24 threads with a slip knot onto the back straps of this loom. They are straps with ends similar to the buckles on overalls and work very well. If they can keep up Farmer Jones' pants, they can hold my rug warp threads! LOL

I line up the rack as close as I can get perpendicular to the loom, I am a bit limited on space. Right now I have three rug looms and two table looms in my Loom Room. Gets a little cramped. Now I am ready to wind up the warp.

It is very important to keep accurate count. If one section is lacking even one or two revolutions too short, you end up wasting all the strings in all the other sections at the end of the weaving space. So keeping count is imperative. No interruptions, No tv, No telephone calls, No husbands asking questions.....
My friend Rosie Dupuy of http://www.applewoodhandwovens.com/ gave me this nifty digital counter. Each time I turn a full revolution of the back beam, I tap the button of this device that is strapped on my finger. Neato!

Look now neat and even those 24 threads are going on!
This makes a weaver's heart go BOING!

I wound on the first section and put double pieces of tape to hold the ends in place. Now moving onto the next section, I double check each part of the process. As I turn I do five turns and double check everything again. Then I can weave the next 45 turns knowing it's evenly filling each space without any "snowdrifts" to either side. That would cause uneven tension, thus uneven rugs!

The clear plastic tubing is formed in "arches" that can be moved from peg to peg across the beam as I work. It helps to guide the threads into the proper space without them jumping a peg and getting inbedded in the next section. That is a mess you DON'T want to deal with!
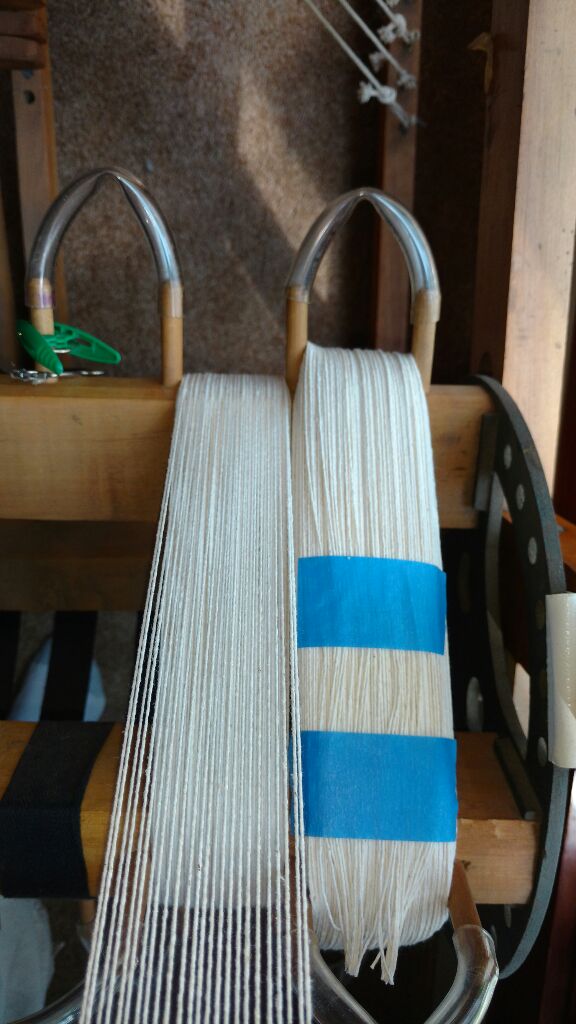
See how the threads unwind from the tubes, go through the box with a tension peg, and then down onto the back beam? This is called "Warping a Loom" or "Dressing a Loom". I have the excess straps clipped down out of the way with temporary plastic clips while I wind the upcoming section.

And ... HERE IT IS!
ALL DONE!

Be Still My Weaver's Heart!
Pitter Pat Pitter Pat for an evenly wound warp!
The threads need to ride though various heddles (wires) on each of the four harnesses to make patterns. From there, they go through the beater and reed to be tied on the front beam.


Tomorrow I will tie
each and every new white thread
in a little knot to
each and every old blue thread.
Yup... all 360 threads!
Once they are all tied, I will gently pull them through the heddles and the reed up to the front of the loom. Then Steve will help me slide the loom back into place. I can tie on the front beam and start weaving! I have two more rug orders to get done this week. Glad I am inside and cool in the air conditioning to get these done.
In Conclusion:
150 feet is 50 yards---
which is enough for about 30 rugs
30" wide and 60" long, approximately
Oh.... I forgot to mention.
Meet my "Helpers"

My Loom Room Doggies!





 Posts

