Our Wonderful Followers who come back again and again to read about us...

Showing posts with label pac brake. Show all posts

Thursday, March 8, 2018

MOTORHOME MODIFICATIONS - *P* is Pac Brake Repair and Replacement

I am going to start off the new year with posting some of our motorhome modifications, a few at a time. I will post repairs, modifications, or neato things we have found for RVing.  I have lots of pics in my files so I will do them in alphabetical order.

Underneath that stuff, I will post my regular daily stuff..... kinda sorta fun, eh?

So here it goes, we are up to the letter P now!


MOTORHOME MODIFICATIONS 
STARTING WITH THE LETTER P


Pac Brake Repair:
THIS REPAIR AND REPLACEMENT WAS DONE IN 2012, SIX YEARS AGO....
We noticed our "pac brake" was not functioning.  It is also called an "exhaust brake".  Steve crawled under the bed to make a diagnosis.  

For those who don't know what this part is.... it goes on the exhaust pipe by the engine and helps as an extra "brake" by shutting down that inside flapper dealie and retards the pressure to make the engine work as a brake.... to slow down the whole motorhome instead of just relying on the brakes pads on each wheel.

Our diesel motorhome has the engine in the back, underneath our king sized bed.  We lift up the heavy bed together.  He props up the bed mattress and deck with a heavy pole and can crawl right into the engine compartment to work on it!


His first thought was the the Humprey valve.  This is the Humphrey Valve. He got a rebuild kit and decided to operate on that as an easy fix. All that he needed to do was change out the little inside rubber diaphragm and the rubber O-ring.  That was the easy part. 


Okay... that was done and we took it for a test drive.  The Pac Brake would still not operate correctly. It moves the piston, but not the butterfly valve.

Upon examination, it was the interior butterfly would not turn and close inside the exhaust pipe.  It was rusted (frozen) shut tight! It gets heated so hot from the exhaust that over time it has swelled up, warped out of round, and stuck.  Fortunately, it was stuck in the OPEN position and not the CLOSED position.  Whew!

Now we needed some serious pounding with a hammer.... on the lever that controls the butterfly inside the pac brake cylindrical tube.  Many whacks later, it still didn't knock it loose!


Now  he figured he needs to remove the entire pac brake to work on it out on the work bench.  So he needed to loosen the two flange clamps and get that entire pac brake outta the engine area so he could work on knocking the butterfly inside loose. 


Sound easy huh?   Well.. of course it's NOT.... once the two clamps were loosened, the entire pac brake housing was rusted in tight!!!!   He had to use a chisel and a big hammer.... after many whacks (Steve estimates about 20)  it finally came loose!!!!!!


Next hurdle, the butterfly inside the pipe was of course stuck in the open position, which the two fins of the butterfly intruded into the exhaust pipe and turbo unit on each side of the pac brake that he was trying to remove.  It was a very difficult job to try to flex back the exhaust tube (which doesn't flex much) to give enough clearance to slide out the pac brake with the stuck butterfly valve.  Arggghhhhhhh

Whew!  There... it is OUT!!!!


See how that center piece (the butterfly) is stuck in the open position?    We stuffed a rag in the opening for the turbo and taped off the end of the air line to the Humphrey valve too.


Yup, this is what is "broke"


A pac brake is not a cheap item to replace...  it runs in the $700-1,000 range.   That is why we are going to try to loosen the stuck butterfly ourselves. The piston part is not the problem.   The piston part seems to function correctly, and it the part that gets lubed with special pac brake lube.   But the rusted up butterfly lever IS the problem and that takes such high heat when the engine is running, that lube does not work on it.


Steve hammered on it out on the bench,
then in the vise, 
then with a bigger hammer... 
nada..  
it was NOT going to move! 

So he took it to work, and on his lunch break he used a rosebud torch tip with high heat map gas torch...   and lots of flame and heat to finally break it loose!  And it worked!!!!!!!!!!!!!!!!

Yes, he put the pac brake back in, and it went in very easily now that the butterfly could be shifted to the closed position.  Dropped it right into place, hooked it all up, clamped down the clamps and then added the brand specific Pac Brake Lube to the 5 points of lubrication indicated on the bottle.   There... done!


We then took it for a test drive and it worked perfectly!   Steve even had me drive for a bit and let him look with the bed lifted up, so he could see it actually working.  What a reward for a job well done! 


FAST FORWARD A YEAR......


Pac Brake Replacement:
Steve decided the leaking piston on the pac brake on our motorhome was not holding after his little repair job.  It was working intermittantly, and a few times we had to pull over and lift the bed to "unstick" the pac brake.  Not good, especially on an interstate! 

So he searched the internet and found a new one to replace it with. 


Here are some pics for you RV Cat Engine guys to oogle at ..... 


I am sure the replacement will go quickly, because we have had the other one out twice.  He thinks the actual flange is hanging up because the round chamber is warped from the heat... and also the piston device is not working properly as it was leaking and he did an epoxy glue job on that might not be holding.  We know on our last trip, it was working erratically.  Instead of fighting with it, he decided we should just invest in a new one. 


Here is the info and cost:

PacBrake PRXB Exhaust Brake GMC C6500/7500/8500 Cat 3116/E/3126
SKU:PB-GMC-C40105
Weight:35.00
Price: $738.25

I am soooo glad Steve is able to do these changes himself.  It would probably have cost upwards of $1,000-1,500 to get it done.

~~~~~~~


Ahhh you guys are probably tired of reading about my front porch redo facelift.  But heck, it's winter, we aren't travelling, so bear with me.  It's the only fun thing I am doing right now after being sick for so long! 


I decided to add four quilted pillows that match the throw quilt on the couch. I put two of them on the chairs, so it ties them all together. I have two little quilted coasters that match on the little table between our chairs as well.  


Over on the couch, I put two more quilted pillows and the throw quilt.  Next to the couch is a basket of quilting and weaving magazines.


Now we are all set for coffee, but it was only 19 degrees out this morning!   If we go out there, with the single pane windows, they all steam up. Even if we set out a little portable heater, the windows are all fogged up and freeze over.  Best to wait for a sunny morning.  We use it for spring, summer and fall.  And these few exceptional winter days that were warm and sunny! 


I do have two eager models
who love to hop up on the couch
and keep an eye out for that Mail Lady! 


We grilled out steaks last night, even though it was cold.  Sometimes a bit of food cooked outside is just the cure for winter blahs.  We got some more snow yesterday, not much, but at least things are white and pretty.  Much nicer than 2 weeks ago when it was all melted and brown and grey and muddy looking.  I will take the fresh white stuff over that any day.

Steve is working on some plans for the upcoming spring spruce up at the museum. We volunteer there and most things are done by a only few people who step up.  They are going to tackle the cedar shingle roof on the log cabin this spring, so Steve is going to a planning meeting for strategy and shopping lists. 

Then later today he is going back to his old park to help with planning for some improvements on the pavillion building. Because he worked there for so long, he is more familiar with the systems and configuration of the buildings. (the state has not hired anyone to take over his vacated position, nor are they going to)  He is going to give input on the HVAC situation there and speak to the contractor they hired for the changes.  I am glad he can still assist them in this project, but they are paying an outsider to do the work.  If he were still working there, I can bet it would be him doing ALL the work! hahahahaha


Wednesday, April 3, 2013

Cabinets Going Going Gone!

Steve only worked till noon today (so he can work on Saturday without acquiring overtime hours)  so he was raring to go when he got home.  He had a project in his mind, and was impatiently waiting for me to finish up what I was doing so I could go help him.  It was a Two Person Project!

But I was busy removing dead leaves from last fall from the tulip beds along the south side of the house.  Although we have a foot of snow in the yard, the edges and around the house are melted down to the ground.  My tulips and crocus are up about 3-4 inches!   So I unburied them from "Nature's Mulch" of the neglected leaves from last fall.  LOL     I had to take the dead leaves off carefully by hand to not disturb the newly emerging stalks and leaves of the tulips and dainty crocus blossoms.  By the time I was done, I had filled two large lawn bags of leaves from just along that side of the house.   It will be exciting to see what all comes up in flowers and bushes this spring.  When we looked at the house, it was mid-November so most blooming or green things were dead and done for the winter.  I have seen photos of the house from the realtor's pics in the spring and knew there is a long row of tulips by the south side of the house.  A big clematis vine was growing on the trellis by the front porch and some beds of tiger lillies and hostas out in the back.  The rest will be a big surprise as it all comes to bloom this Spring!


So Steve cooled his jets a bit until I was done with my project.... and then we hit the demolition of the pantry!  This is what we were starting with in the pantry area:


We removed the base cabinets and counter top and sink....  in preparation to make it into a first floor laundry!   We kept the upper cabinets and light fixture in place as they will go nicely over the washer and dryer and laundry sink.

Steve had to cut apart a few of the shimming strips but mostly we were able to remove the cabinets without any damage to them.  He removed the countertop and sink so they could be reused again too.


We carried all of the cabinets out into the garage and stacked them to one side in the work area.  Good thing we have a large garage, because we have things staged in order of what projects we are working on next.  The garage is filling up.  Steve has also recently acquired a good used riding lawnmower (with leaf bagger) and has room by the snowblower to park that in the garage too.

Then he also bought me FOUR gifts last night and put them in the garage... telling me to go out and look after I got home from my fiber guild meeting.  Ahem... it was a hoe, a rake, and two shovels!  --- one square end and one pointed end.  What a guy, eh?


Anyhow... after we got the water turned off, and the plumbing cut back to the basement level.  Then we pulled the cabinets out this afternoon .... this is our "blank slate" to work with to make into our first floor laundry room.

We have some more of the original white vinyl flooring to piece in where the washer and dryer are going to be located and a piece for along the far wall under the window too.  I think it will seam up close and then I can use a rag rug to cover it up.  The walls will get a layer of white "milk house board"  - a type of white formica clad paneling to cover the walls before we put the washer, dryer and laundry sink into place. The window sill will get a piece of wood from some matching scraps we found in the garage.


Once the cabinets were carried out to the garage, I placed an ad on Craigslist to sell them... they were solid oak, no fiber board, and perfect for someone's cottage or remodel job.   We included the sink and faucets too. A package deal!  I had two calls on them within an hour, and a guy came from Appleton with truck and trailer to get them!   Easy Peasy---  sold and out of our way!

I also put another ad on Craigslist...  this old cabinet that had been in our kitchen, before we installed the nice ones I refinished.  I decided we didn't need this original cabinet so we placed it on Craigslist too.  We got three calls on it, and the first gal is still arranging her work schedule and her hubby's work schedule to get here by Sunday...  They could come Saturday but Steve has to work and I will be at Clayton's first birthday party.  So I put a "HOLD" on our Craigslist ad.

 (just in case she don't show, I can then put them back as "AVAILABLE")   If she don't take them, I have phone numbers of two others who will.  But she sounded so excited and asked me to firmly hold them for her, I complied.    They are 99 years old and exactly what she is looking for.  I know the feeling.....  So Kate, here is your cabinet, waiting for you!


Okay.. that is enough of This Old House... now for some Fiber things for my Fiber and Weaving blog readers.

Spring is really working hard to come around to Wisconsin... and we are enjoying the sunshine, even if the temps are wayyy below normal for this time of year.  I don't think it even got above 40 today!

This morning I was threading up the supplemental warp color stripes on my towels and started weaving ... it was so pleasant to sit in the sunshine in my loom room and work away the morning.

This is my Tools of the Trade 32" 8 harness table loom.


I am weaving up some cotton towels in a southwestern theme of variegated cotton twill borders and stripes going longwise every inch and a half... then some crosswise stripes every five inches.  

Right now on the loom they are loosley woven.  Once cut off, they are washed to shrink them up tightly to make a nice lofty thirsty cotton towel.  They look like this when finished....


I like doing this particular pattern and have done a lot of them over the years.  Kinda like my signature trademark.  I think I have enough warp on the loom to do about 30 of them.  Paula wants two, so that is 28 more to go?  LOL


And to finish off now with a bit of something for my RV readers ....  Steve decided the leaking piston on the pac brake on our motorhome was not holding after his little repair job.  So he searched the internet and found one and ordered it.   It came today....  I was surprised we didn't run out and do this repair on the motorhome after supper!

https://www.dieselpowerproducts.com/p-6736-pacbrake-prxb-exhaust-brake-gmc-c650075008500-cat-3116e3126.aspx?gclid=Cj0KCQjw0dHdBRDEARIsAHjZYYBNB0JzGOOeol1YbPupizOsF1c-nKlY7QqSioTaOosnm8Vmo3vIalYaAmf0EALw_wcB

Here are some pics for you RV Cat Engine guys to oogle at .....


I am sure the replacement will go quickly, because we have had the other one out twice.  He thinks the actual flange is hanging up because the round chamber is warped from the heat... and also the piston device is not working properly as it was leaking and he did an epoxy glue job on that might not be holding.  We know on the last portion of our trip, it was working erratically.  Instead of fighting with it, he decided we should just invest in a new one.


For those who don't know what this part is.... it goes on the exhaust pipe by the engine and helps as an extra "brake" by shutting down that inside flapper dealie and retards the pressure to make the engine work as a brake.... to slow down the whole motorhome instead of just relying on the brakes pads on each wheel.

There.   I think that I covered something for all my blog readers tonight?  Stay tuned to more projects on the laundry, the flower beds, the motorhome, the weaving, and whatever else happens to happen in our little corner of the world!


Tuesday, June 5, 2012

Motorhome repair - REBUILDING A PAC BRAKE (exhaust brake)

Last weekend we were at our fellow Safari-owning friends, Mel and Paula's house.  They have a Safari similar to ours.  The guys were yakking and conferring and configuring all weekend on items on our rigs.  Seems Mel's pac brake (exhaust brake) on their Safari has stopped working properly.  And it turns out that ours was NOT working at all either!!!!

We didn't notice the pac brake was not working, as we have not had much occasion to use it, as it's mostly utilized in mountainous driving conditions.  When we hit the button to engage the pac brake, the engine shifts wayyy down too to assist it.  We thought that WAS the pac brake working.  Guess not!   Who knows how long this has been non-functioning?  Perhaps over the last 6 years since we owned the rig, it was already rusted or frozen into place before we even bought it????

The guys examined Mel's and decided their Humphrey Valve had gone bad.  They yanked his valve out and robbed ours off our motorhome to see if they could get his to work.  VOILA!  It worked!   That was easy.  So Mel's pac brake functions as it should now.

But the bad news, on our rig, it was not the Humphrey Valve that was a problem on ours, it was the interior butterfly would not turn and close inside the exhaust pipe.  It was rusted (frozen) shut tight! It gets heated so hot from the exhaust that over time it has swelled up and stuck.  Fortunately, it was stuck in the OPEN position and not the CLOSED position.  Whew!

Now we needed some serious pounding with a hammer.... on the lever that controls the butterfly inside the pac brake cylindrical tube.  Many whacks later, it still didn't knock it loose!

We left our valve in Mel's motorhome, seeing as his was correctly functioning now.  He ordered a rebuild kit for the other valve to be shipped to our house (along with an extra new valve for him to keep on hand, seeing as he only has a used one in his for now)

Steve would have torn ours down last week and got on it right away for a repair, but we needed the rig to get to the wedding up north over the weekend... so he waited till Sunday evening to work on ours, once we were home, safe and sound.

Our diesel motorhome has the engine in the back, underneath our king sized bed.  We lift up the heavy bed together.  He props up the bed mattress and deck with a heavy pole and can crawl right into the engine compartment to work on it!


This is the Humphrey Valve that needed the little inside rubber diaphram and the rubber O-ring changed out.  That was the easy part.


But now for the other part.... 
He tried and tried hammering on the lever for the butterfly to loosen it up... no go.  


Now  he figured he needs to remove the entire pac brake to work on it out on the work bench.  So he needed to loosen the two flange clamps and get that entire pac brake outta the engine area so he could work on knocking the butterfly inside loose.

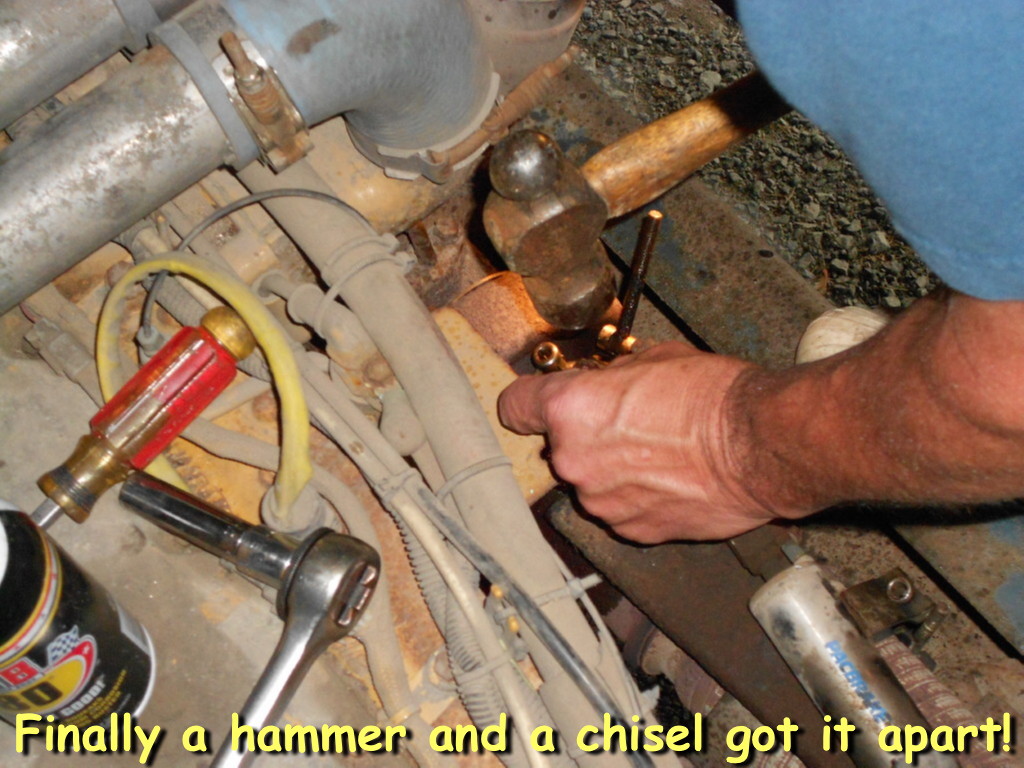


Sound easy huh?   Well.. of course it's NOT.... once the two clamps were loosened, the entire pac brake housing was rusted in tight!!!!   He had to use a chisel and a big hammer.... after many whacks (Steve estimates about 20)  it finally came loose!!!!!!


Next hurdle, the butterfly inside the pipe was of course stuck in the open position, which the two fins of the butterfly intruded into the exhaust pipe and turbo unit on each side of the pac brake that he was trying to remove.  It was a very difficult job to try to flex back the exhaust tube (which doesn't flex much) to give enough clearance to slide out the pac brake with the stuck butterfly valve.  Arggghhhhhhh

Whew!  There... it is OUT!!!!


See how that center piece (the butterfly) is stuck in the open position?    We stuffed a rag in the opening for the turbo and taped off the end of the air line to the Humphrey valve too.


Yup, this is what is "broke"


A pac brake is not a cheap item to replace...  it runs in the $700-1,000 range.   That is why we are going to try to loosen the stuck butterfly ourselves. The piston part is not the problem.   The piston part functions correctly, and it the part that gets lubed with special pac brake lube.   But the rusted up butterfly lever IS the problem and that takes such high heat when the engine is running, that lube does not work on it.


Steve hammered on it out on the bench,
then in the vise, 
then with a bigger hammer... 
nada..  
it was NOT going to move! 

So he took it to work, and on his lunch break he used a rosebud torch tip with high heat map gas torch...   and lots of flame and heat to finally break it loose!  And it worked!!!!!!!!!!!!!!!!

He will re-install it probably later tonight with me holding the flashlight, tools, and snapping pics.  Wheweeeeeeeee  


(added later)

Yes, he put the pac brake back in, and it went in very easily now that the butterfly could be shifted to the closed position.  Dropped it right into place, hooked it all up, clamped down the clamps and then added Pac Brake Lube to the 5 points of lubrication indicated on the bottle.   There.. .done!
We then took it for a test drive and it worked perfectly!   Steve even had me drive for a bit and let him look with the bed lifted up, so he could see it actually working.  What a reward for a job well done! 

Good going, Steveio, you just saved us $1,000 or more having it replaced-------
