Our Wonderful Followers who come back again and again to read about us...

Showing posts with label furniture refinishing. Show all posts

Thursday, April 17, 2014

Camphost Orientation and some furniture refinishing

I have neglected my blog again, sorry.... but since coming back from vacation, I have not had much RVing stuff to talk about. I guess I could just fill it up with grandtot stuff and what weaving or knitting I am doing.  But I do like to focus on RVing stuff.

Well------ Today I do!

High Cliff State Park has a new Camphost Coordinator ....  Steve's job description of Facilities Maintenance Repair Worker Advanced has now has evolved to incorporate a new task since Ranger Rob transferred to a new park.  Steve took on the added job of working with the camphost scheduling and training.  He started out planning an orientation for all of the scheduled summer's camp host volunteers to come to the park for a day.  His Ever-Faithful-Non-Paid-Assistant... known as EFNPA ... (or "me") has prepared all the paperwork, gathered up a meal and assisted with the program today.

The summer schedule is filled with camphosts taking a month at a time as their shift in the park.  We went over new changes, policies, contracts and shared ideas.  Camphosts offered feedback and ideas based on their accumulated years of experience as campground hosts at High Cliff as well as other parks.


Some of the hosts took a power point presentation on training for various pieces of equipment being used in their month working as hosts for the park.


While we munched on a luncheon of some delicious pulled pork sandwiches from Hilde's Deli and Bakery in Chilton, a pot of my famous calico beans, and some veggies and fruit.... followed up by an assortment of cookies from Hilde's.

The park naturalist Cindy presented a program on the history of High Cliff State Park, the lime kiln operation and some of the preservation efforts by The Friends of High Cliff Organization.  Their newest project is to restore the historic building that housed the general store and post office in years that the lime kilns operated.  Now it's a museum and nature center but needs a lot of upkeep and renewal to keep it functional.  


Steve and I will be doing our "stint" for the month of August as camphosts, with myself doing most of the hosting as Steve works full time days.  It's a fun job, and the rewards are worth it for giving of time and effort and energy to the park.


In other news, we did some furniture refinishing around the house....

My kind neighbors in the back yard, RC and Laurie, had an antique rocking chair, known as a "sewing rocker" because of the style with no arms.  Makes it easier to sew in!   They had done some remodeling in their home and didn't have a place for it any more.  So she asked I could kindly take it off her hands!   I offered to pay for it, but she said consider it a house-warming present! Awwwwww!

The chair is known as a "press back" chair because years ago they would soften the wood with steam and then press a metal form with ridges to stamp the design into the back cross pieces of the rocker!  I just love this pattern, it's so pretty!


The seat had a crack across the width of the chair.... and the finish was worn and old.  So it was time for a little make-over.

I was able to find an EXACT replacement of the same design of the seat panel ---- I ordered it from a company called http://www.vandykes.com/   They are still using the original stamps that were used to make the seats in the old days!   The seats are made from the same material as Spaulding basketballs.  Who knew?

The instructions were very clear. One just needs to carefully remove the old seat, trace the shape onto the new one and cut it with a strong scissors.  Using the same upholstery nails, I tacked it back into place but arranged the nails a bit differently to make new holes in the wood.  Easy peasy!


Once the seat was in place, it was time for a spiffy job of adding some rubbed in stain to the seat material.  That went easy.  Then the chair got an all-over covering of colored polyurethane by MinWax called Polyshades. I gave it two coats and now it has more of a reddish orange tone rather than straight brown.  It matches our woodwork in the house better.  

Here the chair got tested by a couple of grandtots, complete with a story book and some cuddles and rockabye baby songs.  (yes, even at ages 2 and 4, they still humor me and let me do some rockabyes!) 


When I had these grandtots for a couple days this week, I wanted to do another furniture refinishing project.  It was time to teach four year old Chelsea how to do this!   I had bought this cute little doggie stool from the gal who runs Critter Sitters Dog Grooming and Boarding in Stockbridge.  It needed a bit of sanding ...... and a new coat of polyurethane. (low odor fast drying)

 (just look at that concentration!) 

Little Chelsea was quite pleased with her creation.
It was a rainy icky snowy night, and we did  this project down in our basement. 


She was soooo excited the next morning to go down to the basement right away 
before breakfast and see if it was dry. 


That sure was one proud little girl of her workmanship and learning how to make something useful again instead of just throwing it away.  The stool is just perfect for the wee ones in our house to reach the kitchen sink---

See???


We had Clayton (2) and Chelsea (4) for three days this week.... and these are my most favorite pics out of the zillions that I took of them.  Please indulge me.

Hanging out in the front porch, sharing fruit snacks....


Playing in the "rainbows" 
on the stair case from the leaded glass window.+


And this one I REALLY like... they are exploring how the light plays off a blown glass flower paperweight and a leaded crystal snowflake paperweight I found at an antique shop in Florida.


I suppose that is enough for tonight.  I am planning on doing some weaving tomorrow.. or maybe some quilting.  Oh I will add some pics (as soon as I take them) of two vintage quilts I got from the thrift shop today on my way home from the park.  

Note-----  You know you are getting well known as a fiberholic when the thrift shop calls YOU on the cell phone to tell you of some fine treasure that came in ----- and could I use it in weaving or whatever fiber idea I might have for old quilts with real wool battings!   Seriously!  They called ME! 


Wednesday, January 8, 2014

Before and After Foyer

Okay... back to some "Before" and "After" pics again....  In the last couple of blogs, we covered the outside of the house and the enclosed front porch, so let's step inside to the foyer!   (or foi-yay as Linda insists!)

We were quite impressed with the foyer as it was when we moved in.  All of the beautiful woodwork was left in original condition.  The southern facing leaded glass window shows rainbows all over the foyer, which move across the walls as the day progresses.  The grandtots "capture" the rainbows with their hands.


The woodwork is so nice, with mission style banisters and individual panels of wood set into a neat pattern under the staircase.  The wood glows a lovely golden reddish with brighter gold grain when the sun lights up the room.

BEFORE                                                                        BEFORE 
The "Munchkin closet" under the stairs is for all the grandtot toys~! 

  
Let me tell a little story.  Almost 30 years ago I rented the downstairs of an older two family home about the same vintage as our house now.  On the main floor was a twist type doorbell that could be heard up the stairwell to the upper unit.  Every time we came in the downstairs doorway, I had to restrain little Erin from giving that bell a good twist, or else the little old lady who rented the upstairs would rush down thinking someone was at the door was for her!  When the knob is twisted on the outside, it makes a very loud satisfying BRRIINNNGGG similar to a bicycle bell but with more "oomph".  It was sooo hard for a little 2 year old girl to resist twisting that knob!  But even for me, I always thought that was a cool doorbell!

Fast forward now 30 years to this house.  When we moved in here, we noticed that in the front door jamb there was an old hole that ran from the outside in the porch through the woodwork to inside the foyer. You could see two little screw holes under the layers of paint on the outside jamb to know that is where the knob was mounted.  And on the inside jamb, the woodwork had a circle shape around the hole was very telling that at one time a bell had been there.   The three grown daughters who sold us the house never remembered a bell being there, so it had been gone a long time, at least 50+ years since the bell had been in that place.

I started looking for one on antique hardware sites and also Ebay and Amazon. Whew they were very expensive--- Finally I found a new reproduction in my price range!   Oooh it was pretty!  But... the shaft was only long enough to go through the thickness of a door, not through the width of the entire door jamb!   But my Steveio said he could fix that!  I went ahead and ordered it, and it arrived in perfect condition.  Then Steveio bought a longer section of square stock metal rod and welded an extension onto the original shaft.  Voila.....


I was so happy to screw the knob into place, set the bell on the shaft and screw the back plate onto the inside jamb. And one good twist made it go BRRRRIIIINNNGGGGG!!!! OH my what a sweet sound!

outside in the enclosed porch                                                           inside the foyer


And here we are now, 30 years later, with our darling little Erin's daughter, Chelsea... 
hmmm  she just "can't resist" twisting that door bell!  

Wonder where she gets that from? 


We didn't need to do much to the foyer.  It does need a coat of paint in the future, but I haven't gotten that far yet. Steve wired up a lovely crystal light fixture for the middle of the ceiling.   I never did take a pic of the light fixture once it was up, but here it is on the website where we bought it from.  It has all little chains of crystals gathered to the center and then teardrop dangling crystals that I had to hang all around on the rim once the fixture was up.  


I was given an original oil painting by my artist friend Rosie DuPuy of Bethel, MO.  to hang on the bottom turn of the staircase.  She literally took it right off the wall in her house and gave it to me last spring!  She is a talented artist and does such nice work!  Each morning I say "Hi Rosie" as I walk past it.   Also I picked up a fantastic all wool oriental rug at an art gallery closeout sale that fit the foyer perfectly!  


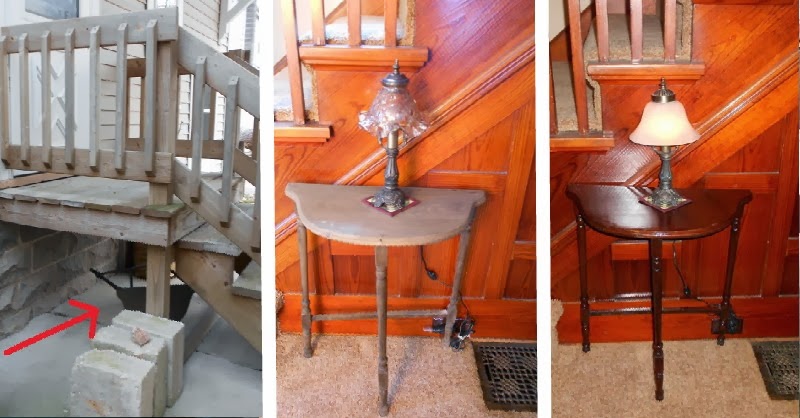
Back when we looked at the house in Oct 2012, there was a beat up old weathered three legged table laying under the back steps.  I took it out and set it in the garage, hoping the sellers would leave it behind after the closing.  (they did)  so I refinished it and added new stain and poly... ahhhh it was perfect for the foyer!

BEFORE OUTSIDE                               BEFORE                                     AFTER 


Steve's father had given us a mission clock that he had refinished years ago, probably in the 1970's Steve thinks.  It has been painted GREEN by someone!  ACK!   So he stripped it and stained it like dark walnut brown.  The wood was pretty, but didn't match our woodwork, so I gave it a coat of colored polyurethane called Polyshades by Minwax.  Also Steve's dad had removed the four wooden pieces underneath the clock, as they were not to his taste.  I googled images of the clock and found out what it could look like if Steve cut me some more oak pieces.  Of course he did, and I restored the clock to it's original configuration.    I used my fabric cutting board to line them up perfectly square.  We hung it up on the wall, hung the pendulum back on, wound up both shaft holes with the key, one for the ticking and one for the BONGING on the hour!


Amazing with a little research, the clock was made in the 1910-1920 range, which dates it to about the same time as our house was built. Look at the ugly green color that it had been painted before!

The grandtots are transfixed by the movement back and forth of the shiny bronze disk of the pendulum, swinging tantilizingly up there just out of reach.  Repeatedly they are told "don't touch"!   One day, right before it was time to leave, we knew little Chelsea (yes, the door bell ringer) had gone to get her coat from the closet.  Lo and behold, that happens to be JUST the exact time a little hand must have stopped that pendulum swinging!  Because when we came home later to put away our jackets, it had been stopped at the exact time that wee one had been all alone, unsupervised, in the front foyer!  LOL


The opposite wall of the foyer has the double pocket doors that lead into the livingroom.  The previous owners said their mom used to keep them in the open position, safely tucked into the walls so no little fingers got pinched.  We find that it helps with the heat bill to keep them closed, and also for sound if someone can't sleep and wants to watch tv in the livingroom (me) while the other one snores away upstairs undisturbed (Steveio)   I snapped this pic before the clock was put up yet. The clock is located on the wall between the pocket doors and the door leading into my Loom Room near that light switch.

Look at the 100 years of wear on the banister post top. 


Well, that is about it for our foyer.... here it is now in all it's glory!    I really like seeing the grandkids playing on the stairs at the first turn at the bottom landing.  They peek between the railings, or snuggle up with toys, or read books, or try to catch the rainbows.

AFTER 
On the weather topic, we have one more night to suffer at about 20 below zero, but the weathermen are promising it to get up to 11 or 12 tomorrow, and from there back to normal winter weather for Wisconsin... whatever that is????


Oh yesterday, Quilting Library Lady asked a question....

 QuiltinLibraryLady said...

Wasn't it a bit cold there on the couch right in front of that big window? Good thing you had the fuzzy blanky and the doggers to keep you warm.   
my answer: Actually that large front window looks out into the enclosed front porch, so there aren't any drafts there by the window.  Although the porch isn't heated, it is another layer of protection so the window is not cold.  But I will write another blog on the topic of windows, as it's a major bone of contention between Steveio and myself.  He wants new ones, I love the old ones.   So there!  LOL