Our Wonderful Followers who come back again and again to read about us...

Showing posts with label dicor. Show all posts

Thursday, February 8, 2018

MOTORHOME MODIFICATION - *D* Dicor, Drains, Drawers and Dogs

I am going to start off the new year with posting some of our motorhome modifications, a few at a time. I will post repairs, modifications, or neato things we have found for RVing.  I have lots of pics in my files so I will do them in alphabetical order.

Underneath that stuff, I will post my regular daily stuff..... kinda sorta fun, eh?


This is the last of the D's! 

MOTORHOME MODIFICATIONS 
STARTING WITH THE LETTER D

Dicor Caulk:
I know I talked in a few past blogs about using this Dicor product on the roof to seal any seams, around vents and antennas, and around our solar panel brackets. It is the GREATEST Stuff to use on the roof, and many RV shops sell it as their only caulk.  


It is made to be flexible and comes in white, or cream.  It is self leveling and there is a formula that will not hurt rubber EPDM material.  We keep a tube on hand in the rig, along with a patch of Eternabond tape in case of having problems on the road. As a matter of fact, I think we used our last patch on my brother's travel trailer so we need to replenish again with a new hunk soon. 


We used up a couple tubes on the roof when we installed our solar panels.
It was great to make a puddle and push the bracket down into it
and then screw through it. 


We know we got a good seal, 
and they are all holding up well now, 8 years later!


Drain Cap:
We bought a different drain cap than the one that came with our motorhome.  This one is kinda cool because it has an outlet that you can screw on a garden hose type fitting to it. It fits on like any bayonet type mounted cap, but has this little cap that can be unscrewed to add a hose.

This is especially handy if you want to drain out some of your grey water to put out your campfire before heading to bed or leaving your campsite.  Also some parks out west allow you to run your grey water into the nearby shrubs to help with moisture as long as it is not standing water under your rig.  Often if we are only gone for a weekend, we will run our grey water out in our yard via a hose over to my tomato plants.  Especially if it is a dry spell and my rain barrels are low.


Drawer Glides:
Our motorhome has some pretty big drawers, especially on the bottom sections under the closets.  The glides under them were pretty flimsy and weak. Often the drawers would pop out beyond their pull out distance and come out all wiggly and not slide back into place.  Steve examined them closely and decided to mount in a better set of higher quality glides in all of the big drawers in the kitchen and bathroom.  Now they slide in and out easily and never "go off the rails" .....

 
But... the new slides do not have a "stop" built into them for when they are shut now, 
like the other smaller drawers do. 

You know, the LIFT then PULL out feature in most RVs? Soooo the drawers do sometimes roll out during transit.  Not good. So see the next "fix".


Drawer Velcro Fix:
I came up with this idea!   I cut some heavy duty velcro (LOVE that stuff!) into little upside down L shapes.  I stuck the fuzzy ones to the frame around the drawer in places they will not be seen once the drawer is shut.  I stuck the corresponding sticky pokey pieces to back lip of the drawer, lining them up.  Voila!  No more opening drawers!  Just a tiny tug to open, and the velcro holds them shut during transit.


Dog Supplies:
Dog supplies are important to have along in our RV.  If you have been reading my blog for any length of time, you will know we are VERY fond of our dogs... and try to keep them as well-behaved campground doggies who do not cause any trouble.   

(p.s. they are both rescue dogs who had a hard start in life) 

Things that make our dog-walking more pleasant is having along certain "Doggie Doo Doo supplies"  and easy ways to carry them.  I like to wear yoga capris and Tshirts in the summer. Thus, that means no pockets to carry supplies --- no keys or cell phone. Hmmmmm  One day I found these little saddle packs from Flexi that strap around the casing of the Flexi Leashes.


I know they have those expensive little rolls of doggie poop bags you can buy, but they are a pain to unroll, rip apart, and open up as your dog is wanting to keep on moving through the campground.  We found these boxes of loose bags with little tie handles at the local Dollar Tree store.  They were two boxes for a dollar... so that is 100 bags for a buck!  I stuff about 20 in the little zipper compartment in each flexi lead.


I like being able to put one bag on my hand, and pick up the offending mess and put it into another bag, so I am using two bags each time.  I don't care about using two, just glad the deed is done and I don't have to touch it.  Tying the handles in a firm knot and slipping the looped handles onto the leash helps carry it until we find a suitable trash can to dispose of it.

I also use these doggie bags in the little trash can I got from RV friend Dee Walters https://tumbleweed-jimdee.blogspot.com/ it sets on the kitchen counter for little scraps and waste that doesn't need to go down the drain or into the big trash.  The doggie bags fit perfectly in the little can, and easy to grab out when doing the trash run.


This is the last of the D's! 

You know what that means?  Tomorrow beings the E's!
ELECTRICAL STUFF!!!

~~~~~~~~

Sorry I didn't get a blog post done yesterday. I have been trying to do one post a day during this long winter with no camping trips scheduled. I was down and out yesterday, and thinking I might need a trip to the doc first thing this morning for some Tamiflu.  About midnight I felt my fever "break" and by 1 am I was sleeping like a sound baby. I woke up at 7 am and feel pretty good. So possibly the strain I picked up over the weekend was only a 24 bug? 

My friend Dot told me to stay inside and away from people. Honestly, I have been trying to do just that. I only went out ONCE since Jan 2.  Well, except for a few doc appointments.  Steve has been doing all of the shopping and errands for me.  So the ONE time, over the weekend, we went out to 2 stores, wearing gloves, not being close to people, using hand sanitizer after having to touch the buttons on the checkout keypad....  I still picked up a bug. ARGGHHHH   So back to seclusion for me!


Sunday, February 5, 2017

MOTORHOME MODIFICATION - *D* - D's are Done!

Since the Packers are not in the Super Bowl tonight, I am going to work on my blog while the tv is on... and watch the commercials.  I will root for Atlanta seeing as I am not fond of the Patriots. 

I am going to start off the new year with posting some of our motorhome modifications, a few at a time. I will post repairs, modifications, or neato things we have found for RVing.  I have lots of pics in my files so I will do them in alphabetical order.

Underneath that stuff, I will post my regular daily stuff..... kinda sorta fun, eh?


This is the last of the D's! 

MOTORHOME MODIFICATIONS 
STARTING WITH THE LETTER D


Drain Cap:
We bought a different drain cap than the one that came with our motorhome.  This one is kinda cool because it has an outlet that you can screw on a garden hose type fitting to it. It fits on like any bayonet type mounted cap, but has this little cap that can be unscrewed to add a hose.

This is especially handy if you want to drain out some of your grey water to put out your campfire before heading to bed or leaving your campsite.  Also some parks out west allow you to run your grey water into the nearby shrubs to help with moisture as long as it is not standing water under your rig.  Often if we are only gone for a weekend, we will run our grey water out in our yard via a hose over to my tomato plants.  Especially if it is a dry spell and my rain barrels are low.


Drawer Glides:
Our motorhome has some pretty big drawers, especially on the bottom sections under the closets.  The glides under them were pretty weak and often the drawers would pop out beyond and come out all wiggly and not slide back into place.  Steve examined them closely and decided to mount in a better set of higher quality glides in all of the big drawers in the kitchen and bathroom.  Now they slide in and out easily and never "go off the rails" .....

 but... they do not have a "stop" built into them for when they are shut now, 
like the other smaller drawers do. 

You know, the LIFT then PULL out feature in most RVs? 
Soooo the drawers do sometimes roll out during transit.  
Not good. 

Drawer Velcro Fix:
I came up with this idea!   I cut some heavy duty velcro (LOVE that stuff!) into little upside down L shapes.  I stuck the fuzzy ones to the frame around the drawer in places they will not be seen once the drawer is shut.  I stuck the corresponding sticky pokey pieces to back lip of the drawer, lining them up.  Voila!  No more opening drawers!  Just a tiny tug to open, and the velcro holds them shut during transit.


Dicor Caulk:
I know I talked in a few past blogs about using this Dicor product on the roof to seal any seams, around vents and antennas, and around our solar panel brackets. It is the GREATEST Stuff to use on the roof, and many RV shops sell it as their only caulk.  It is made to be flexible and comes in white, or cream.  It is self leveling and there is a formula that will not hurt rubber EPDM material.  We keep a tube on hand in the rig, along with a patch of Eternabond tape in case of having problems on the road. As a matter of fact, I think we used our last patch on my brother's travel trailer so we need to replenish again with a new hunk soon. 

Dog Supplies:
Dog supplies are important to have along in our RV.  If you have been reading my blog for any length of time, you will know we are VERY fond of our dogs... and try to keep them as well-behaved campground doggies who do not cause any trouble.   Things that make our dog-walking more pleasant is having along certain "Doggie Doo Doo supplies"  and easy ways to carry them.  I like to wear capris and Tshirts in the summer. Thus, that means no pockets to carry supplies --- no keys or cell phone. Hmmmmm  One day I found these little saddle packs from Flexi that strap around the casing of the Flexi Leashes.


I know they have those expensive little rolls of doggie poop bags you can buy, but they are a pain to unroll, rip apart, and open up as your dog is wanting to keep on moving through the campground.  We found these boxes of loose bags with little tie handles at the local Dollar Tree store.  They were two boxes for a dollar... so that is 100 bags for a buck!  I stuff about 20 in the little zipper compartment in each flexi lead.


I also use them in the little trash can I posted about in my last blog.  I like being able to put one bag on my hand, and pick up the offending mess and put it into another bag, so I am using two bags each time.  I don't care about using two, just glad the deed is done and I don't have to touch it.  Tying the handles in a firm knot and slipping the looped handles onto the leash helps carry it until we find a suitable trash can to dispose of it.

Well, the Falcons are ahead by 21-0 and it will be half time soon.
Wonder what Lady GaGa has planned? 

 So far I have not seen any commercials that knocked my socks off....
~~~~~~~~
on edit.... yup... the Albert Einstein commercial for 
National Geographic Genius series won my vote so far! 

And Lady GaGa's show was pretty nice, amazing and how she started it 
was wonderful.. and how she ended it left me in a shriek! 


~~~~~~~~

Back to the blog: 
We took sweet Millie to go see Dad P again at the therapy center.  He is doing well, had a little set back with a quick visit to the ER and back again, just making sure there is no infection.  Little Millie was SO GLAD to see her "daddy" and make sure he is okay. 

That is such a cool device they have on his knee.  There is a cooler set up nearby full of ice and water. Then a pump device on top of the cooler sends the icy water through the hose and circulates it on a special pad that is strapped over his knee.  Amazing!

Steve and his Pops played some cribbage (Pops won!) and we hung out and spent time with him. I brought along knitting and kept myself occupied. The center is very hot, for the patients' comfort. Will have to remember to wear t shirt and light slacks next time. Both Steve and I were pretty warm in our winter clothes.


And sweet, well-behaved Millie was all too happy to be laying at her master's feet.  Content and at peace.  She is welcome at this center, and I walked her out to do a bathroom break. She gets lots of pats and pets and admiration all the way out and back in again from the residents, staff and visitors.  We didn't put on her official Therapy Dog Vest this time. We will have to bring it again next time. She likes wearing it because it means she is "On Duty" for working.


We loaded her up to go back home. She was not happy to leave her master behind. But we reassure her with treats and special attention all the way home.  I know she misses him SO Much.  Must be why we spoil her rotten by letting her sleep on our bed between our legs the last two weeks. hahahaha


Saturday we started a task that we have been meaning to do for a couple years now.  Since we bought Our Old House in 2012, we repainted most of the rooms during the first year.  We kinda put off the foyer, both stairwells, and the upstairs hallway that runs the whole length of the house.  We just never got around to it.  I did buy a couple gallons of good Pittsburgh Grand Distinction paint (low almost no smell, no splatter, no drips and covers really good)   I had all the supplies ready for the day we wanted to start.  I even won a whole big box of red polka dot flannel backed tablecloths in an auction!  They worked GREAT for drop cloths because the flannel back clings to the carpeted stairs and doesn't slide off like plain plastic would. 

The walls were a peachy taupe beige color... and really needed to be freshened up with new paint.  I chose China White which is just slightly creamy and would look nice against the reddish orange brown of the woodwork.   Most of our other rooms are creamy white too. I like that in a Craftsman House.  I am not into the new style of those bright bold or dark colors in rooms. I like airy and light and clean and crisp. 

Steve and I started draping and taping.  Did I tell you that Steve HATES painting?  But we wanted to get this done and now was a good time to get to it.  (things might change next week, so more on that later) We are good painters and try to not splatter, but we taped the woodwork just in case. 


Hauling out the new paint, and brushes, I went to work doing the cutting in....  around all of the doors, windows, and along the baseboards.  Steve manned the roller and got the first coat on.


It was drying pretty well that we almost didn't need a second coat.... but we did roll a second as it dried within an hour or so before moving on to the next section. 


As we started up the front stairwell (we have two sets of stairs in our house to the upper level)  Steve got out his extension handle for the painting roller.  All I could do was cut in along the baseboard up the staircase and around the leaded window. The rest now was up to him.  You can see the difference this lighter paint makes! 


Once he got wayyy up to the top, he could still reach with the extension pole.  
No ladders or scaffolding needed to get up 18+ feet to the top! 
While standing on the staircase at an angle, of course. 


I had bought a silly little spongey roller wheel disc thing.  It is meant to get into the cracks between the ceiling and walls (we are painting them both the same color). At first Steve was kinda doubting it would work, but it really did!


Two coats over everything from the foyer up the stairwell to the top of the stairs, plus all of the ceiling sections too.  We only used up less than two gallons for all that square footage.  Wowzer!   We cleaned up and put things away to make supper.  Only a few hours and we got a LOT accomplished working together as a team.  After supper we hopped in the car and took a ride to Manitowoc Menards to get two more gallons to finish the rest this week.


I thought Steve was going to hit the floor running this morning and start on the next section. Instead he said no, he was kinda sore and thinking he would not paint today after all???    That is fine with me... it gave me time to work on some quilting.

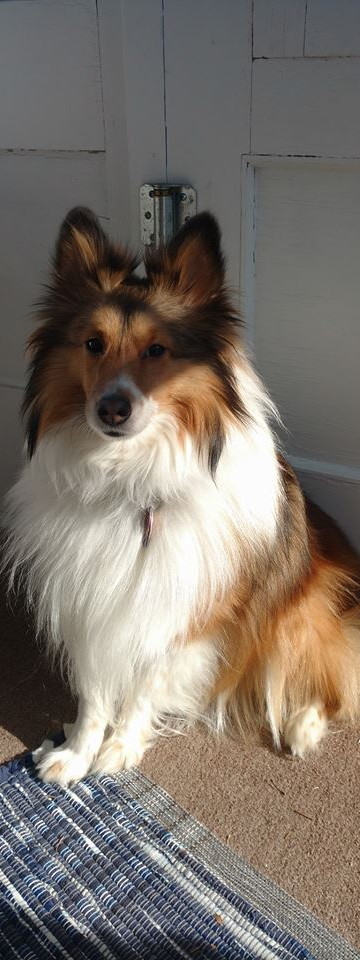
The sun was shining so nicely today, and the temps came up to 32!  (tomorrow is forecast to hit 37!)  I went out on the porch for a bit with the dogs.  The sunshine warmed it up and we sat out there while I read for awhile.  The dogs kept an eye out for any people walking by....


They are such good doggers and have been getting along well.

Finnegan                          Millie                            Binney

It was so peaceful out there... and I put on some soft Celtic music.  Not too often that we can spend an afternoon out there in February.  Sure made me miss the summer months where we spend a lot of time on the porch.  We are due for some more snow, maybe on Tuesday, so winter will return again to Wisconsin.  Might as well enjoy this nice weather for the time being.


Okay.. 
  • I liked the commercial about telling the little girl she is equal from Audi....
  • and the one about Melissa McCarthy was a hoot!  
  • The Mr. Clean one was trashy.... 
  • and the one of Albert Einstein was really good too.  
Now the Falcons are ahead 28-9.  Wheeeeeee


Thursday, January 7, 2016

REDUX - MOTORHOME MODIFICATION - Installation of our Solar Panels

Since it's the boring winter months, and we are not travelling yet, I thought I would do some repeats of my most-read blog posts on RV repairs.  This one had over 2,500 views when I first posted it. We installed solar panels and equipment in April 2010


MOTORHOME MODIFICATION - Installation of our Solar Panels


*~*~*~*~*~*~*~*~*~*~*~*~*~*~*~*~*~*~*~


On our Safari motorhome, we originally had two OEM solar panels… one 75 watt for the big coach batteries and a smaller one for maintaining the chassis batteries.   This setup was enough to top off our four golf cart batteries, with frugal usage we could go many days with it.  But we decided to “Solar Up” with more…   and be more livable and downright extravagant once we are done!  LOL

We removed the old panels, as it’s never good idea to mix sizes.  All panels should be the same wattage. Sold the old ones off on Ebay.


THE EQUIPMENT:
We purchased four 100 watt Siemens panels,  a Blue Sky MPPT solar controller, a Trimetric gauge, and all the various cords and accessories to go along with it.  We already have four 6volt golf cart batteries installed.


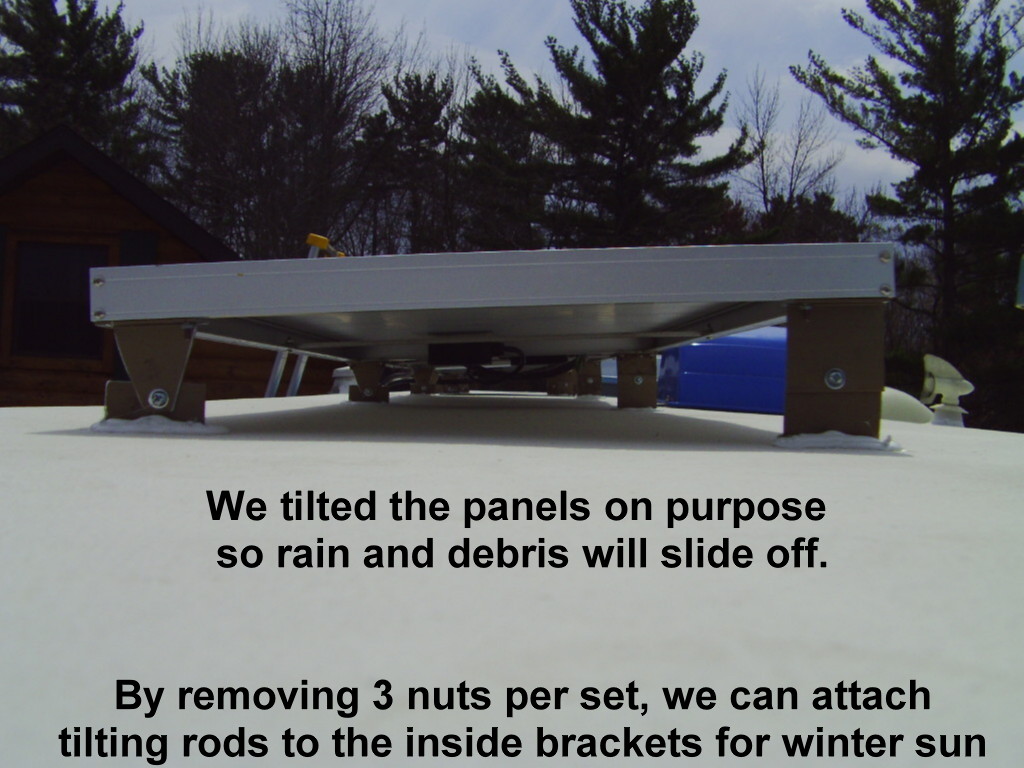
Steve made the mounting brackets out of heavy aluminum, and made them so supplementary metal rods can be wingnutted onto them to tilt them in the winter months if needed.  The panels will ride flat the rest of the year, and only add the tilting rods if we deem it necessary. He pre-fitted the brackets while the panels were still on the ground, rather than waiting till they were up on the roof.


Let’s all sing together that James Taylor favorite:  
Up On A Roof…………….


And I gingerly crawled up the ladder to assist.    I HATE heights….ack!  First step was to hook the four panels together into pairs of two.


Now they had to be wired up together and then joined to the two 8 gauge cords


Next comes the time to flip all four of the panels over and install the brackets to the roof… ohhh drilling holes in a roof can be VERY SCARY!    Once a hole is drilled, you can’t  UNdrill it!


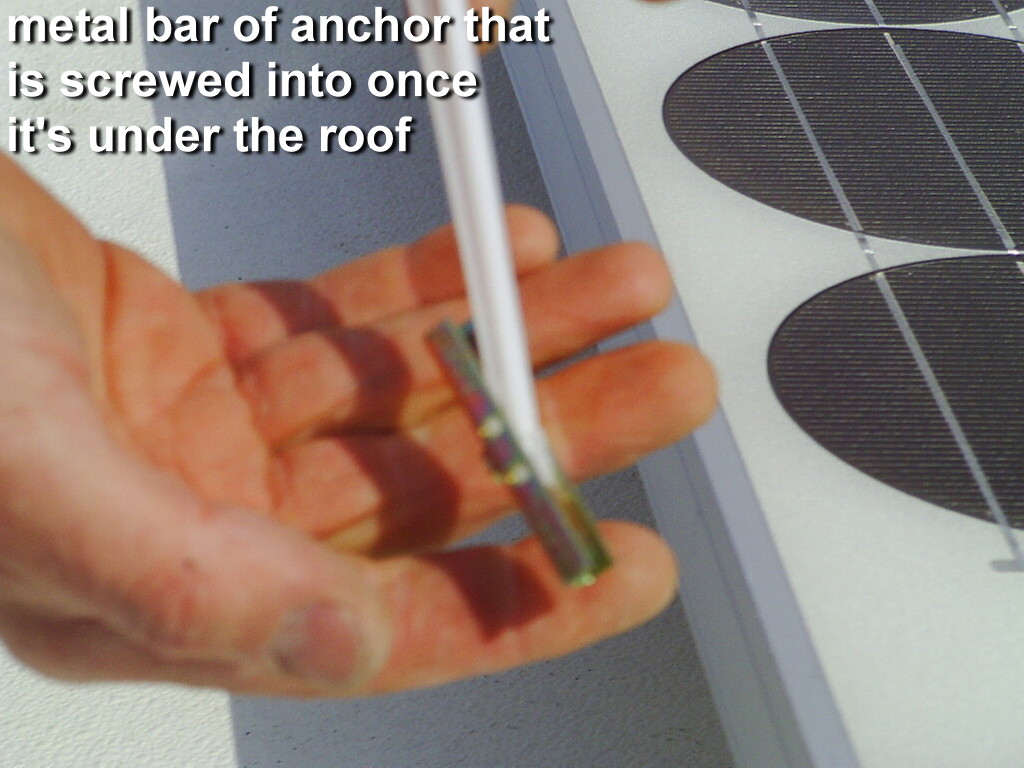
We used some rather unique fasteners.   Before you get too excited seeing “plastic”, calm down.  It’s only temporary nylon guides that hold the metal toggle into place … read on:


Ahhhhh  now look at that !  (about four hours later)

Well, not quite.   Now Steveio had to hook up the wires in the solar controller and 30 amp fuse box.  Then hook the Trimetric gauge back up to the shunt and it *should* work…..


Now it’s time to get on the roof and drill down, and pull through the heavy gauge wires for the panels.  Steve carries along this ladder in our rig, an Xmas present from moi.


WIRING:
We chose a location on the roof for the panels that would not have them shadowed by any objects on the rooftop, such as roof vents and air conditioners. The slightest shadow can hamper the panel's output.   We plan to face the front of the rig east as much as possible when choosing parking spots, so the panels are running lengthwise along our south side (passenger side) of the rig.  We already try to park this way in the hot summer to keep our fridge on the north side cooler by being in the shade.

On the passenger side of the rig is a perfect spot to run the wires down through a hole Steve will drill in the roof, through an access panel in the closet that reveals a chase for other wiring and the plumbing vent from our washer/dryer unit.   Directly below this closet is the basement compartment where the solar controller will be located.


The location of the solar controller is very important.  The closest spot located to the batteries is the most desirable.  But it also needs to be in a protected compartment.  This one is the closest, just on the other side of the wheel well.  Once the controller is mounted here upright, the main heavy welding cable will go around the wheel well and connect to the shunt and the batteries right behind the wheel well.


He got the solar controller mounted, wires and ground all hooked up too.


(this next photo added later .. now it's correctly wired and labelled and marked)


We cut out a section of wall and installed the Trimetric Monitor gauge and the 500amp shunt used to monitor the battery condition.


The gauge is mounted in our kitchen, and the shunt is mounted under the bed close to the batteries on the negative line.  Special wires come back to the wall panel.


Voila! It works!  This is like “Command Central” for seeing how many volts you have in your batteries, how many amps are being used, how much is being charged etc.


Weeeeeheeeeeee it all works!   
And even in cloudy afternoon sky in April we are pulling 20 amps.  
Ain’t that something?


*~*~*~*~*~*~*~*~*~*~*~*~*~*~*~*~*~*~*~


P.S.  We find our solar panels give us ample power to do most everything we wish when boondocking (other than run the microwave or vacuum cleaner)    We run the tv's, my curling iron, recharge our cell phones and cameras, run the Galaxy Tablet, and any of the lights and water pump etc. as needed.  We have to remember to start up our  on board Onan generator once a month to exercise it, because we don't often need it now that we are solared up.


Three helpful links we found when exploring all our solar options were: 


(NOTE: SINCE THIS POST, STEVE RAN ACROSS ONE MORE 100 WATT PANEL THAT MATCHED OUR OTHER FOUR, SO NOW WE HAVE FIVE PANELS UP ON THE ROOF) 
About a year afterwards: 

Steve had the chance to buy one more solar panel that matched our other ones.  (we already have four 100 watts Siemens panels on the roof)    Here is the panel and he got right up there and ready to work!!!

Next, he had to tilt up the set of panels to access the connector box underneath.  Our four panels are tiltable with brackets that can hold up at any angle to collect the sun's rays in the winter, if need be.  But we have never had to do that. The newest panel that he is installing is on a fixed bracket that will lay flat. That bracket is from the old panel and needed a bit of alteration, but he made it work.


There... all done!   Wasn't that easy?  LOL ...  

You can also see the little 10 watt solar panel that is used to maintain the two driving (chassis) batteries. 

While up on the roof, Steveio also checked over all the seams and edges and vents, looking for any potential problem spots for leaks or damage over the winter.   

COSTS OF OUR SOLAR INSTALLATION:

We removed the old 75 watt solar panel and controller, sold them on Ebay for $262  

We already owned four 6 volt marine batteries @ $87.50 EACH  $369

4 100 WATT SIEMENS SOLAR PANELS, (used total $894 

BLUE SKY 50 MPPT SOLAR CONTROLLER, (used $268

NEW TRIMETRIC GAUGE, SHUNT, THERMO SENSOR, 
FROM ALT ENERGY SOLUTIONS (new $234 )

BREAKER BOX WITH FUSES ($24

STEVE MADE THE BRACKETS AND USED 4 ga and 8 ga CABLES FOR CONNECTION  (APPROX VALUE $200)

ONE ADDITIONAL MATCHING PANEL ADDED LATER: (used $65)

TOTAL: $1,792.00 after subtracting the sale of the old OEM panel and controller


Quiet, renewable, reliable energy
being able to boondock in comfort

.... priceless!