Our Wonderful Followers who come back again and again to read about us...

Showing posts with label blown thermopane. Show all posts

Friday, October 23, 2020

MOTORHOME MODIFICATION - Repairing Blown Thermopane Windows PART TWO

This is the Part 2 followup blog post of the process of replacing our driver side window in the motor home. The two lower portions, one which is a slider, had blown their thermopane seals and were fogged up.

Here's the blog post of where we first attempted to open them up clean them and reseal them:

https://kareninthewoods-kareninthewoods.blogspot.com/2020/09/motorhome-modification-repairing-blown.html

But because the glass was etched, from the combination of the metallic spacer and some chemical reaction, we needed to have two new pieces made.

After Steve removed the window and took out the pieces, we had taped it up with a roll of this this carpet film used to protect flooring during open houses. It worked really well to seal off the entire opening of the motorhome window


We put a layer of cardboard from the inside to give it added strength and durability. Originally, we thought it would only be this way for a week or so. It held up well through rain and wind and even some sleet. For how long???  FOR 30 DAYS!
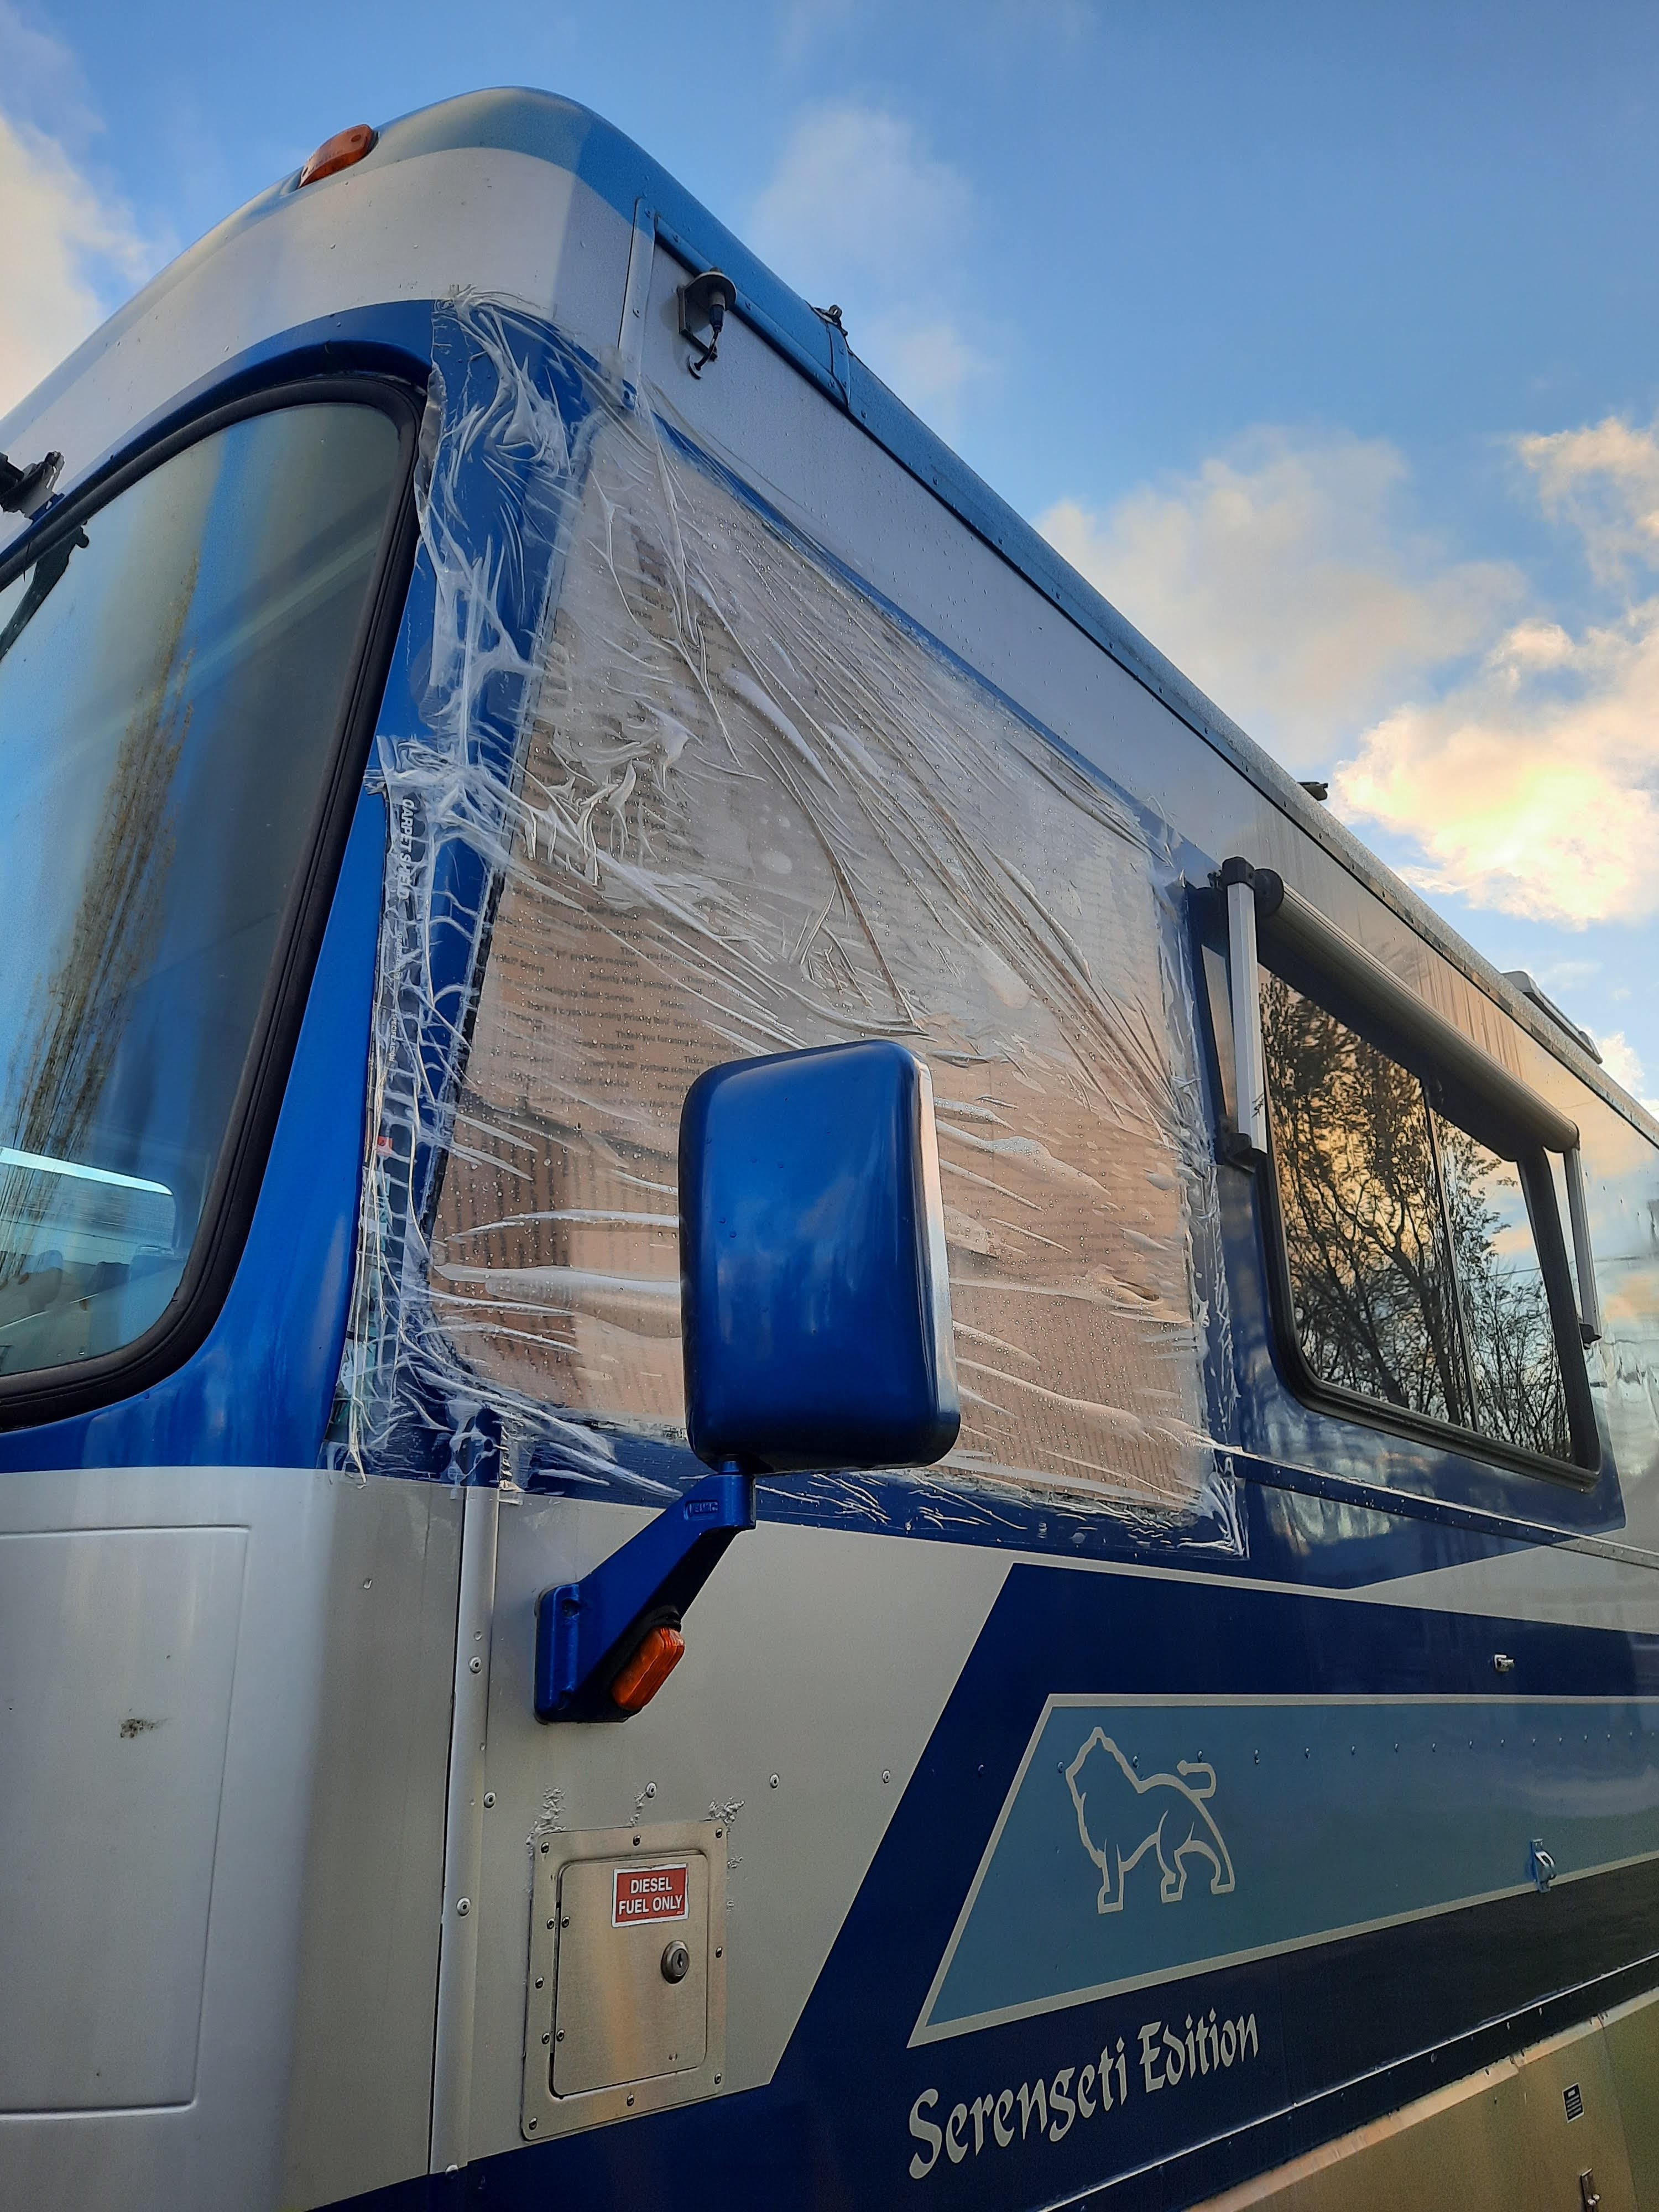


Little did we know, there was delay after delay. After multiple phone calls back and forth, the secondary glass place was finally able to create our pieces and have them shipped back to Packerland Glass in Green Bay. As soon as they arrived today, unloaded off the truck, we rushed right down there to pick them up.

Here are the labels from the windows themselves of what they created for us. We asked them create two thermopane pieces, with tinted glass. It needed to have a radius curve to the glass on one corner, to fit the frame.  We gave them our original pieces to make templates from. It is also tempered glass because it is for an RV window.


We were quite pleased with the bill. They had estimated $80 for each section and came through as promised.


As soon as we got home, Steve went right to work at putting the pieces back into the frame. It had been setting in the garage for 30 days. It was taking up a big spot of his work space area, and I'm sure he is glad to get it assembled and out of there.


After he put the pieces into place, and yes, they fit perfectly, then he had to add the 4 little screws back to where the two pieces of framework joined together. The heads of the screws are covered with silicone to prevent any leaks or any rust and corrosion. This space will be hidden away between the two layers of the interior and exterior walls once the window is in place. But it's just been best to make it as secure as possible and prevent any future problems. 


Here is the large window put back together. The two smaller sections are the ones that were rebuilt. One is permanently fixed to the front half and the other one is a slider window. This is important for things like pulling up to toll booths, or opening up to get directions, or hear someone when he is backing into camping spots. Previously they had been so messed up and foggy that it was becoming dangerous to even use them to view his side mirror while driving.


To reassemble of the window into the frame is one thing, but also we needed to have the proper materials to seal it back onto the motor home. We had pre-ordered a roll of the black butyl tape from Amazon. In contrast to the gray butyl tape which is not nearly as good, we've learned long ago the black is much better and stickier.

We have done this twice before ourselves, and also had the passenger side window completely redone by in Suncoast Designs in Hudson, FL a few years back.  So we know the best products to use. 

Now keep in mind, when we first did this we thought we would have warm weather while putting it back together ---  because we thought it would only be a week or so. That was back in September. Haha! 

Now it's down in the 30-degree range and we have had rain and storm and winds all last night and again today. But we needed to get this window back into place toot sweet. 

While in the warmth of the garage, Steve put a layer of the black butyl tape all the way around on the frame of the window before we carried it outside to actually physically put it on to the motorhome.


Carefully making sure to follow the frame with all the way around and not having it overlap to the outside.


It was getting colder, but tomorrow isn't going to get any warmer. So we needed to get this done and done quickly. Steve set up the ladder and first warmed up the entire window opening from the outside.

Using a heat gun and being sure to carefully not get too close. It was just enough to take the chill off and warm up the entire surface to get the butyl tape to adhere properly. But not let the heat ruin the paint or finish.


We then carried out the large combination window unit and brought it to the side of the motor home. With both of us pushing and hoisting we got it up and into place. Now it was my turn to stand on the outside and hold it tight against the exterior the motorhome while Steve went to the inside to start screwing down the inner frame to clamp it together into place.


I was able to grab the phone out of my pocket and take a little selfie with one hand while he was inside working around the whole frame with I don't know maybe 30 or 40 little screws.

(you can see our kids motorhome 
parked in front of ours 
for winter storage)

He used a little ratcheting box end socket with a tiny square head driver bit in the end of it.  This was the best way to get into the tiny spaces between the dash and the interior window frame.


While he was doing that on the inside, I was on the outside, standing on the ladder. (in the cold)  I was carefully going around and around the entire outside of the frame with the heat gun, this was keeping the window frame on the exterior side warm enough so the butyl tape would seal snugly. On the inside Steve kept tightening all the little screws alternating in various spots all the way around to pull the two pieces together evenly. The inside frame and the outside frame needed to meet perfectly to clamp the window into the opening.


I had to be careful to not let it get too close to the paint, but yet keep it close enough to warm the aluminum frame works from the outside. I kept checking with my hand to make sure it was warm to the touch. It seemed to be working well and I could see it drawing in tight as Steve kept tightening the screws from the inside. 

Around and around he went, giving each one a bit of additional tightening until each screw with snugged into space. I took a break and came inside to warm up. The temperature dropped down to 36 degrees and it was getting quite blustery and windy out there. Plus we were losing daylight. Steve had the inside job I had the cold outside job! 


I went back out to give it one more round of heat applied to the outside frame. Everything was snugging in well and it appears to have seated correctly in the open space.


Then Steve came out and took one final picture of me doing my job. It's not often that I get pictures of myself doing the work. So often people think Steve is the only one that does these projects, because he's the only one in the pictures. Well? That's because I'M the one usually taking the pictures!


But we do work together as a good team. And the window is in place. Darkness fell and we decided it was time to go in the house and get warmed up and eat some supper.

Tomorrow Steve will add one additional row of exterior clear UV silicone along the top edge of the window frame for an additional protection.

Also, stay tuned for our next project. 
It will be the S. O. M. D. 

Friday, September 25, 2020

MOTORHOME MODIFICATION - Repairing Blown Thermopane Windows and Doggie Poopyard Fencing

We are still not feeling up to snuff yet. Right now it's a Waiting Game. More on that later.

While we're sitting home this week, Steve thought he would start a new motor home modification project. 

Our motorhome has dual pane windows known as thermopane. They're very nice and help with heat loss or air conditioning as well as sound muffling. We really like them. But since they are of the vintage age, 25 years old now, some of them have blown their thermopane seal.  Especially the side windows of the cockpit area. The rest of the windows around the coach are in pretty good shape.

Four years ago, while we were spending a couple months down in Florida, we did go over to Hudson to Suncoast Designs. They did a wonderful job taking apart our 3 piece window on the passenger side cockpit area, cleaning them up, resealing them, and reinstalling. It cost $225 for all three panes of that window section. Here is my blog post from that project.

blog of our repair at Suncoast Designs 

That side has held up beautifully, and we are very happy with the work. Now the driver's side cockpit window has gotten pretty bad. But we aren't planning on going to Florida in the near future.  The topmost larger portion had already been replaced years ago, but not the rest of the panes on that window configuration.

The two lower portions were getting dangerously clouded up. It was getting so bad that Steve did not have easy access to view through them for his driver side mirror. He decided we would try to fix it ourselves.

We watched a couple YouTubes and read a couple blogs about guys who had done this project themselves.  We figured that we could do it, and ordered up the supplies. We ordered the proper sealant that goes around the edges of the windows, as well as the proper spacer for between the panes once we had them apart and cleaned up. We also ordered the good black sticky butyl tape for around the exterior window frame itself when we would be putting it back against the motorhome opening.

Steve's first step was to remove the entire three pane window section from the driver's side of our motorhome. Steve was one jump ahead of me before I could get the camera out there. By unscrewing all the little screws from the inside flange, then he can carefully removed the whole window construction piece from the outside by unsticking the butyl sealant all around. He carefully lowered the window to the ground and brought it into the garage before I even got out there with the camera. Mister Zoom Zoom at his best!


One wonderful hint that we had seen on YouTube was to seal up the window space opening while the glass is out, is to cover it with a few strips of carpet protection film. This is the same film that people put across carpeting during open house showings to eliminate foot traffic marks on their carpeting. It worked really well to put a couple layers across the open window.


Once he sealed the film into place, he also stuck a few pieces of cardboard to the inside surface to give it a little more rigid construction. That way if the wind would blow against it, it should hold by being pretty taunt and smooth. It should hold up until we get the window put back in.


This is the now removed window frame in the garage. Like I said, the upper portion is just fine. It's the two smaller portions that need to come out and be repaired. One is the slider, and one is stationary behind another trim strip.


Steve carefully laid it out flat on a large piece of plywood to work on the frame. That way the frame would not flex or bend or twist by working on a flat surface. He carefully removed the tiny screws and the little plates that held the frame together.


This is the one end of the window frame that comes apart. Once he loosened this part he was able to take out both of the small pieces of glass. 


He carefully labeled each piece of glass as to which was the inside, the outside, and it if was the slider or fixed panes.  Then he took the panes of glass apart. 


The construction of our thermopanes are two pieces of tempered glass with a thin strip in between of metal called a spacer. The metal is a type of an aluminum. Some of the other Safari motorhomes, as well as some other motorhomes, have used other window construction that have a rubber spacer. That rubber spacer tends to move and flex and make what's called "snakes" on the window in between the panes. They're very unsightly. 

The problem is that as the thermopanes leak, something happens with that aluminum spacer which causes actual etching on the glass in between the layers. It's some kind of chemical shedding that is so strong it etches the glass! We watched a couple YouTube videos on guys fixing these windows, and they said once you get the window apart, if the glass is etched, there's really nothing you can do. Yep, that was our case. The more we tried with various cleaners and solvents, nothing would take off those big gray blotches. It's permanently etched into the glass!!!


We tried vinegar, CLR, Mr. Clean Eraser, Soft Scrub, glass cooktop cleaner, and even lightly scraping with a razor blade.  Nothing worked, it was etched right into the glass surface. Dang!!!!

After deciding that we tried everything possible, then we called the commercial glass place down in Green Bay. Packerland Glass said yes, they can build us two new units just like the ones we have, if we drop them off. For social distancing, they said all we have to do is drop them off at the door with our name taped onto them and call from the parking lot. They will come out and get them. They quoted us $80 each--- which includes new glass, with tinting to match what we have, and tempered because it is for a recreational vehicle side window. $80 each is not too bad, in our opinion. The only problem is it will be sent out to another place for fabrication. It may take a week or more. So we are glad that the side of the motorhome opening is sealed up well, in case we have any bad weather.

Well, it looks like that project is kind of on hold for now. I will make another blog post when we get the new pieces and put it all back together again. In the meantime, it was time to work on another project.

~~~~~~~

We have sassy doggies. 

We know that. It is in their nature because they are of the herding variety breed, is to bark warnings of anything they see. "Danger danger, a wolf is after our sheep!!! or danger danger it's a burglar"...  you know the drill?

When we let them outside into their little potty yard, which is a fenced in section on the back corner of our house, they bark frantically at anything else they see out the side fence. Whether it's our neighbors dogs who are let out into their own potty yard, who are very quiet and well-behaved dogs. Or the neighbor beyond that who sometimes babysits his grand-dog, or his teenage grandkids who play basketball. Ours find something to bark about, and work themselves up, and are quite sassy. We have to correct them.  Or we have to bring them right back in the house.  We try to keep them quiet, and especially we look out first and see if there's anybody out there before we let our sassy dogs out to go to the bathroom.  If there is someone out there, we wait until they go back in.  Then ours are quiet and fine and do their business. 

The fence is like this:
They are portable large mesh metal panels
that are wire-tied together at the joins.

Our dogs are "inside doggies", they are only outdoors for a few minutes at a time. It's not that they are doing irritating incessant all day long barking. It's just while they are out there, if there's something interesting to look at and bark at it. Otherwise they are perfectly quiet when there's nobody else around.  So it's not that they are a habitual problem or irritating anybody else. All of our neighbors have dogs, and they all bark from time to time. I think it bothers us more than anyone else.  Nobody has ever complained, and we have apologized to them numerous times. 

Even indoors, it bothers us. They bark when just looking out the glass french door from the she shed, when they can see over to the neighbor's yard and bark their fool heads off ----  while they're inside the house and work themselves up into a frenzy!

We had tried a piece of privacy tarp strapped along our fence a while back. That didn't last long and eroded due to the UV rays. Actually, the dogs could kind of see through it because it was a screening type material and they still barked because they could still see.

So we decided it was time to put up a taller privacy fence. The cost is quite expensive and it really wasn't in our budget. A 24 foot span of white vinyl 6ft by 6ft wide panels would run us about $350 between the 4 panels and the 5 posts. Ouch! That's a little more than we could afford right now with all of our other projects going on. 

But, my Smart and Savvy Facebook Marketplace Watching Guy found someone selling 4 vinyl panels, 5 posts, for the mere price of $50!

All we need are the four panels between the corner of the house and straight back. It won't even be on our property line, just along the corner of the house leading back to the east, so they don't see anything to the south. The rest of the area can be our original open grid fencing because the dogs never bark at anything out back to the east or to the north. Just to the south.

(drawn with finger on my smart phone)

The pictures of the used fence looked good online, we made contact with the seller that if we went to pick them up, we would need to be socially distanced of course. Once we got there, we were dismayed to see that they were actually a very light pale tan beige color, and not white, as we thought. But the price was good and we figured let's just snap them up anyhow.

I googled, (Google is my friend), on how to prepare the surface of the PVC vinyl fencing panels for paint. It was suggested to use this Rust-Oleum product primer which is made for specifically for plastic items in preparation for paint.


We set up the fence panels and had adequate ventilation in the garage. The stuff is really really stinky! I rolled it on all of the surfaces and let them cure for two days.


Now it was time to roll on the paint. We used a good thick acrylic porch and floor enamel paint in white. Two coats and I think the panels are looking great.


I'm glad that we have the space in the garage to do the project like this with the panels in a horizontal position, set up on saw horses. It's much easier than trying to paint the fence when it's already installed vertically.


This morning, as I write this blog, Steve is already out there figuring out the placements of the posts and the leveling of the ground and where we need to fudge it a little, or to dig away, or where we need to beef it up. I am sure our neighbors are going to appreciate us putting up this little fence. It's nowhere near the property line and it's not trying to make the neighbors feel alienated or fenced away from us. It's merely to block the view of the two sassy little dogs and hopefully curtail their barking.

Things are getting more and more beautiful here as fall has arrived in Wisconsin. Just walking around our backyard and looking at the changing colors on the trees from the Nature Preserve behind us---  it is absolutely beautiful. The sun is going to be out today and I think the colors are going to get more and more vivid.


My tomatoes are almost at the end of the season. Just a few more green "hanger-oners", I might pull them off pretty soon and bring them inside to ripen in dark brown paper bags. 


We will soon need to rip these out of the way because we have another project coming and we will need access on this side of the house. More on that later in an upcoming blog.

In the meantime, 
please stay safe and healthy. 

We are doing our best 
but we aren't doing
as good as we thought. 

More on that later in an upcoming blog too----

Thursday, February 25, 2016

Foggy Window Repair at Suncoast Designers in Hudson, FL

We have heard so many good reports from RV folks who deal with Suncoast Designers in Hudson, FL.  Located just north of Tampa, FL.

Suncoast Designers
15050 Labor Place
Hudson, FL 34667
727-868-2773

Many RV's have double paned glass called "thermopane" windows.  With all of the twisting and stress that an RV chassis frame goes through, not to mention the speeding down the highways in our travels can sometimes make the thermopane leak.  This is called a "blown seal" and allows intrusion of air and moisture in between the glass layers that leads to fogging.  We have that on our passenger side window up front.  The faulty metal band between the layers of the glass has allowed the air to leak inside.

Also, some RV's have a different type of window construction with a black rubber seal around the edge that gets sucked inwards and leaves a black rubber "snake" between the layers of glass, called "snaking" ... our friends Mel and Paula have that on their motorhome.

Two weeks ago, Steve called Suncoast Designers and we made appointments for both of us to have our windows repaired.  They were assigning appointments two weeks in advance and told us to come on a Tuesday night for a Wednesday appointment.


They have room in their lot for about 20 motorhomes, 
and offer FREE 50 amp electric and water too... 
and even a dump station! 
(under the orange cone) 


We got settled into our spots for the night 


 Most of the sites have hookups, but the last few on the end are boondocking 
or overflow area if you are waiting for a spot.

(we did notice some folks staying a day longer after their windows were done, 
taking up sites that new arrivals could be occupying....argggh! )

They even offer free wifi! 
If you sit in the pretty gazebo, you get the best signal.  
Also a couple picnic tables are available to eat out, socialize or rest. 
 A doggy walk area across the parking lot makes our stay complete! 


Wednesday morning we woke up in the pre-dawn hours to our weather radio alerts of a tornado watch in the area!!!  We filled an "evac bag" of current medications, purse and wallet, laptop and cell phone etc.  That was setting by the door in case we had to leave fast and get to the big building. We kept our shoes on which we normally don't do in the motorhome. The dogs were both ready with harnesses and leashes trailing inside the motorhome.  We could grab them in a moment and run if we had to!

We kept the news on to watch the progress of the storm, and most of it went south of us and some to the north.  We only got a few drops and some light winds... very lucky!

We got a knock on the door at 6:40 a.m. with a form to fill out and get ready to have our window removed. We had a bit of mix-ups at the office on our reservations. By 6:45 a.m. they were removing our window!~  At least we were going to get our window done, so that was good!   We were invited back later at 1 pm to get a tour of the window repair process inside of the factory.

These guys were very courteous and friendly.
You can see how foggy the large pane in the passenger side window is. 


 We watched the careful window removal process, cutting the silicone around the frame
and removing the window without damaging the frame or surrounding area.


This is how thick the walls are on our coach.
This guy came over and cleaned up the outside area 
to make sure it would be a good surface to adhere the frame back onto.


Then he stuck up the plastic coated window covering that would be in place during the process.  Now we felt like "part of the crowd" with our green taped up window like the rest of the folks around us! LOL


Later that morning Paula and I snuck off to the quilt shop and a grocery stop. which I wrote about on my blog before this one.  Steve and Mel held down the fort.

By 1 pm we went to the building to take our tour.  We donned safety glasses and were lead to the back work area.
This is one huge place! 

 Kevin was our tour guide 
and took the time to explain each step of the process 
and answer our questions.


He told us that even though we were just doing the one large window pane on the top of our window, that they do ALL three pieces in the window frame.  That was good to know, because we were wondering if we had to pay an extra $225 for each smaller window pane in our window. Nope... we were happy to hear that!

He said each window is clearly labelled and tagged.  Then they remove the glass from the frames and seals.  Care is taken to not bend or kink the frames in any way with a spreading tool to get the glass out. Some folks are having ALL their windows done, so the frames are laid out according to job order on the open space.


None of these frames are our window....


The glass is taken away to a clean area where it is processed...
 pieces are rolled on these beds of wheels into machines that clean the glass


New seals are added to replace the original thickness of your particular window brand.
This is done in a very clean area to not allow any dirt particles to enter the seal.


Now each panel of sandwiched glass goes into this oven and baked
at around 400 degrees (I forgot the exact temp he said) 


Here is a finished panel of glass with the new seal in between
the layers...  ready to go back into a frame! 
(sorry, it's a bit blurry, I snapped the pic in a hurry before he set it down)


They have two of these ovens to work on glass panels, 
and I bet it gets REALLY hot back there. 
not a place I would want to work.....


Thank you, Kevin for the great tour! 

At the end, available in the office are cans of the really great window cleaner they use. Someone on our RV list told me to be sure to buy some.  It's only $5 a can here, and I found it online in the $8-12 range plus shipping.  So I thought I would give it a try. 


We bought one can, and it cleans great with no streaking! The glass and mirrors feel smooth after wiping them down, the rag just slides across the surface.  I am going to get some more before we leave, for sure. 


Okay.. now it's the next day..... 
It is noon and they have our window all done and completely installed!  

Here are the pics I snapped of the guys who came to our rig.  They came and prepped the outside surface well before adhering the window frame.  It came all pre-gooped up with black butyl caulk on the inside of the frame where it meets the outside wall. 


It fit snugly into place and they had to tap it a bit and lift it a bit to get it into the most centered position.  With one working outside and one working inside, they had it all set in a minute.  The guy inside started screwing in the bracket tight to the inside wall, while the other guy on the outside held the frame tight to the body.

They would make wordless motions to each other through the glass, and you could tell they have done this before!   The guy outside was also using a clear silicone caulk around the top edge, then down each side as the inner guy was tightening the screws... then he went all around the window frame, even on the bottom.  I was hoping he would!  So it is good and sealed on all four sides. Thank you!  Here is a pic of the caulk they used around the edges.  The window frame itself is sealed with black butyl caulk to the body of the coach.


Now it was "clean up time" with their good can of the Ardex window spray. 
They washed the window free of all handprints and smudges both inside and out.
Of course I had to teasingly ask if he does ALL the windows all around the coach as a courtesy???

I bet he hears that 20 times a day-----

That window cleaner is really nice , and we bought two more cans before leaving.
They even gave us a handy, dandy tote bag to bring it all home in.  Ahhhh! 


Next, it was time to water test it. 
 The guys brought over a hose and sprayed it down... 
while one sat inside to look for any leaks. 
We were good to go! 


 Well, not quite.

First, we had to PAY the bill!

It was exactly as quoted. 
We are very satisfied and the window has a ten year guarentee,
with a sliding scale of pro-rating for each year in use. 

Here is our invoice, (plus sales tax on the bottom cut off) 

It was time for us to head up to Mom's ... and other people were wanting our parking spot in the electric sites, so we had to get a move on. 

We got road-worthy and headed on out, after saying our goodbyes and see ya laters with them.  They are heading south to join with some friends at another park, and we are now heading north back to Mom's house. 

Got more projects to finish up for her! 

ON EDIT 2 WEEKS LATER


We are now heading home to Wisconsin.... and are really appreciating our view out of the newly redone passenger window.  It's clear and no longer streaked, fogged, or full of moisture (even in the horrible humidity and pouring rain we just went through)  Thanks Suncoast Designers!
