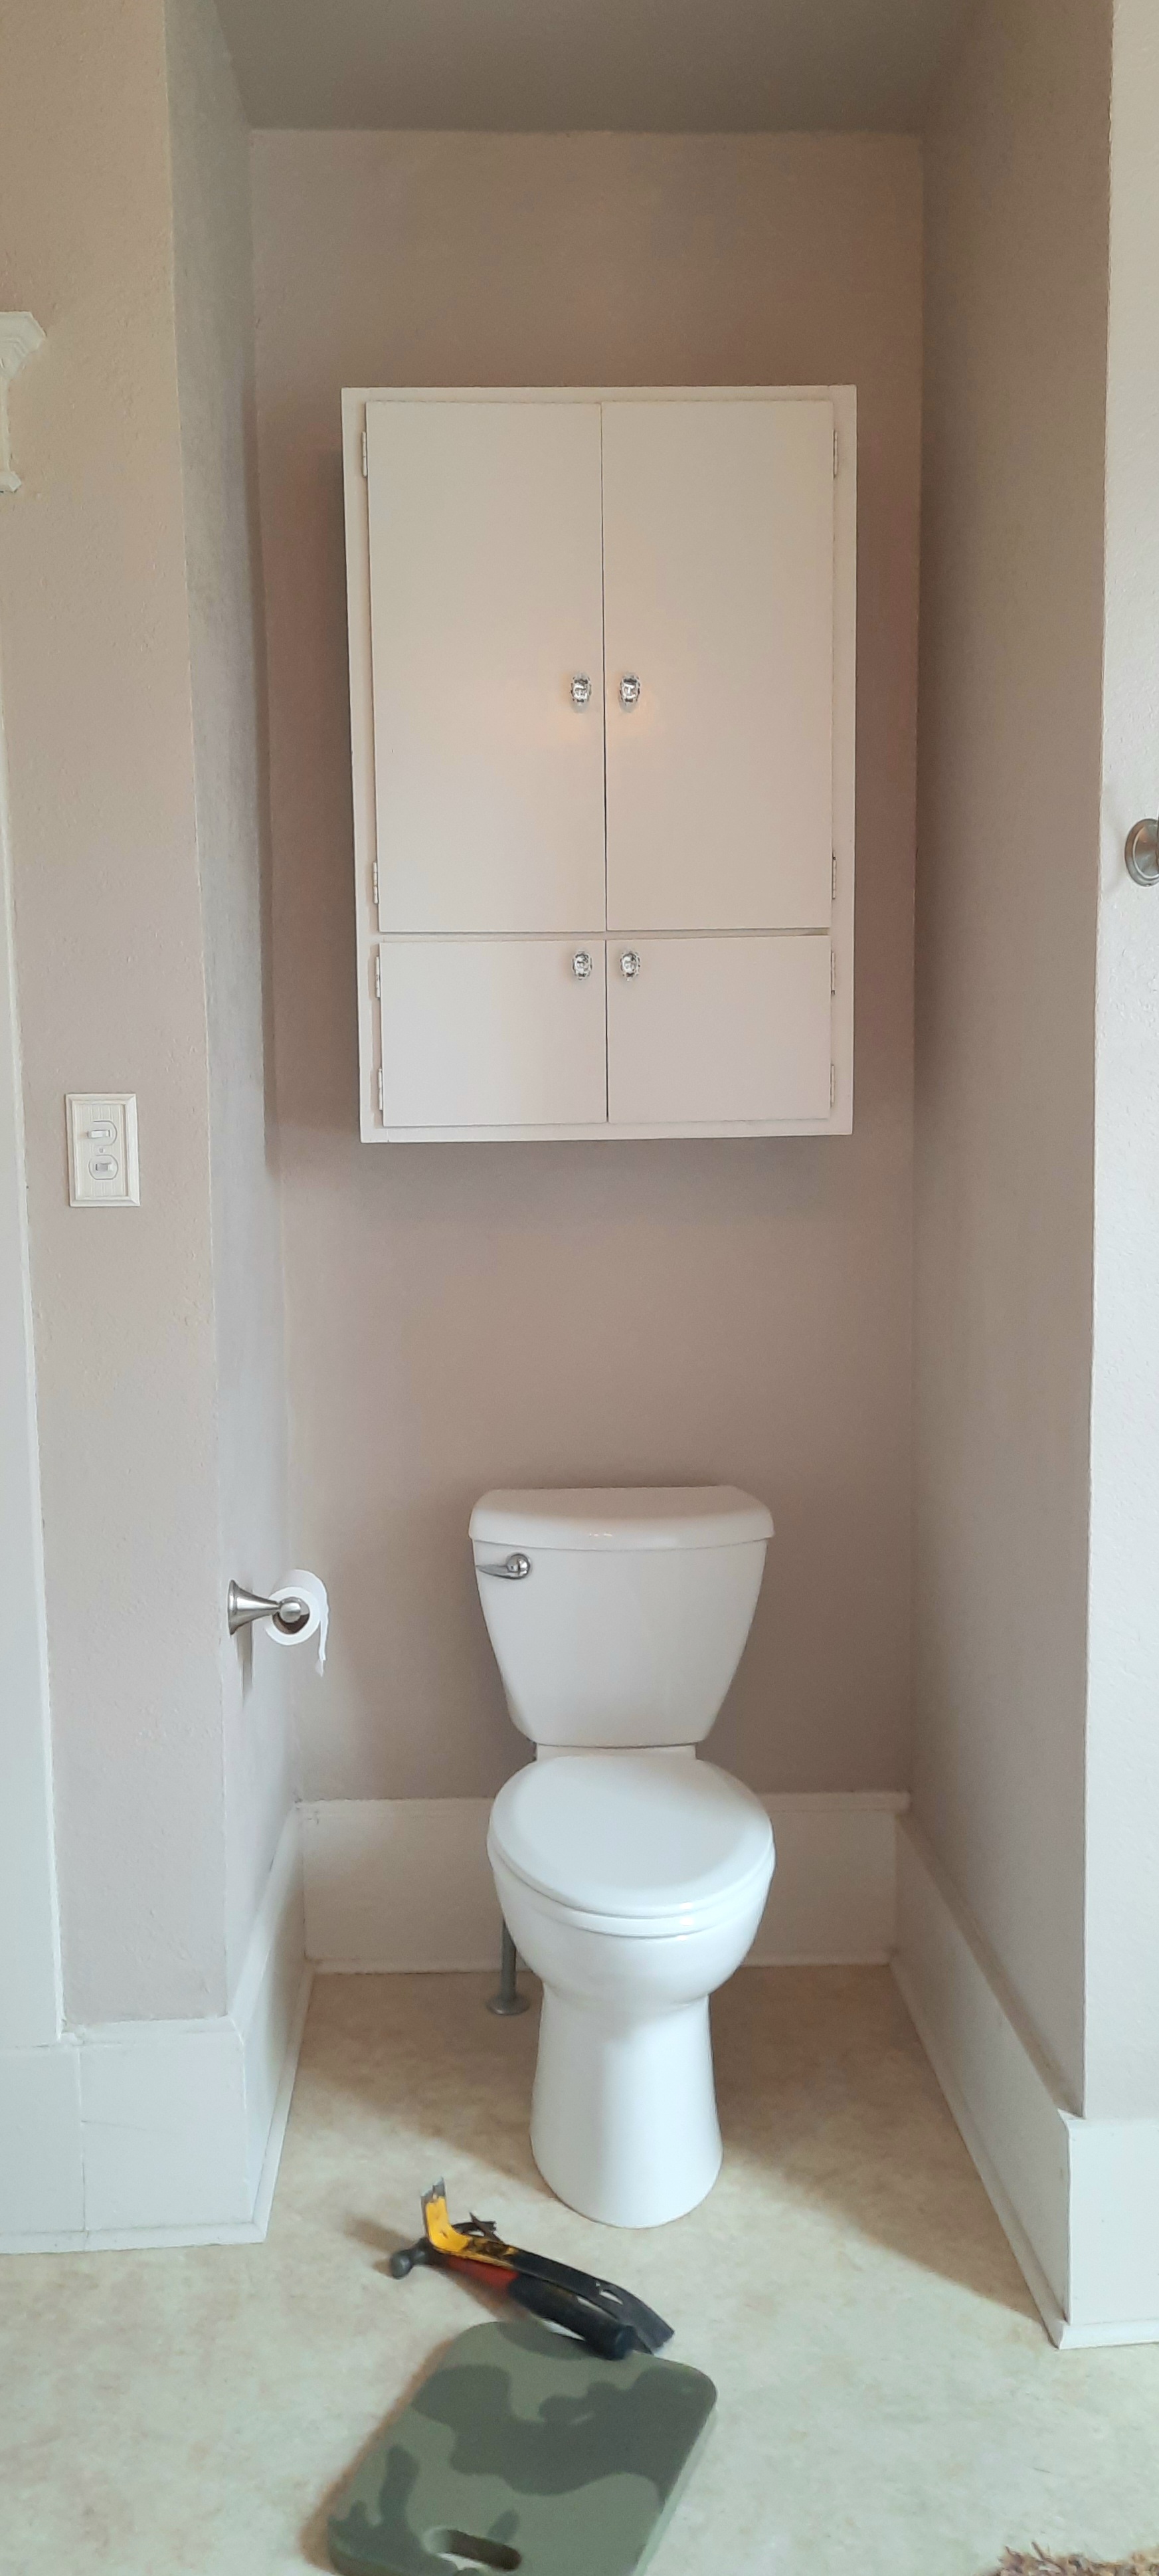
Now what is my guy doing bending over by the toilet? He's not sick!
He is actually removing some of the old quarter round trim around the toilet in preparation for the next project.
He decided that he looked at the pile of beadboard slats piled up out in the garage long enough. It was time to get them cut to size, brought in the house, and installed on the last two walls in our bathroom.
This little area around the toilet with the three walls and the two little edges around the corners needs to get completed with the beadboard.
The other wall underneath the window and the area around the sink still needed to be completed. That's one of the most complicated walls with the most technical cuts.
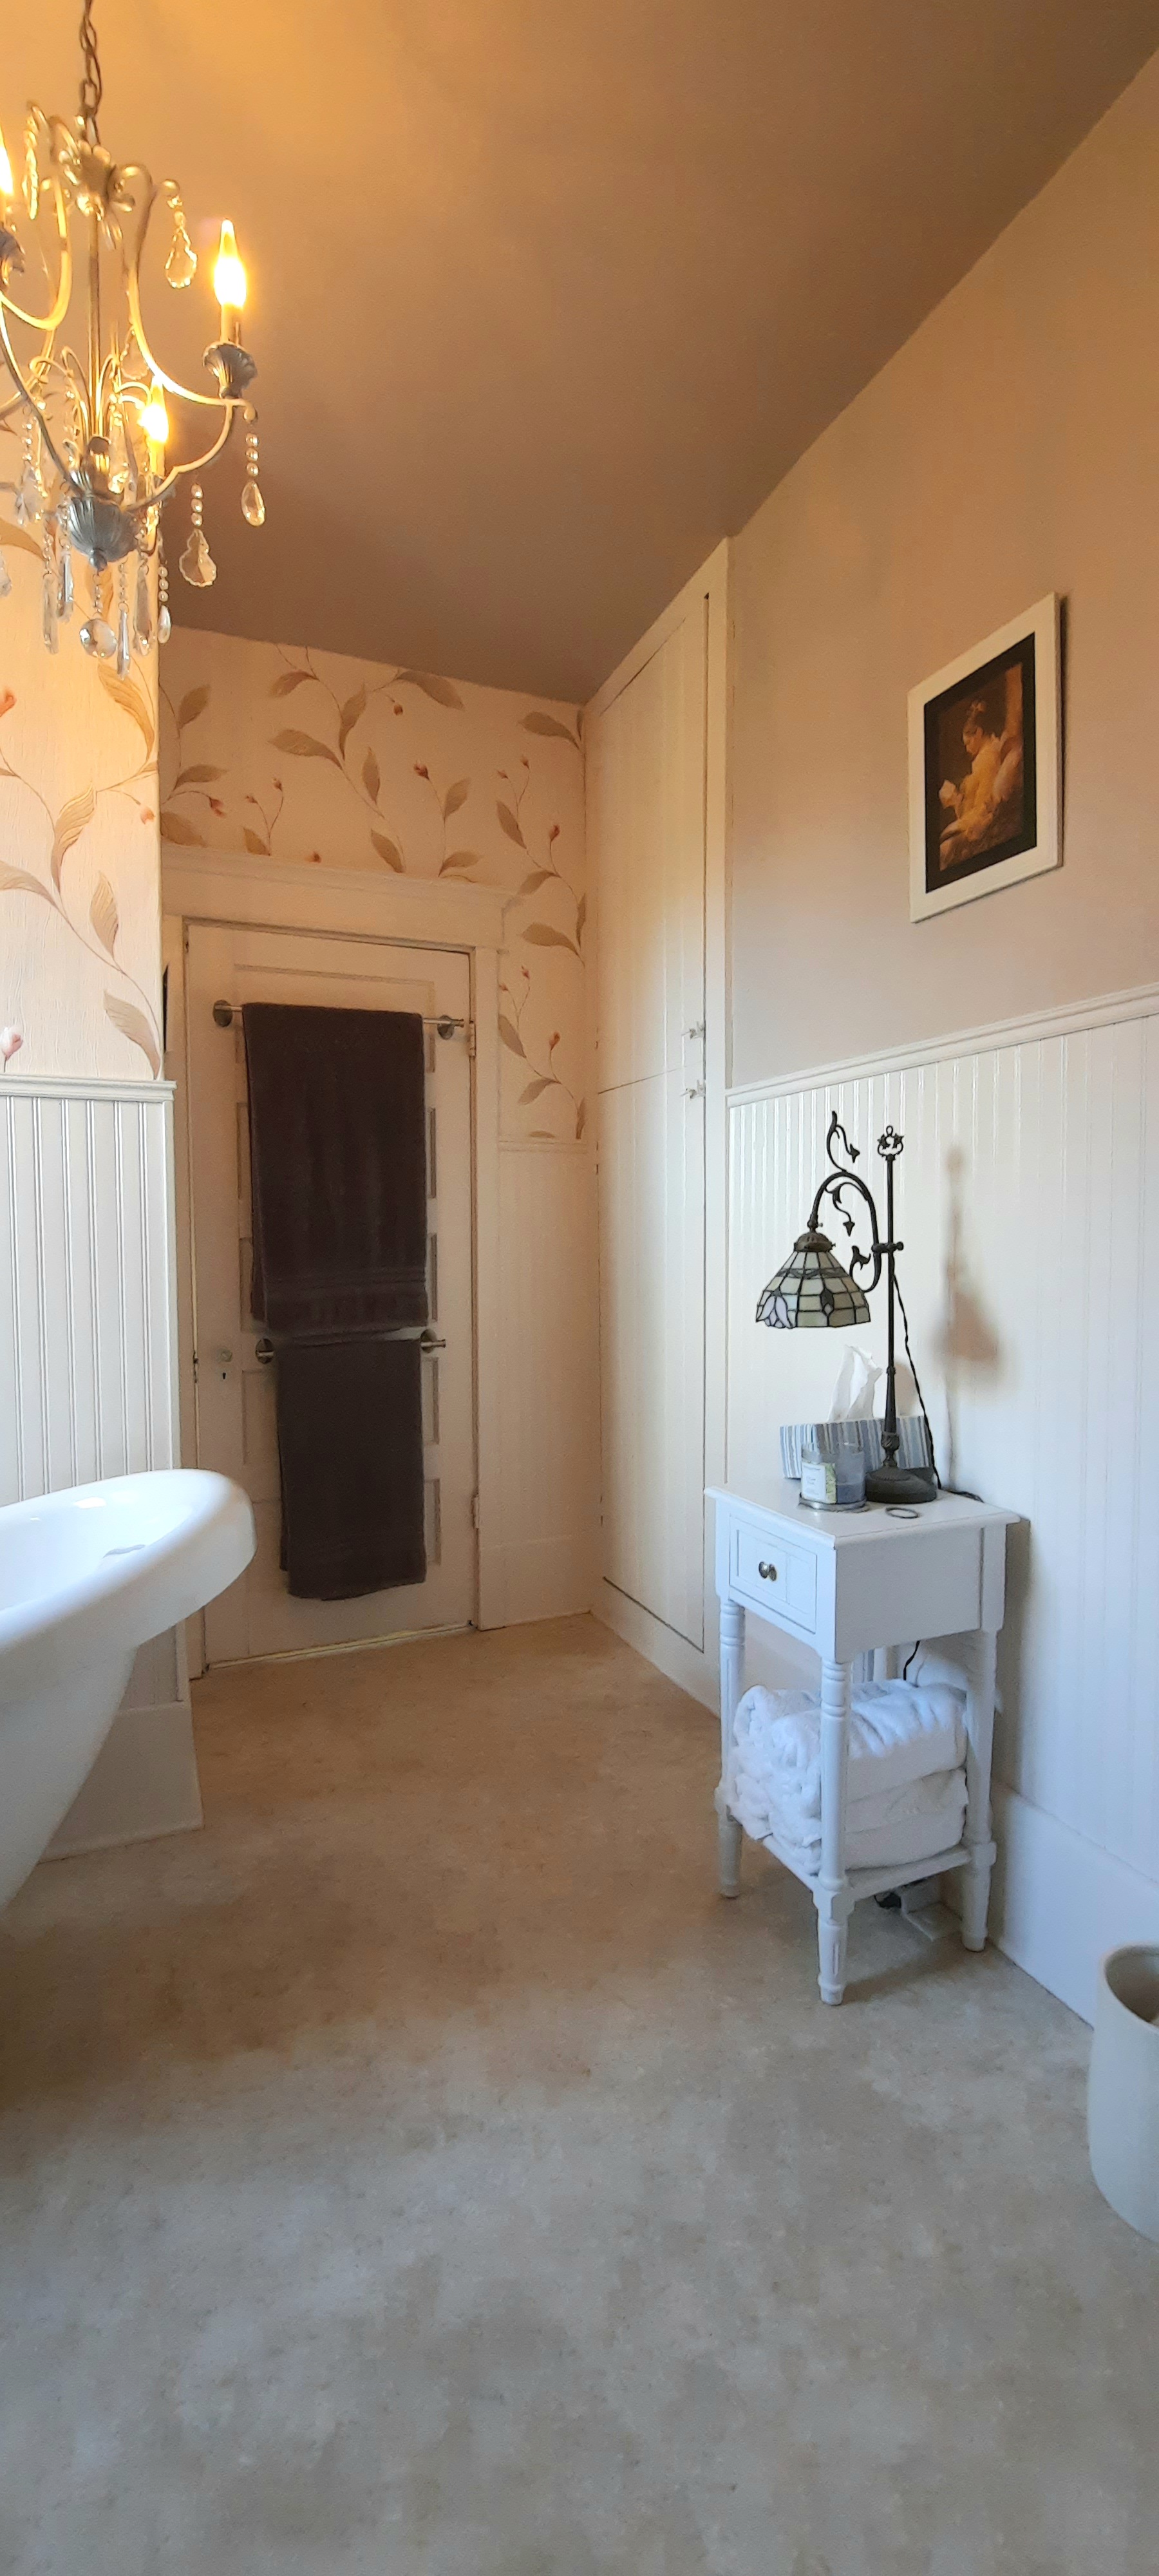
Last year we had completed the wall along side of the bathtub and around the corner to the master bedroom. We also completed the other wall near the linen closet and alongside of the end table with the stained glass lamp. Those were the two widest expanses that needed to be done. They were easy because it was one piece after another - boom boom boom - dune.
Steve started working on the odd cuts to get around the lip edges of the sill and then he fortunately was able to just loosen the brackets on the pedestal sink and work in the boards behind it. That was much better than having to dismantle the whole sink.
This wood is comprised of thin pine slats that have a tongue on one side and a groove on the other. The front portion has two sections of beadboard, about 3 1/2 in wide. Here is a profile end shot of a slat.
It can be applied with small finishing nails while making sure each tongue is snugly pushed into each groove. Steve has also opted to put a layer of special adhesive on the wall behind each slat to make sure that they are securely fastened. Otherwise they may be subject to warping and shrinkage over time. So we fasten them both ways to be extra secure.
On Saturday morning, it was time for me to get out my paintbrush and start getting the first coat on the beadboard. The temperature is here in Wisconsin have dipped way down, below normal, which is pretty much like the rest of the country it appears to be this week. Good to do some inside projects today.
We were babysitting one of the granddaughters, so I bravely wrapped her in a an old t-shirt and put her to work. She has helped me before and even though she's only 6 years old, she does a very good job.
She loves the little roller. It's just her size. It works out really well to have a tiny person assisting. She could easily fit between the bathtub and the window to work on the wall underneath.
I could also stick her underneath the sink to roll that portion of the beadboard. Because the baseboard is already the same color as well as the window trim, we really didn't have to worry about her bumping anything other than the shower or the sink. Those were easily wiped off of any "oopsies".
We also gave her the opportunity to learn about "Lefty Loosey and Righty Tighty". She was able to take off the two screws that held the heating register grid in place. They are never too young to learn.
One good coat of paint, and then it was time to clean up, curl up and take a little nap together.
After nap time, she was ready and raring to go to put her painting clothes back on and get back to doing a good job.
Soon we had two coats on everything on that wall... while Steve was working on the other area over by the toilet.
Fortunately, the toilet is almost 4 inches away from the back wall. It was good that we placed it far enough away when we changed the flooring. Now Steve had room to get in behind there with the boards without having to maneuver around a tightly fitting tank. Plus, I can get back in there with the roller to paint the beadboard once it's in place.
He was able to work into the tight corners with his battery powered finish nail gun. Sitting backwards on the closed toilet seat really made it easier to work in such close quarters. It looks funny, but it makes a good work surface to lean on when working on the back beadboards.
I was able to get the first coat of paint on this next part of the beadboards, and Steve started cutting the top cap trim wood. It has a little bead roping and also some egg and dart design like the original trim around the windows on our 100+ year old farmhouse.
That was enough for Saturday. It was time now to take it easy for the evening, pop some popcorn and watch a movie with the granddaughter. We got enough done for one day. So we popped our ibuprofen and went to bed early.
Sunday morning we were able to finish up the rest of the trim and I gave everything a quick second coat of paint. It really came out nice. We just have two little pieces of cap trim to put on each side of the mirror and two L-shaped corner pieces on the edges around the toilet space. We have to stop up at the Home Improvement store to pick up a couple pieces of the L-shaped trim. Then we are done!
I'm quite pleased to have this finished up. I was thinking it was a midwinter project. I'm glad that Steve decided to get it done now and get the wood out of the way from in the garage. He's been reorganizing out there and this wood has been setting in his way since last winter.
~~~~~~~~~~~
Here is my little Sullivan table craft table that I picked up at the thrift store last week for only $10! Works out very well also as an ironing surface.
I am prepping this quilt top to get ready to roll it onto my big frame. I lay down my big board ironing board across the entire length of the craft table. Now I am able to iron portions of the quilt without the rest of it rumpling up or landing on the floor.
What's great about a rectangular shaped ironing surface for a quilter is that you're not dealing with the funny angled nose edge of a traditionally shaped ironing board. Seeing as most quilts are straight lined shapes, it makes sense to get a larger surface for ironing on with a rectangle shape.
~~~~~~~~~~~
Growing up in Upper Peninsula of Michigan, some local foods are imbedded deep in my heart. In the tiny town of Caspian, Michigan, almost every kitchen had this iconic red lettered brown paper bag sitting near their breadbox or next to the coffee pot.
trenaryhomebakery.com
My daughter brought me a bag today as a gift, and babysitting thank you.
From their website:
Our original and most popular flavor of Trenary Toast - made in Trenary since 1928!
This crunchy snack is coated in our signature blend of cinnamon and sugar, and is ready to be dunked in your morning coffee, afternoon tea, or late night hot cocoa.
For over 90 years Trenary Home Bakery has specialized in the production of this Finnish Korppu - try it today and experience Michigan's favorite breakfast treat!


How great to have a "little" to help with the tight spots - she's the perfect size for that. These "lessons" will become dear memories for her one day. Linda
ReplyDeleteGorgeous bathroom. I was wondering what you were going to do this winter. It appears you have no plans to sit still.
ReplyDeleteI enjoyed seeing your sewing machines in the previous post. Makes me wish I had my 1914 New Home treadle machine running.
Your quilts are a wonder. Congrats on your artistic eye for color and pattern. It shows in both your quilts and weaving.