I am going to start off the new year with posting some of our motorhome modifications, a few at a time. I will post repairs, modifications, or neato things we have found for RVing. I have lots of pics in my files so I will do them in alphabetical order.
Underneath that stuff, I will post my regular daily stuff..... kinda sorta fun, eh?
MOTORHOME MODIFICATIONS
STARTING WITH THE LETTER E
Extend-A-Stay:
Our motorhome has a big 50 gal built in propane tank. It does not have smaller BBQ type tanks you can remove and haul off to be refilled. Soooo that means you have to pull up stakes and drive it somewhere to get the big tank filled (usually on a business day and searching to find bulk filling/home delivery places that will fill it for you)A few years ago, we discussed about putting on an Extend-A-Stay unit. This allows you to run all of your propane items from an extra external tank if need be. Then you do not have to move the motorhome to get more propane if you are settled in a campsite for long term. Steve wanted to set our rig up with one, even though I don't ever see us staying in one spot that long. Oh well... another toy for the boy. LOL
I saw a new one for sale on Ebay. It was going to end within the hour. The funny thing is that as I was bidding, but someone else was bidding against me. It kept creeping up a dollar at a time. It turned out to be STEVE!!! I was down in my studio on my laptop bidding... and he was up in the livingroom on his laptop bidding!!! LOL LOL ... we paid a few dollars more, but still got a good deal. We got it for only $17.00 plus shipping. They run in the $50-60 range.
It was pretty easy to install, and Steve had it done in no time flat with the easy instructions. I didn't even have time to get out there with the camera to take the pics! Be sure to use piping tape around the threads that is rated for propane. Now not only can we use it to extend a stay as the name implies, but it also has port that we could run an external item like a grill or lantern off it with an extension hose.


Electric Timer on Water Heater:
Did this ever happen to you???
In the dark of the night:
"Honey?"
"Hmmmmmm?"
"Did you turn off the water heater after your shower?"
"uh oh.. don't think so....."
(crawling out of bed to walk back up to the kitchen area of our motorhome and fumble in the dark to turn off the propane water heater and then back to bed again)
And so it goes!
We usually DO turn the switch off after using the propane water heater in our motorhome. But sometimes we forget. "Why turn it off?", you ask? Because in a motorhome, it doesn't make sense to keep it going 24/7 and waste propane. People living in a stix-n-brix house don't think about having to refill a propane tank, as they usually have piped in natural gas and pay the bill at the end of the month or a big bulk tank in the yard that gets filled a couple times a year.
Why waste propane by heating water all night long, when it only takes 10 minutes in the morning to get a hot tank for a shower if you just turn it on prior to using it? Why waste propane by heating water all day long if you are only going to do dishes after supper at 6 or 7 pm?
We do find that we sometimes forget to turn it off; only to remember it once we are snuggled into bed at night. That means whoever left it on, has to get outta bed and turn it off! LOL
Guess who usually forgets???
it's not ME
(before)

First Steveio pulled out the water heater switch to locate the wires and be sure he wasn't going to drill into anything important. LOL He pre-drilled four pilot holes to the measurements of the back of the timer device.

Next he used a small jig saw and carefully cut away the wood (not a very clean cut, but it will be hidden by the face plate)

He made all the proper connections, and put dialectic grease on all contacts, and then wire nutted each one securely to hold tight, even with all the jiggles and bumps in a house moving down the road at 60 mph. He put the switches back into place, and added the face plate. Although it's kinda ugly silver, it works and that is what he wanted. We tested it out and it works great! We know that 9-10 minutes fully heats up our 10 gallon water tank, and we can set it for that and let it run.

Now we never have to worry about turning it off anymore!
Electric Timer on Inverter:
We put a timer switch like this on our inverter too. That way I can play the TV for an hour or so at night before falling asleep and not have to get back up out of bed to turn the inverter off for overnight. Of course I can set the sleep timer on the tv, but that doesn't turn off the inverter. We don't waste precious battery power by leaving the inverter on overnight, as it takes a draw all by itself.

(for the non-RVers reading my blog: an inverter changes DC power to AC power....
so the 12 DC power from our solar panels and battery bank is inverted
over to 120V AC power to run household type appliances and lights.
The more battery power we accidently drain and waste,
the more we have to re-charge again the next day)
so the 12 DC power from our solar panels and battery bank is inverted
over to 120V AC power to run household type appliances and lights.
The more battery power we accidently drain and waste,
the more we have to re-charge again the next day)
Sometimes we use this small inverter to run little things instead of firing up the big one. Or if we are in the car and I want to use something 120v AC like my curling iron!


~~~~~~~~
The huge storm heading to Chicago/Detroit area today is going to miss us. We are a bit further north than that. Instead we have soft fluffy flakes coming down this morning, with only a few inches expected. It sure looks pretty!

Last night for supper, I made some
Chicken Alfredo Lasagna.....

I pre-cook boneless skinless chicken breasts, usually 6 or 8 at a time in my electric pressure cooker. Then I shred it up into quart zip lock freezer bags. Perfect to have on hand for meals like this, or chicken salad, or toss into soups etc. So I pulled out a bag and let it thaw while I gathered the other ingredients.

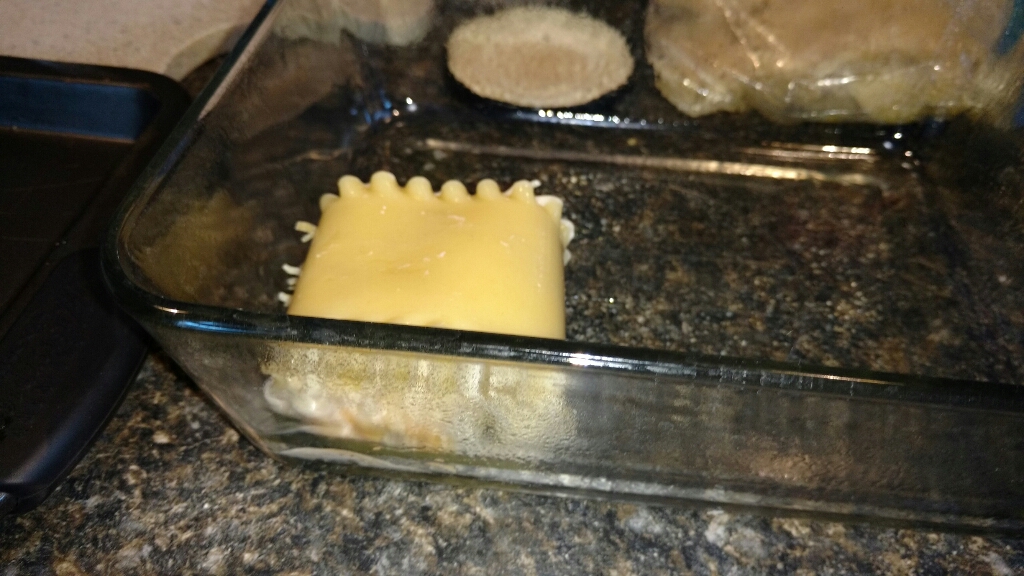
I simmered 6 lasagna noodles in a flat plan
so they could cook without getting
all bent and curled up.
I only cook them to about halfway,
so they don't rip or tear when handled.

While the noodles were cooling in ice water in the sink,
I will explain the next part.
A number of years ago, I happened to flick channels (I hate cooking shows) to Cooking With Amy of local Fox 11. She showed how to fill lasagna noodles while laying flat and roll them up to set in the pan! Never saw that before. Well, she did it on a flat tray. I have done it her way a number of times, but sometimes the filling falls out the side during the rolling. I had a brain storm and started using a draw-divider organizing container to do my roll-ups!
Lay down a half cooked noodle in the container

Dollop on three gobs of canned alfredo sauce
(or make your own)
then sprinkle some shredded chicken,
shredded mozzarella cheese and a shake of parmesan cheese

Roll it up, kinda lifting and helping it along
to keep the filling inside the noodle edges

Transfer it carefully to a baking dish,
which has been sprayed with non stick cooking spray.
On Amy's show, she set them upright like a coil,
with the rippled edges facing up and down on the bottom.
I decided to change them flat like the recipe above also says.
Here are three rolls done!
This is a smaller Anchor Hocking pan,
only 8x10 so they are not as huge as it looks in the pic.

The pan holds six rolled up noodles

Now cover up the rolls with the rest of the jar of sauce,
then more mozzarella cheese

This next one is a trick from buying Stouffer's Vegetable Lasagna...
(they put bread crumbs on top of the cheese for more flavor and color)

I add some Italian Seasoning, some Garlic Powder and
Parmesan Cheese to top it off.

I cover it up with tin foil and set the glass pan on an extra cookie tray.
That prevents spillovers in the oven,
and it's also easier to reach in and pull it out by the tray
instead of reaching with hot pads on the
sloped sides of the very hot casserole dish.

I bake it covered for about 30 minutes at 350,
then about 10-15 more uncovered.
During the last ten minutes, I toss in a couple unbaked garlic knot rolls. We get them from the bakery department in Walmart, and they are made to bake the whole bag at a time. I only bake 2 at a time and freeze the rest. They are almost like the Italian cornetti bread of my childhood.

VOILA!
Dinner is done, along with a salad.
This dish is so easy to serve up a roll at a time,
No need to let it "settle" like traditional pan lasagna.

Of course, you can also do this recipe with normal tomato and meat sauce and roll the noodles up as well. What I like about this method of rolling, is that it makes serving sizes easier to plan, one noodle at a time as a serving. Leftovers freeze well when put into small containers in the freezer. Just reheat and eat for a quick lunch.
Steve is gone now for his handicapped job of the Old Fart Party Bus. I am going to get back up to the sewing room and find out why my sewing machine is skipping stitches all of a sudden. I changed the needle, cleaned out the lint around the bobbin and rethreaded the machine. If that doesn't do it, I will take a sledgehammer to it next!


No comments:
Post a Comment
Thanks for taking the time to comment on my blog! I moderate all comments so it may take a little while for your comment to appear.