It's a little USB device that hangs off the laptop that has a GPS signal receiver on the end of it.
After our last trip, I realized I was severely lacking in my GPS navigation abilities by just using the Google Maps on the phone and the Rand McNally RV GPS unit on the dash. I was really really missing my Microsoft Streets and Trips on my laptop!
It has a dongle which is a cord that plugs into the USB slot and at the end of the cord is a little Microsoft GPS device that pulls in the signals from the satellites as you are in motion driving down the road.
With the big screen on the laptop, it's so much easier to use, to plan ahead, and look things up. It leaves a track or a "mouse trail" of where you've been and it allows you to put push points at various spots on the map. Each of the push points can have a label attached to it with three or four lines of information or internet links or even just numbers. And then they get closed down so you don't see all the information unless you click on it.
By downloading POI's, (points of interest), I can have access to all different types of categories of campgrounds, gas stations that carry diesel, Walmart's, Cracker barrels etc. They are all loaded into my maps so they pop up when the GPS car symbol gets near to them.
Best of all, it does NOT need an internet signal to operate!!!! Just a clear line of sight to the sky to reach the satellites.
But.... if I tether my laptop to our cell phones' hotspot, I can even look things up while we go along down the road. It is such an easy way to navigate and I'm used to it. It doesn't pay to teach this Old Dog any more new tricks if I can still keep using this. I know Microsoft has discontinued supporting it, but it still lets me update the maps via satellite and I just uploaded brand new points of interest so everything is current.
Now back to our newest modification---- the laptop stand itself:
The only problem is, in our last motorhome I had a wonderful roll out desk that the laptop could sit on and stow away when not needed. It just rolled into the dash and latched into place. It was perfect to bring along the laptop for navigation.
Not so on this new-to-us Winnebago View. But after looking and configuring and thinking and researching... Steve and I together came up with this bright idea!
For $39.95 and free shipping from Amazon, we got this wonderful heavy duty metal strong laptop stand.
It actually comes with two arms, a second one to put a monitor screen on. That 2nd arm is identical to the 1st arm for the laptop, other than the tray. That's great because now we have a second arm in case something ever happens to the first. LOL So that extra one will get stowed away in the "Things We Never Will Use, But Keep Just In Case" closet!
We figured out that there was a spot on the frame underneath the passenger seat that we could securely bolt it onto. We chose the model with the tallest post for leg clearance - 17 inches tall. Plus where it bolts onto the seat frame, it is also now part of the swiveling mechanism. When we swivel the seat around to face the rear it can also be used as a computer workstation when we are parked.
Even though it was miserable and hot outside yesterday up into the mid-90s, Steve wanted to try and get this mounted early in the morning before it got too hot. The windshield is covered with our sunscreen shade panel from the outside, so that's why it looks dark.
l1
From the inside, there is plenty of room to swivel it out of the way or up towards the dash and to still get into the seat. The bar on the right side does prevent me from getting in and out of the passenger door easily. But I find that I usually get up from the passenger seat and exit in between the cockpit seats. I either grab my purse or get the dog leash anytime I'm ready to exit the vehicle anyhow. I go out the actual side camper door by the kitchen cabinets rather than the passenger door. In our last motorhome, we always had to use the side door, because we never had drivers or passenger seat doors. That is what we are used to.
There is still plenty of leg room and knee room and space for the airbag from underneath. The seat can retract back all the way and come forward easily up as far as the bracket arm.
It can be swiveled around to face the rear if we ever want to use it as a computer workstation when we are parked. Now I can face into the living room and kitchen of the motorhome if I want. The entire mechanism swivels with the seat base.
There's even room to set my little ottoman in front of the seat when it's swiveled. We use these ottomans for shoe storage. They double up as extra seating or footrests if we are sitting in the swiveled cockpit seats.
The laptop tray swings away to get in and out of the seat easily. All of the joints seem to be well made and strong, and there are three points of articulation to adjust it to whatever position works the best.
To secure the laptop down to the tray so it doesn't bounce off while driving, I have two of these wide strips of Velcro that go completely around the tray and the laptop. The lid can still close with the velcro in place. There are little clips on the arm for cord management to keep the tangles out of the way.
They think of everything! The three different size Allen hex wrenches that are needed to tighten or loosen any of the joints or connections are stored right on the upright arm bracket in this cute little nifty holder!
Here is the GPS device from Microsoft
that attaches to my laptop
via a USB dongle cord.
There is a little tilt plastic base piece that I use to aim it up through the front windshield. The cord will be bound up better later and attached to the cord keeping clips on the laptop arm once I get it all settled into place.
Steve felt it might be a little wobbly when we're driving down the road, due to vibration. When it's parked it seems to be just perfect when I type on it. But Steve had this extra metal arm from when we had installed our recliner chairs. It was already painted with a nice black finish matching the seat mechanism.
He bolted it up into place with some self-tapping screws just to see how it would work. He's going to grind off the sharp edges and instead add wing nuts to be able to easily remove it if we need to.
Here's an example of one of our GPS maps from Microsoft Street and Trips. This is a trip that we took around Lake Superior. At any time I can go back and open up one of these maps because they are all saved by date and place in my files. I can see where we've been or double check where a certain campground is. Sometimes when we are talking with people we like to relay different places we've been and what the best site was. If we go that way again we can look ahead and see which site was better and if we make reservations, we know what is what.
The 17-inch monitor on my laptop is a big display that lets us zoom in or zoom out and see exactly where we are. It gives us speed and elevation as well as distances and directions. It will show us upcoming things like gas stations and campgrounds. This is an older photo with my old laptop that had a glossy screen. My current laptop has the matte screen which reduces the glare.
Even though we didn't have it along for our last trip, I was able to go in and create a new map of our entire route. I was able to make notations and mark each stop. Now I have this one in the files even though the laptop wasn't actually with us for the trip.
~~~~~~~~~~
Okay, enough about laptops.
In my last blog I showed where the grandchildren had made tie-dyed shirts. I had a solid white sweatshirt and managed to grab one blue bottle of dye from the grandkids the other day. I decided to try and do some up and down stripes. It came out kind of cool, don't you think?
My tomatoes are appearing by leaps and bounds on the vines. I have so many and I keep canning up a few jars at a time. We are eating the littlest Juliette grape tomatoes like candy. Put them out in a dish on the counter and grab a couple each time we walk by. Healthy snack!
It was the first day of school for the grandkids on Tuesday. They were all excited to get back to school and see their friends again after a long summer.
Here are Chelsea Clayton and Claire getting ready for 8th grade, 6th grade and 1st grade.
Here are Jameson and Whitney all ready to go!. Jameson is now a sophomore! Where did time go? And Whitney is in third grade.
On the school website, someone had taken a photo of little cousins Whitney and Claire, who found each other on the playground. They're so cute holding hands along with their neighbor Elias.
Thinking back in my own memories of those first days of school.
Well, we've been home exactly one week from our big Canada and New England vacation.
We got in a visit with Steve's dad at hospice and also Steve got his hair cut after cancelling his appointment while we were on the road. We are getting settled back in and doing all the things that we've wanted to catch up around the house. Our neighbors kept very good care of our house and took care of lawn cutting and harvesting tomatoes. The grandkids came over and watered flowers and plants. We had plenty of rain so the rain barrels took care of all of our needs without having to turn on city water in the house.
Like I said in my last blog, we turn off the water at the main valve while we are gone. Our daughter once had a mishap with a bad fitting on a dishwasher that flooded their entire first floor and almost ruined all of their hardwood! It's a vintage schoolhouse so the insurance company opted to pull up all the original hardwood floors, have it all re-kiln dried, and laid them all back down again. Then they were all sanded and stained and polyurethane sealed. The insurance company said it was cheaper to do that than to actually put down new flooring! Can you imagine? So after that experience, we always make sure we turn off our water when we leave for any length of time. We have vintage hardwood floors that I would hate to see damaged.
~~~~~~~~
We learned a few things on our trip. Especially after using our new to us Winnebago View for an extended period. We love the ease and maneuverability of it. We love how everything has a place, and we have already taken out some things we are not using. We love the features and the storage and everything works quite well.
But.... I have never really cared for convection ovens. So much so, that in our last motor home we actually removed two of the lower cabinet drawers and installed a larger RV stove with a propane oven. That made me very happy.
In this motorhome, we could do that, but it's going to sacrifice a lot of our very valuable drawer space.
During our trip, one morning I baked muffins in the convection oven. It's so high up over my head it's not even at eye level for me. It's pretty dangerous for me to pull things out of the oven while reaching up over this little flimsy rotating rack that you need to use when you're in convection mode. I actually burned my knuckle a little bit, dropped the whole pan of muffins upside down onto the counter below, which broke into a million pieces and made a huge mess!
The other disadvantage of the convection oven is that you need to have a power source to make it operate. So unless we are camped somewhere with a power hookup to electricity in a campground, the only other way it can be used is if we are running the generator. I don't think anybody wants to hear us fire up a generator at 7:00 in the morning in the rustic wooded campground to bake muffins? This was one of our main reasons why we had converted the stove and oven in our last motorhome.
So Steve and I decided that to bake regular items or prepare baked dinner meals when we are traveling, we would like a propane oven. We just had to figure out what we were going to do.
Many many years ago I had a little portable Coleman propane oven. It was called the Coleman Instastart oven. I called it my Easy Bake Oven. It was so cute and we used it an awful lot. We sold it long ago when we upgraded to the inside stove/oven combo. Wish we never sold it.... We went online and saw that they are not made anymore. We thought maybe we could search for a used one on eBay. We started reading some reviews, and instead came up with an idea.
This Camp Chef stove and oven is highly recommended by a lot of people on the RVing lists. Even people with van conversions or little pod trailers with outdoor kitchens. We started reading the reviews and they were really good.
We looked online and they run in the $200 to $250 range. Ouch!!
We watched some YouTube videos about it, and read more reviews. Then we saw someone had them on sale at Costco for about $150. None of the local Costco's in our area had them, nor do we even have a Costco membership.
Back to the drawing board.
So then Steve searched on Facebook Marketplace. Here was a lady within 25 miles of our house, who sells new-in-the-box packaged merchandise that she buys by the pallet full from somewhere. She has a rented warehouse and regular hours every week to come in and buy items. And sure enough, she had one of these Camp Chef stoves new in the box for only $90!
We contacted her and told her to hold it until we could get there. She agreed and we got there before she closed at 4:00 p.m. The box did have a puncture hole which is why it was probably sold on a pallet auction. But it was still sealed from the factory and unopened. She let us open it up and everything was intact and complete. There was one tiny little ding on the lower edge of the oven. Cosmetic only and didn't bother the function. Steve looked closer and figured he could even pop it right back out. Sold!
We brought it home and put it all together. Yes, Steve was later able to take the ding out of the bottom edge just like he figured. You just got to love that guy hey?
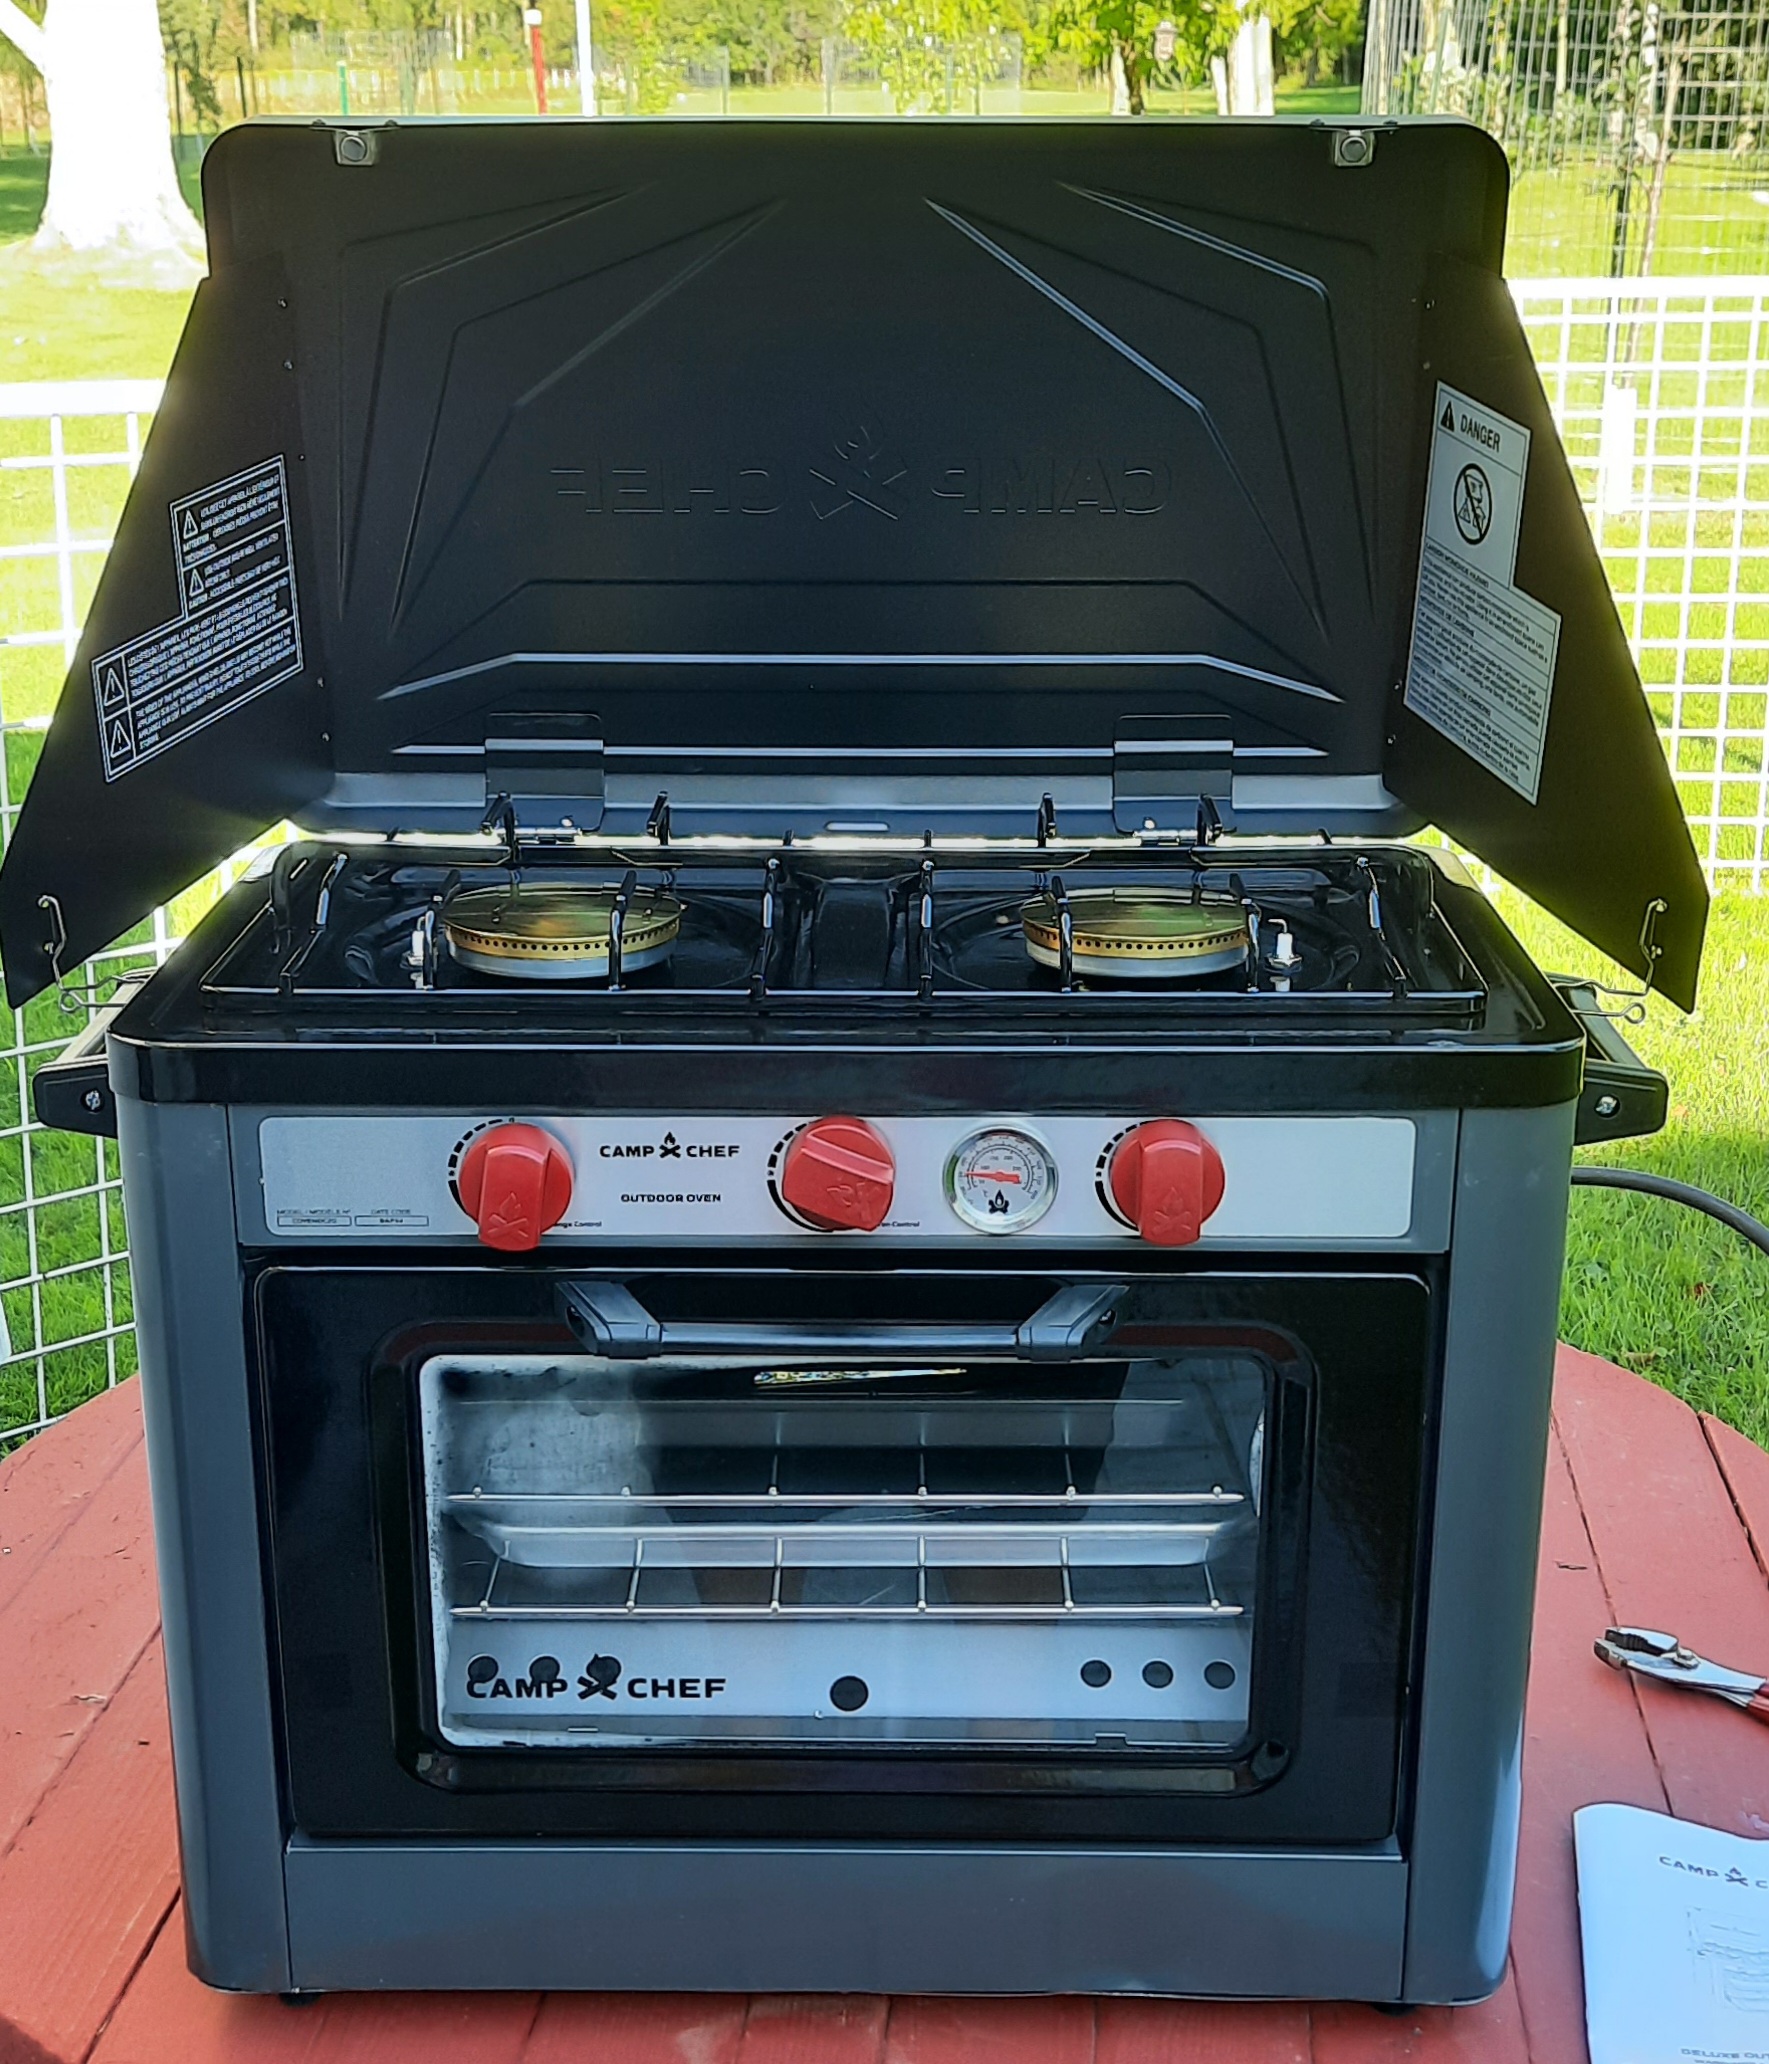
On top are two 8,000 BTU burners that we can cook outside or perk coffee or even pop popcorn if we want. This will be nice if it's too hot to cook inside of the camper, we could be out here making breakfast on the stove top and make toast inside the oven portion. The lid lifts up with side wings for a windscreen, and folds down for storage. It has piezo ignition, no matches needed. It can run off the 1 pound green cylinders or our 5 pound or a 20 pound grill tank via a hose.
The oven itself is very generous. The inside measurements are 15 in wide by 11 in deep. It can hold a 9x11 pan easily with space all the way around. It comes with two baking racks and three different positions. It came with one of these nice baking pans but I had another one from Tfal that I added to the repertoire. Also my larger muffin pans from the house will fit in here, which are better than the small ones that I used to try to use in the convection oven.
I added a 9" pizza stone from Meijer store to the bottom burner cover (not in this pic) which helps even out the heat distribution when baking. Long time RV oven baking trick!
We started it up and burned off any new manufacturing smells. We also put in a small oven thermometer because the one that is built in is sometimes inaccurate. So now we can tell what the actual temperature is inside the oven and adjust accordingly.
The overall size of the unit is 25 in long by 15 in deep by 18 inches high. If fits absolutely perfectly in the bottom of our closet underneath our clothes, so it has a nice secure spot to ride along with us.
~~~~~~~
Speaking of cooking and baking, during our search for YouTubes on this particular propane oven, we found this other YouTube on baking cinnamon rolls. It's just a random You Tube, not specifically for this oven. They can be baked in any oven. He shows how to take a tube of refrigerator cinnamon rolls and doctor them up before baking into the most amazing tasting cinnamon rolls! You'll have to watch the video to find out what the guy does. But we did it this morning and they are absolutely delicious. Steve said that we are never going to do them the old original way again.
~~~~~~~~
Before we left on vacation, we had promised all of the grandchildren that we would come back in time before school starts to take them miniature golfing. And that is just what we did! We are missing Clayton, because he decided to spend the week at his other grandfather's house. But we will take him another time all by himself. So we had four of them to take for a day of adventure.
Here is a little YouTube that I shot of the fun we had over at the mini golf here in Oconto, some are slide show shots and some video segments interspersed as well.
We also decided to tie dye t-shirts
like we did last year
right before school started
They needed to lay the pre-washed t-shirt flat on the floor. Then take a dinner fork and stick it in the middle and rotate. It helps to have a second set of hands to help group it together and keep it level. It gets rolled up, just like a cinnamon roll!
Once it's rolled up into a flat spiral, then rubber bands are stretched around it at various intervals to hold it tight and to create marks where the dye will not absorb as easily.
The kids put on old t-shirts as smocks and we covered our plastic tables for the project. The kids put on rubber gloves to protect themselves. I had picked up a tie dye kit and Chelsea had one to bring over too. They've done this already, so they knew what to do again!
Even 15-year-old Jameson got into the act and he really worked hard to customize his black and red and white dyed shirt. He said those are his favorite colors.
Here are the bundled up t-shirts in their rubber banded cinnamon roll configuration. Whitney and Claire did every color under the sun. Chelsea chose to do blue green and yellow. And Jameson's of course was black and red. I did a white sweatshirt in only blue.
We let the dye soak in while we were gone miniature golfing... It sure was a lot of fun. Grandpa is the one that knocked his ball into the water hazard three times! The kids thought it was hilarious having to scoop it out with the little dipper nets for him.
They really had a lot of fun playing all 18 holes. Claire developed a method that she called "Drag and Drop". She would just corral the ball in the curved edge of her putter and drag it right the hole and let it drop in. That's okay, whatever works.
Jameson and Grandpa both tied scores of 60 from 18 holes. They had a lot of fun and it was worth the ride in the convertible as a reward on the way back home. Chelsea and I drove separately in the Saturn. There just weren't enough seats for all six of us in that little convertible.
We came back home to a pizza party! We cooked up some nice big pizzas and the kids got to eat as much as they wanted with beverages of their choice. Sometimes you just got to spoil them!
Now back to our tie-dye T-shirt progress.... We carefully snipped all the rubber bands to see the creations that they made. What beautiful designs!
The shirts still need to "rest" like this for about 6 to 8 hours before I rinse them and wash them and dry them. So after I finished them by next day, I delivered them to the kids to wear in time for the weekend.
Kids were having fun playing at Grandma and Grandpa's house. Did you know we happen to have two doctors in the family? They even have office hours at their hospital when they are open and closed. That's good to know.
~~~~~~~~~~~
Another thing I had to catch up on since we got home are my tomatoes. They are producing by leaps and bounds from just four regular plants and one Juliet grape tomato plant. We brought some to Steve's dad to snack on. He loves tomatoes.
I picked a big basket full and judged it was probably another four quart jars worth. I like to do all of my processing in my big kitchen sink and tried to keep the mess all in one spot.
I really miss my Mom when I do canning. Coming from a big family with a large garden, we always had to pitch in and help with the canning during August and September. We had an abundance of vegetables, plus apples for making sauce... then my parents would do two huge crocks of sauerkraut. The stinky crocks would be percolating for a month before it was ready to get canned up.
Mom and I would carry all of the jars down to the basement. There we lined up rows and rows, shelf after shelf. Literally hundreds of jars. We depended on it all winter long. When we would put the last jar in the shelf, my Mom would stand back with her hands on her hips and say "My oh my, are we ever rich!".
I sure miss her.
With her in mind, I took care of slurping my skins off my tomatoes and processing my jars with a smile on my face --- as I thought of how many years I stood by her side, doing the very same thing.
Soon I had four jars done and in and out of the canning kettle. PING PING PING which is music to a canner's ears. I have been doing a few jars every few days to keep up with the plants.
~~~~~~~~~
Oh, one more thing we learned when we were traveling is that I really really miss my Microsoft Streets and Trips Program on the laptop along with the GPS dongle. Although Microsoft no longer supports it, it still allows me to do map updates and the program still works on my older laptop. So for our next trip I am taking it along. Now, in our last motorhome I had a nice pull-out laptop desk built in to the front dash on the passenger side. Not so on this Winnebago View.
But we started researching what other people have done to take along a laptop or even a tablet that is accessible from up in the front seat. We found that there is already a very firm frame underneath the passenger seat and already has an accessible hole on one corner that will be perfect for mounting in this articulating arm.. I can swivel it around and it has three different articulation points plus a tilt to get it and a comfortable position in front of me in the passenger seat. It can swing out of the way when not needed and it can even flip up flat if we want it totally out of the way. The laptop can be secured with velcro straps right to the laptop tray. We think this might be the answer to being able to have the Streets and Trips functioning when we travel.
The little GPS on my phone from Google Maps or the one built into the motorhome dash from Rand McNally just do not let you zoom in and out easily to get big pictures of what you're looking for or where you're headed. Also, you have to go to alternate screens or search boxes to find points of interest or gas stations or campgrounds. I don't find them very "user friendly" and it can make my whole route vanish with one backward touch. Ugh!
On my Streets and Trips I can plan the route ahead, and look behind, and I can keep exact locations of everywhere we've been. I can save maps and routes and alter them easily. I can add detailed push pins of where we stayed, what site was the best and what we paid. I have maps like this from all of our trips in the past --- ever since we started traveling with a laptop. So I am quite excited to be able to use it again. So much so that I even went in and graphed out our entire last trip just to keep it in our records, even though we didn't have the laptop with us.
What is really nice is that the Streets and Trips will leave a little blue mouse trail of everywhere you've been, right down to where you've turned around or where you've parked at a wayside and had a little lunch or even where you stayed within a campground or even to know where the dump station was. Things like that are important to me to keep track of and I am looking forward to having the Streets and Trips with us again for our next journey.
So that's it for now...
but we are planning our next camping trip
after the crazy holiday weekend is OVER
and the horrible awful temps forecast in the mid 90's are past.
Steve is able to take time off from his old fart party bus job... so we took a week to escape a bit before all the lawn work and flower beds and tomato planting begins! Plus we are going to start dressing up the trim on the house this summer. Good to get away and do some camping before we get too involved.
The temps earlier in the week were in the high 70's and low 80's in Wisconsin. But today it turned wet and cold and only in the low 40's. The weatherman said even a few snowflakes will fall!!! ACK!
We have no plans in mind, other than kinda head west. We were thinking of heading south westerly to the other side of Madison and angle downwards to a few state parks in that area, then maybe a COE along the border to Minnesota and maybe into Iowa. Steve checked the weather for the week and it's going to rain almost every day in that direction!
Last night we looked at our Streets and Trips program (still works even if not supported by Microsoft) and decided to head more directly west and then perhaps northerly. The northern part of Wisconsin is due for warmer weather and no rain. Go figger!
I like the Streets and Trips because of the little GPS dongle... it hooks right into the USB on my laptop with the big screen. I plan all our trips and make changes as we go. It leaves a mouse trail of wherever we travel. Plus I can put "pins" with info of things we see, where we stopped and reviews of campgrounds or best campsite numbers to choose for reservations in the future.
This is a screenshot from our trip last fall around Lake Superior...
We loaded up most of the motorhome last night after attending our oldest grandson's choir in Oconto. We normally keep it fully stocked (minus the refrigerator food). Since this is our first trip out this spring after being winterized, we have to reload a lot more. All of the dry goods, canned goods, cleaning supplies, clothing, bathroom supplies and of course, dog food! That all stays in the rig during the spring, summer and fall. Then we only need to pop in the fridge and freezer food, the dogs, the laptops and cell phone and we are ready to roll!!!!
It is now Friday morning and I set the tire sensors for the tire pressure monitoring system. They need a "base line" temp reading setting before the tires are warmed up from travelling. We take the sensors off the motorhome and Tracker tires to not drain their little internal batteries all winter long.
We use a tire pressure monitoring system from Nvision, called Hopkins, which is what we bought about 8 years ago. Since then we have replaced the 10 individual sensors at least twice, some even three times. They are NOT cheap for a pair. (about $45 a pair) High costs when you have 10 tires to monitor! 6 on the motorhome and 4 on the Tracker. We had decided that when this system finally takes a crap, we will invest in another system with replaceable batteries instead of these all in one units.
But then last summer we stopped at a rummage sale and there was a whole new system in a box with 6 more sensors for only FIVE BUCKS! The people said their parents never got it set up right, and it is confusing to find, locate and lock in each reading on each tire, so they gave up. (it is very futzy to do it) Their loss, our gain. The whole setup is about $400.00 We nabbed it up fast!!!!
See... we are not nuts on this system that much anyhow. Sometimes we would lose the signal from the Tracker tires if we keep the monitor up near the front of the rig. If we move the monitor towards the back, then we lose the signal from the two front tires of the motorhome. We really needed to get a signal repeater to increase the range... but never got around to it. Now we don't have to because of buying the second unit!
I used one monitor now for the six tires up on the motorhome and set that one near the table in the middle of the rig with the 12 volt plug-in at the table. The second monitor now I set up with the four sensors for the Tracker and locate that one near the rear of the rig with the 12 volt plug in by the bed. I set it on the bed, facing forward and I can glance back at any time and see the reassuring green light that all is well back there. That way we don't need a repeater unit and we are able to hear it if the alarm goes off. I got the readings set and all is good to go.
I went out into the motorhome during the afternoon and simmered up a pot of chili. That way when Steve got done with work between 4 and 5, we could just hit the road and eat when we felt like taking a break.
Steve arrived home at 4:30. We backed the motorhome out of the driveway, and then he drove it out of town to the extra lane for the turn off to the high school. I followed him with the tracker and we stopped there to hook it up. Once we tested the lights, the brake, the shifters, and the steering wheel --- we were good to go. It was still pretty cold but the rain has let up for a little bit.
Sitting at my Command Central
Navigating with the
Streets and Trips GPS on the laptop
Happy Motorhoming Man
We looped around the bottom half of Lake Winnebago past Fond du Lac and up the western shore to Oshkosh. From there we turned West, which was really nice because there was a wind blasting at us from the East. Now it was a tailwind and we didn't feel a thing.
We only drove 123 miles and ended up at Roche a Cri State Park. Roche A Cri State Park (Wisconsin) There are 41 campsites, but only five are electric. Since it is so cold, we decided to splurge and take an electric site. There is only one other camping trailer here, and one tenter with a boat and a pickup truck. (Not counting the hosts).
We self registered on our site for $28. We have annual stickers on both our motorhome and tracker so we do not have to pay the additional vehicle fee. Thanks to Uncle Pete for a nice Christmas present!!
I plopped the pot of chili back on the stove from where it was safely riding in the sink. Steve took care of the levellers and the electric cord while I took the dogs out for their potty break. Soon our chili was ready and we ladeled it out over the pre-cooked noodles. I don't put the noodles in with the chili because they get mushy. We had a fine meal and now we are settling in for the night.
It's kind of nice to splurge with the electric campsite, using our mattress pad heater on the bed, and the electric heater to supplement the heat and not use our propane as well.
Tomorrow we will explore the area and see if we want to stay here for another day, or if we should move on and look for warmer weather.


 l1
l1


.JPG)









 Posts
Posts

