Our Wonderful Followers who come back again and again to read about us...
Friday, October 28, 2022
Mold, Leaves, and Bats???
What do these three things have to do with each other? Nothing really.
They are just the three different topics I'm going to talk about in today's blog. LOL
I belong to a Facebook group of treadle sewing machine owners. We all share ideas and thoughts and hints and projects and repairs and supplies. I made a friend on there named Robin. She happens to have the same Franklin treadle sewing machine as me, but she also has the same unusual and rare beautiful parlor cabinet. This is a special wooden cabinet that the machine rises up out of the bottom using a chain and gears.... and the treadle for the feet is enclosed within the base of the cabinet. It is a lot different than the standard iron framework Singer treadle machines that you usually see.
The only problem is that she is missing a section of the applied wooden scroll work on the left hand curved door of her beautiful cabinet. She was at a loss of what to do and how to replace it, because this is something that is 100 years old.
her cabinet
When she found out that I have the same cabinet, she asked a huge favor of me. Is there intact scroll work on the left hand door of my cabinet? Yes there is!
my cabinet
She sent me a box in the mail. This is where the "mold" part of my title comes in. Not icky mold growing bacteria infested gunk! Instead, it is a molding kit that you can use to create a flexible rubbery type mold material. I was worried about it perhaps ruining or blemishing the varnish of the hundred plus year old cabinet. So I did a little test sample in an inconspicuous area on the inside of one of the doors.
After 20 minutes, I peeled it away and it came out perfect! Even right down to the tiny lines of wood grain. That is exactly what Robin had hoped for. This is gonna work.
So I proceeded to mix up the two compounds in the remaining material of the kit. Mix mix mix thoroughly, wearing rubber gloves so I don't get my oils from my hands into the material. You mix the white and the yellow compounds together like molding clay making, sure that they are thoroughly mixed.
I cleaned the surface of the scroll work and brushed it free and clear of any excess lint or debris that might be hiding in the cracks. Then I pressed the mold material into place starting at the top and working my way down. Making sure to press it firmly in every little nook and cranny.
She also wanted the mold to go as far as the lip edge of the door so she could be sure of the exact placement of the scroll work. The faces of these doors are somewhat curved a little bit and she wanted to be sure it would be formed exactly when she used the mold.
I set the timer to wait 20 minutes. Actually, I waited closer to 25 just in case the thicker parts of the mold material needed longer to cure??
I started at the top and peeled it away carefully
Oh my! Look at that! It was a perfect exact copy replica of the scroll work on the door. And thankfully it did not harm the finish whatsoever. Our joint project was a success on this end so far.
I packaged it up to send it back to her. She is going to fill it with a flexible wood putty product that is stained the color of the woodwork. She was hoping to get all the details like the wood grain lines and even the little aged cracks that are in mine. That will make it look more realistic than ever.
I was so glad to be able to help her. What are the chances of her finding somebody on a little Facebook group of a couple hundred people that happened to have the same machine and cabinet as she did?
She was so thankful, that in the box for extra padding she included these two beautiful skeins of wool sock yarn! She said the colors were perfect for somebody known as "Karen In The Woods".
Yesterday I hauled out my handy dandy cranky sock knitting machine. If you followed my blog for quite some time, you will know that I am an officiado and collector of these very interesting antique contraptions. They are known as CSM's, Circular Sockknitting Machines. I had to work on an order for another friend, Patti, who wanted me to make her a couple sets of leg warmers for just her ankles. She said she has a pair of fuzzy boots that she likes to go barefoot in, but she wanted something to keep her ankles warm between the boots and her pants legs. So I custom made her four different pairs in assorted colors on my sock knitting machine.
Once I got her order finished, I started with my new yarn from Robin. It was so pretty as I cranked it up last night while we were watching tv. These sock machines are finicky and cranky and sometimes they work great and sometimes they just don't want to. I have been cranking on sock machines since 1998 and they are a lot of fun. But other times they are a source of frustration and you want to throw it out the window!
This newest machine I have is from 1925. It works better than the ones I had from 1904 and 1908 and 1914. I guess they kept getting better and better?
Here is a YouTube link on how I operate the machine:
The machines have been recently put back into production and can be purchased at the Erlbacher Knitting machine company in Cape Girardeau, Missouri.
They are rather expensive, but they are made from the same patents and diagrams that this one is made with a few more improvements. If you're looking for some cranky fun and can't find an antique one to restore, at least there are new ones are available.
~~~~~~~~
While I am working on my fun stuff in my she shed, I am looking out my window from time to time. Sometimes I get lost in day dreams looking out over the backyard. Fall has really come to the area and the colors are beyond peak now. A lot of leaves have fallen and more come down every day. Our backyard has a carpet of golden leaves spread across wherever the trees are standing.
In the middle of my daydreaming I suddenly hear an engine start up and the whirring noise of a leaf blower. What do I see out by windows? That super industrious Steveio is out there trying to blow away all of these leaves from two and a half acres! He would blow them up into great big piles and then transfer them onto tarps. From there he would drag the tarps up to the front of the house and dump them along the curb.
Our city comes by with a big vacuum cleaner sucker machine that sucks them all up for us. Bye bye leaves!
And then it will get windy tonight, and a lot more leaves will go right back where he just cleaned them up. Such is the routine of fall. But it's good to get them up before the snow flies.
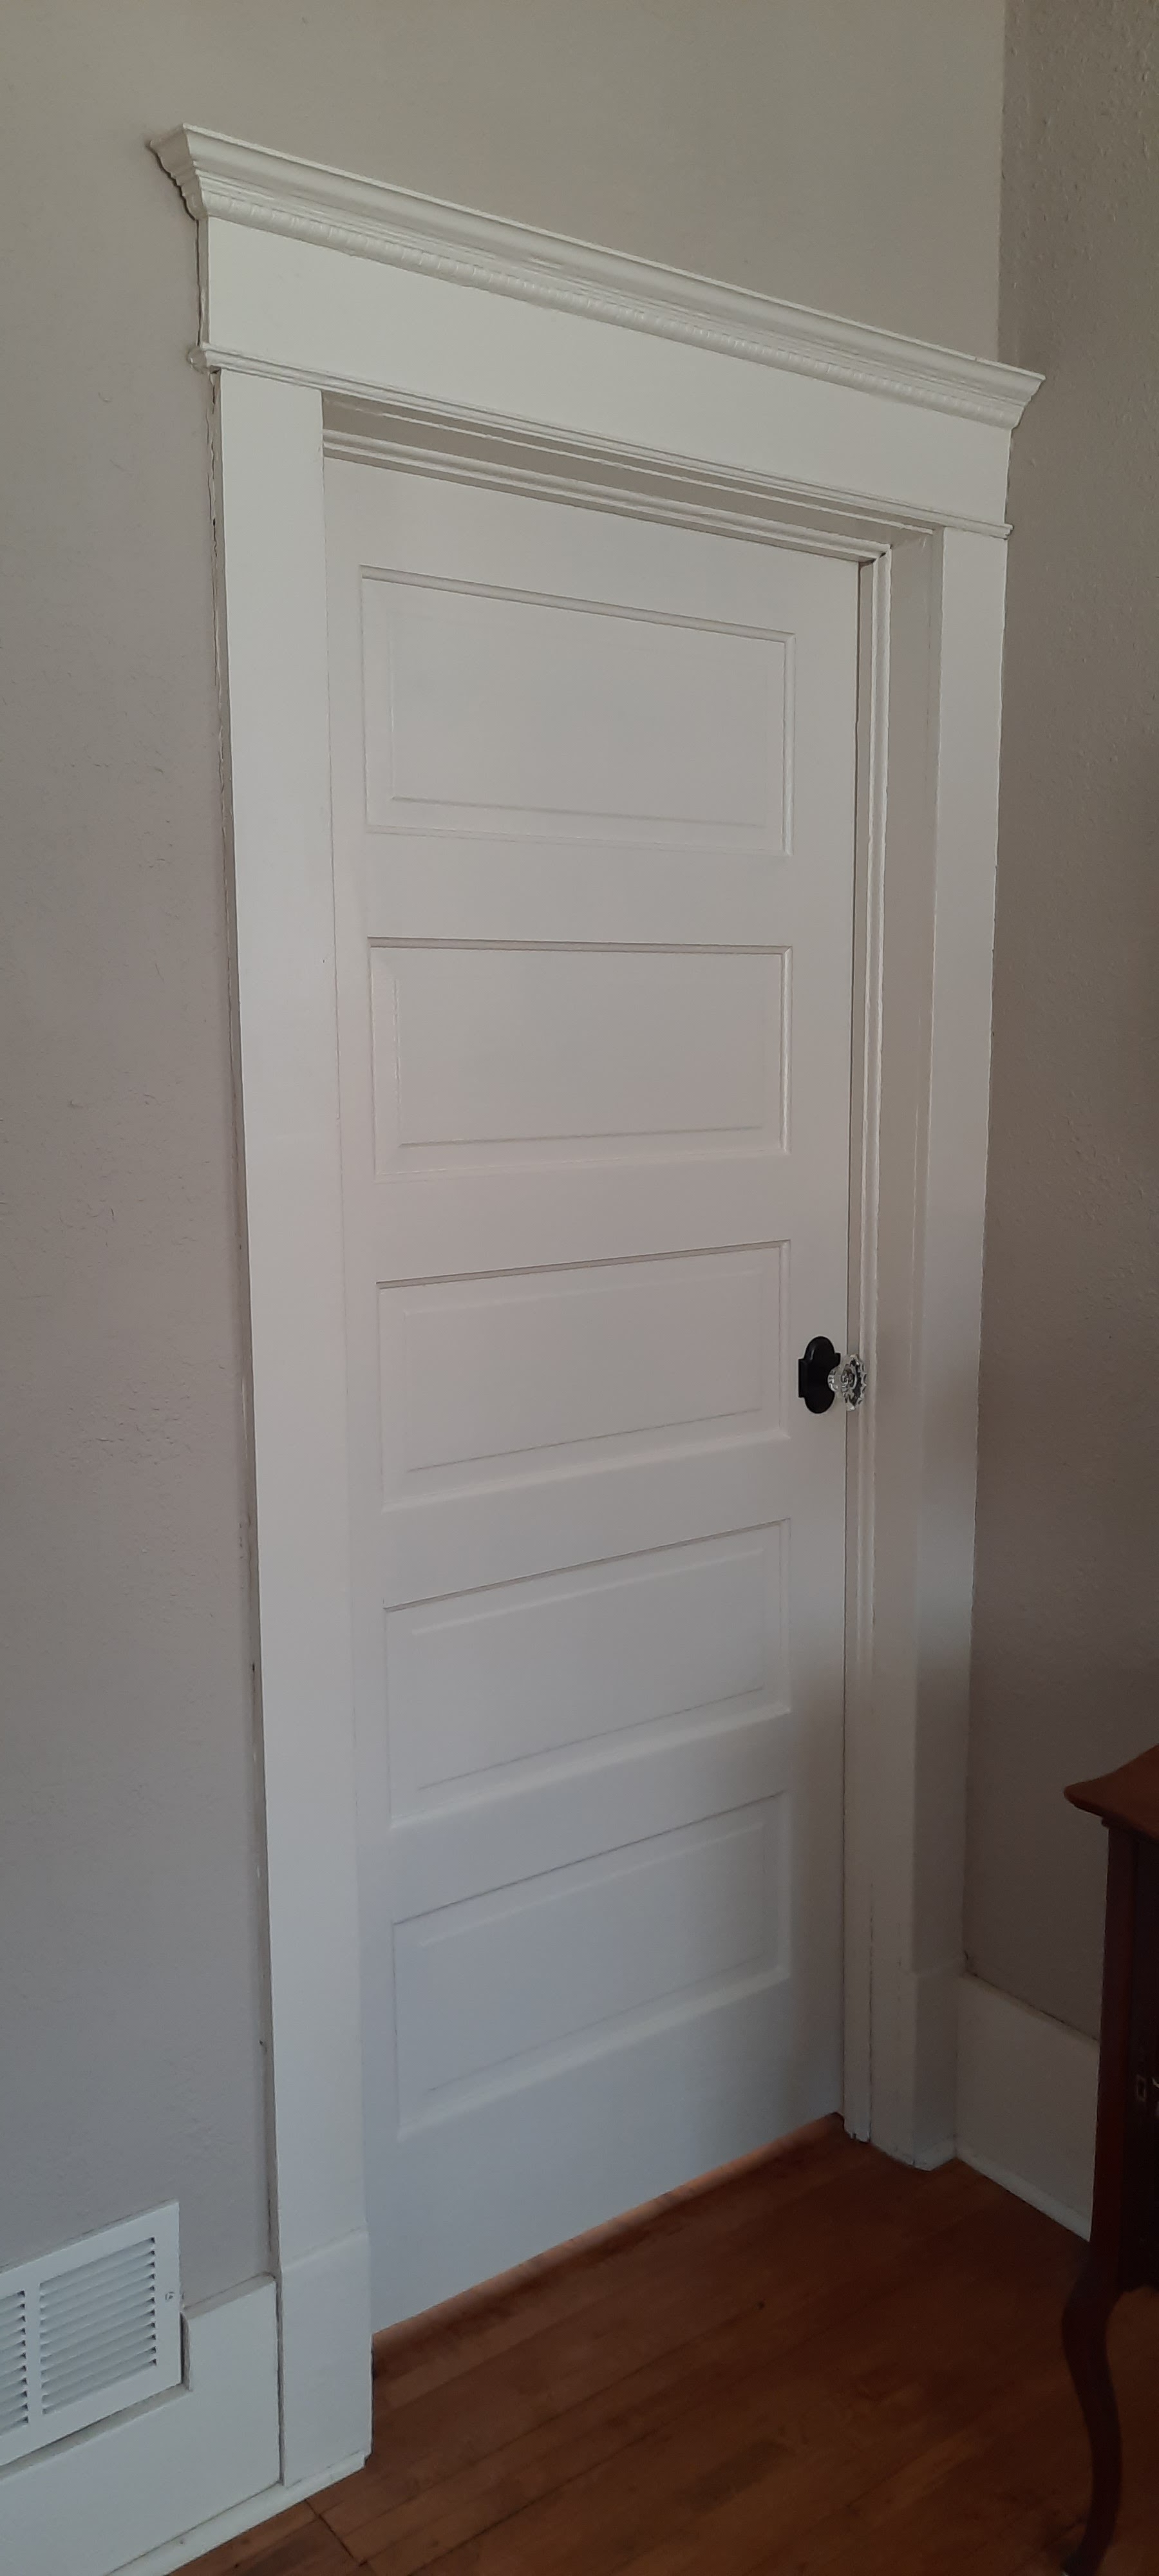
Speaking of preparations before the snow flies, Steve and his brother Pete went up by their father last week to Door County. They helped him get all of his little tasks he needed done that he needed before winter. While they spent the day up there, I took care of painting the "A-Door-Able Door".
If you look back a couple blog posts you will read about the beautiful antique door that Steve found on marketplace. Once he stripped it all down and sanded it off, then he filled all the gouges and holes and scratches with putty. Now it was my turn to put on some primer and paint. After a couple coats, the door was all done! It is so nice to have a vintage looking door that matches the rest of the doors in our 100 plus year old home. Much better than the modern cheap hollow core door that was there before.
This is a new doorway that was created between the living room and the master bedroom by the previous owners. There had never been a door there before. The only way to get into the bedroom was to walk through from another bedroom. I really like that the doorway configuration had been changed. But Steve couldn't stand looking at that hollow core door. Now that it's been taken care of, I think it's nice to restore the house with items from the same era.
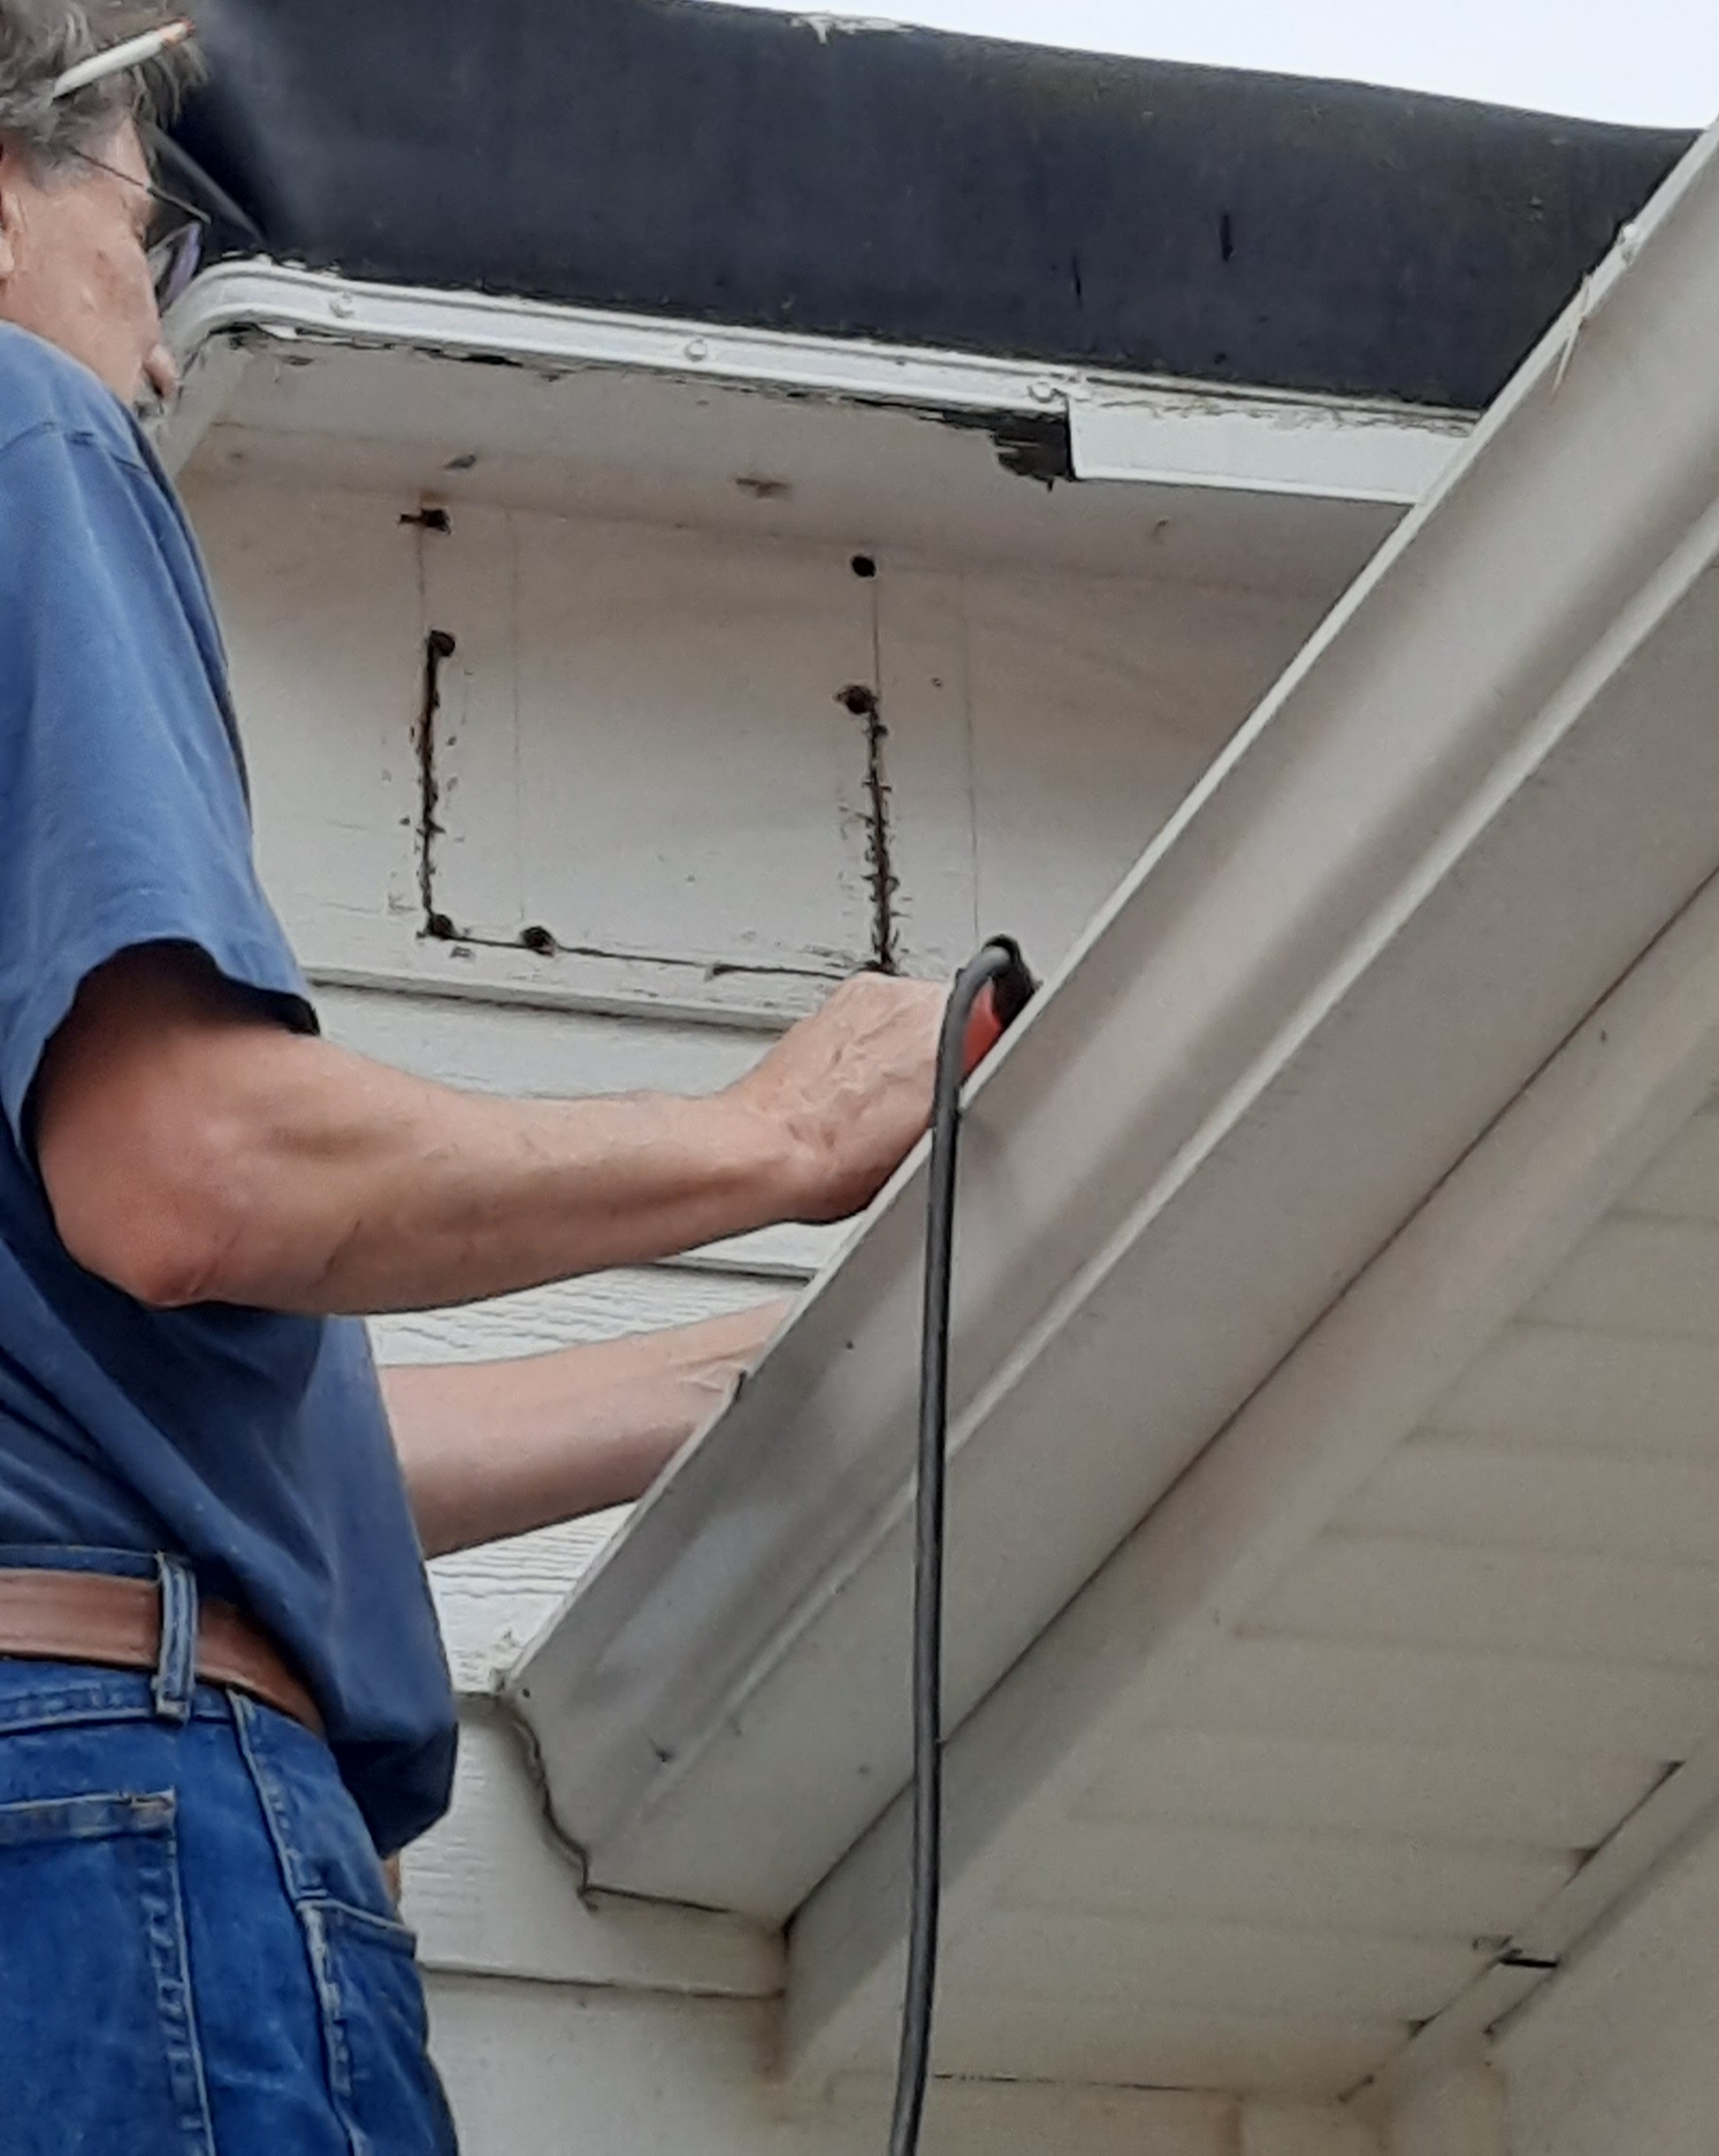
We have another project in the works. I was in the kitchen and I heard a little noise outside. I looked out the window and what did I see? Steve's knees!
Now what on earth was he doing? I went outside to see. He was perched up on his ladder with his tools. He was going to take care of a problem that we noticed this summer...
And this is about the third word in our title. Bats!
We went through quite a process the year before to remove the bats from the attic of our home. We had hired a "Batman" exterminator from Green Bay to eradicate the little stinkers. He used humane methods by installing one way trap doors to let them out, but not back in. All of the bats are alive and well, but OUT of our attic! Everything was sealed up and cleaned after we got them out. Then we had to spread a special paint with a big rented sprayer to kill the odor and smell from those buggers. Finally the last step is we had all new insulation blown in. It was quite an expensive process. We are now free of the bat excrement called "guano".
But there was one little section where the one part of the roof meets up to the other part of the roof where the two houses were joined together years ago. This section of attic is not open to the rest of the attic--- it's merely a long enclosed triangular tube between them. This past summer, we had noticed that there was a bat flying out of a little edge opening along the soffit and fascia! Steve had gone up there to examine it and sure enough, those little buggers found a way in to that little triangular space. He caulked it up firmly at night to make sure they couldn't get back in there again. It was done while they were out for the evening searching for mosquitoes. But he really wanted to seal that space up, and he also realized it had never gotten filled with insulation. So it was a wide open triangular shaped space about 12 ft deep by a couple feet wide and high where the two roofs came together.
He decided the best way to fill it with insulation is to cut a new opening and then place a firmly sealed vent over the opening after he has the opportunity to blow in some insulation. So he decided to get the first part done by at least cutting the opening and fitting the vent into place.
The vent is just screwed into place right now. Perhaps this weekend we will rent the insulation blower unit from Menards and get a couple bags to fill the void. Then when he puts this vent on permanently he will seal around all of the edges with caulking. He will also repair the soffit and fascia boards. Got to keep the bats out!
When we hired the "Batman" from Green Bay to come in eradicate them the year before, he told us a couple interesting facts.
1. The bats that seem to congregate all up and down the West Shore of the Green Bay are all from the same species and family. They gather along the shoreline in all of the homes throughout Menominee Marinette Peshtigo Oconto Pensaukee all the way down to Green Bay.
2. The reason why they congregate here is because they have a vast amount of food available from the swamplands all along the water's edge. We are right next to the great big marsh and the mosquitoes are overly abundant. He said he has quite a list of customers from all of these towns along the bay, especially in the older homes and their attics.
3. Where they congregate over the winter is a mineshaft in Iron Mountain, Michigan. They have a bat viewing area to view them as they emerge in April and early May. The bats start leaving the cave and start looking around for food. That's when they migrate south all along the Lakeshore and Green Bay.
4. That's when they come to our house! Then again in September and into October the bats return to the mine up north. There is a large bat viewing area that you can see these millions and millions and millions of bats return to their winter haven.
Here is a link about the bat viewing area if you are interested in such things. I'm not!
I just want them out of my attic! There are plenty of bat houses nearby in our neighbor's yards for them to hide out in, as well as all the trees in the swamp behind our house. Just stay out of my attic please?
Well, that is enough for today. Tomorrow I will write about a thrifty day with my friend Vicky!
Wow, what a fun read! That Gearhart sock knitting machine is really neat - good video btw. That was smart of that lady to get you to mold the scrollwork for her, I'm sure she will feel thrilled every time she looks at the "new" molding matched-up and in place. Glad you're back in the swing of things with your blog, it's so enjoyable. (I've got to get busy on my boring old blog, lol). Good job on all of your DH's projects too.


Wow, what a fun read! That Gearhart sock knitting machine is really neat - good video btw. That was smart of that lady to get you to mold the scrollwork for her, I'm sure she will feel thrilled every time she looks at the "new" molding matched-up and in place. Glad you're back in the swing of things with your blog, it's so enjoyable. (I've got to get busy on my boring old blog, lol). Good job on all of your DH's projects too.
ReplyDelete