Our Wonderful Followers who come back again and again to read about us...

Monday, January 18, 2016

REDUX - MOTORHOME MODIFICATION - Coating our Fiberglass Roof on the Motorhome


Since it's the boring winter months, and we are not travelling yet, I thought I would do some repeats of my most-read blog posts on RV repairs.  This one had over 6,500 views when I first posted it. We coated our roof on October 7, 2009


Coating our Fiberglass Roof on the Motorhome


On our 1996 Safari Serengeti, our filon fiberglass roof can be known to get tiny microscopic cracks and fissures after 10 years of age.... resulting in potential leaks! Although we don’t have any leaks yet, we decided it was a good idea to Git Er Dun! 


roof coating Aug 20092


3 years ago, we had already replaced the sealant tape at the front and rear caps with new layers of Eternabond, removing the OEM sealing tape that was on there.  We also used Eternabond around the sky light, and roof vents.  

These are common places for leaks to start, so we did the preventative thing and had sealed those too the first year owned the rig.  

So, keeping in mind that we want this rig to last a looonggg time, we decided to take the advice of the guys on the Safari list with rigs the same vintage of ours.  They are all coating their roofs with a special elastomeric coating made for fiberglass roofs.... (similar to Kool-Seal, but we had to get the formula made for fiberglass roofs like on our rig) 
roof coating Aug 20093


The roof surface on our rig is like a textured sheet of fiberglass that is laid on top of the substructure and sealed around the edges, but left loose in the middle to allow for expansion and contraction in temperature changes. 

But not being sealed down allows for any little leak around vents, AC units, or skylights to let in water and create horrible damages.   
Thus the preventative care is very important. 


We checked the weather forecast and found three days in a row of nice 70-80 degree days and warm nights, without any rain in sight.  We hoped.

roof coating Aug 20091


First,  Stevio scrubbed the roof really good with TSP, a heavy duty cleanser.  He then rinsed with a lot of hot water, and let it dry... 

The next day after work at 3pm, we both got up there and got busy!

roof coating Aug 200910


Whew, I sure don't like heights, but with adrenaline rushing and heart pounding, I joined him up there to work fast as a team effort to get it done! 


I sure was clutching that ladder!!!! I HATE heights.. but Steveio needed my help, so I bit the bullet and squeezed my eyes shut and did it. The worst part is when you reach the top of the ladder and have to swing your leg around to get ON the roof. 

finished roof coating 6


Even with Steveio holding the ladder firmly down on the ground, I was still a scared silly mouse. Tee heeeee

Using blue painter’s tape, we taped off the sides where the white roof meets the blue colored sidewalls. 
 

I crawled around on my hands and knees, hand brushing liberal amounts around all the vents, air conditioners, skylight and antennas. 

finished roof coating 4


Steveio rolled the remaining parts with a thick napped roller on a long handle. 
He got to stand, I was too scared to stand! 

finished roof coating 5


 There are a lot of different brands of elastomeric coatings out there. 
You have to find one that works for your type of roof. (ours was fiberglass in this case) 
Read the cans and find something with a long warranty life. 
Ours said 7 years if you do two coats. 


Here is the brand we bought, called SealBest at Menards, a mid-west home improvement chain. 


roof coating sealant1


(DON'T use that fibered roof coating stuff that is used for mobile homes, it's very thick black tarry stuff that dries silver-- I did that on my old motorhome in the 90's ... not good, and not the right product for a flexing moving structure)


roof coating Aug 20098


roof coating Aug 20099


We used almost a full gallon with the first coat. 
This is a wide body motorhome almost 40 feet long. 
We used the second gallon and rolled it on as thick as we could. 

The warranty reads that you must put on 2 coats to comply with the 7 year warranty. There was still some left, so Steve got almost a full third coat done before we ran out.


Whewww!


roof coating Aug 200911


finished roof coating 1


It was a job well done.  

Wonder what the next project is going to be???


*added note: it is now 2016 - 
8 and a half years later, 
and it still looks great!

Sunday, January 17, 2016

Grandma Dust and Making a Sewing Room

Since we are kinda hanging close to home and waiting to see what is happening in Ohio with our step dad, it's like marking time.  We don't want to start using any vacation time, instead we are holding on to it to help mom afterwards.  Each time the phone rings, I jump.  We are so thankful that mom got her laptop going, so we can keep in contact hourly.  Hospice is now there round the clock with our dear Lowell...  and he is so very frail.

We are having sub zero weather this weekend, and the wind chills are in the 30 below zero range. No dog walking, no outside projects and no going anywhere unless we need to.  Plus, I am feeling a half-arsed cold coming on, arggghh!


I was looking at my Loom Room the other day.  Since I have also taken up quilting, the studio known as my Loom Room is getting "crowded"...  I am primarily a weaver, and need to have access to my looms at all times for custom orders and rug creation.  So that is the main purpose of having the room set up exclusively for weaving....  Looms, shuttles, supplies and materials are a mainstay of my job.


But... the quilting is fun!  I don't make much money at it, but I enjoy creating the wonderful hotpads, wall hangings and quilts that I have made.  Soooo keeping those things set out, in the way in my Loom Room is taking up space.  I have three sewing machines in there!   My big 101 year old Singer Treadle machine, my 1941 Singer electric from my Grandma Groop (which I also use to hem rugs) , and then a newer computerized Janome for the actual quilting process.  On top of that, I have a Singer Quantum for the motorhome!

Add to that, I have a "Big Board" ironing board which Steveio made that takes up a lot of room, and I end up setting it up in the dining room each time I want to work on a quilt.  Then I end up putting my big Olfa cutting mat on the dining room table. We use our dining room a lot, and it is a main walkway between the kitchen and living room.  So I can't just shut away the stuff in the dining room either. It's right "there" in our faces while I am working on quilting projects. Then I have to move all this junk errrr stuff at the end of each sewing session back into the Loom Room.  Things get "dumped" in there on nearest available flat surface and soon I have a mess!

I was thinking.... hmmmmm we have a whole third bedroom upstairs that we fondly call "The Grandtot Room"  We use an inflatable queen size mattress in there for when the grandtots come to sleep over.  We filled the room with toys and books, but in actuality, they don't play up there. When they do come over, they play down in the main livingroom, foyer and diningroom by us, the grandparents.  We keep a toy closet in the foyer, completely filled with toys and a reading nook with books too.  Now that most of the grandtots are of school age, the overnight visits are less and less.  Hmmm why are we keeping a whole room set aside for them?


We have a perfectly good guest room with a queen sized bed for visitors. Now that the grandtots are all potty trained and sleeping in big beds at home, they can do the same thing here.

I decided to clear out the toys, condense them down to the toy closet on the main floor and clear out the room in preparation to make it into MY SEWING ROOM!  Heck, we could even inflate the mattress in the middle of the sewing room if they do want to sleep in there. Just have to remove the scissors and needles first I guess.

On Friday night, I brought up the idea to my partner in crime, Steveio.  I was hoping to get his help in carrying up the sewing stuff to the grandtot's room and help me make a Sewing Room.

One glitch.. that danged perfectionist husband of mine!  He said there will be no moving ANY sewing stuff into the room. Why? Because he said FIRST we need to skip trowel new plaster on the ceiling BEFORE I can move any of my sewing stuff up there.  Dangnabbit, he threw a monkey wrench into my plans.

Our home is a sturdy stout 101 year old Craftsman home.  The plaster is thick like cement on the walls and ceilings.  But over the years the ceilings look "wavy" and he doesn't care for that. It's not cracking or falling down.  He just doesn't like the look of the wavy plaster.  The walls are fine and smooth, it's just the ceilings he is bothered by.

When we bought the house 3 years ago, we skip troweled the ceilings in the living room, dining room, Loom Room and our master bedroom.  We never got around to plastering the ceilings in the other two bedrooms.... (or painting them either, but wait, that is going to foil me even more!)

Off to the store we went to get a bag of the proper plaster (the 210 wt size for good adhesion) and then we cleared out the last few things from the room.  First thing Saturday morning he was hard at it, doing a skip trowel technique on the ceiling. He mentioned we should PAINT the walls too...  He HATES painting, and that means it's left up to me to paint the ceiling.. and now the walls???  Well, the walls were perfectly good and nice pale blue, from the previous sellers, and there was nothing wrong with them!

I asked... "Why do you want the walls repainted?"  He just grinned and replied: "So I can say they are all repainted since we bought the house"  Huh??? I sure couldn't see that logic!   Then...then... he pulled a fast one on me!

He had a little repair to do on the bump structure from where the roof line comes down into the room on that side of the house.  Seems while doing the repair, he just HAD to mess with the trowel against the walls too.. making gray streaky metal marks on the light blue paint, knocking some pieces loose in the joint and making a real mess of the wall!   Geeesh!!!!   I had no matching paint to touch any of that up, because it had been original paint from the previous sellers when we bought the house.


Dangnabbit!  Now the wall looked awful!  I went to my "paint stash" in the basement and found a nice gallon of pale yellow paint I had been saving to redo the laundry room (which is already yellow).  I guess we were going to be doing some wall painting too.

He mixed up the plaster to the right consistency. He uses a big beater device in the end of a drill to mix the plaster.


While he was troweling it on, I was running back and forth with buckets of water, damp rags, and moving the step ladder around for him.  I am the "Go-fer" to his projects! In the photo on the right, you can see the wavy ripples in the 101 year old plaster that he is talking about.


The ripples don't bother me one bit, 
but they bother him enough to do this project 
on a lovely Saturday morning!

See?  He's bothered, all right. 


While the plaster was drying, we attended our neighbor's birthday party at Hilde's Deli in Chilton.  It was a nice break in the day's task, with a wonderful lunch, good laughter, and so nice to be included with her family and friends for her party. 

Once we got home, we changed into old clothes and time to get to work! 
We took the paintings and print picture frames down, 
pulled off the curtains,
 and covered the hardwood floor with tarps.  
Time to PAINT! 

Here is where the "GRANDMA DUST" part of my blog title comes about.  This is my prized possession, hand made by my maternal grandfather, Harvey Kafehl.  I never knew him, he died 10 months before I was born. He loved to dabble in woodworking and made a lot of cute wooden items in his spare time. He was an electrician by trade.  This crescent moon and star hung for years at my Grandma Kafehl's house.  The little bear on the star was something my daughters gave to Grandma years later and she stuck it there too.  See the Grandma Dust???


I had made her a set of little ceramic Christmas Carolers that she kept up year around, setting on the steps. 20 years ago I took it off the wall in her apartment after she passed away. Dust and all!  I never dusted it off.  I rehung it in the studio at our house in Oconto. When we sold that house, I took it down carefully, dust and all, and wrapped it in plastic.  When we bought this house, it came out of my treasured steamer trunk and I hung it up again on the wall.  Yes, dust and all!    So again, I carefully took it down to paint the walls.  And I warned Steve that I would skin him alive if he wiped the dust off these little moon stairs! LOL 

I rolled the white paint on the ceiling while Steveio was cutting in on the walls with the yellow paint. He had to brush around all of the doors, windows, baseboard and crown molding.  Did I say that he HATES painting?  So I gave him the hardest part of the job because he is the one that ruined the wall in the first place. LOL   

A second coat of ceiling white went on while he was just finishing up the cutting.  I rolled the pale yellow on the light blue walls kinda thick, and it covered in one coat!  Wheeee I hate doing two coats of paint.  So many of the new paints now are made for just one coat, and low odor too.  Being closed up house on a subzero weekend, the smells would have been awful with old paints. 


We finished up in no time flat, and cleaned up our tools... and we both took a nice well-deserved nap! 

Ahhhhhh by the time the Packer Game came on at 7, the walls were dry. We started carrying in my sewing items bit by bit during commercial breaks, and we carried up the super heavy parlor cabinet for the treadle machine during half time.  

By the end of the game (which the Packers sadly lost) we had the Sewing Room complete! 


I kept the rocking chair, some story books, and the little Raggedy Ann and Andy in their chairs for one corner.  The tv will keep me company while sewing, or can be for cartoons if the grandtots inflate the mattress in the middle of the room for sleepovers.  I guess, afterall, it's not changing the room too much for them, but it's making a huge change in my Loom Room accessibility.


 I just love this 101 year old treadle machine, 
it was made the same year as my home. 
My friend Paula gave it to me.
The cabinet opens up and the treadle is inside. 
The machine raises up like an elevator to the top surface to sew on,
and the treadle belt is hidden in a compartment on the right side.


This morning I finished hanging a few pictures on the walls, hung my thread rack, and moved a few things around. My Janome machine goes well on a rolling typing table my friend Linda found for me. The Big Board ironing table works well on the side wall.  I hung my stained glass pieces in the windows, and set up my supplies.  Ahhhhhh  


I am not putting anything on the wall over the Big Board ironing board yet, because I am going to look for a rack or pegboard idea to hold all my various cutting rulers, shapes and templates.  

Now my Loom Room is cleared up and ready for more weaving! 

And yes, the crescent moon and star are back in place,
 complete with my "Grandma Dust"!!!


Sunday, January 10, 2016

REDUX - Take a Tour of Our Motorhome


Since it's the boring winter months, and we are not travelling yet, I thought I would do some repeats of my most-read blog posts on RV's.  This one had over 6,500 views when I first posted it. 


Take a tour of our motor home

When reading some of these RV blogs, I really like to read the ones about folks’ RV units… be it campers, travel trailers, fivers, motor homes etc.  I like to see inside and outside pics of folks’ rigs, and how they personalize them for travelling or living in. 

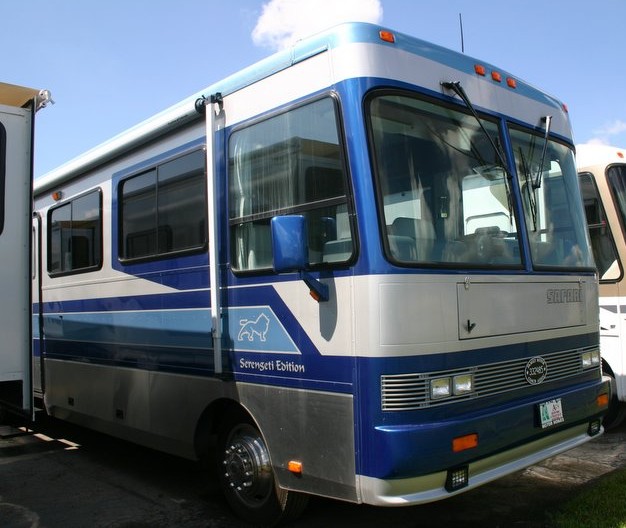
So, I thought I would work on a blog about our most recent motor home….   1996 Safari Serengeti 38 ft Diesel with Cat 3126 and Allison tranny     (there- got the technical stuff in for the guys!)  This is what we saw on the lot:


We bought this rig in 2006… from Al’s Motor homes in Rockford, Ill.  It only had 22,000 miles on it, and was in immaculate shape. With just one little glitch about 2 mechanics not understanding if each other changed a faulty turbo boost sensor, the rest of the purchase went very well.  We negotiated into the deal:

  • 6 new tires, mounted and balanced,
  • all new belts and hoses,
  • tranny, oil and radiator flush and all new fluids and filters,
  • 4 new coach batteries, 2 new chassis batteries,
  • a full propane 50 gal tank,
  • and full diesel 105 gallon tank before we left. 

Our UVH rating is 18,600 (Unloaded Vehicle Weight)
Our GVWR rating is 28,000 (Gross Vehicle Weight Rating)
GCWR-32,000 (Gross Combined Weight Rating)


And...
We weigh in with full water, fuel, and propane tanks and 2 people at 22,000 pounds without our gear when we first bought the rig.

We have about 8,500 pound capacity available from empty. Even with all our tanks full, (propane, fuel, fresh water and waste water) we still have around 6,000 pounds of CCC cargo carrying capacity above that.


Wheeeeeeeee   what an adventure!


Most Safaris come from the factory each with a custom painted mural, by the Dame family.  Here is a website of various ones collected:  other safari murals     Most Safari’s have a hidden tiny animal somewhere in the mural.   It makes a great conversation starter with folks, and little kids love to try to find ours.  Here, I will help you find it on ours with a big red circle.


On the exterior, we have full body paint on aluminum exterior… (which means no delamination or fading decals or cracking fiberglass like our last rig) . We have one large  silver fabric awning and smaller fabric awnings on all the windows around. On the roof are 2 AC’s, dual air horns, 500 watts of solar panels we added, two Maxi-vent covers and two venturi vent whirligigs.  Sadly, people ask us if we are Detroit Lions fans because of this side logo.  Nope, sorry, we bleed Green N Gold for the Packers!


Compartments:
(this is a long one, so I will only do one *C* today instead of 3)


Actually that is a mis-nomer because our rig doesn't really have compartments like most motorhomes or trailers, it's one huge storage basement wide open from axle to axle and side to side. 

Some folks have asked me about how much storage we have or how we organize our basement compartment.  It seems their rigs never having enough room, or they are worrying about cargo carrying capacity weight issues.   When I tell them that is not an issue with us, they have a hard time believing it.  

While newer rigs have multiple slides, which are very weighty by themselves, they also have storage issues with the slide mechanisms taking up valuable space.  We don’t have the slides, so we have more than enough storage area in the basement of our rig, and weight is not a problem.  

Even with all our tanks full, (propane, fuel, fresh water and waste water) we have almost 6,000 pounds of cargo carrying capacity.   Being  aluminum exterior construction instead of fiberglass makes a big difference, plus wall and roof supports are all aluminum too.   We weigh in with full tanks at 22,000 pounds without our gear when we first bought the rig.   Our rating is  GVWR- 28,000    GCWR-32,000

I thought I would show you what we haul along in our rig. I had taken these pics for insurance purposes because most RV policies only carry $500 coverage on the personal contents, I kid you not!  So please check your policy and ask your agent.  We carry an additional rider for the rest of the possessions we carry above $500. 


There is a huge basement storage area with stainless steel doors all around the rig, which look impressive.  The basement is a wide open space, not separate little compartments.  It is a huge pass through space with doors that open up high on each side.  It is completely open side to side and front to rear between the front and rear axles.  We can load in quite a bit because our GCWR is 32,000 and we are well below that. 
Although we don’t have any slides, the floorplan we have allows for plenty of movement, 
storage and our rig is a “wide body” model which adds extra width.


DRIVER SIDE:  there are many compartment doors all along the entire length of the coach. It's open all of the way through to the other side!

Let’s start on the driver’s side.  All of our stainless steel compartment doors rise upwards on struts and when shut, they lock securely on both ends instead of one latch in the middle. 


I will go down the side from front to back, door by door. 
Here is door number 1. 

Whoda thunk of that space above the tank as a good spot to put a long tube for stowing the stinky slinky!   For those of you who do not know what a "Stinky Slinky"  is, it’s the flexible 3” hose used to dump the grey and black tanks…ewwwwwww   We don’t want to keep THAT hose in our carpeted storage basement area. 


On to the next door…..

We bought an assortment of these gray totes with heavy snap on lids.  They are made by HOMZ 

 http://www.homzproducts.com  and I see that Ace Hardware carries them.  

The large totes measure 30 inches long by 18 inches wide.
The smaller totes measure 18 inches long by 14 inches wide.  

We like them because they have a full handle on each side, not just a lip edge that you carry by the fingertips.   Also, the lid fits firmly over the top and comes way down on the sides, which does not allow anything to get into the tote.   We have more than enough totes, and keep swapping out sizes back and forth as we determine our needs in the future.  The extra totes we keep in our garage or my fiber storage room for now.  


In these matching big silver totes that fit perfectly, each one labeled for it’s contents:  dog stuff, lanterns/propane stuff, picnic table and patio lights, diesel filters oil and supplies, raingear and boots, freshwater supplies, wastewater supplies, etc. and of course my fiber toys!  At the far right is the plumbing compartment with all the manifold fittings for water areas in the rig and an outdoor shower.


In this next photo below, if you look close to the center of the rig, you will see a white poly 2x4 Cosco table and a larger 3x6 heavy black folding table.  Both tables slide in nicely under the space under the suspended fresh water tank.  We use them for eating and serving food when boondocking at places without picnic tables.  Also good for extra table space when working on crafts or doing some crazy things like canning pickles (see Runkle Lake campground review or Paint River Forks in my archives)   I can use these tables for an impromptu craft sale if we want while on the road at a campground too. 


Here it is loaded up,  each one labeled for it’s contents:  dog stuff, lanterns/propane stuff, picnic table and patio lights, diesel filters oil and supplies, raingear and boots, freshwater supplies, wastewater supplies, etc. and of course all of my fiber supplies and toys! When we travel for a longer length of time, I have to have storage for my fiber supplies and inventory.  This is "My Space" for storage.


At the far right is the plumbing compartment with all the manifold fittings for water areas in the rig and an outdoor shower.

This door is kinda a half access on the front, but behind the water manifold section is the water pump, expansion tank and some extra plumbing.  It used to be walled off, but Steveio removed the wall piece for better access.  Nice to have access to that mechanical stuff instead of it being buried behind a wall.   You can see the daylight from right through to the open compartment on the other side of the rig. Steve usually lays his fishing rods in this area, plus the awning rod, which is reachable from the other side. 


The next door behind the axle area is our power compartment... behind this stuff, we have a wired-in Progressive Industries electric management protection system to cover us for dangerous power surges or brown-outs.


We recently replaced the inverter from the old Freedom 2000W Heart (which burned out) over to this Tripplite 1500W. We also have a wired in Progressive Industries unit for surge and brownout protection. 


In front of the things in the photo above, we store the power cords and adaptors for 50 amp to 30 or 20 amp if need be. Sometimes the cords get dirty from being on the ground, and it's nice to have this compartment separate from the clean carpeted center basement of the rig. 


In the last compartment on the driver's side is our generator.  We don't use it often enough because of now having 500 watts of solar panels on the roof. We have to remember to exercise it monthly with a load on it to keep it in tip top shape.  We didn't always do that and had a very costly repair.  Now it's a priority to take care of it.

 It looks a little crooked in this photo because it was snapped when we were putting the generator back into place after having the rotor rebuilt.  Rest assured, it is firmly bolted back into place now and works just fine.  LOL  


We don’t use the generator too often, but we have to run it from time to time under a full load to exercise it.  Great to have in an emergency, or to run one of the roof AC units as we are driving down the road if need be during hot summer temps.  But we really appreciate the peace and quiet when camping and don’t like to run it at all.  So if you are a genny-fanatic, please park far far away from us? 


PASSENGER SIDE:

Now on to the passenger side compartments:

These are the two most used doors near the passenger front between the side entry door and the front of the rig.   We kinda packed them full, huh?


Someone asked on the blog about how does Steve fix stuff while we are on the road?  Rest assured, he has ALL his tools along, even a vice that can clamp into the back hitch to work on items like an outdoor workshop. 

This one is Steve’s favorite compartment:
Steveio filled one door space with his tool box area… where he carries all of his tools in a handy dandy toolbox he made from an old shop desk.


Stacked on top of the totes are our camping signs, picnic table cloth, kneeling foam pad  and whatever else don’t get stowed away properly as we break camp the time before. 

We carry along our two zero gravity recliners, and four folding chairs for company and our two macreme lawn chairs, a few little wooden tv trays for coffee clutching too.  It all fits along with some room for the patio mat behind the chairs. And Steve's big air compressor alongside the chairs.


Yes, Steve puts the large air compressor right into this compartment too. It's used for his air tools, and also in case of a low tire, it's capable of going to the 110 pounds needed for our tires.   It slides in and kind of curves back underneath the stairs in an open space usually not accessible.  By just reaching in to flip the lever on, and grabbing the long air hose, he is in business!    (of course when boondocking, we have to fire up the generator first to get the power to make this run) 


Now we can move to the rear half of the passenger side.

The two interior entry steps into the rig to reach the main floor are the only things taking up any square footage in the basement storage area. 

We also carry a folding table, extra leveling blocks, fishing gear and an air compressor.  Our Safari does not have air bags, instead it has a special suspension on its Magnum chassis, made by BF Goodrich called Torsiliastic (sp?) which is comprised of rubber wedges and rubber fittings that give it a *Velvetride* …. yes, veryyyy smooth.   So we need an on-board air compressor for Steve’s air tools and emergency tire filling.


This door number 3 is located at the left of the entry door.  In here, we have the big solar controller for the solar panels on the roof. There is also a big pull out fuse to disconnect the whole system for repairs.  I like that we have an outdoor tv antenna jack here. Sometimes we carry out the inside tv to watch packer games under the awning.  There are both DC and AC electrical outlets and a little light to see what we are looking for in the dark too. We also stow the 6 large planks for under the tires for leveling the rig.  (not in the pic) 


In this next compartment, we stow the planks we use as pads under the hydraulic levelers, and also sometimes driving up the wheels on to get more level.  Our solar controller unit and breaker box are also in this compartment, along with Steve's fishing poles, pudgy pie makers and the ever-coveted awning pull down rod!


Further down on the passenger side is the battery compartment.  Since we installed the 500 watts of solar on the roof, these four 6v batteries store all the power created by the panels.  link to our Solar Installation blog post   We can comfortably use lights, tv's, computers, coffee maker and other various electrical things and quietly solar recharge again the next day.

 I talked about them more in depth a few blogs back. They are located behind the rear wheels. It is open around the sides and bottom for ventilation.   There are 6 batteries in there now, but we can later move the 2 chassis (driving) batteries into a new rack in the engine compartment that Steveio made.  Then we could increase the bank of coach (camping) batteries to a total of six 6volt golf cart batteries if we wish.  Although with our five 100 watt solar panels that we installed, we may never need six batteries… four might be enough.


Now this last door is the cool stuff that you do not see on gas engine motorhomes.  This is Steve's Control Central! He finds out all kinds of  diagnostic stuff in this compartment. He can even start the engine from in here if the key is in the ignition. Pretty cool! 


For those Techy Kinda Guys, here is the new head piece he re-vamped to fit the newer Fleetgard FS 1212 fuel filters that are available for our engine, now that the Racor Win 200/200 ones were discontinued. 


Now let's move across the front of the rig. 
Inside the front compartment are all the electronic fuse boxes and grounds etc.  
I had to cut and paste a few pics of it, as it won’t all fit in one picture.


In here we also have a large fire extinguisher with access in emergency because this compartment does not lock.  Hope we never have to use it, but it's a great location.  If we are ever needing to help on an emergency on the road, it's easy to grab. 

Yes we carry FIVE fire extinguishers in our motorhome: 

Just stop and think for a minute.  If you are asleep in your bedroom of your camper, and wake up to a fire in the middle of the rig, you probably have to bail out a window or emergency exit.  The extinguisher is usually located up near the door which is locked from the inside.  So even if you bailed out, you can’t even get back into your camper to get to it.  Of course, they do burn up fast and sometimes there is nothing you can do to save it.  But having a few around, plus an external one in an unlocked compartment is a real smart thing to do.  Locating one at the far end of your rig, like your bedroom, where you might be trapped is a good idea too.    Having one in an outside compartment means you can access it and quick blast at say a fire on the brakes or tire, or at a campfire that is spreading  etc. 
(keeping a hidden door key outside somewhere is a very smart idea, not just for a fire but for any time you might get locked out or lose your keys)


So.. that completes the tour of our storage compartments and how we organize them.  In the future we see ourselves adding a few more totes of clothes (in vacuum sealed space bags)  some supplies of my craft stuff, and perhaps my table loom when not in use. The loom folds up somewhat and fits in drivers side number 3 quite well.  

Otherwise we are pretty well set for full timing, and more than adequate space inside the rig for the personal items we take along regularly and keep our kitchen fully stocked as well as the clothing and bathroom gear.   So our weight load will not change much, right now fully loaded we are about 3,000 pounds under our CCC limit, so that is a good thing.  We still have 4,000 towing capacity on top of that too.  We currently tow a Geo Tracker that only weighs 2,200 pounds

OKAY... LET'S GO INSIDE! 

Our rig has a side-entry door, which we LOVE!  It is just about a deal-breaker item for us, after having been in both my parents and Steve’s parents motor homes with front entry doors.  We realize the ease and sensibility of a side entry door that leads right into the kitchen.  It’s a short turn to the left to the bathroom too.

We find a side-entry door is great for hauling food in and out to the kitchen, wet muddy dogs into the bathroom, or just the ease of running in and out to get things for cooking outdoors, which we do a lot of.  We are not tracking food, dirty dishes, dogs and feet through the carpeted living room area and less wear and tear on the carpeting just by travelling back and forth.  Plus, we ALWAYS take off our shoes, no matter what.  Moccasins and clogs work great for slipping in and out of when camping.

Our other deal-breakers in looking at a rig are the need for BIG windows… all around.  We hate the dark *tunnel* feeling of some rigs with dark woods and lots of walls. This rig has huge sliding windows and very few wall spaces. The last *deal breaker* was a king sized bed, for my tall man Steveio’s long legs to not hang over the end of a regular queen bed.

The large kitchen area, with plenty of drawers (NINE!) and plenty of cabinets, and lots of counter space were an added plus.  There are more cabinets to the left over the kitchen table (the table pulls out with 2 more leaves to make it big enough for 4 of 5 people to sit around.  Lots of storage and shelves inside the cabinets. The only downfall is the lack of an LP oven, it has just a micro/convention unit.  UGH!   We use an external LP oven from Coleman that I have talked about in previous posts.  Or we fire up the generator to use the convection portion if we have to.


All of our cabinetry is solid Western Alder wood, native to the Oregon coast where our rig was made.  There is no fiberboard, fake panels or papered layers to our cabinetry, which is something that wood-loving folks like us appreciate.   Even our double door Dometic fridge has real wooden matching panels, custom fit from the Safari factory.  Fountainhead countertops (like Corian) make the kitchen really durable and handy.  I enjoy cooking in it. 


All of the drawers are very wide and deep to the backs of the cabinets.  Not much wasted space back there.   They don’t make em like this anymore.  Sigh.  So we gotta keep this rig in tip-top shape to make it last.

There is a stand-alone icemaker over near the entry door under the wine-glass cabinet.


Now... forward to the livingroom area:
We went through some transitions in this room.  At first there were two uncomfortable jack knife sofas.  They were peach and frost blue tiger stripe upholstery, I kid you not!   So right away I recovered them with this blue and gray textured corduroy fabric.


We later removed one couch and added a euro chair and ottoman.  
That worked for a while.  

Then we pulled out the other couch and tried two big recliners.  
They took up a lot of room, but were more comfy than the couches. 

Finally we settled on one wall-hugging reclining loveseat from LazyBoy which comes in three pieces and easy to assemble inside the rig.  This is exactly what we wanted! Comfy, soft and takes up less room. 

It really opened up the space.  Now I can bring along a table loom and set it on the coffee table, or a spinning wheel or sockknitting machine.  We can fit a queen size air mattress on the floor when the grandtots come. Lots of room now and when we rotate the captains chairs up front, we have additional seating for company. 


Up in the cockpit, we have a neato pullout desk area, perfect for the laptop!  We use Microsoft Streets and Trips with a dongle usb GPS, so it’s nice to have it handy and close to my co-pilot seat.  It retracts and folds outta the way in flash for me to get up, or if we go inside somewhere for a bit, the laptop is stowed away and not visible to passersby's.


There is an AC outlet under the dash if we have the inverter on, and Steve wired in a DC outlet nearby so I can use that when we are driving down the road.  I bought an AC/DC power source for my laptop and tablet, instead of using only 120VAC via the inverter.  We did burn out one alternator in 2008, which might have been from driving all the time with the inverter on.  Now we use the DC instead when driving on the roads, if at all possible.

Let’s walk back to the middle of the coach….


We have a large walk-through bath, with a full tub and shower.  It works well for bathing dirty dogs, messy grandtots and yes, I can even lay down in it with a good book, a glass of wine, and a bath pillow.  Yes, my knees are bent a bit, but it's still a bath tub! 


We are pleased to have plenty of closets and drawers, with a Splendide washer/dryer combo installed.  We added an Oxygenics shower head which is GREAT!   It gives a frothy foamy full shower without wasting as much water that regular showerheads do.


Our last rig had a split bath, with a hallway through it, and small area for the toilet.  We realize we like this roomy walk-thru full bath better.  There is a wooden four-panel sliding pocket door that separates the bath from the kitchen and another sliding door leading to the bedroom.  Good for closing the dogs off into the back.

Now for our Master Bedroom:


We didn't care for the huge mirror over the head of the bed,
so we covered it a well-loved Robert Duncan print called "April Storm"
suspended from the cabinets above on brackets.


The driver's side corner of the bedroom contains a little makeup area, lit mirrors, and overhead tv cabinet.  We also have our controls for the inverter, and we installed a timer for the inverter to shut itself off at night when not in use.  So I can have the tv on in bed to fall asleep, and not have to get back out to turn off the inverter.  We most often camp without hookups, so using the inverter draws on our batteries all night long. That is why we turn it off via the timer.


The bedroom is a bit cramped due to the king sized bed, but it is a very workable situation for us, considering how much we need the king bed.  There are cabinets all above around all three sides for added storage.


The whole bed lifts up for easy access to the complete diesel engine.  You can step right inside on top of the engine to work on it, which makes for much easier repairs.  Slides and sideway beds really complicate that access, and many diesel repair shops will shoot out an automatic “NO”  reply when asking for engine repair work on a motor home, due to the difficulty of most rigs to access to the engine compartment.  Once we explain the huge access area, they reconsider and take us in.  Happened twice for us so far on the road.


After the first few years of using a scooter on a back rack, we installed a Blue Ox tow bar and haul around a Geo Tracker.  Easier to tour the areas we visit and we can take the dogs along with us....


We hook up with a routine each time and double check each other's tasks.

It can shift easily into four wheel drive, which was fun out in the desert...
and I do appreciate the air conditioning as we ride along on hot days!


NEWEST MODIFICATION:
Because we now face a different direction when sitting on the loveseat, we decided to invest in another tv.  The regular tv was installed up over the driver's seat and doubled as our backup camera screen.  We looked at the power consumption of various TV's until we found a low-wattage LED tv from Vizio.  

We decided to remove the overhead tv completely, and just have four panels of dark plexi cabinets... Steve took out the tv cabinet and made it shorter to avoid the "head banger" feature of hitting his head on it! 


Here is how it looked before
with the big "head banger" cabinet hanging into the driver's area.


 We removed the tv and Steve shortened up the cabinet from the top down
so it would sit level with the rest of the cabinets


Of course, he had to reroute a bunch of wires 
and stereo stuff and back up camera stuff

The backup camera signal used to come in on that overhead tv... 
now we put the cable to a small monitor between the dash consoles


A fellow Safari-ite Bill sent us an extra plexi glass door to cover the open space! 


 We had to move over one of the small tweeter speakers for the surround sound


There... done! 
It looks SO much better.... and gives us more windshield view too

Now that the tv is gone over the drivers area, we only use the flat screen in the livingroom space.  Now we mounted our flat screen onto a bracket located between the two windows. It works much better there!


 (I love Andy Griffith and Mayberry!) 


We also put a tv arm in the back bedroom spot,
with a smaller more energy efficient Vizio flat screen too! 


Well, that is about it for our grand tour.  This is what a 20 year old motorhome looks like if you keep it in good repair, check for roof leaks, do routine maintenance and drive it carefully.  These diesel engines are made to last a long long time.  So as long as we keep the chassis and exterior in good condition, we will enjoy it for many years to come.   This year we qualify for "collector plates" when we go to license it... meaning no more yearly fees!