Our Wonderful Followers who come back again and again to read about us...

Monday, February 14, 2022

Happy Valentine's Day! Eggs and Darts

After 13 days, we finally felt good enough to get out and about. We're not totally over this crud yet, but at least we are feeling better. Steve said he is 80%! 

We were able to make a run down to Home Depot and pick up the trim to start on the top of the beadboard and quarter round for the baseboard in the kitchen. They were 8 ft long pieces so we are able to haul them in the Saturn, wedged in from the front to the rear and closing the back hatch. That is a lot easier than hauling out our trailer on a snowy day to pick up trim wood.


It's called "Egg and Dart" plate rail trim.  The pattern matches the vintage "Egg and Dart" our home has above all of the windows and doorways.

Of course, old houses are never level, even, or square! As we started on the first piece of trim, we realized the plaster wall bulged out too far in one spot and did not allow the piece of trim to set flat and flush against the wall. I remembered something I had seen on one of the HGTV shows where they actually cut away part of the plaster wall to get a piece of trim to fit. So that's just what we did!


After drawing a line, Steve used the little oscillating cutting tool and I held the end of the Shop-Vac nearby to catch most of the mess. It worked perfectly! Now that piece of trim could be recessed flat on the wall and nailed into place.

Steve started nailing the bottom trim around where the bead board meets the top edge of the existing old baseboard. This is where we put a narrow piece of quarter round and then I got down on my hands and knees and painted it all the way around the room. It looks so much better, more neatly finished by just adding a little piece of trim.


I painted the first two coats on the upper trim of the "egg and dart" plate rail. Steve cut all of the pieces to size while I took care of painting them on the island.  It's a lot easier to paint trim first, rather than once it's up and on the wall. I used a little brush and was able to get in the tiny little grooves and cracks of the egg and dart design.  While we were letting it dry, we finished the baseboard.


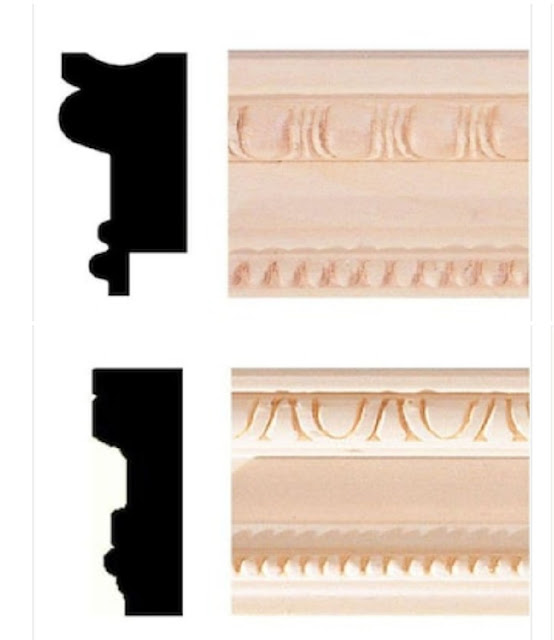
Here is the profile view shape of this trim the top has a groove for a plate rail and the bottom has a notch cut out that sets right over the rough edges of the beadboard. This is a sideways shot, but at least you can see the end detail.


Using his battery powered finishing nailer, he was able to tack tack tack the pieces up into place. Then we used a little bit of spackle to fill in all of the tiny nail holes and any gaps were filled with caulking. Again, the uneven wall makes things difficult but we sure made it look as good as we could. Once all of the spackling and caulk were dry, then I could give it a one more coat of paint to finish it off.


I really like how it sets it off along the top trim of the beadboard. I think it came out pretty neat considering that we had a crooked old wall to deal with???


I took some brighter pictures today as the sunlight was streaming in. We pushed the cabinet back into place and now this room is complete.


Here is one of those wide-angle shots that kind of distorts the view, but now this is the whole southern wall of our kitchen has beadboard on it, and then it goes around to the eastern wall. (Those are the new windows we replaced last summer).


The big cabinet is an upcycled old cabinet that we added some beadboard into the recessed panels of the doors and on both of the sides. It's amazing how much extra pantry space that allows us to have in the kitchen. It contains my big Nesco roaster, my Mix Master, the crock pot, our blender, our food processor, a waffle iron, and any overflow dry goods or canned goods that don't fit in the regular cabinets on the other side of the room.


On the other side of the room, the island and the ends of the cabinets also have beadboard highlighting them. This kind of ties it all together and makes the room coordinate both sides.  Excuse the painting supplies still stacked on the island.


Now that the beadboard in the kitchen is done, NEXT is the master bathroom!!!  Stay tuned.

~~~~~~~~~

We got a little bit of snow the other morning. Even though it was going to be a warm day and the snow is starting to melt on the road, Steve wanted to get out and snow blow away the bank that the snow plow left behind. It was wet and heavy.  Otherwise, the temperatures were dropping down to below zero at night and that thing would freeze solid. Then we would have a hump at the end of the driveway for the rest of the winter.


While the sunshine was streaming in, I took another picture of my beautiful amaryllis bulbs. I can't believe these gorgeous blooms are just evolving and opening up and lasting so long. It's already been over two weeks and there are more stalks are coming up with more blooms.


~~~~~

Yes, today is Valentine's Day, the day for lovers and sweethearts. We dropped off little red bags over by the grandchildren's houses so they could have some treats. 


ON EDIT:  some of the little ones enjoying their treats, pics sent over to us this evening:


We are enjoying our Valentine's present to each other, our pretty cozy nice fireplace. Not only does it help with the heat bills, but it's also beautiful to look at and so comforting in the evenings if we sit in the living room and read or listen to music.


I think it was a pretty smart investment, made a nice improvement to the house, and it was also a very romantic gift to each other.


The sun is still out this late afternoon, actually quite strongly yet as I write this. It's already 4:30 and we are having daylight running later into the evenings. A sure sign that spring is on its way. 

Someone here in town saw a robin this week and took a picture of it! It's way too soon for robins to be back yet, I think that one got a little confused? Although we have some warm temperatures coming this week, there is still plenty of winter left for us here in Wisconsin.

~~~~~~~~

During the Super Bowl last night I kept myself busy cutting strips of a bedspread for my newest rug.  These are vintage white chenille bedspreads given to me by my old neighbor Charlotte.   The Super Bowl was a bit boring. I wanted the Bengals to win. Oh well.  I loved the commercials, especially the one with the goats from Disney Plus... and the one with Arnold was a hoot too. 


I already wove up one of these Caterpillar Rugs with the help of little Claire, the youngest granddaughter.  I wrote about that a few blogs back.   Here she is helping me: 


I delivered the first rug to Charlotte as a surprise gift.  She has it proudly laid next to her bed for her toes to touch first thing in the morning.

Now I am going to weave up the second bedspread into a rug to put up for sale in my Etsy store.  It makes a GREAT baby shower gift when combined with the book The Very Hungry Caterpillar.  It will soon be listed in the store for sale.

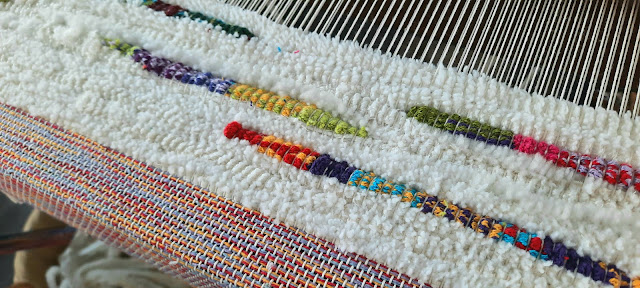
I started the header section with bright colorful cotton yarns.  Then I inlay the little knit caterpillars as I weave the rug with the white chenille fabric strips. 


It sure is cute,
 and it makes me smile.


Time to get supper going,

so I will post this now.

Wednesday, February 9, 2022

A Romantic Valentine's Fireplace

After twenty-five years, Steve and I have reached the point where we now decide to buy a mutual gift together to celebrate our holidays. Much like at Christmas, when we purchased the tankless water heater, which is something we both wanted. That was our Christmas present to ourselves.

Well, the next holiday coming up is Valentine's Day. There was something we had wanted for the house, and Steve suggested that we consider it our Valentine's Day present to each other! It's not very sexy, but it COULD be.....

In our living room we have a big brick fireplace. We have long ago blocked off the chimney and made sure that it is no longer accessible from outside.We did not want to go through the expense of relining an entire chimney flue for something that we really weren't even going to use.

In the fireplace opening, a while back we placed a natural gas vent-free stand-alone fireplace unit from Charmglow. With the pretty screen in front of it, you really don't even see what is in the fireplace opening. Just the beautiful flames flickering against the curly cues on the brown mesh screen. It's very soothing and relaxing, plus it takes the chill out on a cold morning. It's supplements the central heating and is a comforting and yet practical way while adding ambience to the room.  Here is the pretty screen:


The only problem with the older natural gas fireplace that we had installed is that it was "manual". We had to reach down inside, and reach underneath the back edge to push the igniter or to control the temperature knob settings. We had to reach down below underneath for a switch for the blower.  And reaching way down underneath was achieved by laying on the floor to turn on and off the gas at the main valve. Although it worked, it wasn't all that fun to operate.

Now, to those "purists" to say the only fire is a real wood fire, I beg to differ. We get enough wood fires when we're camping. Keep in mind, our experiences in the past have led us to enjoy a gas log fireplace instead of woodburning type.

I grew up in a home that was heated solely by wood in a big old wood stove. That meant all of us children helping to haul wood, chop wood, stack wood, and keep the fire going at home, around the clock.  This was in the dead of winter in the Upper Peninsula of Michigan.  Stoking the fire every few hours was a necessity, not a pleasure. It was not fun. Plus cleaning out the wood stove, bringing out the ashes, dumping them in the back garden, and then cleaning up the mess is a whole other process that needed to be done.  Cautious use and dangers of a chimney fire were always present in the back of the mind.

After I grew up, and had a home of my own, I had a wood burning fireplace. It was not the main source of heat, but it was nice to have on cold winter nights.  Again it meant hauling firewood, starting fires, keeping it going and not being able to close off the damper until the fire went out. That meant sucking the room heat back OUT of the room and have it go up the chimney before the fire was completely out. That was not fun. And did I mention cleaning up the ashes?  There was always the issue of bugs coming in the house with the firewood. Having to clean up the soot every once in a while because smoke would puff back into the room when it was windy. I would have soot on the bricks, the wall, the mantle, etc. Not fun.

When we built our log house out on the river, again we had a wood burning fireplace. Then again the same stuff of hauling in wood, maintaining the fire and cleaning it up afterwards. Steve did most of that, and it was not fun.

After 50+ years of this, I think our days of messing with the real woodburning log fireplaces are done. 

When we moved to the house in Chilton, we had a faux electric fireplace. We installed a natural gas log fireplace kit into the opening.  From then on we really appreciated the ease of having natural gas logs instead of a real wood burning fireplace! 

When we bought the house here in Oconto, we knew that there was was a real wood burning fireplace but the chimney was of questionable quality. Sooo blocking it off and putting in a gas log unit made the most sense for us. Even if it wasn't the easiest to use, we were glad to have something in the opening.  We also have a nice gas log unit down in the She Shed that we use during fall, winter and spring to heat the space.  Although they have electric blowers to help move the heat, both of the fireplaces can operate without any electrical power if need be. Perfect solution in a power outage due to storm or other mishap, our pipes won't freeze and we wouldn't have to leave our home.

Steve's Valentine gift suggestion was to replace it with another similar fireplace, but this time with a remote control! That's just what we did. We ordered it from our local Tractor Supply Company that had it shipped directly to the store a couple miles away from us. We did a curbside pickup where they carted it right out the door to our waiting vehicle.


So here we are, posing with our new Valentine's Day gift to each other. We are finally feeling about 1/2 to 3/4 of the way better from last week's sickness that we could finally get up some energy and decided to start the installation.  Not too bad for a couple of sickos?


Here is the older fireplace fully operating with pretty flames flickering. Once the installation of the new one is done, we will sell the old one on Marketplace. Somebody else will be able to use it. Our decorative screen is removed to take a good pic to sell it.


Yesterday, Steve opened up the box and started assembling the new fireplace. He was mounting the legs on and we were reading through the directions. Imagine that, a man reading directions? The old one is pulled forward out of the fireplace opening, so we could start disassembling that one at the same time.


He worked on it for a while and then we decided to take a break. He had all the tools assembled and ready to go. We vacuumed out the fireplace opening before installing the new one. Then we kind of ran out of energy. So it sat like this in the living room overnight. Nobody says we have to rush rush rush and get it done in one day. Although, when we were both feeling better, that's exactly what we would have done.


Bright and early this morning, Steve was feeling better, so we decided to tackle the rest of the installation. Step-by-step--- everything was correctly switched over, the new blower unit installed, and the settings all correctly adjusted for the space.

One of the best features on this new unit, which is made by ProCom instead of Charmglow, is that the controls are right up front underneath a little flap door. This is similar to the one that we have down in the she shed. It makes the controls much more accessible than the other one that we had.


Now it was time
 to put the pretty fireplace screen 
back in front of the unit. 


Once this is on, all I want is some nice flickering flames and warmth and heat coming into the room. Plus now having a remote control is great to handle it all.  P.S. I got the screen from Wayfair last year.


We'll look at that. It fits perfectly in the same spot it did before and you really don't notice anything has changed at all in the room. But we know now with a flick of the remote, we can be enjoying the flames and heat and warmth of the new fireplace, just much easier than before.  


No wood to haul.
No bugs.
 No ashes.
No soot. 


We toasted to our new gift to each other,
a few days early for Valentines.


~~~~~~~~~

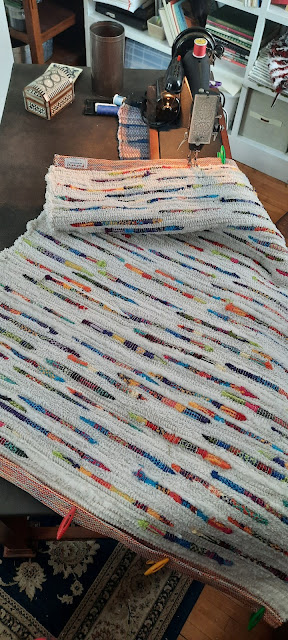
Since I had so much energy today and I've been recouping from being ill, I decided to get out my grandmother's big old Singer sewing machine and set it up on the desk in the office. Of my five sewing machines, this is the only one that will sew through a triple folded hem on my hand-woven rugs.


It was nice to sit at the desk with the beautiful blooms over my shoulder from the amaryllis plant. I'm now enjoying four large stalks full of blooms and more to come. One website I read said the blooms can last from 30 to 60 days! 

I fold over the hems twice and clip them into place so I am sewing through three layers of woven header material. It's nice at the desk to have all this space to move the rug around while I sew on the hems. I used to do this on the dining room table and had to move everything out of the way.  Since I repurposed these two end tables into a desk for the office, it's made a nice area to set up the sewing machine for the occasional times I need to hem a rug or two or three...


This machine from 1942 just goes and goes and goes
a real work horse.


The weather outside has warmed up nicely and we were almost to 40 degrees today. 40 and February in Wisconsin is a pretty nice day. 

For supper we were actually grilling outside because it's so nice and warm. Of course, we ate inside. Our appetites are coming back and we enjoyed some freshly grilled hamburgers tonight.


We don't need to be fancy,

just comfortable. 


Monday, February 7, 2022

What a Way to Start February?

Ugh.... this has not been a good week.  Definitely not a good way to start February. 

But I try to look at the good things.  And one good thing are these blossoms! 

In my last blog, I had posted about the blooms on this amazing amaryllis plant. I have never had a plant like this before. It was given to me during the fall and I never really knew how to care for it. I didn't even know it was 7 or 8 individual bulbs in the one pot! 


My friend Connie sent me this email with some really nice explicit instructions:

 This is how I treat mine.

Usually the single flower stalk will have four blooms.  It's good that
you have propped up the flower stalk.  Cut each blossom off as it droops
down and be careful of the sap as it can stain. After all are done cut
the stalk as close down into the leaves as you can do it without
damaging the leaves.  Set the pots outdoors when the weather gets warm
enough and water all summer.  I usually put them on one side of the
house for partial shade.  Stop watering about Labor Day and it'll take a
long time for the leaves to dry out.  Bring the pots in before a severe
frost and take off dry leaves as they get brittle.  Then I put them in
the basement. This year I brought the first one up in mid-December
watering it and putting it in a sunny window.,  I've brought one up
every two weeks since but the three are all at about the same stage of
development.  The first one took forever, it seemed, to put out a shoot
and the third one popped right out so maybe the sun intensity has
something to do with it.  Last summer as I put them outdoors I divided
the new shoots, which are little bulbs off of a big bulb, into separate
pots.  As gifts they came in pots without drain holes which I think is a
BAD idea.  I've repotted all of mine into pots that can drain."


I now have four tall stalks full of beautiful peachy orange blooms. There are five more stalks poking up their heads, ready to give me more as these die off.


It's hard to get a good pic against the open window---
I tried with the mini blind down.


I think all of the blooms will be the same color.


It sure is a cheery sight to walk around the corner and peek into the office each morning. Seeing the sun streaming in on these beautiful blossoms reaching 2 ft or more higher than the flower pot that they reside in.


~~~~~~~~~

I am finally starting to feel a little bit better after being sick for more than 7 days. About 3 days after I started feeling sick, Steve fell right into step after me. So he's about three days behind me on the increasing wellness factor. 

I did take a home covid test that said negative. But I am beginning to doubt that. I have heard a lot of these home kits give false negatives. I suppose short of actually going in and taking a PCR test at a clinic or at the doctor office is the only way to know for sure. 

But since I'm starting to feel better and Steve is slowly getting better behind me, I think we will leave it as it is. But I'm pretty sure we have covid again because this is no ordinary flu.  And yes, we both have had our flu shots, as well as our covid vaccines and boosters. Sigh.

~~~~~~~~

We put on hold our beadboard project of last week because neither of us had any energy to do anything. I did wake up yesterday morning feeling the urge to get the final coat of paint on the beadboard that Steve had added around underneath the windows and by the cuckoo clock. Honestly, it took all of the energy I could muster to get that much painted. But it's done!


The last step will be to add the rest of the little bit of trim where the bead board meets the baseboard. Plus the top cap of what ever of the two designs that I had previously talked about.  But we can't do that until we feel better and take a run to Green Bay to the Home Depot to pick them out.  

Sometime later this month, when we feel better, we will start the beadboard in the bathroom. 

~~~~~~~~

Last week the littlest granddaughter had helped me weave the caterpillar rug. I posted about it in my last blog. I had finished it up but never got around to unrolling it or cutting it off the loom yet. After a little bit of rest from my painting, I got up and decided to unroll the rug and see what we had created. 


The next step is to cut it free from the loom, fold-over the woven header ends three times, and hem each end securely on my grandmother's antique Singer sewing machine.

~~~~~~~~~~

Steve was finally feeling good enough today to get up and put on some clothes. We've been wandering around the house in jammies and slippers and sweats for the last 7 days. Today he got dressed because he needed to get down into the basement and change our whole house filter, as well as check the little filter on the new tankless water heater system. We are proud to say that both are operating perfectly and it was worth it to double-check everything and maintain it. Even if it took all of our energy to do so.

(the ceilings are very low in this half of the basment,
that is why he is down on his knees.)

While he was taking care of the water heater, I was watering my boxes of coleus that I am wintering over in the south-facing windows of the basement. I also have a pot of ivy growing down there as well. 

The basement windows are large enough that they can bring in the sunlight even though they are at ground level. If I kept these plants up on the main floor they get a little messy when the leaves fall off and new ones grow, as well as the stems get rangy and kind of awkward.

I'm glad that I can keep them down in the basement. I can water them liberally and let the excess trickle out and down the basement drain. It doesn't matter if they are messy, I sweep up the dead leaves every few weeks. By Spring, they'll be ready to be brought outside after the danger of frost has past. I distribute them in the flower beds around the yard for summer color.  I have kept the same ones going since Connie gave them to me in about 1990 or so. 


From time to time I snap off the longest rangiest pieces and stuff them into a vase of water, and place them upstairs in the window. There they have a chance to grow new roots. Then I can plant them alongside the other more mature plants or I can put them into a new pot.  See the tiny roots starting in the vase below?


I also take snips off this ivy plant from time to time and root them the same way.  This ivy is from way back when we first had our house in Chilton in 2012 and I had the pot growing inside the front porch. It's just plain old basic ivy that used to grow outside and  then moved inside to one of my flower pots, common garden-variety stuff from garden center for 99 cents.


I stick it in a vase of water until it grows roots 
and then I pop it into some potting soil to create a new house plant.


Amazingly, I have been putting some of these ivy plants out around the pergola each summer and they make it through the entire winter to grow again in the spring. I had no idea that ivy could winter over in Wisconsin. Especially this plain old regular potting ivy. I guess it's pretty hearty stuff.


Well I really don't have a lot to blog about today other than my beautiful flowers that are blooming. I might get a little quilting done but I haven't gotten an awful lot done this whole week. I do have a nice beef roast in the pressure cooker today and I'm just about ready to add potatoes and carrots to finish it off for dinner this evening. We don't have very huge appetites but a pot roast is always good to save for leftovers or to turn into a hearty beef stew. Good to stick to the ribs on these cold winter days.

In the meantime, we are inside, staying warm.  The dog is helping to pick out next week's specials at the grocery store. Our soninlaw offered to pick things up for us as needed. What a sweet guy.


I am relaxing and planning on just watching winter happen:


Stay in. 

Stay warm. 

Stay safe. 

Tuesday, February 1, 2022

Beadboard, Barking and Blooms

What do you do when you have 100 plus year old plaster walls? 

Most of them are pretty nice shape in our house. For their age. The South wall in the kitchen was good enough. And we normally have a large refurbished old cabinet used as pantry pushed up against the wall. The rest of uneven old plaster has been covered with a woven wall hanging and plaque talking about being a grandmother. So you really didn't see the wall too much. 

But since Steve had gotten a large amount of beadboard planking from a guy off Facebook Marketplace, we have enough to do the bathroom wainscotting as well as this South and East wall of the kitchen. I figure the beadboard will kind of pull together the bead board trim we put on the pantry cabinet and tie it in with the rest of the kitchen which also has bead board trims here and there on the cabinetry. I like "matchy matchy".

We pulled out the big pantry cabinet by carefully sliding it away from the wall. Fortunately we had put on those little felt pads when we first brought it into the house, so it was easy to slide across the hardwood floor. We didn't even have to take out any of the canned goods or cooking appliances out of it. Easy peasy!  


Steve started tearing off the little pieces of quarter round trim along the baseboard. The register opening there is actually defunct and has been disonnected from the heating system. It had been rerouted to a different spot and this register was just kind of sitting there unused. Now was a good time to cover it up.


Steve started with the first piece of beadboard, making the most difficult cut around the lip edge of the window sill. Then he could work to the right or the left attaching the rest of the beadboard strips. Each strip is 3 1/2 in wide. This is so much nicer than working with 4 by 8 sheets of imitation beadboard paneling. As most of you know, old houses are not square. Big sheets of anything don't lay square or true in old houses.This way he could work with this type of beadboard a strip at a time along the wall and work along the uneven surfaces.


Besides using his little finishing nail gun, he is slathering behind each piece this type of adhesive made for this very product. He needs to trowel it on the wall, and then get the boards nailed into place a section at a time.


Yesterday he started working from the first board going out to the right. It really was going very well. The beadboard is 4 ft high and the bottom baseboard is about 9 or 10 inches tall.


Along the top edge we are going to put a piece of plate rail trim. I looked online at Home Depot and there are two different types that I like. The upper one is only an inch and a half tall but has a little lip edge for a plate rail. Plus it already has a notch cut out to set along the top edge of the beadboard planks. The bottom one looks a little more chintzy or pressed into the wood with the egg and dart motif, but is 2 in tall. No notch, so we would have to router one on each piece. 


I guess we will reserve our choice until we get down to Home Depot and see which one we like better?  I haven't been feeling too good and have to make sure it's not Covid before I venture out in public.


Steve worked his way down the wall and got all the way to the corner. Now it was my turn. Having experience with knotty pine, (we lived in a home for 13 years that was ALL knotty pine), we knew we had to cover the knots with two coats of clear shellac ---  otherwise they bleed through the paint. I bought low older clear shellac and gave every single knot two coats before I started painting.


Last night I started the first coat of primer / paint. This morning I gave it a second coat. And this afternoon a third. Now all we need is the top trim cap! But that necessitates a trip to Green Bay and we might not do that for a couple days yet. In the meantime I think it looks pretty nice.


While we are working on the wall, this big pantry cabinet is setting right in the open doorway. We don't want to push it anywhere else in the house and will soon be able to slide it back into place. Fortunately, the kitchen is wide enough that we can walk around it. 


This afternoon Steve started working on the wall underneath the cuckoo clock and across underneath the windows. That takes a little bit more work down on the hands and knees. He had his kneeling cushion to take the brunt of it.  I have the feeling that I will be rubbing some aspercreme or ben gay on his knees tonight anyhow.


Working a section at a time, he came across from that original starting strip and worked to the left, up to the corner underneath the window.


Before supper this evening, I put two more coats of shellac on all of the knots of the newest section. I took some AlkaSeltzer Plus and felt pretty good....  so after supper I got around to starting the first coat of primter/paint. It doesn't take long and I have a small roller with long nap that gets into the grooves pretty well. 


In between watching the end of PBS Finding Your Roots and then the starting of HGTV Fixer to Fabulous, I was able to get this portion painted!  The episode of Fixer to Fabulous was a couple from a town about 25 miles north of here who were having a winter retreat home redone down in Arkansas.  They wanted to get in before winter struck up here, and it looks like they did.  We like that show. 

Anyhow, this is OUR Fixer to Fabulous!  Tomorrow I will get the 2nd and 3rd coats done....  Then it only needs the top plate rail trim. Steve said let's push the pantry cabinet back for the few days until we can get to Home Depot.  We will also add a small piece of trim along the bottom edge to meet and cover the edges at the baseboard, maybe flat stock or maybe a tiny quarter round.


~~~~~~~~


On to the second word of my title: "barking". Our backyard has become a pit stop on the raceway of all of the deer in the neighborhood. Every night there's usually between 5 to 10 wandering past on their cruise through, looking to see if there's anything good underneath our bird feeders.


Their appearance is much to the delight of little Binney. She considers them her "friends" and she barks like a crazy dog when she sees them out there. She dances from the window, over to our chairs to tell us that her "friends" are here. Then she dashes back to the window to bark at them. Then over to our chairs again, and then back to the window. This can go on for 15 or 20 minutes. But we figure it's her entertainment. 
If we can watch a good TV show,
 she can watch a good deer show.


~~~~~~~~


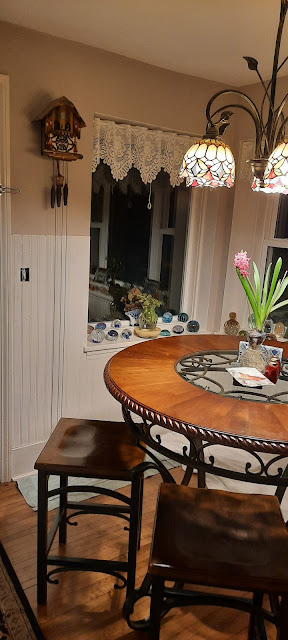
The third word of my title was "blooms". Even though it's the dead of winter, our house is feeling very spring-like. When the sun shines in, it really makes us feel warm all over. When we were at Aldi last week, they had these beautiful hyacinth bulbs in little glass vases. They grow completely out of the water itself and no soil. This one is blooming beautifully in gorgeous shades of pinks. I smell it every time I walk past and I have it in the middle of the sun shiny windows at our kitchen table. Every day it needs to be rotated a quarter-turn to keep it from growing too much in one direction.


The other exciting "bloom" subject is in our office. 

Last summer, when we had picked up a loom, a woman insisted I take this strange flower pot with me of dilapidated old green leaves laying down in all directions. It look like it was almost dead. She said she wouldn't be able to grow it anymore because she's going away for the winter and her brother could no longer take care of it for her. She insisted I take it. So much so, that she physically put it into my car and made me take it. I didn't even know what kind of a plant it was for sure. She said something about it being an amaryllis. But I had never grown one before so I had no idea what to expect. 

I took it home and started giving it little bits of water and it perked right up. That was last September. The leaves were growing while I had it an East window. But then Steve moved it to a South window and suddenly we started getting little stalks coming up in the middle of each clump. It turns out there are eight amaryllis bulbs in this one pot. I guess they like to be crowded. We now have eight stalks growing up and reaching two feet high!

I am trying to keep them from bending over too far by supporting them with some little wire devices and loops. I keep rotating the pot. I have no idea if they are different colors or all the same. I was very excited to see the first one spread wide open and start exposing the beautiful petals of the blooms,


It looks like this first one is going to be a peachy orange color!. I don't know if all the rest will be the same, or if they will all be different. I looked them up online and they come in many many different colors. So it will be a surprise. I'm anxious to see them open up because I have never grown this type of a bulb before.


So as the sunshine streams in, we are embarking on February 1st. There's still a lot of winter left. But I guess I don't really mind as long as we can sit here and look out the windows. We are cozy warm inside and we can let the winter pass by outside. Today was pretty nice and sunshiny and up into the high 30s. 


But there's a big storm coming across just south of us. We aren't going to get much from it, other than the cold temps. Temperatures will be diving the back down below zero again in the next day or so. So we got to enjoy the sunshine while we can.