Sorry... The loom is now sold. The author of The Weaver's Friend 2 Historic Loom Newsletter is buying it....
http://www.weaversfriend2.com
But, you can still read about how we did the loom restoration!!!
Here it is ALL DONE
Earlier this spring, I happened upon this poor old Union Special Loom. It needed some knowledgeable restoration and kindness and LOVE. That's what Steve and I do best!! We loaded it up and double checked that all of the parts were there.... and hauled it home in pieces.
We have hauled home Union looms before, and knew they could sit in a car trunk and backseat. or in a small SUV. Of course the best way is fully assembled in the back of a pickup truck or on a trailer being towed behind.... which we have hauled them home in all of those ways!
So this process doesn't daunt us in the least. These looms are meant to be rescued, restored and placed back into service again. They are big tools, like a shovel or hoe or rake or wheelbarrow. They never go out of style, and are made to last a lifetime, or a few lifetimes as a matter of fact.
HERE ARE A FEW
"BEFORE" PICS:
rusted up wire heddles (now thrown away)
rusted up 12 dent reed and rusted beater handle
rusted cloth beam take up gears and missing lever and spring on the pawl device
Dried out wood with scarred painted surface
closeup of castle pieces shows the original blue paint color
We were pretty busy with building our big backyard fence and putting it up, and other summer projects, so the loom sat on the backburner for a while. It was in the garage. Each time I pulled in the garage with my car, it was staring at me. Asking for help. It wanted to weave again and be useful!
It was bugging at me to get it together and see how I could make it shine. We assembled it with the help of our two grandsons... they LOVED using tools and helping to solve the puzzle of assembling the loom.
The wood was pretty grubby, so it needed to be washed down with some Liquid Gold Wood Wash to take off the layers of grime. It was a hot summer day and since I had two 5 year old slave helpers here to scrub and get wet and dirty. They are small and can lean and bend and twist around the loom with brushes and rags and sponges.
They worked hard
and we had to reward them with a treat from McDonalds
and some fun active time in the indoor playland.
Cheap labor, eh?
we assembled it all together and everything is there, and straight and true!
I clipped away some of the tangled old warp on the back,
but left this much on to use for practice or threading up to test adjustments
After we assembled the pieces into the garage, I wanted to learn a bit about the loom's previous owner. It's like a historical excavation. I unwound the partially woven rug on the front beam. It was lashed onto a big broomstick for a front bar on the take-up beam. VERY interesting.... I decided to carefully sew across the unfinished edge and save what I could of the rug. It is now a "wall hanging" in my Loom Room! hahahaha (I might be persuaded to include it in the sale with the new buyer)
This next part is very interesting.... for those of you who don't know what the "apron" is, it's the first section of fabric (usually canvas or denim) attached to the front beam to start weaving your rug onto. It usually has a fabric panel with small holes and a bar for tying on the new warp strings to hold them taunt to weave upon.
It looks like some industrious weaver had woven an "apron" of carpet warp threads so it was a panel of fabric, and then took the long threads leading off it and braided them into cords!
She tied the cords to a big hunk of broomstick, not a dowel. This is what she lashed her beginning of the rug onto with big long stitches of cotton butchershop string. Very interesting! Hmmmmmm
Sadly, the cloth take-up beam rusted onto the woven fabric
and it looks pretty messy)
The loom has a nifty rack on the top of the castle for placing the wound up rag rug shuttles. Especially if weaving in a pattern of stripes, it is handy having the shuttles all set up in order of the pattern. By having this rack overhead, the weaver doesn't need another surface to set the shuttles (where they might get mixed up) It is one of the few looms on the market, then or even now, that has such a rack!
The painted surface of the wood is pretty rough shape. The loom originally came from the factory back in between 1920 and 1940 in this blue painted color. I know during the war and depression, sources of wood to the factory in Boonville NY were limited. Sometimes they had various types of wood in different sections all built onto one loom. We had restored a few like that. I am thinking (and I may be wrong here) that the painted version was added to cover up the differences in the wood types?
I debated between leaving the wood with the faded and rubbed worn blue surface, or should I take it all apart and paint each piece fresh blue paint? Or should I strip off ALL the paint and just restore the wood finish??? (my preference is the last choice because I like wood)
Now I had to make a decision...
Do I keep it?
Or sell it?
Because it is wider that my other looms, (54" vs the 44" wide of my Newcomb Looms) I don't have much room as it is. If I tried to stick a 54" wide loom where a 44" one is, I don't think it would fit too well. As it is, I have to be careful of the window to the left and the french doors to the right when I weave. If I sold off both Newcombs and only kept the Union, I would be limited to only weaving one color of warp at a time, and only 2 harnesses vs 4 harnesses on the Newcombs. Hmmmmm---- Plus I have three table looms that wander around the house from Loom Room to Front Porch to Storage Room to Motorhome.
After careful consideration, I decided to sell the Union Custom Loom
and let someone else love it,
and put a little cash back in my pocket for Christmas.
Next the "real work" starts. Steve got out the electric grinder and took a layer of rust off the handle and the reed and the cross beams. I started cleaning the wood and giving it a good oiling that soaked in but good. That wood was REALLY thirsty! Steve added a nice coat of Rustoleum enamel paint to the handle, as that is where the weaver touches the loom the most. There is still some rust on the gears and chains, but the rugs don't touch that.
The loom was missing a few items:
1. A warping clip.... most weavers already have tension boxes, but it is nice for a warping clip to be included with these old Union looms. They came that way, along with spikes along the bottom back edge for an impromptu warping rack. Those spikes HURT your ankles when you walk around the loom. Most weavers remove those spikes because they own a separate warping rack instead. The spikes can be replaced by buying large nails, cutting the heads off and pounding them into the existing holes in the back bottom brace. I will let the new buyer decide if they want to do that.
The clip looks like this and it is used to run warp
from the tubes on spikes on the back bottom brace of the loom like this:
Steve had made a few of these clips for me over the years and he didn't disappoint me. He had one made up toot sweet and ready for the back beam if someone wants to warp it up. What a guy!
2. Also missing was a crank for the back beam. Those get lost so often when looms change hands. Because you don't leave the crank on the loom all of the time, only when winding warp on the back beam. They get left in drawers, on shelves, in baskets or set aside and forgotten about when it comes time to load up the loom. My friend in New York, Hilary Cooper Kenny from
Crazy As A Loom had one and popped that into the mail to me!
3. All of the wire heddles were rusted and crappy... so in the trash they went. I had on hand about 100 more wire heddles of that particular size, but I needed about 300 more. I put out a call to help from my weaving friends, in case they had this strange 12.5 inch size on hand. Yahhhh my friend Tina Hilton in Indianapolis had some leftover nice flat steel ones and popped them in the mail to me!
Weaving friends are the best!
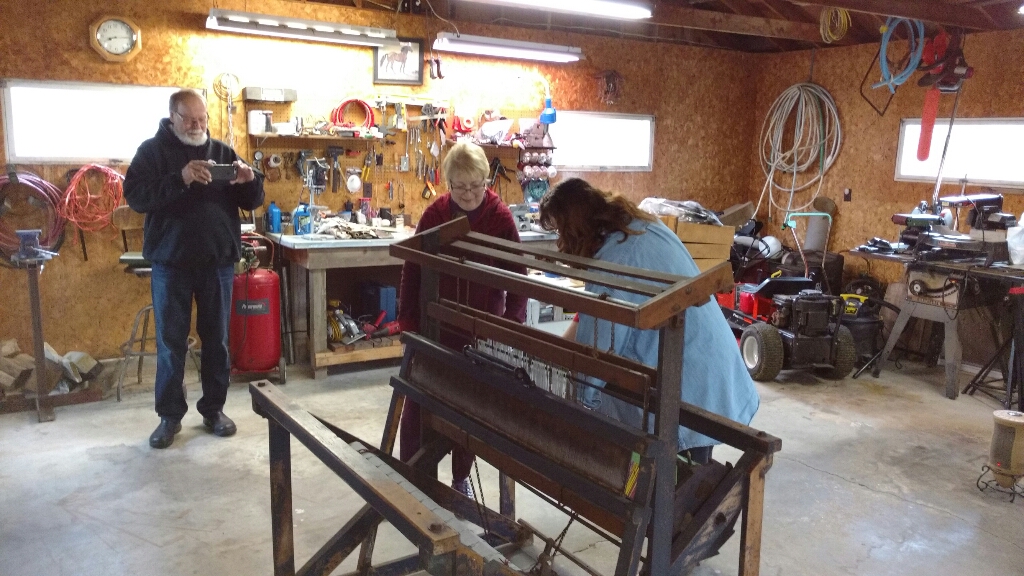
Steve decided to spend the rainy day helping me out in the garage to put the heddles on the loom. Rut Roh, although they are the right length, the little eyes on each end of the flat steel ones are too tight to slide nicely on the heddle bars. What to do??? My Steveio had a GREAT idea!
*doesn't he look like he has great ideas?*
He took each and every single one
of those 300+ flat steel heddles
to his vice,
one at a time,
and carefully tapped the opening just a smidge wider
with a clamped down screwdriver and rubber mallet!
What a guy!!!
MY HERO!
Next, I could do the time consuming task of putting each and every heddle onto the two bars for each harness. Doing them one at a time so they never criss-cross or flip the other way. All the eyes are slanted in the right direction for easy threading.
366 heddles later, I was done!
We attached the harnesses, squared up the loom from corner to corner and checked for level. Then we attached the beater with the freshly ground off and oiled reed. We checked the shed opening by stretching a few strings from the front to the back beams, threading them through a few heddles. It doesn't do any good to warp it up for a whole rug, because the person buying it might not be able to haul it fully assembled. Or they might have to disassemble it to get it into their own house. There is some warp wound on the back beam, but it's old and probably not in too good of shape to weave with. But it is okay to practice or use to check if they have the loom squared up and harnesses hung correctly. The chains let you adjust one link at a time, a bit up or down, on each harness and for each treadle underneath. The only way to "fine tune" a Union loom is to adjust those chains once the loom is fully warped.
The spring on the takeup cloth beam was missing, as well as a little metal arm that bolts to the pawl. We knew how it needed to look, so that wonderful Steveio fabricated a new metal arm and we bought the correct sized spring at the hardware store. Done!
Next part- a new apron! Remember the old handwoven braided one? Well, I made up a nice new one of a heavy canvas/denim type fabric. With triple sewn seams, and a pocket to accept a new firm metal rod (not a broomstick, LOL!) Now the weaver can tie on the warp evenly so this loom can weave a lot of new rugs in the future! Steve secured it down to the five pre-drilled holes that used to hold on the old apron with bent nails. Instead we used heavy self-tapper screws and wide washers to help secure the apron even more firmly to the metal cloth take up beam.
I tied two little shoelaces around it to keep it secure:
On the back sectional beam are rows of wooden spikes that divide the warp into sections as it is wound onto the loom. Three of the spikes were broken off. Steve pulled them out and I made three new ones to take their place. Over the years, we have found that using the largest opening on a school-type wall pencil sharpener works GREAT to angle the tips on the new pieces of dowel!
The loom is restored and
it was time to snap a few pics
and put it online for sale...
sigh.
(I hope I don't regret selling this loom)
I have had three persons seriously interested withing 4 hours of listing it! I put in on various Facebook Buy Sell Trade groups and on Craigslist.
Of course, on Craigslist, I got one foreign guy
who will send me his money order
overnight to my house,
and send extra amount included for cash too
for his shipping guy
who will come and pick up the loom...
yah right!
I told him that "nowhere in my ad did it say I was STOOPID ...
and he should go find an honest way to make money and get a job!" LOL
So please be careful if you post things for sale on Craigslist!
Here is some more information about the Union Loom company. I have owned four of them over the years and they are great looms. In my last house I had room for 8 or 9 looms at a time, but this house I am bit limited and have to let them come and go. But they are great rugged looms!
HERE ARE THE FINISHED PICS
AND WHAT I PUT IN MY AD
UNION CUSTOM
2 HARNESS
LOOM
(Sorry, now it is sold)
This hard working rug loom is ready to be put back to work again. Union looms are a favorite in the industry and have a wonderful repuation for being a solid rug loom. Union Custom looms have a rack on top of the castle for holding the rag shuttles in order of weaving for faster efficient production.
Original paint from factory is blue. Could be restored or left as is.
Some surface rust, does not affect the function of the loom.
- Weaves 42" wide
- Counterbalance action
- 2 harnesses, 2 treadles
- 366 heddles (some flat steel, some wire)
- 12 dent reed, 45" long
- double pawl locking back brake bar
- Sectional back warping beam
- Level straight back and front beams, no warping or sagging
Includes:
- 2 rag shuttles
- warp beam crank
- warping clip for back beam
- Beginning To Weave DVD
- How to Warp a Sectional Loom DVD
It is fully assembled and set in my garage for now.
54" tall x 44" deep x 54" wide
Will NOT ship.
Can be hauled completely disassembled in a car trunk and back seat,
or partially disassembled in pieces in an SUV.
Additional fee if you need us to disassemble it for you to pick up.
Willing to deliver within Wisconsin for reasonable fee plus gas.
Sold







 Posts
Posts

