Our Wonderful Followers who come back again and again to read about us...

Showing posts with label DVD How to Warp a Sectional Loom. Show all posts

Tuesday, July 6, 2021

Updating My Finlander Barn Loom

Although I would love to keep the Finlander Barn Loom as pristine and original as possible, I do need to do a couple adaptations to make it function better for my own use.

I looked back over my loom scrapbook and see that I now have owned 34 looms in my lifetime! That means somewhere along the way, I have gleaned bits and pieces of innovations from different loom configurations to know what I like best for weaving under certain circumstances. 

-There are adaptations you make to the big heavy rug looms. 

-There are adaptations you make to the small portable table looms. 

-There are adaptations you make for looms with fine thin fibers that maybe snarl or snag on each other, like mohair or silk yarns. 

I've added things like a bicycle rear view mirrors to be able to aim underneath and check the progress, making sure that I didn't skip any rows of intricate patterns of overshot or boundweave. I have added things like magnets to hold tips of scissors or large long weaving needles to darn in loose ends. I have added cup hooks to hang little printed cards of weaving patterns to follow. Over the years I've added and done things to looms to make them more "usable" to me.

Now it's time for a couple little upgrades and updates to this Finlander Barn Loom. 

~~~~~~

First, the old fraying sisal ropes needed to be removed. 

I replaced all of the ropes with good strong cotton sash cord, meant for hanging window weights on old windows. It does not stretch like clothesline or twisted ropes. Once it is tied at a certain height or length, it stays that way.

 
Once I am sure that my length is the correct distance for the largest optimal shed opening, I knot them off securely and tape up the ends to prevent fraying. I left some excess length on the two ropes down by the treadles because I may be adjusting those differently later on.

~~~~~~~~

Next, I added a good heavy handle that my friend Jim Burkett makes.  It is made from very heavy solid steel pipe. Not only does it make it easier to grab the beater, but adds packing weight to the beater as well.


I used to keep a couple of these handles on hand in my stash to add to looms that come into my studio. Then I remove them if the loom happens to be going on to a new owner. This is my very last handle! Jim is now retired and doesn't make these anymore. So I think this loom better stay here with the very last handle on, and never leave my studio, ever.

~~~~~~~~~

The next improvement I had Steve help me with. "Sectional Warping" means I can put a large amount of warp on the back beam using the easiest method, without having to wind long warp chains on that big warping reel. That is a tedious long process and subject to tangles and snarls and mistakes. By using the sectional warping method, I will be able to pack 40 or 50 yards of warp onto the back beam... when we are done with this improvement.

Steve carefully constructed four new sectional rakes, by drilling in holes every 2" on center. We added the oak pegs cut from 3/8" dowels. 


I glued them into place and stained them, and added a coat of polyurethane for protection. 


With careful measuring, we attached the rakes to the back beam. They need to be absolutely symmetrical so as the threads go around, the pegs are lined up with the previous row before it.


Now I can pack on a bunch of warp and get ready to weave a whole big batch of rugs. 

~~~~~~~~~

The turning motion of the back beam was kind of rumbling and rough where the ends slide down into cradles on the frame. We added some PVC vinyl slides to the cradle sections to make the back beam turn more smoothly.  


Now it rotates smoothly. Because I'm thinking that if I'm doing 80 turns per section to warp up this beam, x 15 sections, that makes 1,200 revolutions! It better turn easily....


~~~~~~~~~


Steve is still working out the details to attach a handle to the back beam to make it easier to crank. Previously, the warps had been put on slowly, by turning the other end of the beam a half revolution at a time, using a stick in the braking holes. I think we will find a way to wind on much faster. 


~~~~~~~~~
 
Somewhere along in this loom's lifetime, someone replaced this back support beam for the treadles. It's made with a newer piece of raw lumber that is actually stamped from a mill somewhere.  100 years ago they didn't do this.  I can't quite read the printing.


Since it was newer lumber, it didn't match the old aged patina of the rest of the loom. I laid down some cardboard, got out some rags, and rubbed in some dark walnut stain. I think it made a big improvement, don't you?


~~~~~~~~


Now here's one little nifty thing that I discovered, that I don't even need to improve! While I was weaving the last rug on the loom, I realized my little scissors needed a resting spot. Usually I just glue a magnet somewhere onto the loom to hold the scissors by the tip. But on this loom I discovered a nice little hole on the wedge used to hold the bench seat into place. Perfect for a scissors!


But I will have to remember to snatch it up quickly and put it in a safe place when the little grandkids come over. That is my routine, before they come in the door, I snatch up all scissors, pins, needles, rotary cutters etc from anywhere in my she shed. I call it "de-kidderizing". The youngest grandchild is only 4 and those could be dangerous items in curious little hands.

~~~~~~~

UPCOMING IDEAS FOR IMPROVEMENTS
 
An upcoming future improvement will happen, sometime, as I am keeping an eye out for exactly the right piece. As you can see, there is a piece of metal pipe used as the braking bar for the back beam.


There had been a wooden bar here, but it had been accidentally snapped off at the museum somewhere during it's display life. I have the partial piece, but it is going to need to be replaced with a wooden bar of the same diameter. I am looking for just the right sturdy strong broom handle or shovel/implement tool handle. Maybe a good one out of hickory? Or strong oak? I know the right one will come along, whether it's at a rummage sale, recycling center, or thrift shop.   It needs to be just a tad bit longer than the pipe so it can fit down into this cradle. 


For now the piece of pipe will work, but I really do want to get a wooden handle.

~~~~~~~~~

Speaking of pipes, someone had replaced the two bottom heddle bars of the harnesses with two pieces of conduit pipe. Although it is heavy, and works well, I would like to replace them with traditional wooden bars.


The top support piece for the pulleys is also a big heavy metal pipe. I am not sure if I could find a wooden bar that thickness. Steve suggested a piece of oak handrail or closet rod. In the meantime, this works just fine and I may just paint a dark brown. But if the right piece comes along, I may replace it.


~~~~~~~~

The little metal cradles for that top pipe, as well as the top of the beater swords, are kind of a mishmash of some homemade metal. Some of it is bent. Some of it has been resupported with nails, some of it has been boosted up from the back side with a block of wood. 


I think I will look for some heavy cast pieces of metal that will make a perfect cradle here for each of the components.

~~~~~~~~

I am also going to replace the string heddles sometime down the line. What is there now will work fine.  Either I will order up some really good strong seine twine from Sweden and tie my own, or I may just order the right sized texlov string headles and put those on. But for right now, like I said, what is there will work fine.

Now it's time for me to get off my blog, and go start the warping process. I already have the tubes of warp on the rack and the tension box clamped to a saw horse. I'm ready to start winding on.   ....as soon as we get that cranking handle thing figured out.


AS SHAMELESS SELF PROMOTION...  I sell a DVD on how to do the sectional warping process. It can be a daunting task to someone the first few times they attempt it. My DVD is a nice reference to look back to again and again if you are trying to sectionally warp a loom. 

I sell it on eBay:

HOW TO WARP A SECTIONAL LOOM DVD

And Etsy:

HOW TO WARP A SECTIONAL LOOM DVD


Just is case you wanted to learn more about sectionally warping a loom,  I think that my DVD is pretty helpful.


Thursday, February 16, 2017

LITTLE DANDY RUG LOOM FOR SALE - WISCONSIN


SORRY BUT THE LOOM IS NOW SOLD

(IF SOMETHING FALLS THROUGH I WILL POST IT AGAIN) 

LITTLE DANDY RUG LOOM - $325.00


Located in Chilton, WI - halfway between Milwaukee and Green Bay.


I am up to six looms now, with a seventh on it's way.  I need to clear out a few to make room. Please copy, paste and share?

Sturdy two harness rug loom made by the Reed Loom Company of Springfield, OH
This model is their Little Dandy Rug Loom.


Two shaft counterbalance loom with sturdy construction. Heavy cast iron ratchet and pawl devices on both brake and take-up beams. 15 dent reed. Restored with new cords and flat steel heddles.


 Sectional back warp beam with 2 inch spacing between pegs.


This loom is all set up and weaving straight and true.  Can be disassembled and we can make a video of that process step by step to refer to for re-assembly.


It is fully working and ready to go. I have a rug in progress that I will let any buyer come and try it out. Will include the remaining weft material to finish it.


Easy weaving with just 2 treadles... left or right. Not complicated at all. One step, weave, let go and beat, other step, weave, let go, and beat.  Voila.. in no time you have a rug!


Weaving width is 30 inches. Current rug on the loom is 25 inches.
Overall loom size is 42 inches wide, 48 inches deep and 51 inches high.


Possible to take out through a wide enough doorway
 on its side if left mostly assembled.
(like this)


ACCESSORIES INCLUDED:

2 RAG SHUTTLES
4 STICK SHUTTLES 
1 BOAT SHUTTLE
(all vintage handcrafted)


MY OWN SELF-PRODUCED DVD ON 
WARPING A SECTIONAL LOOM
and 
A BEGINNING WEAVING DVD


WARPING RACK 
(needs 8 dowels)


HANDCRAFTED TENSION BOX 
(for sectional warping) 


A free weaving lesson if you'd like included with the sale.


$325.00

NOT WILLING TO SHIP, CASH AND CARRY
NO MONEY ORDERS, CHECKS OR BANK DRAFTS.
Located in Chilton, WI halfway between Green Bay and Milwaukee

Please email at pfundt@gmail.com

Tuesday, July 26, 2016

Meeting Fellow RV Bloggers Cheri and Dean - Warping up a Sectional Loom

We spent a delightful evening with fellow RV bloggers Cheri and Dean of Travels With Bentley blog.  They came for a few nights at High Cliff State Park on their way to Door County, and then on to the U.P. of Michigan.... after that they are heading east to New York.  They have been reading my blog for quite some time.  I was so glad she reached out to us and we got to meet up face to face!


They are not quite fulltimers, 
but they travel in a big rig fifth wheel
and have a home in Kansas. 


After Steve came home from work, showered, ate supper, then we hopped back in the car and drove right back to High Cliff to visit with Cheri and Dean. We brought out our lawn chairs to sit in around the campfire.  PS... my chair is now done too!  Please see last week's blog about fixing our chairs:


We sat around a campfire and enjoyed the evening... filled with stories of travels, camping, families and fun.  The evening went so fast, and before we knew it, the clock said it was almost midnight by the time we said our goodbyes and headed home!!!  

Safe travels to Cheri and Dean.  
See ya down the road somewhere! 


~~~~~~~~


One of my Newcomb Studio Looms has been "naked" for a while and needed to get warped up.  That means getting 360 threads... can you imagine handling 360 individual cotton threads, each 150 feet long, all wound on evenly and neatly, no criss crosses, no snarls, and perfect tension????  

With the right tools and preparation and practice, it CAN be done!   

PAUSE FOR A MOMENT FOR A COMMERCIAL..... 

I have a self-produced and self-marketed DVD of how to do the entire process, complete with hints and tricks learned over the years.  If interested in buying it, it can be ordered from: 
or 
 my Etsy Store
or 
my Ebay link of


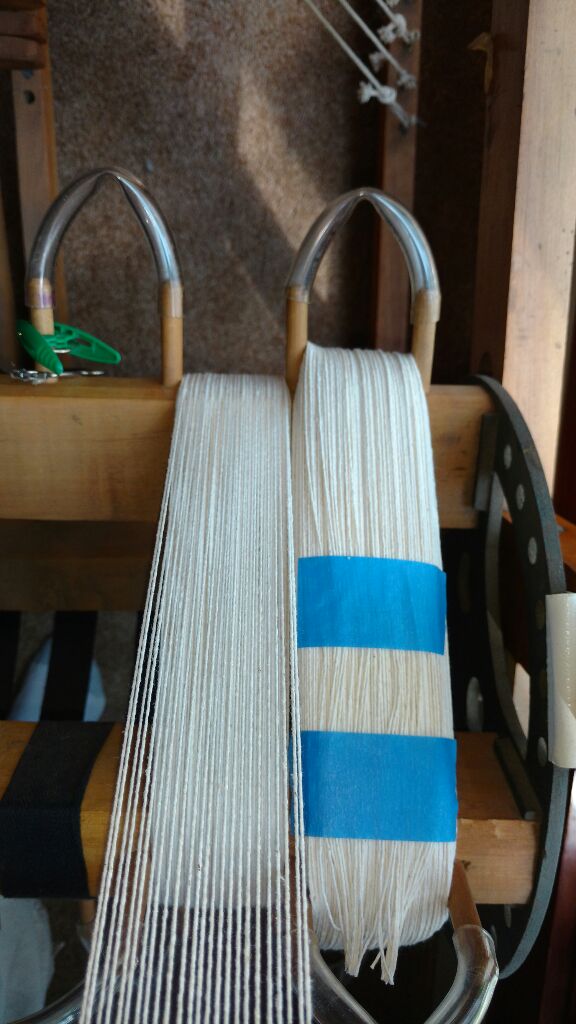
First Step--- is to gather all the materials.  I have 24 tubes of rug warp (cotton string) to wind on.  Each tube is 800 yards.  I have a rack to slide all the tubes on so they can unwind freely without tangling. I have a tension box that lets all 24 threads slide under even tension through little slits in metal combs and onto the loom in each section. I have scissors and blue painter's tape. 

And most of all, I have PATIENCE! 
This is not a job to be rushed. 


The back of my loom has a special beam with little pegs on it. It guides my 24 threads into each section. It's one yard around, so I am cranking 50 turns, thus 150 feet for each section (approximately because as the threads build up, they gain circumference and take up more space)


I tie each bout of 24 threads with a slip knot onto the back straps of this loom. They are straps with ends similar to the buckles on overalls and work very well. If they can keep up Farmer Jones' pants, they can hold my rug warp threads! LOL


I line up the rack as close as I can get perpendicular to the loom, I am a bit limited on space. Right now I have three rug looms and two table looms in my Loom Room.  Gets a little cramped.  Now I am ready to wind up the warp.


It is very important to keep accurate count.  If one section is lacking even one or two revolutions too short, you end up wasting all the strings in all the other sections at the end of the weaving space. So keeping count is imperative. No interruptions, No tv, No telephone calls, No husbands asking questions.....   

My friend Rosie Dupuy of http://www.applewoodhandwovens.com/  gave me this nifty digital counter.  Each time I turn a full revolution of the back beam, I tap the button of this device that is strapped on my finger.  Neato! 


Look now neat and even those 24 threads are going on!  
This makes a weaver's heart go BOING! 


I wound on the first section and put double pieces of tape to hold the ends in place.  Now moving onto the next section, I double check each part of the process.  As I turn I do five turns and double check everything again. Then I can weave the next 45 turns knowing it's evenly filling each space without any "snowdrifts" to either side.  That would cause uneven tension, thus uneven rugs!


The clear plastic tubing is formed in "arches" that can be moved from peg to peg across the beam as I work.  It helps to guide the threads into the proper space without them jumping a peg and getting inbedded in the next section.  That is a mess you DON'T want to deal with!


See how the threads unwind from the tubes, go through the box with a tension peg, and then down onto the back beam?  This is called "Warping a Loom" or "Dressing a Loom".   I have the excess straps clipped down out of the way with temporary plastic clips while I wind the upcoming section.


And ... HERE IT IS!  
ALL DONE! 

 Be Still My Weaver's Heart! 
Pitter Pat Pitter Pat for an evenly wound warp! 


The project tomorrow is to thread all these sections through to the front of the loom.  The painters tape holds them all in order so I can thread them up a section at a time without messing them up.
The threads need to ride though various heddles (wires) on each of the four harnesses to make patterns. From there, they go through the beater and reed to be tied on the front beam.


Being thrifty with my time, I saved the remaining threading warp threads from last time and tied them off in knots hanging off the back of the loom.  See the old warp threads in various tones of blues?


Tomorrow I will tie 
each and every new white thread 
in a little knot to
 each and every old blue thread.

Yup... all 360 threads! 


Once they are all tied, I will gently pull them through the heddles and the reed up to the front of the loom.  Then Steve will help me slide the loom back into place.  I can tie on the front beam and start weaving!  I have two more rug orders to get done this week. Glad I am inside and cool in the air conditioning to get these done.   

In Conclusion:
150 feet is 50 yards---
 which is enough for about 30 rugs
30" wide and 60" long, approximately


Oh.... I forgot to mention.  

Meet my "Helpers" 

My Loom Room Doggies!