Our Wonderful Followers who come back again and again to read about us...

Tuesday, September 29, 2020

Around The House Projects

Since both of us are starting to feel a bit better,  we decided that we wanted to work on a couple projects around the house. I ordered these really cool lights from Menards, and wanted to put one on the top of each of the new fence posts


They didn't quite look that cool when I got them. They were a copper color. So before assembling them, I spray-painted each of the tops and the base sections with red paint to match the red trims on our house. The solar panel square at the top was still sealed from the factory with a piece of cellophane so it was pretty easy to spray paint.  I just love working on projects like this. 


Although the instructions said it would fit on top of posts, with the various size adapters in the base construction as the specifications listed, I think they are meant to fit onto wooden posts like deck posts! It didn't mention plastic PVC fence posts! ACK! 

Soon I realized I would not be able to use the nice base pieces that I had painted. But, as luck would have it, the clear prism part had a ridge on the bottom edge that would exactly fit into the recessed area of the PVC fence post!  Whew... crisis averted.

A few little dabs of my glue gun on opposite corners was just enough to hold them into place without being inadvertently knocked off.   I didn't want to glue them all of the way around the perimeter.


My dad used to use the term "INGINILITY"!  I believe it was a cross between Ingenuity and Ability. So I used my inginility to figure out how to get these lights on the top of the posts. And here they are!


I waited until night time to go out and take a picture. The lights are able to glow in either white, or blue, red, or green. We chose the white.


I was quite pleased with how they turned out, and they reflect off quite a bit of light. This was only the first night so far.  They didn't even get a complete day's worth of a solar charge.  


Another project that I worked on today was to rescue my clumps of coleus that are still growing in the yard, as well as some that I had rooting inside on the windowsill. I carefully preserve these the strains of these plants every year. I keep them growing throughout the winter in the basement windows. Other years I had planted them in individual pots. It was a lot harder to take care of them spacing them close together as I could with the tapered flower pots. 

This year I decided to use my long plastic window boxes and plant them in rows. I only had three window boxes, but my handy dandy husband built me a fourth one. He also made some wonderful support racks for down in the basement to hold the window boxes level to the south-facing windows.

Last year they grew quite well over the winter and got adequate light as well as the warmth from the furnace in the basement.


For the next few days we will roll them out during the day into the warmth of the sun and the weather and then in the evenings roll them back into the garage. But it's good we took care of this now, because the weatherman said tomorrow night we will be going down to 36 degrees! We might have a few evenings of frost coming up, so it's worth it to get these sheltered in the garage before cold weather sets in.


Another project I had seen was to make a tea kettle hanging sideways on a post. It makes an adorable little birdhouse. Since my mom just sent me a beautiful new blue tea kettle to keep in the motorhome, I took the old 1970s one I had in there and gave it a fresh coat of pretty glossy red paint. I think it's going to be cute. I just felt like getting it done because I had the spray paint out and wanted to get this accomplished before winter. That way we can hang it out by Springtime, perhaps on the end post of the fence and hopefully get some new inhabitants??


Here is a picture of 
the main idea of what 
I want to accomplish


Another project we decided to work on, with something else that we ordered. This time it was something we got from Amazon. Seeing as we are social distancing and remaining as isolated as possible, we are doing a lot of our shopping online or do curbside pickup.

Anyhow, when we use the water heater in our motorhome, we have it on a timer so we only use it at certain times of the day. Why waste all of that propane running the water heater 24 hours around the clock if we're only using water between say 5 and 8 p.m.?

Well, if that works good for our motorhome, we decided it should work good for our house!

Let me explain, our house has a fairly new water heater, but it's electric. It was put in by the sellers and was not our first choice of a source of energy for creating water in our house. So, we looked at replacing it with a natural gas power vented water heater and that would run us in the $800 range. Then we looked at the on-demand natural gas water heaters that along with all the configurations and items that go with it would probably run us $900. So, we decided to do the next best thing. Steve is always thinking you know....

Because of knowing how we use the timer in the motorhome, he looked up and researched about special timers you can buy for an electric water heater in your house. On top of it, we both researched into the Wi-Fi water heater timers. We already have our home heating thermostat on Wi-Fi, as well as our security system and door locks, why not put our water heater on Wi-Fi?

This is what we are ordered. It came in just a few days and we were all ready to set it up.

Steve took care of all the connections while I read the directions and downloaded the app for the smartphone. In no time at all we had it figured out. I did one Boo Boo on the setup and had to reverse it and reset and do it over again.  That was nice to be able to start over and correct myself. 

Now we are expecting to see a nice drop in our electric consumption. We set the timer to run between 5 and 9 p.m. That's when we do our dishes, take showers or baths, or perhaps throw in a load of laundry. The water still remains hot in the tank overnight. The next morning there is still enough if we want. But with most of our hot water usage between the hours of 5 a.m. and 8 p.m. or so. We will let you know after our next electric bill what are differences in consumption.

Like I said, our cool fall temperatures are going down and we have started kicking on the cute little gas fireplace in the She Shed. Tonight we are cozied up to it in our wool socks and our jammies. It's comfortable and cozy watching the flickering flames...


I have my glass of wine ready and the debates are going to start soon. We will see what we will see, not going to get political here. 


Just going to be an entertaining evening, 
I am sure!

Sunday, September 27, 2020

Covid Tests Are NEGATIVE and Fence is Done

As I mentioned in my last two blogs, both Steve and I had been sick. It had been going on too long.  We had been sick for 8 days and it was not getting any better.  We were worn out and depleted.  Digestive issues, fatique and coughing topped the list. No fever, no runny nose and no shakes. 

Although we are mostly isolated and not out in public places, we try to be as cautious as we can. We could not figure out where we could have picked up covid, so we didn't really think it was that. 

We did take care of the youngest granddaughter for 2 days the week before last, and she had a cough.  She had just been covid tested as a pre-surgery precaution, and was negative, but she still was coughing up a storm and bleary head stuff. She needed to be isolated before her eye surgery and could not be in daycare. So Grandma and Grandpa to the rescue and we watched her for two days, while she was sick. Then on top of that, we next found out that we were inadvertantly exposed to a person who had been exposed to a positive covid tested sick person. 

So it was time we call the doc and make the appointment for a covid test for ourselves.  We went through the checklist at 4 p.m. and got set up for the next morning at 8 a.m., how nice is that? 

We did the drive up thing and it was the easy nose swab, not the deep nasal cavity one. Whew.   It was done and over in seconds.  Then we only had to wait less than 48 hours, and each of us had a NEGATIVE!!!!!!

We celebrated with a TOAST....


Steve has since started to feel better, just about back to normal. I am still coughing up phlegm 13 days later. We are both weakened and not sure when our normal strength will be back.  But we can't just sit still, you know that!   We are working on little things, a bit at a time.  

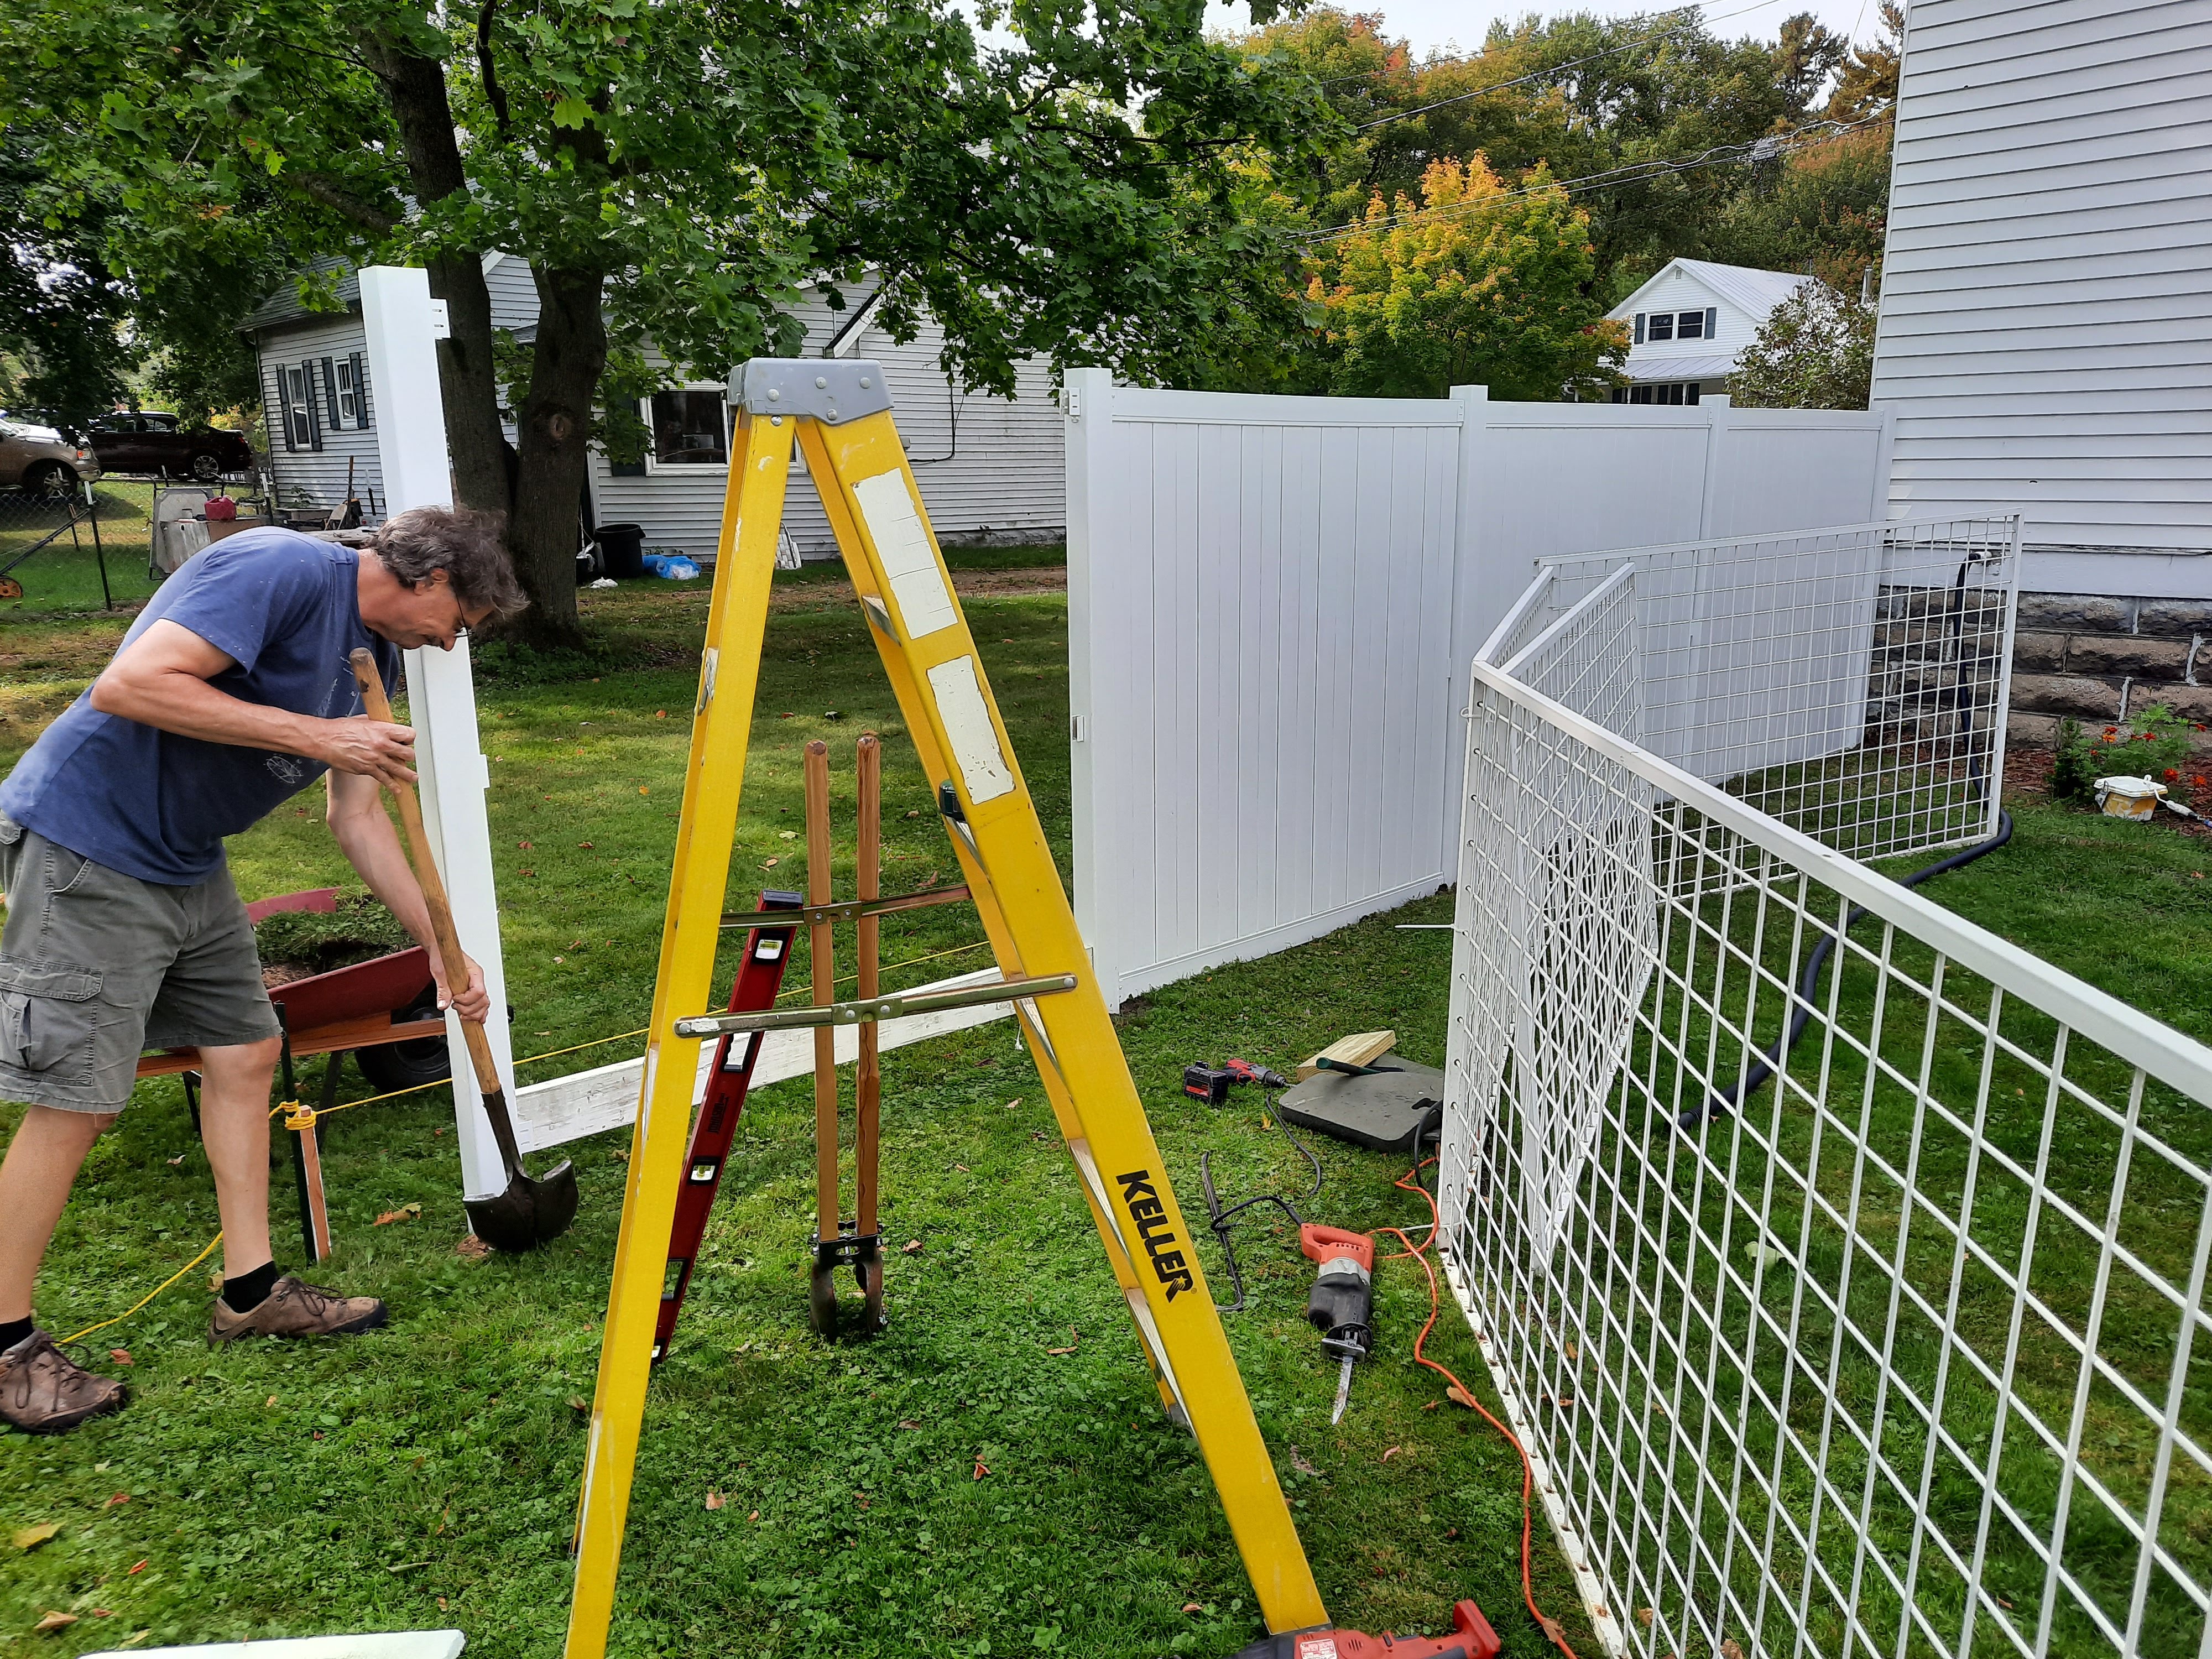
In my last blog, I was writing about putting up 4 fence panels to prevent our dogs from barking at the neighbors. They were used fence panels, a bit beige color, so I primed and painted them white last week. Since Steve was feeling better, he said that it was time to get them up. That means, with me sick or not, I would be there helping.

We started with the first post.... and of course he hit a lot of big rocks right by the foundation. 


What is interesting, is that once he got down about 12 inches, the dark silty dirt changes over to white sand!!!  Yes, we are close to the waters of Green Bay and Lake Michigan.  One time long ago, this was all once water and sand.... and receding lake levels many many centuries ago left the sub floor now exposed as land. With global warming, hope it doesn't fill back up again!!!

Once we got the first post in, the next post hole now found a bunch of tree roots.  The nearest tree is wayyyy far away, but those danged roots traveled a lot further underground than the farthest reaching branches of the canopy overhead.   Steve found out that using a sawzall reciprocating saw down into the hole worked well to get in and cut out the offending roots. 


YAY....
one panel into place! 


The dogs had to come out and inspect the progress.  They didn't like us messing with their little potty yard.  It is their "domain" and they have staked out their territory as their own. 


We took a little coffee break and then dug the next post hole.  This one only had one tree root this time, as compared to three in the last hole.  It was a beautiful sunny day, and the work was pleasant and not too much of a strain.  I was more the leveler-gal and the tool-hander-gal while Steve did the digging.  Then we both carried the panels from the garage where I had painted them last week. We moved the old mesh fencing panels back one at a time while we worked, so the dogs wouldn't escape. 


We had a guide string on stakes to stay in a straight line from the house, and used a spacer board between the posts the right width of the panels. It didn't take long and we were setting the last post and putting the last panel into place. 


We eliminated three of the mesh fencing panels, and pulled the remaining panels straight across now to the corner of the She Shed. Those were originally heavy store display racks of plastic coated steel and worked well for fence panels.  We will use them for suspended shelving in the garage again, like we did at our last house in Chilton.   The dogs were let loose inside and walked all around the perimeter.  They can still see out to the east, but there is nothing back there to bark at, it's just our own big backyard and then the nature preserve. 


From the street side along the side yard it looks kinda nice. It effectively blocks the view from the doggy potty yard up to the front street.... 


They settled in nicely after sniffing all over.  Now the entire view to the south is blocked off.  They can't see into any of the neighbors backyards anymore, nor bark at their dogs, their grandkids or the granddoggy who comes to visit two doors over.  

What is amazing, they laid out there in the grass for half an hour!!!  Previously, they have never laid out in the yard, they just patrolled the fence and barked their fool heads off.  This time, they never barked, they just laid there and relaxed!!!!


We put up a temporary gate for now, which is a baby gate flipped vertically. Steve will build something later from some scrap wood he has in the garage.  That is a project for another day. 


After about half an hour, Binney got up from laying in the grass and walked over to the screen door of the She Shed.  She seemed to say:

"Excuse me, can I please 
speak with management?  
There seems to be nothing at all 
to bark at out here....."

My response:

"Entertainment is now effectively curtailed"


I ordered three 2-packs of these solar post lights to put on top of each post. I am going to first paint them red and then we will set them up. I think they will look cute and help illuminate the area at night.  


Steve did mention we could go out there now and nude sunbathe with the fence in place.  Where does he get those kind of ideas??? Geesh! 

~~~~~~~

Well, fall is upon us.  Soon I have to start clearing out the front window boxes of the geraniums so I can use the long plastic planters for putting my coleus plants in for wintering over in the basement.   


I almost hate to pull them out, they look so pretty yet.  But soon they will be frosted over and need to get pulled out anyhow. I need to get the rooted coleus from these jars planted and growing good. 


I set the coleus window boxes in the basement windows facing south and they grow pretty good over the winter.   I have kept this same strain going since the early 1990's from my friend Connie.  

All too soon the cold weather will be here, and frost and then snow.  I love the fall days, especially when the colors change.  My side flowerbed that grandkids helped plant is still so pretty and has not been touched yet by frost. 


Oh, another tiny project I did was resurrect this huge old handyman's tool caddy into storage for my She Shed. I got it for ONLY TWO DOLLARS at a rummage sale a while back.  I added some soft felt pads on the bottom to prevent scratching, and put a layer of contact paper inside to cover the age old stains of whatever oil, grease or gunk from years of holding tools. 


I am not sure yet what I am going to put in it, 

perhaps weaving shuttles and weaving tools,

or maybe cones of yarns?

Or it could be stacks of fabric blocks as I work on a quilt. 


I don't know. 


Anyhow, I just loved it and couldn't pass it up. 

Friday, September 25, 2020

MOTORHOME MODIFICATION - Repairing Blown Thermopane Windows and Doggie Poopyard Fencing

We are still not feeling up to snuff yet. Right now it's a Waiting Game. More on that later.

While we're sitting home this week, Steve thought he would start a new motor home modification project. 

Our motorhome has dual pane windows known as thermopane. They're very nice and help with heat loss or air conditioning as well as sound muffling. We really like them. But since they are of the vintage age, 25 years old now, some of them have blown their thermopane seal.  Especially the side windows of the cockpit area. The rest of the windows around the coach are in pretty good shape.

Four years ago, while we were spending a couple months down in Florida, we did go over to Hudson to Suncoast Designs. They did a wonderful job taking apart our 3 piece window on the passenger side cockpit area, cleaning them up, resealing them, and reinstalling. It cost $225 for all three panes of that window section. Here is my blog post from that project.

blog of our repair at Suncoast Designs 

That side has held up beautifully, and we are very happy with the work. Now the driver's side cockpit window has gotten pretty bad. But we aren't planning on going to Florida in the near future.  The topmost larger portion had already been replaced years ago, but not the rest of the panes on that window configuration.

The two lower portions were getting dangerously clouded up. It was getting so bad that Steve did not have easy access to view through them for his driver side mirror. He decided we would try to fix it ourselves.

We watched a couple YouTubes and read a couple blogs about guys who had done this project themselves.  We figured that we could do it, and ordered up the supplies. We ordered the proper sealant that goes around the edges of the windows, as well as the proper spacer for between the panes once we had them apart and cleaned up. We also ordered the good black sticky butyl tape for around the exterior window frame itself when we would be putting it back against the motorhome opening.

Steve's first step was to remove the entire three pane window section from the driver's side of our motorhome. Steve was one jump ahead of me before I could get the camera out there. By unscrewing all the little screws from the inside flange, then he can carefully removed the whole window construction piece from the outside by unsticking the butyl sealant all around. He carefully lowered the window to the ground and brought it into the garage before I even got out there with the camera. Mister Zoom Zoom at his best!


One wonderful hint that we had seen on YouTube was to seal up the window space opening while the glass is out, is to cover it with a few strips of carpet protection film. This is the same film that people put across carpeting during open house showings to eliminate foot traffic marks on their carpeting. It worked really well to put a couple layers across the open window.


Once he sealed the film into place, he also stuck a few pieces of cardboard to the inside surface to give it a little more rigid construction. That way if the wind would blow against it, it should hold by being pretty taunt and smooth. It should hold up until we get the window put back in.


This is the now removed window frame in the garage. Like I said, the upper portion is just fine. It's the two smaller portions that need to come out and be repaired. One is the slider, and one is stationary behind another trim strip.


Steve carefully laid it out flat on a large piece of plywood to work on the frame. That way the frame would not flex or bend or twist by working on a flat surface. He carefully removed the tiny screws and the little plates that held the frame together.


This is the one end of the window frame that comes apart. Once he loosened this part he was able to take out both of the small pieces of glass. 


He carefully labeled each piece of glass as to which was the inside, the outside, and it if was the slider or fixed panes.  Then he took the panes of glass apart. 


The construction of our thermopanes are two pieces of tempered glass with a thin strip in between of metal called a spacer. The metal is a type of an aluminum. Some of the other Safari motorhomes, as well as some other motorhomes, have used other window construction that have a rubber spacer. That rubber spacer tends to move and flex and make what's called "snakes" on the window in between the panes. They're very unsightly. 

The problem is that as the thermopanes leak, something happens with that aluminum spacer which causes actual etching on the glass in between the layers. It's some kind of chemical shedding that is so strong it etches the glass! We watched a couple YouTube videos on guys fixing these windows, and they said once you get the window apart, if the glass is etched, there's really nothing you can do. Yep, that was our case. The more we tried with various cleaners and solvents, nothing would take off those big gray blotches. It's permanently etched into the glass!!!


We tried vinegar, CLR, Mr. Clean Eraser, Soft Scrub, glass cooktop cleaner, and even lightly scraping with a razor blade.  Nothing worked, it was etched right into the glass surface. Dang!!!!

After deciding that we tried everything possible, then we called the commercial glass place down in Green Bay. Packerland Glass said yes, they can build us two new units just like the ones we have, if we drop them off. For social distancing, they said all we have to do is drop them off at the door with our name taped onto them and call from the parking lot. They will come out and get them. They quoted us $80 each--- which includes new glass, with tinting to match what we have, and tempered because it is for a recreational vehicle side window. $80 each is not too bad, in our opinion. The only problem is it will be sent out to another place for fabrication. It may take a week or more. So we are glad that the side of the motorhome opening is sealed up well, in case we have any bad weather.

Well, it looks like that project is kind of on hold for now. I will make another blog post when we get the new pieces and put it all back together again. In the meantime, it was time to work on another project.

~~~~~~~

We have sassy doggies. 

We know that. It is in their nature because they are of the herding variety breed, is to bark warnings of anything they see. "Danger danger, a wolf is after our sheep!!! or danger danger it's a burglar"...  you know the drill?

When we let them outside into their little potty yard, which is a fenced in section on the back corner of our house, they bark frantically at anything else they see out the side fence. Whether it's our neighbors dogs who are let out into their own potty yard, who are very quiet and well-behaved dogs. Or the neighbor beyond that who sometimes babysits his grand-dog, or his teenage grandkids who play basketball. Ours find something to bark about, and work themselves up, and are quite sassy. We have to correct them.  Or we have to bring them right back in the house.  We try to keep them quiet, and especially we look out first and see if there's anybody out there before we let our sassy dogs out to go to the bathroom.  If there is someone out there, we wait until they go back in.  Then ours are quiet and fine and do their business. 

The fence is like this:
They are portable large mesh metal panels
that are wire-tied together at the joins.

Our dogs are "inside doggies", they are only outdoors for a few minutes at a time. It's not that they are doing irritating incessant all day long barking. It's just while they are out there, if there's something interesting to look at and bark at it. Otherwise they are perfectly quiet when there's nobody else around.  So it's not that they are a habitual problem or irritating anybody else. All of our neighbors have dogs, and they all bark from time to time. I think it bothers us more than anyone else.  Nobody has ever complained, and we have apologized to them numerous times. 

Even indoors, it bothers us. They bark when just looking out the glass french door from the she shed, when they can see over to the neighbor's yard and bark their fool heads off ----  while they're inside the house and work themselves up into a frenzy!

We had tried a piece of privacy tarp strapped along our fence a while back. That didn't last long and eroded due to the UV rays. Actually, the dogs could kind of see through it because it was a screening type material and they still barked because they could still see.

So we decided it was time to put up a taller privacy fence. The cost is quite expensive and it really wasn't in our budget. A 24 foot span of white vinyl 6ft by 6ft wide panels would run us about $350 between the 4 panels and the 5 posts. Ouch! That's a little more than we could afford right now with all of our other projects going on. 

But, my Smart and Savvy Facebook Marketplace Watching Guy found someone selling 4 vinyl panels, 5 posts, for the mere price of $50!

All we need are the four panels between the corner of the house and straight back. It won't even be on our property line, just along the corner of the house leading back to the east, so they don't see anything to the south. The rest of the area can be our original open grid fencing because the dogs never bark at anything out back to the east or to the north. Just to the south.

(drawn with finger on my smart phone)

The pictures of the used fence looked good online, we made contact with the seller that if we went to pick them up, we would need to be socially distanced of course. Once we got there, we were dismayed to see that they were actually a very light pale tan beige color, and not white, as we thought. But the price was good and we figured let's just snap them up anyhow.

I googled, (Google is my friend), on how to prepare the surface of the PVC vinyl fencing panels for paint. It was suggested to use this Rust-Oleum product primer which is made for specifically for plastic items in preparation for paint.


We set up the fence panels and had adequate ventilation in the garage. The stuff is really really stinky! I rolled it on all of the surfaces and let them cure for two days.


Now it was time to roll on the paint. We used a good thick acrylic porch and floor enamel paint in white. Two coats and I think the panels are looking great.


I'm glad that we have the space in the garage to do the project like this with the panels in a horizontal position, set up on saw horses. It's much easier than trying to paint the fence when it's already installed vertically.


This morning, as I write this blog, Steve is already out there figuring out the placements of the posts and the leveling of the ground and where we need to fudge it a little, or to dig away, or where we need to beef it up. I am sure our neighbors are going to appreciate us putting up this little fence. It's nowhere near the property line and it's not trying to make the neighbors feel alienated or fenced away from us. It's merely to block the view of the two sassy little dogs and hopefully curtail their barking.

Things are getting more and more beautiful here as fall has arrived in Wisconsin. Just walking around our backyard and looking at the changing colors on the trees from the Nature Preserve behind us---  it is absolutely beautiful. The sun is going to be out today and I think the colors are going to get more and more vivid.


My tomatoes are almost at the end of the season. Just a few more green "hanger-oners", I might pull them off pretty soon and bring them inside to ripen in dark brown paper bags. 


We will soon need to rip these out of the way because we have another project coming and we will need access on this side of the house. More on that later in an upcoming blog.

In the meantime, 
please stay safe and healthy. 

We are doing our best 
but we aren't doing
as good as we thought. 

More on that later in an upcoming blog too----