Our Wonderful Followers who come back again and again to read about us...

Wednesday, October 24, 2018

Winter Gardening, Bathroom Is Done, Pot Roast and Thrift Shop Finds

Winter temps have set in now in Wisconsin, We have been down in the 20's some of the nights, so the outdoor plants are totally kerput. I love my coleus because they are my favorite colors of fuschia, magenta and green.  They add color immediately to the flower beds in the spring, because the leaves are the full riot of colors. The flowers are an added plus in the later summer of pale lilac blooms on thin stems.


My coleus cuttings that I talked about in recent posts have been safely ensconced in quart canning jars to grow some roots. It only takes a few weeks and they are ready to plant.  I have been doing this since the early 1990's since my friend Connie gave them to me.  I have shared them with other friends over the years as well.


The roots were filling up the jars, 
 so it was time to plant them in the dirt! 

I used three long plastic window boxes with no weep holes in the bottoms (don't want water on my hardwood floors!) I use moisture control potting soil over a layer of pea gravel for drainage.  With careful watering all winter long, they will be ready again for next spring.  I put the trays in the south facing guest bedroom window for the best exposure.   


I smile when I put down the layers of tin foil on the old wooden tv tray tables.  Fond memories of my Grandma Kafehl putting tin foil down on her end tables before she sat down her pots of african violets and cactus plants.  Ahhh I miss her.


Steve was done with driving today around noon. He started at 5 am ...ack!  He wanted to finish up the floor in the bathroom this afternoon.  A few days ago, he spread floor leveler over the patched in area of the floor where the old tub piping had originally been.


Now that it was dry, we could cut back the old flooring, carefully tuck a new piece under the edge back under the shower pan, and lay it out to do a "double cut" for an almost imperceptible seam. Once the seam was cut, we could use some vinyl flooring tape slid underneath and press it down firmly.  The third side got tucked under the tub and the last side along the wall will be held down by the baseboard and quarter round trim.  You almost can't see on the flooring seam where the patch job took place!


Here is Steve's corner with his shower.... and my little table and antique lamp set between the shower and the tub. Don't worry, the lamp is not even plugged in, nor is there an outlet nearby.  I like it for the flavor and decor...


We mounted the lip edge of the tub now firmly to the bead board walls (now that the flooring is tucked underneath the tub)  The tub is settled securely into place anyhow with the circle shaped feet and support brace on the bottom, plus the plumbing held into place.  All we needed to do now was to attach the lip edge that is held by six little screws. Steve attached the lip edge with the screws and used these handy little screw cap covers that snap into place. Looks much nicer than an ugly screw or having to put a trim strip over it.  See the screw to the left of the corner that the cap hides the screw nicely.


I don't like big towel bars, nor do we have a lot of wall space anyhow.  We have some moveable plexi hooks that we hang towels from the shower stall when they need to dry.  But when I am in the tub, I wanted a big hook, like a robe hook, to hang my two towels on to be within easy reach as I get out of the tub.  (I need one for my hair, and one for my body).

We stopped at Hobby Lobby and found two big wrought iron hooks that would work for my idea. There was an online coupon to bring up on the phone at the checkout to get 40% off for ONE item.  The nice lady at the checkout let Steve use the coupon on my phone for his hook, and then let me use the same phone coupon for my hook.  Deal!


We hung them on each side of the window frame and they will only be used when I am actually in the tub and want my towels within reach.  The other one on Steve's side is for his towel or washcloth he uses near the sink while shaving.   Like I said, they won't be hanging there all of the time, just when in use.  Don't think we have some weird decor theme of towels used as side curtains on the windows... LOL.


Sooo there we have it done!  My birthday isn't until next week, but the tub is finished and we are happy to say it looks more balanced and fits the space well.  We had wanted to do this tub 6 years ago and didn't at that time. I am glad we did it now....   Complete with the tray, pillow and towel hooks, we are finished!


This afternoon was cool and crisp,
but sunny....   we took a walk to the post office
and stopped at the little city center park.


Yesterday I had plopped a big ol pot roast in the electric pressure cooker.  We LOVE LOVE LOVE our electric pressure cookers!  We have an 8 quart Go Wise USA cooker in the motorhome and an 11 Quart Nesco one in the house.  You can do food so fast and so flavorful in a short time.

I add an envelope of onion soup mix and a few dollops of Andria's steak sauce.  40 minutes later it is fall apart tender.  Then I add a pile of peeled potato chunks, a bag of baby carrots, and a sliced up vidalia onion.  15 more minutes on high pressure and the meal is finished!   It was sooooo good that we re-heated leftovers tonight for supper. Yummmmmmmm!


Oh, yesterday I was also on an errand, and stopped at one of my favorite thrift shops in Plymouth WI.  I saw this interesting little juice pitcher.  I picked it up two times and set it back down.  I didn't really need it.  But passed it by. Then the third time I saw it as I passed that section, I put it in my cart. It was only 79 cents, and I could not resist.  Hmmmm  Maybe for a pitcher of ice water, lemonade or iced tea while I am sitting in my tub?


The other big "bargain" I stumbled on was a huge 9 yard hunk of quilting fabric for only $7 (worth about $90) and a bunch of fat quarter bundles for only $1.29 - 1.49 a bundle.  Each one is worth about $10-12. Score!


I am working on something that I will post about in my next blog... when the time is right. But I am glad to say that family is going to be fine, and healing takes time. Thank you for your prayers and kind thoughts.

Saturday, October 20, 2018

Scrub-A-Dub-Dub

I would like to start out tonight's blog with a special note. I am requesting  an unspoken prayer request for two close family members that had an incident. Things can change in an instant. Please tell your family that you love them. They will be okay, but prayers will be appreciated.


Scrub-a-dub-dub
 This birthday chick's got her tub!

But first off... We had to page Dr. Stevieo. He donned his blue rubber gloves because he had a sterile job to do.


Remember in my last blog I mentioned that he was going to redo all of the plumbing from the upstairs down to the basement? He is bypassing all of the old steel pipe drain lines which are a hundred plus years old. Everything now will be new PVC and up to code.

Well, part of that project had to do with the toilet in the half bath on the main floor. The piping from the half-bath toilet was still old cast sewer pipe. Since he is replacing all of the pipe in the basement, that means ripping up the toilet in the half bath and changing out the flange and elbow to a new PVC flange. The little corner sink we put in the bath a couple years ago already has new plumbing.

Of course, don't you know--- when he got down in there to remove the toilet, the floor itself was in rough shape and needed some beefing up as well. So he cut out the bad areas, installed new support wood, put in some new subfloor, and a new wax ring for the toilet. That took up the entire morning and soon he had the toilet back in place. Everything was functioning again.


Upstairs, we had some creative decisions to make. The bottom of the tub has a number of circular support feet to help hold the weight of the tub on the floor. We had to transfer the designs from the bottom of the tub onto the floor so we knew where we could make a cutout for the piping to drop down. Because there is no access from the side wall, all of the plumbing had to be installed in place on the tub as we set it down. So Steve has to cut a channel in the actual floor between the joists for the pipes to fit down into. If there is ever a plumbing issue under the tub, we will have to remove the trim screws around the tub and lift the entire works back out again from the corner. Either that, or cut up from the ceiling below in the back stairwell.

By using some large sheets of taped together freezer paper, and a piece of sidewalk chalk, we made a rubbing of the bottom surface of the tub with all of the little support feet and drain sections preserved onto a template. From there we transferred it right onto the old flooring and traced where the support brackets needed to be. Now we knew the route that we could send the drain pipe over to the down drain to the basement.

As much as Steve hates templates, it was my idea to do it this way. He did admit at the end that it was a good idea!


Here is all of the plumbing mounted directly to the tub. The tub is laying on its side in this picture. This is the drain and the overflow pipes attached right onto the tub. Now it is ready to drop into place because Steve cut out a channel in the old flooring.


On the top corner of the tub seat, he drilled in the hole for the faucet. This is actually the cute faucet from our last bathtub that we are reusing. I just loved this one when I saw it in the store and it reminded me of a a little well pitcher pump. Actually, I think it was my birthday present from him 3 or 4 years ago. I was glad we were able to make it work for this tub.


He attached all new PEX water lines for both the hot and cold water.  The old water lines were copper pipe, connected to lead pipe in the basement. It's nice now that everything is fresh and new and up to code.

While he was working on configuring the drain pipes and traps, he had these two supervisors take over to make sure he was doing a good job.


Little Finnegan intently observes everything he does,
 while Binney just barks her fool head off every time he runs a drill or a saw.

I popped them into the tub to keep them out of the way.

Soon he had all of the plumbing hooked up and tested. Now both the separate standalone shower and the tub each have the correct trap and a vent as well. That was never done before in the old days and was probably part of the problem why the tub or shower did not drain very well. He capped off the old pipes even though they're not connected to anything downstairs. He's going to leave the old steel pipe in the wall but he was able to pull out the copper one. We were fortunate that he did not have to bust up any plaster in the route from the second-story down through the first story wall in into the basement.


He has new subfloor and flooring to put over this access spot on the floor and we can always open it back up to address any plumbing issues in the future. Hopefully not, of course.

He said we should test the tub and the shower both right away just to make sure there are absolutely no problems with the setup. As my tub was filling, I prepared my new birthday bath spa caddy tray. I ordered it from Amazon 2 days ago and it came toot sweet. It also had with it an extra bath pillow which I really needed and a little overflow plastic cover to allow you to allow a tub fill a little deeper. Never fear, I don't even need to use that because this tub is plenty deep enough!


I poured myself a glass of wine, got myself some aromatic candles flickering, a bar of scented soap from my friend Rosalyn and enjoyed my bath. I set my little tablet securely on the rack. Don't worry, it's not plugged into an electrical source. And if it ever did get wet or fall in the tub, it's no big loss. It was a free tablet I got from a phone deal many years ago.


I am happy to say that the tub worked perfectly. The water heater was plenty fine to fill the capacity and actually it was a little too hot to begin with. The last tub was 60 gallons and this one is 71 gallons. I will have to adjust my fill temperature or get into the tub sooner to adjust it as it fills.

Steve tried out his separate shower and everything works perfectly with the drains for both units. In the past everything tied together between the shower, the tub, the sink and the toilet. All four items on the same line to go down to the basement???

This morning, Steve started putting some of the trim back in the bathroom. It took some special cuts carefully with his jigsaw to replicate the shape of the tub especially around the base. He was able to get some of the baseboard back into place and it looks custom-built to me. He does such fine work and is so talented. I am so lucky to have such a wonderful man in my life who enjoys doing this type of work as well as enjoys creating such a wonderful birthday bathroom oasis for me.


I decided that if one bath last night was good,
 then another bath tonight would be even better!

So tonight's blog is being dictated to my tablet,
directly from my
 Birthday Bathtub!


"Happy birthday to me,
Happy birthday to me,
Happy birthday to spoiled rotten me,
Happy birthday to me"

Tuesday, October 16, 2018

Our Old House Project - My Early Birthday Present

Since only 2 of the 3 parts are in for the motorhome repair, my Steveio is just waiting around with nothing to do. Oh my... that is NOT good for him, is it?

Well---- a while back he mentioned that both our shower and bathtub upstairs are draining slower and slower.  Even with cleaning out the trap, they are the last of the old original steel drain and copper water plumbing pipes left in the house. The rest has all been replaced with newer PVC drain pipes and Pex water lines.   He said in order to drill in a new hole to go down inside of the laundry room wall on the first floor, then he would have to pull up the bath tub to get access!  Oh my, that is not good either.

On Sunday night, he said that since he has to pull up the tub, would this be a good time to actually get the bigger corner tub that I looked at 5 years ago when we first redid the bathroom??  It was not in our budget at that time and we bought a cheaper regular tub instead. We decided to put the money into the separate stand-alone shower.  The tub was fine, and it was deeper than most on the market. I was happy with it. 

But in our last home, in Oconto, we did have a big corner tub which was soooo nice! It was good for soaking, or bathing grandkids, or even getting a romantic evening as it had a two-person capacity.

I said to him: "Yes, a corner tub would be nice, but we are watching the budget for the motorhome brake repairs, remember?"    Then he turned around his laptop to show me his screen of what he found on Craigslist!!!

It turns out that last year, a guy had bought the same exact tub that I had looked at 5 years ago.  It had to only be 4 foot on the side walls because of our window placement. The more common 5 foot ones are too big for our bathroom configuration.  So I knew that the 4 foot Lyons Sea Wave was the only one that would fit in our house.

That Craigslist guy brought this tub up to his cottage near Rhinelander and planned on remodeling his bathroom up there.  It took over a year and a half before he was ready to set the tub in place, and guess what?  It was TOO BIG for his cottage!  Now it was too late to return it. He listed it on Craigslist for a very, very good price.  He was only asking $150.  New it is over $600.  Steve said we can re-use my same faucet and drain and it can be my early birthday present. Wheeeeee!

Steve said "Let's hook up the trailer and go see the tub".  It was a little trek over to Wisconsin Rapids where the guy lived. (about 90 miles one way)  He met us in the parking lot at his place of business.  He and Steve wheeled and dealed until they settled on $130.00  Ahhhh that sure is a nice early birthday present for me. 

We drove home and while he had it in our own driveway, Steve MADE me get in the tub and try it out.  Hahahaa I knew I would like it, because I sat in it 5 years ago on display in the store too.


I could just see it---
 full of bubbles, 
soft music,
 and a glass of wine! 


Monday morning he had a little time to get the old tub unhooked and removed from the corner in the bathroom.  Underneath where it was located is where he needs to put down the new drain lines with proper traps and a vent (which weren't correct in the old plumbing configuration anyhow). 


There... the old tub is out! He had to leave and drive for his job later on that morning, but we carried the old tub down and set it in the garage. It was only 70 pounds and we managed that easy enough. I am going to sell it on Craigslist and Facebook Marketplace because it's just fine, and only 5 years old.

Now he has the access room to put down the new drain pipe and lines and cap off the old ones.  In the meantime he set the bath tub faucet (that we are re-using) into the shower stall next to the tub to the right.  Just in case of it getting bumped, I taped the lever down.  The shower still works, as he later capped off part of the old drain that went to the tub.


We carried up the new tub together. It was a bit awkward around the three turns of our front staircase, but we made it!  It weighs 110 pounds, but between the two of us we managed to get it up there. Whew!  It's good that we are doing these projects while we are still strong and in our late 50's for me and 60 for Steve.  We won't be able to do these kind of house remodeling projects 10 or 20 years down the road.  

We set the tub into place to take measurements and figure out the drain placement.  We have an extra piece of flooring and sub floor to splice in later to cover the open older plumbing area. 


The new tub is shorter in length on the side walls (4 ft vs 5 ft) so luckily we have extra beadboards from when we updated the walls last winter.  I am glad I saved the leftovers! We pulled the boards back to remove the short ones and replaced them with the longer ones to fill in the gap.  The baseboard will go back on once we set the tub into place permanently.


Steve drilled the new drain hole using a hole saw.  Oh wow... they sure made houses strong and sturdy in 1913!  We don't hear a lot of upstairs noise and that is because there is a 3/4 inch subfloor of heavy old pine, then 3/4 of an inch of thick hardwood flooring (the bathroom had been originally wood floors!)  and then a subfloor of 1/4 inch thick wood too.  Then the wall plate was also 2 inches thick to drill through as well.  Back then in 1913 real 2x4 boards measured 2" by 4".


Steve had to go and drive again today for a while, so he had to let the project sit and percolate in his brain. What a frustrating thing for him to have to do.  He loves projects and says this is his version of "fun".  Once he got home, he couldn't even wait for me to cook supper.... he went right to work assembling the drain pieces and dry fitting and double checking the measurements. 


You know the old adage:
"Measure twice - Cut once"
It works on both wood and on plumbing. LOL

He then went down in the basement to double check where the old pipes were tying into the newer sewer pipes that were installed back 5 years ago. Now he can bypass the old cast iron sewer pipes and everything will be new plumbing, once he ties it all together. 

While he was doing that, two little Nosy Rosies came in to see what was going on.  They like to bark at the drills, saws and hammers.  I popped them both in the tub to keep them out of trouble.  Do they look like they get into trouble?? 


After supper, I decided that we should relax a bit. He put in a full day between tub removal, taking measurements, drilling holes and then working for 4 hours.  I made up some chicken stir fry and we are settled back in our comfy chairs.  He is antsy and I am thinking he is going to pop back up and go double check something. Soon I will hear a saw or a drill or something going on?

I was looking online and decided to splurge on something for my new bathtub too.... my old chrome bath caddy won't span the wider tub width, so I found this one that will go to 42 inches wide to fit the new tub. How nice is this?  It's made from bamboo to withstand moisture, and has legs if I want to use it as a bed tray too.  Happy Birthday to ME!  (even though my birthday isn't until October 31)


Hmmmm I wonder how long he will sit still in his chair?  


Monday, October 15, 2018

It's That Time of Year to Say Goodbye to the Yard

In comes the frost 
and out goes the flowers.

The temps in Wisconsin have finally gotten down below the 32 degree mark at night. That of course means one thing. All of our flowers are done for.  We covered them up the first few nights of low temps to get a bit more life out of the blooms.  But now it is time.

They're full of wilting heads and shriveling leaves hanging down off of the window boxes. It looks kind of sad.  The flower gardens are all withering stalks of mushy vegetation and brown curled up drying leaves.

Sunday was crisp and cold, and the winds of Saturday had also died down.  Steve and I grabbed our work gloves, the wheel barrow, the little red wagon and a pile of large garbage leaf bags. The dogs ran around the back yard, barking their fool heads off at the neighbors who were also getting their yard work done.  (they think the neighbors are "burrrglurrz" and need to warn us of their presence).  After a few minutes of that noise, we put them inside to watch us from the windows instead.

They watched us pull out the flowers from the window boxes... which really gave us a lot of enjoyment this summer.  The flowers had grown so tall, they could be seen nicely from inside of the house as well as outside.  This is the side windowbox by the family room... where the dogs can look out from their little ottomans.


The front box had a few less blooms, but the greenery was still in pretty good shape.  Oh well, they all had to go! There was snow in the forecast.  I want these boxes put away for the winter, after Steve worked so hard to build them last spring.


Steve pulled up the clumps of plants and they were so pot bound that it pulled out all of the soil in a perfect rectangle shape!  He had to actually break it up into sections to put it into the bags, after I dug off the pieces of styrofoam.  We had added those to the bottom to work as lightweight drainage instead of gravel.  We didn't want the styrofoam to go into the mulch recycling program at the city refuse yard.


After we pulled off the boxes and stored them away in the garage, I had to wipe off all the leaf and blossom marks they left on the windows. I wasn't going to do ALL the windows of the house, just the ones that I could reach.


It made me smile to think of old Mr. George Kopf Sr., who used to do the windows on the house too.  I was given a picture of him working on the same section of the house 45 years before.  That was when it was three separate sash windows, which had been replaced with the more modern one years later.  Someday if I find three old sash windows, I would like to restore them back to original too. 


We cleared out the pots of flowers as well.  On each side of the garage door this year I had planted these new pedestal planters I got from Craigslist.  These geraniums and spikes grew like crazy and I added some ivy.  Whew... did they ever get pot bound!  The roots were even growing out the bottom holes of the planters and dangling 6 inches below the pots! 


Up in the front, the same story--- The two cement planters on the stoop were pot bound so tight that there wasn't any dirt left in the pots!   Guess next year I should plant fewer plants per pot?


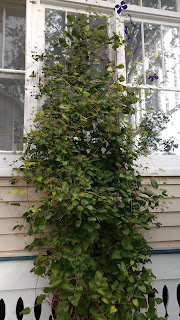
Even though we had frost, there were a few brave clematis blooms poking out their pretty heads yet for a bit of sunshine.  Now I clipped those plants back to about 3 feet tall so they could have some old growth stalks to help support the new shoots next year.   This is a new plant I bought this year that took off and grew quite well.  I love the delicate pale blooms with the pretty purple thin lines of accents.   I hope it survives the winter? 


The vintage old purple ones are as tall as the top of the windows on the front porch.   I love these clematis because they give shade from the southern facing sunshine into the front porch, plus you can see the purple blooms from inside the windows. It keeps growing back bigger and bigger each year. 


This is the same original old plant that appears in photos from 1947 that the Kopf family shared with us.  This is George Kopf Jr., the son of the man who appears in the old photo above.  You can see the clematis plant to the left corner in the pic below of his 8th grade graduation.  We "re-created" his childhood photo when he came to visit the house in August.  


It was time to hoist up my little Dutch girl and boy into the red wagon and haul them off to the garage.  They are very heavy cement and take a lot of "oomph" to move them. I suppose they could winter outside, but I would like the paint to last and not have to redo them every year.  I nabbed them cheap from a rummage sale last fall, (I think 10 bucks) and they graced my front flower bed all summer long.  Now they can sleep in the wagon all winter... hibernation?


While we were working on the flower beds, pulling up clumps of coleus and begonias, this little guy was hiding out by the downspout in the corner.  We know he lives under our front porch.  As long as he doesn't nibble on my tomato plants in the summer, I don't mind him hiding out.  He is almost grown now. His mom used to live under the front porch as well, and I have a feeling he was born here.   Once in a while the dogs give him a good chase, but he easily flings himself through the fence spindles and gets away to a safer spot.


AHHHHHH my precious hydrangeas!   These are started from small slips and shoots from my friend Charlotte back in our old town of Oconto.  They have multiplied and flourished well here in Chilton.  I dug up some last spring to move to another spot in the yard and they have survived as well.  Next spring we are going to share some with Steve's brother Pete who is landscaping his new yard at his newly built house.  For now, the creamy white blooms have all gone rusty brown. I snipped off some of the heads and sprayed them with clear acrylic spray to preserve them in a vase in the house.  The rest of the plants we snipped off about 3 feet tall with the electric hedgetrimmer for the winter.


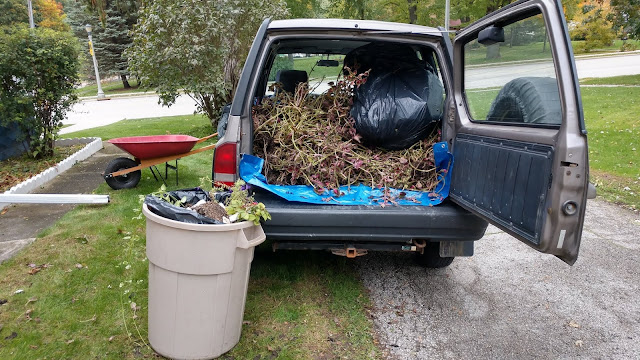
Steve started to load up the back of the Tracker after I spread a tarp down on the floor.  We put in all of the coleus plants we pulled up. It's easier to clean them up in the fall than in spring dealing with mushy old vegetation. I learned the hard way last spring when I breathed in some of the rotting old leaves and got soooo sick! I ended up pneumonia in both lungs and it took three separate courses of antibiotics to rid myself of the illness.  So this year, all the vegetation gets pulled in the fall so I am not messing with moldy old leaves next spring.


We chopped off the hosta plants at ground level and bagged up the large flat leaves, as well as the blossoms and clippings from the rest of the yard. We had six big bags to haul besides all of the loose stuff in the Tracker. Whew!


Our city has a big refuse area to bring yard waste.  They let you pile the loose stuff in one area and then the tree branches in another. They grind it all up and make piles of mulch for next year.  It is used in the local parks and also available to the residents to take for their own gardens and yards.  How nice is that?   (someone tossed SILK flowers in the pile... we pulled them down to the side to separate them from the real stuff... geesh)


These are all of the rows of tree branches that are collected in large rows as people unload them.  The city crews run these through a chipper device to make wood chips for next spring.


After we were done with all of that, it was time to come home and relax in our chairs and take a break!   I grabbed ice water and Steve did a glass of his favorite limeade as we got comfy in our livingroom.  Whew... what a day.


But --- But --- But ---

That didn't last long!  

Steve found something on Craigslist and we had to jump back up and head out to go get something for my "early birthday present".  Here we go with another project???


More on that in my next blog!