Our Wonderful Followers who come back again and again to read about us...

Showing posts with label plastering. Show all posts

Tuesday, November 16, 2021

Playing in the Playroom

We are still waiting for the door knobs to arrive. I am working on a stained glass idea for the transom.  Then we can finish up the French doors. 

In the meantime, Steve decided to move on to the next project on his list. He has this list of things in his head that he wants to get done. I don't add to the list, I don't ever make a "honey do" list. He's driven by his own crazy ideas of what he wants to do. 

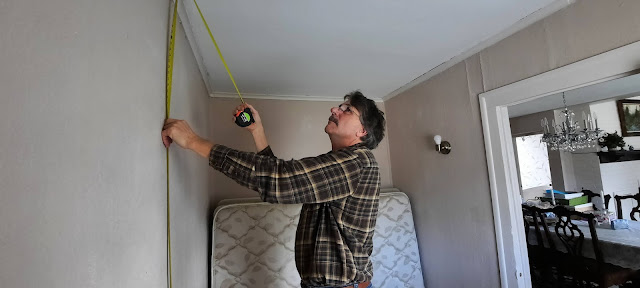
This little room, which is only 10 ft by 6 ft, was used as an office. Well, now that we moved the office into the guest room with the new french doors, Steve wanted to work on the walls of this little room before we make it into the grandkids Play Room.  He grabbed his tape and now he could start Measuring Up.


There isn't much room, but there will be toys on a bookshelf on one wall, my steamer trunk under the window, and the double bed snugged up tight to the walls on three sides like a day bed with throw pillows. It will be great for sleepovers, and we can store things in the room later when they all grow up. 

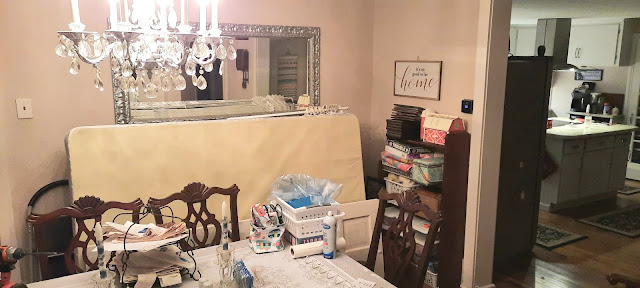
Again it was chop chop chop, crack the whip, and get everything pulled out of there and stacked up into the dining room.  Ugh... I just got it cleared out from the last big move while we were doing the office changeover. 


Our original plans were to cover the room with eight pieces of 4 x 8 sheets of beadboard paneling that we bought earlier this summer. Another one of his bargain Facebook Marketplace finds.

Once he started measuring up and checking the squareness of the corners and the walls, he came to a grim conclusion. Remember, old houses walls are never straight and things are never "square". He concluded that the walls were too crooked to put the straight vertical lines of beadboard on in that room. From top to bottom they were off as much as almost an inch. That would add really crazy beadboard lines to the corners where the panels would intersect. So that plan was out. 

On to plan B ---

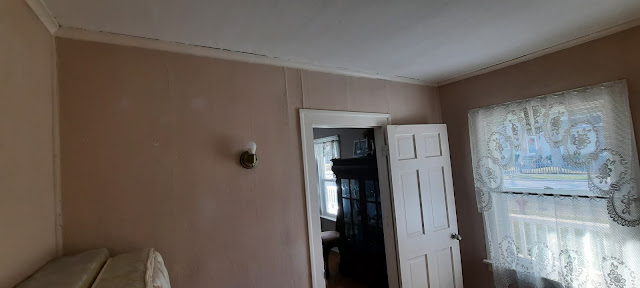
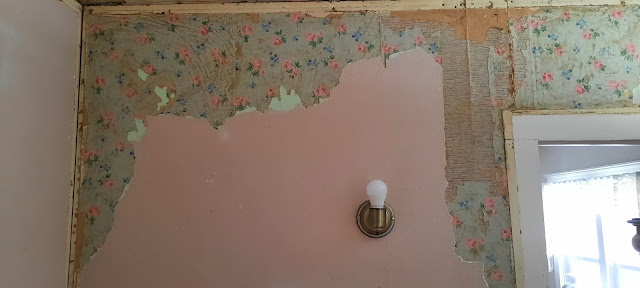
Do you see how rough this plaster is?
 Especially up around the doorframe? 

I had to take this photo on wide-angle view which kind of distorted a little. 

So we need to do something, and the plaster is very rough in that area.  Also on that wall, there is an electrical wall sconce. You can only turn it on and off by twisting the little knurled nut underneath the bottom of the sconce. I would like a switch on the wall by the doorway. So he said that was a good idea and he's going to take care of that at the same time.

It would be impossible to put a light fixture up into the ceiling at this time, because we had this whole section of the house blown with insulation. The roof line slopes so close there that it would mean crawling on hands and feet with about one foot of clearance to even get up there to wire in a light fixture. So I'm happy enough to just to have a wall switch instead of reaching up for the sconce light fixture. He said that's easy!  What a guy. 

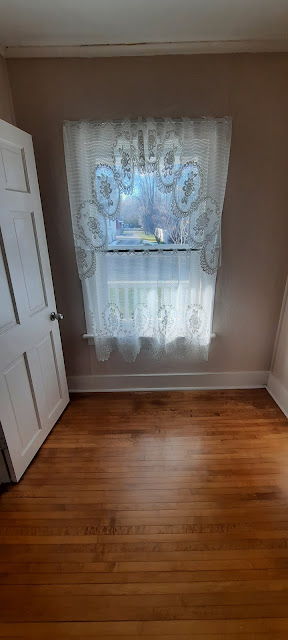
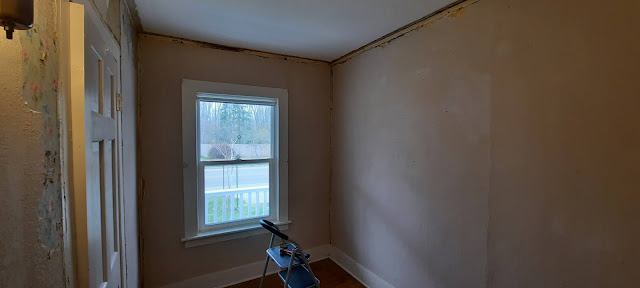
The room is really cute, even though it's small. Here's the six-foot wall that's facing the front of the house and the front porch. We put the new window in last December, so really the only thing left in this room to do are the walls and some new crown moulding. The floors had all been refinished beautifully right before we bought the house.


P.S. when we ordered the door knobs for the new french doors, we also ordered a set for this door too.

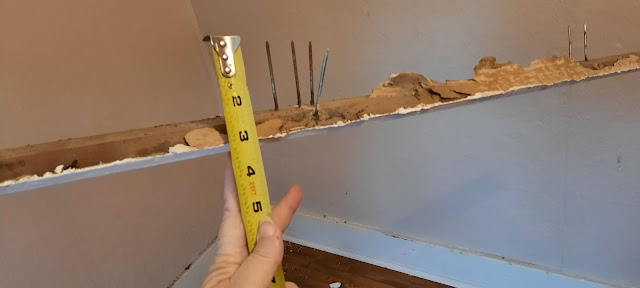
Steve started tearing off the top crown moulding trim. He really had to pry and pry and pry with his big pry bar. Want to know why? Well, just look at this! They used 3 inch sinker nails for rough construction to hold this trim up into place! Isn't that crazy? But I suppose, in the old days you used whatever nails you had around in your tool box or in your work shop when you were doing things.


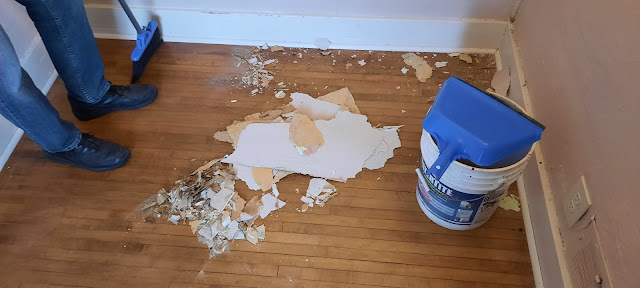
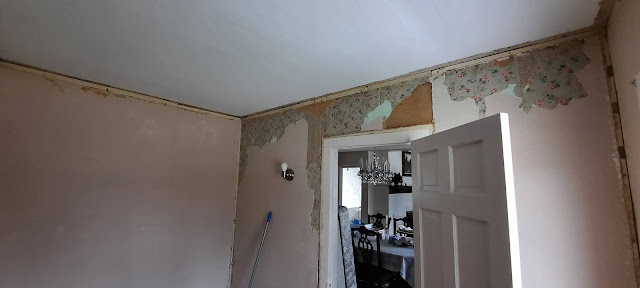
Steve poked around on the different surfaces of the wall in that room. Some of the plaster on one wall was kind of loose so he decided to rip it down. I didn't even have a chance to get the floor covered with rosin paper. He started to make a mess!  Watch out.. it's Steveio Demo Day! 


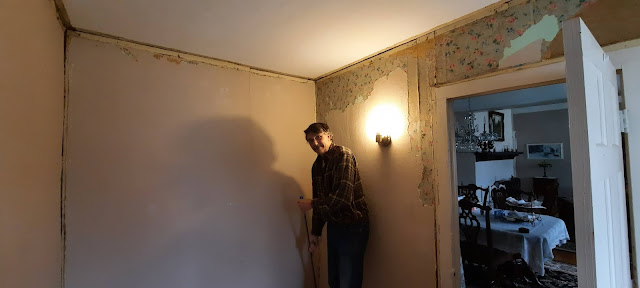
Look at this naughty boy! He had all of the crown moulding ripped off where it met the ceiling. He also ripped some crazy quarteround trim off all of the corners. Pretty soon he started ripping any loose plaster off the wall. I think he looks happy?


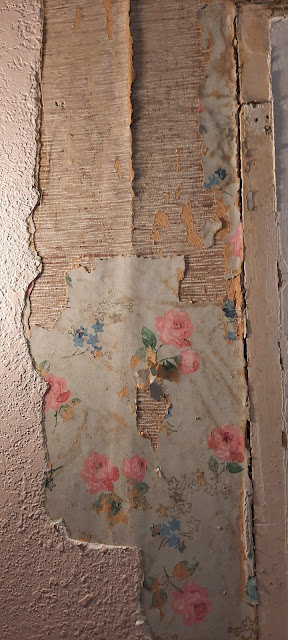
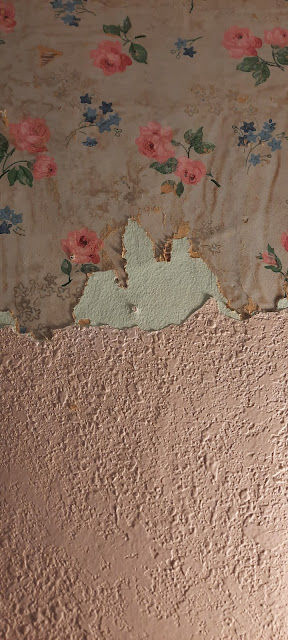
This is what he discovered underneath. Three layers of wallpaper! So someone plastered over the wallpaper with this texture splatter gun? It was just a thin layer and in some spots it had pulled away.


Kind of neat to look at the old wallpapers. First there was the brown stuff with the tiny white stripes, then on top of that was the blue floral with pink flowers, and then the one on top of that was a mint green. Very interesting. But also very messy!


I tried to keep one section of the vintage paper but most of it came off in little pieces. The layers of old wheat paste were discolored and disintegrating.  Why on earth someone would plaster over wallpaper with a texture splatter gun is beyond me. 


He only ripped free the loose stuff and got it back down to the base panel or wallboard or whatever it was mounted to. Behind that there was old plaster and lath strips that had cracked and crumbled away. That's why it had been covered up with some kind of wall board.  


That one wall was the worst wall around the doorway. The rest of the walls were still in pretty good shape. So he didn't have to rip it any further.  Now he went around securing any loose spots with more drywall screws, making contact to the studs and lathes underneath.  Soon nothing was loose or flexing. 


Well, he decided we are NOT going to mess with the beadboard paneling at all. Instead we are going to sheetrock the entire thing with new 3/8 inch thick drywall. He called up Paul, the young man we just had do the plaster in our bedroom, and prior to that he did our whole She Shed. Paul said that was just finishing up another job tonight and will be available in the morning! 

So guess where Steve is right now? He is off at Menards picking up all of the supplies needed to get everything ready. I guess tomorrow morning bright and early we are going to be redoing this cute little room.  Also, Steve was able to wire in the new light switch like I asked. 

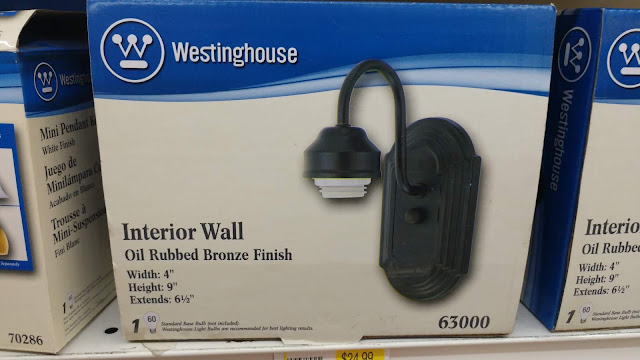
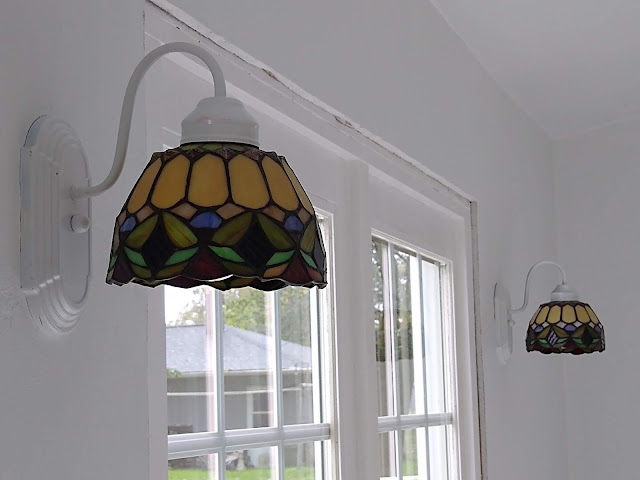
Then.....  He said let's get a matching wall sconce, the same as what we used down in the She Shed.  I have one more special leaded glass shade for a wall sconce, and they only fit a certain type of light fixture housing. 

I called up the local True Value in Oconto Falls, to ask if they had any more of these particular wall sconces. I wanted the exact same one so my stained glass shade would fit. Well, dangnabbit, it turns out that they've been discontinued! 


Come to think of it, when I bought these first three fixtures (actually two years ago), they were the last three boxes left on the shelf. They had been marked down on clearance. One was white, one was brass, and one was rubbed oil rubbed bronze. When I bought them I painted all three white so they would match for the she shed.


I was disappointed, but then the gentleman called me back 10 minutes later and told me they have one left without a box that had been a display model! Yay! He set it aside with our name on it and we will pick that up in the morning!!

He didn't even tell me what finish was on the one that we want to buy that he is holding for me. I don't care, because I will paint it anyhow. At least we have the same one that I know my leaded glass shade will fit just like these others. They are an unusual size and these light fixtures happen to have a big ceramic ring inside that screws around the bulb socket that holds these unusual sized lamp shades. There isn't any lip edge on the stained glass shades to hold into more traditional style light fixtures. 

So tomorrow, while the guys are busy working in the Play Room with the plastering, I will be running to the hardware store in Oconto Falls to get the light fixture. Thanks United True Value! You just got to love small towns and personal service.

I am gonna relax in the tub tonight while I have a bit of peace and quiet. Steve is gone getting our supplies and I think I need a little break.  ahhhhhh a glass of wine, soft music, maybe some soduko puzzles.  Relaxxxxxxx


Tuesday, September 21, 2021

Getting Plastered and Canning Tomatoes While Missing Mom

The Packer game last night sure was good. We watched until half time while we were still in the house. We could see the rain start pouring down at Lambeau Field in Green Bay on the screen. It's only about 30 miles south of us. We figured this would be a good time to gather up our sleeping gear and head on out to the motorhome in the driveway.

Because of our bedroom being dismantled, we slept in the motorhome. I preferred getting out there in our jammies while things were still dry and not with the impending storms that were forecast. So we packed up the dog, some morning coffee makings and a couple donuts, and headed on out to the motorhome. We finished watching the game out there, in comfort, while the rain beat down on the motorhome roof. Packers won 35 - 17 over the Detroit Lions.

We woke up in the motorhome to sunshine, but chilly temperatures. Much better than the muggy humid stuff we had yesterday. We snuggled in with our coffee in the morning and watched a little TV before it was time to get up and start the day.

We wanted to get in the house and unroll some more of the rosin paper to make a protective walkway back and forth to the front door. That way when Paul, the plaster guy, came he could carry his buckets in and out and not worry about the hardwood floors. He has the outside water faucets, both hot and cold, to stand outside and mix up the buckets of plaster with his power mixing drill.


The original hardwood floors are so nice, we don't ever wear shoes in the house. But we sure don't expect a hired contractor to take off his shoes each time! Lol


Paul started on his project this morning and got the seams all taped up and first coat on every seam. It's important to get the first coat on and let it dry because the compound shrinks a little bit. Then before you put on the second coat, you are sure the first coat has done all of its shrinking. Otherwise you'll get cracks! Then he started filling in the rough textured walls with the new plaster. It's going to look amazing!


This is one of those wide angle shots that distorts the room, but you get the general idea. We are quite pleased that everything is filling in and it's going to be a nice ceiling surface as well as new walls ... without the splattered blown on textured surface that they were before.  Look at all of that beautilful sunshine streaming in.  Ahhhhhhhh


He said he should be completed sometime tomorrow. 

~~~~~~~~~~

Silly me, remember when I was so excited my very first grape tomatoes this year? It was such a delight to go out and pick one at a time as soon as it turned red and pop it into my mouth. They started out slowly, one by one.  The grandkids would go out and look all around for even ONE little tomato, to nab it from the vine and bring it in like a treasure. 

Soon we were getting a handful at a time--- enough to cut up and put into a salad or even chop up and put into tacos. 

Now I get tons and tons of them and they're driving me nuts LOL. Soon the season will be over. So it's time to can them up. I chopped them up into little pieces and mix them in with the large tomatoes to process in my canning jars.


Yesterday I picked a whole bunch of ripe larger tomatoes. These are Better Boys and Early Girls. My tomato patch of 8 plants is getting almost to the end of growing season.  This batch is about 6 quart jars worth. I was going to can them up last night during the Packer game. But the game was so darned interesting, that I ignored the tomatoes. So this morning I washed them up and got them ready to process.


I chopped all of the little ones in my food chopper with the skins on. Then with the large tomatoes I cut out the stems and I slice an X into the bottom of each tomato. Roger, if you are reading this blog, that is your beautiful tray right there... I used it to carry the tomatoes over from the island to the counter. I love that tray!


Then I simmer the large tomatoes in a pot of water, just enough to loosen up their skins. By having the X sliced on the bottom it makes it much easier to peel the loose skin off the tomato.


I plunged the simmered tomatoes into a big tub of ice water. That helps loosen the skins up even more. I ladle them out with a large slotted spoon & peel the skins away to discard. In the bottom of the jars I have a tablespoon of lemon juice, a tablespoon of pickling salt, and a couple scoops of the chopped up little grape tomatoes.


As I peel the skin off each tomato I grab my little knife and cut it right on the large slotted spoon into sections or chunks. This is much easier than trying to hold it in your hand because the tomato is still very hot.


Instead of using my big canning kettle that holds nine jars and heating it on the outside propane burner, I am just doing six quarts in the house. I do not like putting the big canning kettle on my glass top stove, I have heard it may crack it. Instead I use my tall blue enamel soup pot, and I put in three jars at a time. Because there isn't a rack for the jars, I wrap each one in a burgundy cloth dinner napkin and I put one on the bottom of the kettle as well. That way the jars are not sitting on the hot metal. That can crack a jar. In the smaller red kettle on the right I keep the next three jars warm on a low setting just so they don't cool off too much after filling them. Once the first three jars have been in the hot water bath for 45 minutes, slowly simmering, then the next three jars will take their place.


As I type this, I have three jars finished and sitting out on the towel, and the last three jars are in the hot water bath right now. Soon I will hear the PING PING PING of their lids as they seal up tight. 


I line them up on my little pantry shelves. Row by row, jar by jar, my shelves are filling up for the long winter. Nothing can be better than popping open a jar in the middle of winter to make a pot of chili or a casserole. The smell of summer comes wafting up. I reach in with a fork and take out the first chunk of tomato and eat it straight from the jar. That is my reward for these hot days of summer, processing these tomatoes.


I wistfully recall my childhood years, of canning vegetables with my mother. Year after year. I would stand by her side in that hot steamy kitchen and we would process up all of our garden produce. We did hundreds of jars of everything. Not just tomatoes! We did all kinds of canned vegetables and sauerkraut and jams and jellies. One of my fondest memories is after putting the last few jars on the shelf of what Mom called her "Veg-All Mix" which was a mix of all different leftover vegetables at the end of the season. As we placed the last few jars on the big wide deep basement shelves, she stood back with such a look of satisfaction on her face. She put her hands on her hips and smiled after wipinig her brow. She said "My oh my, are we ever rich!"

That made such an impression on me, because we weren't rich at all financially. Life was not easy with a large family and a big garden and not a lot of money. But knowing she had hundreds and hundreds of jars stashed away for the upcoming winter, it gave her the sense of being rich.

Sometimes, it's the little things.

I miss my Mom.


Wednesday, November 6, 2019

Getting Plastered!

As promised, I'm continuing the step by step process of what we were doing to complete the she shed. Yesterday's blog detailed all of the electrical and insulation.

I mentioned at the end of the blog that we had contacted our neighbor to get a referral. Our neighbor hangs drywall and we asked him who to get to do our finishing, which is all of the taping and the mudding work.

After our putting up all of the insulation and then hanging all of that drywall, we decided we are getting too old to do all of that overhead work. Especially up at 11 feet high sloping down to 8 feet high in the she shed.  Steve said after mudding and drywalling the half bath last month, he was DONE doing it himself. Time to hire someone else instead.

Our neighbor recommended a young man by the name of Paul. He is an experienced drywall finisher who has done various jobs in the area and works for a local contractor. Our neighbor said he did an excellent job for him personally at his own home and he is willing to take on side jobs at his own convenience.  He also mentioned that he had done a plastering job in a restoration of a historic lighthouse.  Interesting!

Paul came over at a designated time to give us a quote. When he saw the wonderful job that Steve and I had done with the drywall installation, he said that he would like to offer us an alternative rather than just taping and mudding. The drywall was done and joined so well that he had another idea.  He suggested that we go ahead and actually plaster the walls. He said he enjoys plastering much more than traditional drywall work.

Paul said with the plastering we could either have a smooth finish or a light skip trowel finish. We agreed to the light skip trowel finish that way we can hide any blemishes or imperfections later from normal wear and tear. It's easier to camouflage nail holes or repair "oopsies" that can happen with walls over the years.  We had a skip trowel finish on our ceilings in Chilton and we liked that effect.

He quoted us a very reasonable price to do the work, based on the condition that he could come over and work on it in the evenings or on the weekend after his regular job hours. He made it clear that it may take a little longer to complete it, but that would give it a chance for the plaster to dry in between coats.

We agreed to our picking up all of the materials and he would bring over all of his tools. We agreed to lock it up each night so nothing could be misplaced or disappear, but each morning we would unlock the room so he could come and go at will.

He furnished us with the specific brand of Venetian plaster that he likes to work with, as well as a special wall prep material that works as a bonding agent between the plaster and the drywall. He liked a certain type of mesh tape, and we got everything on his wish list.

We picked up all of the materials that evening and had them ready to go, and he was able to come over and start the next evening.


Paul brought in all of his scaffolding and stilts and tools to get right to work.  He had to roll all of the walls and ceiling surfaces with the bonding agent to insure a good surface for the plaster to hang on to.


The next step is to cover all of the seams with a special blue mesh tape. Then he covers those seams first with the plaster, making sure it gets pressed deep into the mesh. He also gives a good coat around each wall outlet and light fixture box.


He was especially happy that he did not have to put drop cloths all over to cover and protect the floor, like at most jobs. Because the floor in the she shed was still the original garage cement floor, he didn't need to do anything special to protect it. We said it was fine if he dropped plaster on it and we would take care of cleaning it up later. It made his work much easier because he would not be stumbling back and forth over tarps while wearing his stilts or arranging his scaffolding and having to rearrange tarps all of the time. It made his job much easier.

We provided him with a little mixing station outdoors with hot and cold running water by our exterior faucets, as well as an area to plug in his long drill with a mixing bar and additional buckets if he needed them.

I furnished him with buckets of ice water and bottles of drinking water and clean terry cloth rags and towels, because the weather was starting to turn very hot and muggy!!!

Boy oh boy, did that guy work hard! It was hot and muggy and sweaty while he got the first coat on. He said actually the muggy weather is nice, because it will prevent the plaster from drying out too quickly. He worked a lot with the windows closed down to help control the drying process.


I could have NEVER HANDLED ALL OF THAT HEAT AND HUMIDITY!!!  It was well worth the money we were paying him to do the job for us.

Over the next four days he came and went from the she shed. He lived nearby so he was able to go home to grab lunch or supper or take care of other errands. In between working and being here, he was also running his grandfather to a doctor appointment, running his dog to the vet, and working full-time.  He managed to squeeze in all of our work in 4 days. He was always messaging us to let us know when he was coming or when he was leaving. Some nights he was out there as late as 10 or 11 p.m.  It had to dry in layers in between each visit so that was good to space it out he said.


Here are some pics during the process:

EAST WALL WITH THE FRENCH WINDOWS


NORTH WALL AND PART OF THE WEST WALL 
(WHERE THE GARAGE DOOR HAD BEEN)


SOUTH WALL LEADING TO THE DOGGY POTTY YARD
AND PART OF THE WEST WALL LEADING UP TO THE KITCHEN

Each time after he left, Steve and I would go down on to the floor and do some mid job clean up. Steve would scrape any big gobs of plaster up with a snow shovel, and then sweep it into piles. I would vac up a lot of the excess with the Shop-Vac. It just kind of kept the job site a little cleaner and easier to work in and kept it from accumulating too much by the 4th day if left untreated.


The only inconvenience the job posed to us personally was that we had to remove the temporary back stairs so he could access the entire ceiling and corner walls with the scaffolding and stilts. Without having the stairs from the kitchen down into the she shed, that meant that the dogs could not access their potty yard as easily as their routine allowed.


Instead, we had to bring them out the front door, around the house, and put them into the fenced-in area from outside. Four or five times a day we would do that routine, even in the early morning and the late-night one before bed. But it was a minor inconvenience considering the fact that we were getting all of this work done for a good price.


We also covered the stairs to the basement door with a hunk of sturdy plywood. Later we would level and block those stairs off permanently, and just make a scuttle hole access in the wall.

It was kind of fun to watch him from time to time, but we did not want to interrupt or waste his time. The neighbor who recommended him also came over to check out his work and compliment him on a fine job he was doing for us.

Watching the way he handled his tools and slide that plaster back and forth with such precision was interesting. He kept up a figure 8 motion with that big trowel that just moved everything around to where it left an attractive finish as it dried.  No big gobs, no funny "chatter"  as he called it, and no big differences in thickness. The venetian plaster dries with some smooth and shiny and some more matte type finish in the skip trowel areas.


By the fourth day he was finished and we gladly paid him in cash. Steve also had some old plastering and drywall tools that we would no longer need, so he passed them on to Paul to add to his own collection of tools. We had some leftover materials that we also told him to take along and could possibly use on his next site.

I posted positive job reviews on all of the local marketplace groups, to help gain him some more side jobs.  We were totally satisfied with the finished project and we felt he did a good job.  Plus it was saving us a lot of back breaking work in hot and humid miserable working conditions too!

Now we had to do the agonizing process of waiting three days for the plaster to fully cure before we could prime it and paint it!!!


Sooooo during those three days of forced waiting, we took care of another project that has been on the back burner for quite some time. I will talk about that in my next blog!!!


Friday, June 30, 2017

Our Old House - Laundry Room Makeover

This week I worked on an Our Old House project.....

Originally, when we bought this house, this small room had been a pantry with a sink. The previous owners had added some modern light oak cabinets and also had the refrigerator and dishwasher in this section. There is a larger main kitchen that had only contained the stove and a small set of cabinets original to the home,


To me, it didn't make much sense to have the sink and fridge and dishwasher all crammed into this little pantry, but the stove out in the main kitchen with the table and chairs?  It was sunny and bright but tight quarters.  Only one person at a time could be in there cooking or cleaning up. 


This Part Happened Four Years Ago:
We decided (four years ago when we bought the house) to revamp this pantry room a bit. That meant moving more items into the main kitchen room.

First, we added more cabinets to the main kitchen. I found some beautiful 100+ year old ones that came out of a mansion in Fond du Lac. I lovingly refinished them and we installed them all along the north wall in our main kitchen.


We also added a large island of dark woodwork to match. Inside the island on the other side we installed the dishwasher underneath.  This is the way the main kitchen looks now.  Ahhhhh I love it!


Now back to that smaller pantry room----  our solution four years ago:

We pulled out the lower cabinets and sold them on Craigslist. We also moved the refrigerator and the dishwasher into the Main Kitchen leaving the smaller pantry room basically empty.  We laid new flooring to match what we had in the main kitchen.


Our plan was to now make this a First Floor Laundry Room! 

That is when we moved up the washer and dryer from the basement and the laundry sink too. The laundry sink is important because our washing machine has a wonderful feature called "Suds-saver". (I had this on my washing machine in Green Bay and loved it)  When doing multiple loads of laundry I can have the sudsy wash water pump out into the sink.When when I'm ready to start the next load I turn the switch to a feature which pumps it back into the washing machine. By creatively managing the loads, doing the least dirty light things first, the same load of wash water and soap can be used two or even three times depending on the items I am washing. Saves on water too. I used to use the third load for Steve's work clothes, which were usually pretty grubby. Now that he is retired, I'm only doing two loads lately.

Anyhow, the light oak modern cabinets always kind of bugged me. They were not original to the house and the woodwork didn't match. I am a "Matchy-Match" kind of girl.  See how they do not match the dark reddish brown original woodwork of our home?


Fast Forward to This Week:
I had considered going over the cabinets with a poly stain varnish to try and make them a darker like the rest of the woodwork. But the more I looked at them and how dark they were in that room as it was, I decided I would paint them white! Yes! From a person who abhors painted woodwork, I was going to take a brush and roller to paint over these cabinets. Blasphemy I tell you!

Steve HATES painting, so this project was totally all on me.

First I've removed all of the cabinet doors and brought them down to the basement and laid them out on saw horses. From there I sanded all the surfaces with a palm sander to rough them up a little bit. Then I gave it a coat of Liquid Sandpaper. This product helps prime the wood and makes the previous finish kind of sticky so the new paint will adhere better. I opened up the windows in the basement for fresh air to help with drying in between coats.


My prep work also included the front face frameworks 
of all the cabinets up in the laundry room too. 
I used a small foam roller to avoid any brush marks. 

 I didn't bother to do the insides of the cabinets. 
It's only pantry storage and laundry supplies in these cabinets. 


The Next Step was to apply a primer. Well I had this wonderful primer paint mixture that was for exterior painting. So I used that and I figured it should hold up pretty good. I gave it all two coats, thoroughly letting it dry in between. The last coat, I used some white enamel paint on both sides of the doors.


Now while that was drying, what I needed to do was to prep the walls and ceiling in the laundry room. They were a deeper golden yellow, not quite a Harvest Gold of the seventies but still pretty dark. I had half a gallon left from painting my sewing room... a soft pale lemon yellow.  Lighter and much softer and muted than what was on the walls and ceiling right now.

Up on the ceiling there was a little bubbled up area in one corner. I got up on the ladder and started chiseling away at it with my putty knife. Rut Roh! Here it was a big wide swatch of fibered seam tape. As I pulled on it a little bit I realized it was traveling across the entire width of the laundry room from one side to the other! It had been covering a long skinny crack. Well, there was no going back now. I had to pull the whole piece off!!!

ACK!!!

So now, instead of just spackling one little area I had to do a complete plaster patch repair job. I hauled out a bag of plaster and the tools and mixed up new plaster. I eased it up into place and made it as smooth as I could.


While that was drying, I decided to go ahead with painting the ceiling and walls. I could paint up to the fresh plaster and just take care of the rest of it in the morning. I painted the upper portion of the walls that were original plaster.


On the lower portion of the walls, there is a kind of funky vinyl covered wallboard paneling stuff kinda grayish-white. I decided I will throw a coat of paint on that too. If it doesn't hold up, we can always yank it off. I would love to put a white beadboard wainscotting in here and it would really dress it up. That can be my backup plan if this does not hold up.


Also, as a backsplash when it was a kitchen, there is a wide sheet of a mottled printed cream Formica being used as a backsplash between the underside of the cabinets and the trim rail. I really don't like that color so maybe someday in the future I can add beadboard wainscotting back there to to match. That's where Steve can come in and use his talents by doing the woodworking for me. For now this is a kind of interim solution to improve the laundry room.

I cleaned up my mess for the evening, popped a couple of Aleve in my mouth and took a nice long soak in a bubble bath!!!

After the plaster dried the next morning, I used the sanding tool and took down the high edges and smoothed it out as best I could,  I put a coat of primer on the patched crack and now I was able to paint over it and make it match the rest of the ceiling and walls.  Voila!


Now it was time to bring up each of the doors and install them back into place. I had carefully numbered each one with a tiny marker on the hinge itself so I would know what order they went back on.


The original white ceramic knobs look just fine on the cabinet so I attached each knob back into place. Don't you know it, on the very last door, the very last knob would not screw back in properly. I tried to force it with the screwdriver (which of course it slipped) and jammed right up my fingernail! Owiee Owiee Owiee!!!


I got all of the doors back into place, put the curtain back up, attached to fire extinguisher back on the wall, and put up the hanging rail on the other side for the clothing hangers. It was originally a dish towel rod but it works well for hanging clothes as I unload them from the dryer.


It's hard to take pics in this room because of the bright light coming in through the window. So I pulled down the shade and now it appears darker than what it really is. Believe me, it's a very soft light lemony yellow and nice bright white cabinets to match the white washer and dryer and freezer.


There is a really neat swinging door that leads out to the main kitchen. We usually leave it propped open, but it is also handy to block off the noisy washing machine sounds from the rest of the house.  We also close off the dogs into this room when we need to contain them in one spot. They have not figured out how to push on the door with their noses, so it is essentially doubles as their little indoor doggie room too. 


I cleaned up and put away all my mess and tools. It felt so good too have a bright clean fresh light airy room. This is the last room in the house to get painted. So during the last four years every single wall in the house has been coated with a new fresh coat of paint since we bought Our Old House!

~~~~~~~~~
I would like to take this time to wish 
our oldest daughter a 
VERY HAPPY BIRTHDAY!!!!  

It seems like yesterday she was a tiny baby in my arms.  Awwwwww Erin and her happy family are on the road heading out for vacation with Waylen's folks in Oklahoma.  Happy Birthday On The Road!


What a beautiful, accomplished woman you have become! 


 First and Last Days of school....


One of my most favorite camping pics of Erin


 Where does the time go, sweet little baby girl? 


~~~~~~~~~~~~~~~


I just wanted to pop a few more pics on here.... I was sitting out taking a break in the front porch. I just LOVE how the clematis on the south side is climbing up, covering the windows.  I zigzagged thin white string across the window frame, wound around tiny white nails.  I looks so pretty, even from the inside.


Plus it makes a nice shade from the sun streaming in 
on the south side on the porch. 


I am also working on a new quilt... I got 8 blocks done, and it is slow going and putzy challenging, but fun! Nice to work on during the rainy days we have been having lately.


I am also keeping myself busy with some new rugs on the loom.....  My elbows both were suffering from a "tennis elbow" condition the past 6-7 weeks since we built the fence. Now they have healed enough to slowly weave and take it easy. It's hard, because I tend to push myself and overdo it.


 I am really liking this new pattern! 


Well, it is back to another doc checkup today.... 
all is well and I think I am doing fine.