Our Wonderful Followers who come back again and again to read about us...

Showing posts with label pac brake lube. Show all posts

Thursday, March 8, 2018

MOTORHOME MODIFICATIONS - *P* is Pac Brake Repair and Replacement

I am going to start off the new year with posting some of our motorhome modifications, a few at a time. I will post repairs, modifications, or neato things we have found for RVing.  I have lots of pics in my files so I will do them in alphabetical order.

Underneath that stuff, I will post my regular daily stuff..... kinda sorta fun, eh?

So here it goes, we are up to the letter P now!


MOTORHOME MODIFICATIONS 
STARTING WITH THE LETTER P


Pac Brake Repair:
THIS REPAIR AND REPLACEMENT WAS DONE IN 2012, SIX YEARS AGO....
We noticed our "pac brake" was not functioning.  It is also called an "exhaust brake".  Steve crawled under the bed to make a diagnosis.  

For those who don't know what this part is.... it goes on the exhaust pipe by the engine and helps as an extra "brake" by shutting down that inside flapper dealie and retards the pressure to make the engine work as a brake.... to slow down the whole motorhome instead of just relying on the brakes pads on each wheel.

Our diesel motorhome has the engine in the back, underneath our king sized bed.  We lift up the heavy bed together.  He props up the bed mattress and deck with a heavy pole and can crawl right into the engine compartment to work on it!


His first thought was the the Humprey valve.  This is the Humphrey Valve. He got a rebuild kit and decided to operate on that as an easy fix. All that he needed to do was change out the little inside rubber diaphragm and the rubber O-ring.  That was the easy part. 


Okay... that was done and we took it for a test drive.  The Pac Brake would still not operate correctly. It moves the piston, but not the butterfly valve.

Upon examination, it was the interior butterfly would not turn and close inside the exhaust pipe.  It was rusted (frozen) shut tight! It gets heated so hot from the exhaust that over time it has swelled up, warped out of round, and stuck.  Fortunately, it was stuck in the OPEN position and not the CLOSED position.  Whew!

Now we needed some serious pounding with a hammer.... on the lever that controls the butterfly inside the pac brake cylindrical tube.  Many whacks later, it still didn't knock it loose!


Now  he figured he needs to remove the entire pac brake to work on it out on the work bench.  So he needed to loosen the two flange clamps and get that entire pac brake outta the engine area so he could work on knocking the butterfly inside loose. 


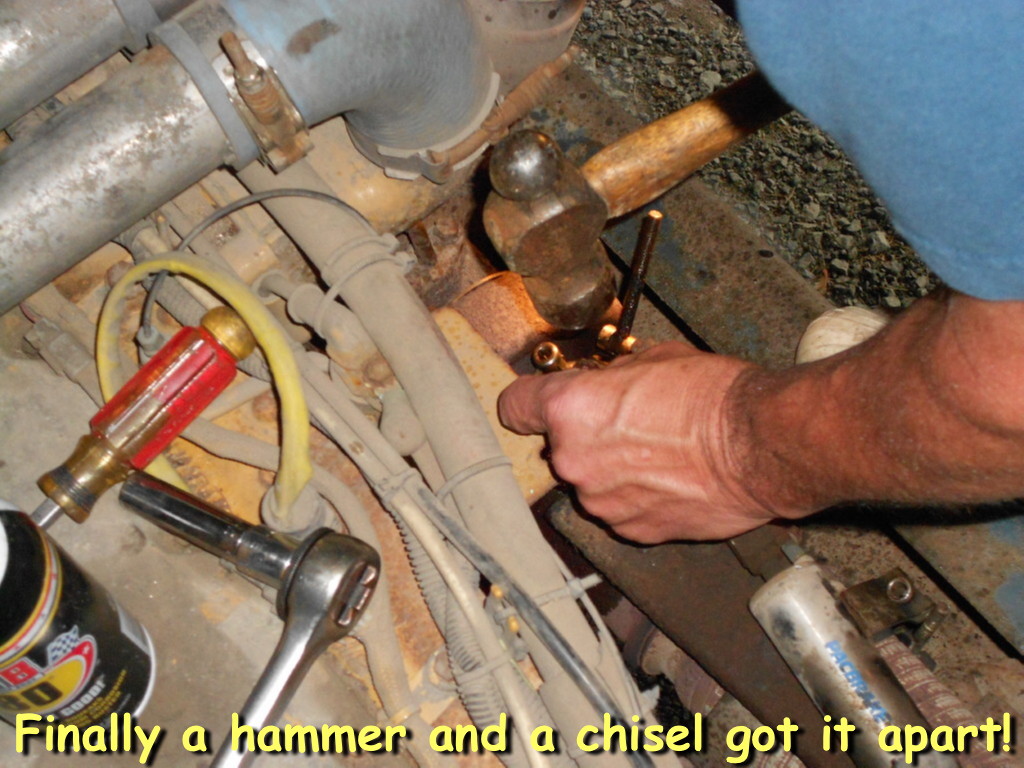
Sound easy huh?   Well.. of course it's NOT.... once the two clamps were loosened, the entire pac brake housing was rusted in tight!!!!   He had to use a chisel and a big hammer.... after many whacks (Steve estimates about 20)  it finally came loose!!!!!!


Next hurdle, the butterfly inside the pipe was of course stuck in the open position, which the two fins of the butterfly intruded into the exhaust pipe and turbo unit on each side of the pac brake that he was trying to remove.  It was a very difficult job to try to flex back the exhaust tube (which doesn't flex much) to give enough clearance to slide out the pac brake with the stuck butterfly valve.  Arggghhhhhhh

Whew!  There... it is OUT!!!!


See how that center piece (the butterfly) is stuck in the open position?    We stuffed a rag in the opening for the turbo and taped off the end of the air line to the Humphrey valve too.


Yup, this is what is "broke"


A pac brake is not a cheap item to replace...  it runs in the $700-1,000 range.   That is why we are going to try to loosen the stuck butterfly ourselves. The piston part is not the problem.   The piston part seems to function correctly, and it the part that gets lubed with special pac brake lube.   But the rusted up butterfly lever IS the problem and that takes such high heat when the engine is running, that lube does not work on it.


Steve hammered on it out on the bench,
then in the vise, 
then with a bigger hammer... 
nada..  
it was NOT going to move! 

So he took it to work, and on his lunch break he used a rosebud torch tip with high heat map gas torch...   and lots of flame and heat to finally break it loose!  And it worked!!!!!!!!!!!!!!!!

Yes, he put the pac brake back in, and it went in very easily now that the butterfly could be shifted to the closed position.  Dropped it right into place, hooked it all up, clamped down the clamps and then added the brand specific Pac Brake Lube to the 5 points of lubrication indicated on the bottle.   There... done!


We then took it for a test drive and it worked perfectly!   Steve even had me drive for a bit and let him look with the bed lifted up, so he could see it actually working.  What a reward for a job well done! 


FAST FORWARD A YEAR......


Pac Brake Replacement:
Steve decided the leaking piston on the pac brake on our motorhome was not holding after his little repair job.  It was working intermittantly, and a few times we had to pull over and lift the bed to "unstick" the pac brake.  Not good, especially on an interstate! 

So he searched the internet and found a new one to replace it with. 


Here are some pics for you RV Cat Engine guys to oogle at ..... 


I am sure the replacement will go quickly, because we have had the other one out twice.  He thinks the actual flange is hanging up because the round chamber is warped from the heat... and also the piston device is not working properly as it was leaking and he did an epoxy glue job on that might not be holding.  We know on our last trip, it was working erratically.  Instead of fighting with it, he decided we should just invest in a new one. 


Here is the info and cost:

PacBrake PRXB Exhaust Brake GMC C6500/7500/8500 Cat 3116/E/3126
SKU:PB-GMC-C40105
Weight:35.00
Price: $738.25

I am soooo glad Steve is able to do these changes himself.  It would probably have cost upwards of $1,000-1,500 to get it done.

~~~~~~~


Ahhh you guys are probably tired of reading about my front porch redo facelift.  But heck, it's winter, we aren't travelling, so bear with me.  It's the only fun thing I am doing right now after being sick for so long! 


I decided to add four quilted pillows that match the throw quilt on the couch. I put two of them on the chairs, so it ties them all together. I have two little quilted coasters that match on the little table between our chairs as well.  


Over on the couch, I put two more quilted pillows and the throw quilt.  Next to the couch is a basket of quilting and weaving magazines.


Now we are all set for coffee, but it was only 19 degrees out this morning!   If we go out there, with the single pane windows, they all steam up. Even if we set out a little portable heater, the windows are all fogged up and freeze over.  Best to wait for a sunny morning.  We use it for spring, summer and fall.  And these few exceptional winter days that were warm and sunny! 


I do have two eager models
who love to hop up on the couch
and keep an eye out for that Mail Lady! 


We grilled out steaks last night, even though it was cold.  Sometimes a bit of food cooked outside is just the cure for winter blahs.  We got some more snow yesterday, not much, but at least things are white and pretty.  Much nicer than 2 weeks ago when it was all melted and brown and grey and muddy looking.  I will take the fresh white stuff over that any day.

Steve is working on some plans for the upcoming spring spruce up at the museum. We volunteer there and most things are done by a only few people who step up.  They are going to tackle the cedar shingle roof on the log cabin this spring, so Steve is going to a planning meeting for strategy and shopping lists. 

Then later today he is going back to his old park to help with planning for some improvements on the pavillion building. Because he worked there for so long, he is more familiar with the systems and configuration of the buildings. (the state has not hired anyone to take over his vacated position, nor are they going to)  He is going to give input on the HVAC situation there and speak to the contractor they hired for the changes.  I am glad he can still assist them in this project, but they are paying an outsider to do the work.  If he were still working there, I can bet it would be him doing ALL the work! hahahahaha


Tuesday, June 12, 2012

Motorhome Modifications - THINGS TO DO WHILE TRAPPED INDOORS

Wisconsin weather has been just crazy lately.  Over the weekend it had been in the 90's, very hot and horribly humid!   (as I type this on tuesday morning, it's windy and cool at 52 degrees)

We spent Sunday afternoon out in the motorhome where it's parked in the driveway.  The motorhome is sitting out in the full sunshine, sweltering in the heat just like us.  We are only connected with a power cord to the garage's 20 amp service, which means we can only run one air conditioner at a time.

That was fine while we were laying the bedroom area with the door closed, only cooling with the bedroom air conditioner.  We took nice long naps, recovering from the weekend of babysitting the wee ones.  That sure was a well deserved nap!  

But then we wanted to move forward to the livingroom area to sit in our recliners, browse on our laptops and let Steve watch a stupid man's movie, Die Hard 2.  

We turned off the back air conditioning unit over the bedroom and fired up the front one in the livingroom to cool that area off.   It was the hottest part of the day and unit works well, but only blows the air out the end vents, one  vent to the front windshield area and one vent to to the kitchen.   Not much air movement goes directly below in the livingroom by our chairs.

Sooooo after a while, Steve pipes up:  "I'M GONNA DO WHAT MEL DID!"   and off he goes to get his power drill and a 2 1/4" hole saw!!!!!!   With some careful measuring and checking... he drilled a hole right through the underbelly of the air conditioner!

 (it's just a layer of plastic and soft insulation -  no metal)


Amazing! The nice cool air blasted right down on us in the middle of the livingroom!   Now we can sit in our recliners and feel more comfortable than before.  
Yes, our brainy modification friend, Mel, with the same type of motorhome as us, had done this quick fix to his AC unit too.   We will get a little vent plug to put in the hole to cover it up when not in use, but I think while using it, we will just pull the vent plug out to not impede any of the air flow.   Thanks Mel for giving Steve this wonderful idea!


While we were "trapped" inside the motorhome for the day, it was a good time to go over what we had in each cabinet, and what we planned to bring into the rig.  I also took out a bunch of stuff we were not going to want along when we move into the rig full time next month.  Steve is hauling a batch to St. Vinnies next week.  We planned and thought and figured and thunk!   Got most of our things settled in our minds of what is going where in our rig.


When Safari built our motorhome, they included a Delco Electronics 10 disc CD changer unit along with a surround sound.  We used it and it works well.   But in the age of new technology, I have put all of our CD's onto a little MP3 player, we really don't ever use the 10 disc CD player unit at all.  The mp3 player hooks right up to the surround sound speakers and sounds just as good.    Plus, I can now random among 200 CD's instead of just 10 for a variety of music.

I offered the 10 disc changer for free plus the price of shipping to anyone in our Safari group on yahoo http://autos.groups.yahoo.com/group/SafariCoaches 
One member asked for it, as his was sticking and not operating properly.  It was easy to remove the deck unit, just unplug the cords leading to it.  But then we thought about the wired in remote unit and the cords that went to the radio.... what if he needs those too?  What if this one is not compatible with his cords?  We should give him the cords, right?   His rig is a little newer than ours, what if Safari changed styles of units from year to year?   We figured it was best for us to remove any and all cords to include with the unit when we shipped it out.

Ahhhhh but one of those cords went down through the side post between the front windshield and side window.   We THOUGHT it would be a quick removal, take off the padded cover and slide the cord out.   But noooooooooo!   That cord was wire-tied to bundles of other wires in about 10 places.  Mind you, wire ties are usually easy to snip, but not these!  Safari used some very very good plastic wire ties!~   Even a scissors was not able to snip them, so Steve had to carefully use a very sharp knife and be sure to not cut any other wires.  Two of the bundled areas were up above the driver's area and hidden way up behind the tv cabinet.  Not accessible from the compartment panel behind the tv either.  Steve found the best position to reach them to work on undoing the wireties.......

(can you imagine if anyone was walking past our house to see this?) 

Finally we got the cord snipped free from the top cabinet to where it went down behind the dash.  Next part: follow the cord between all the wires, vent hoses, and assorted junk under the dash.  It was a like following a single piece of noodle in a plate of spaghetti!   We followed it along through about 2 or 3 more bundled areas, only to discover it now goes OUT through the firewall to the front of the motorhome behind an access door!   Steve braved the sweltering heat to go out and see what was up.  He came back in and said "WE GIVE UP!"    There was no way he could unscrew the whole dash to get that cord through and back into the rig again.    Soooo we cut it off where it exited the dash through the firewall and cut the other end off where it entered back in again on the other end.   Done!   If the new owner wants, he can have both ends of the multi-stranded cord soldered together to make it work again.  Whew!


See the fun stuff we can think of doing when trapped indoors???  

Life is never boring when you own a motorhome.....


I forgot to post one more pic in my pac brake repair post from last Tuesday's blog motorhome-repair-rebuilding-pac-brake  of the last step.  Steve lubed up the five points on the pac brake pump unit with Pac Brake Lube, specifically made for Pac Brake units.

After he lubed it up, we took it for a test drive and it worked flawlessly.   He even had me drive the rig for a bit, while he stood in the back and lifted the bed to watch it function correctly.  What a reward for a job well done.  He saved us $1,000 or more of having it replaced.  


Now for a little bit of grandtot stuff:
I wrote this next section in an email to my friends... but thought I would copy and paste it into a blog for your "reading enjoyment".   Now you will know why we needed such a nice long nap on Sunday after the grandkids left:


Saturday night, we babysat for Clayton and Chelsea while their parents, Erin and Mark, went to a wedding.

Do NOT read this next part if you are eating!!!!


Toooo funny, but when Erin brought diapers, she tried moving Clayton up from size Newborn to size 1... the diapers kinda *gapped* at the leg openings.  I woke up for the 1am feeding and all went well.  Changed him and he went back to sleep.  

I was feeling horrible and nauseous from a sinus thing draining and a sore throat and could not get back to sleep myself.  I was up all night. My stomach was rolling.  By the 4 am feeding, the baby woke up very crabby, so I woke up Steve to help me out a bit...

Steve stumbled outta bed and was holding a very very very fussy Clayton while i was preparing a bottle... RUT ROH!   Now i know why the baby was fussy!  Seems he had a huge amount of ummmm ohhhhhhh  you know what coming into his diaper, (remember those gaps around the legs???   It OOZED all over Steve!!!!   it came out the gaps of the diaper and down on Steve's lap, on his boxers, on his legs, it was just EVERYWHERE!!!!  He could not even stand up!!!!  

I can not believe one little butt can produce so much ummmm you know what!   i think he saved it up, because all evening he had only wet diapers... not this .....  he waited till 4 am to let it all go! 

By now, the baby is screaming, Steve is grossing out and gagging, i am trying to pick up the baby from his arms and not *dribble* anything on the way to the bathroom,  He is sitting on the ottoman in the darkened livingroom, and he can't even stand up and he don't know what to do!  He can't see in the dark, and doesn't have on his glasses either. The last I saw of him was as he sat with both hands catching the mess dribbling down his thighs and he cant think of what to do next! 

I got the baby into the bathroom and grabbed a stack of towels to toss on the floor and lay him down. In the middle of all this hubbub Chelsea wakes up and adds to the confusion saying she HAS to go potty!  Someone has to lift her up on the toilet and help her NOW, but I have a gooey icky baby on a towel on the bathroom floor and trying to get off a poopy onesie outfit up and over his head!   

Remember, I am nauseous to begin with, and not feeling well.  But I manage to get Chelsea propped up on the toilet.  I get all the bad stuff washed off the baby, and have him on a third towel on the floor, while trying to wipe him down with a warm washcloth. Steve managed to "crab walk" into the bathroom without dribbling on the new carpeting in the livingroom.  We have 2 stairs up and 2 stairs back down to get into our bathroom, and he maneuvered those too. 

Chelsea is sitting on the floor watching me, and Steve is trying to step over us to put his oozing boxers into the washing machine next to me by lifting them up over my head!!!   I can just about see it coming out of the corner of my eye and i move JUST IN TIME to not get dribbles on my hair!!!!!   It went down my back instead, so now i have to get changed too, but not until i can dress the baby back up into a new diaper and clothes which Steve has to go get for me because now I can not move.... but he is already in the shower!    

Good thing 2 year old Chelsea was awake, because my little helper girl went out to the livingroom and brought me back the diaper bag to the bathroom.  We got the baby dressed and done, got myself changed, and finally Steve emerged from the shower... .still gagging to himself over it all

The washing machine took care of the rest of the work, but now nobody could go back to sleep.... 

Did I mention it was 4 am when this started?

Now it was 5 am and I said it was Steve's turn to take over, I needed to sleep!   After my operations, I have on hand some very strong nausea stomach pills to knock me out when things get bad. They knock me out for 4-5 hours straight.  

I went up to bed and he took over from 5 till 9 and I got sleep!   He read them stories and got both kids back to sleep for a bit, later he fed them breakfast and he even had Chelsea help him fold clothes from the dryer. He had it all under control ....   MY HERO!!!    

But we were never so HAPPY to see Mommy and Daddy at the door by 10 am~!!!!!