I am going to start off the new year with posting some of our motorhome modifications, a few at a time. I will post repairs, modifications, or neato things we have found for RVing. I have lots of pics in my files so I will do them in alphabetical order.
Underneath that stuff, I will post my regular daily stuff..... kinda sorta fun, eh?
So here it goes, we are up to the letter I now!
MOTORHOME MODIFICATIONS
STARTING WITH THE LETTER I
Isolator:
When we were having alternator troubles, along with our inverter fluctuating up and down, it was not good. We were told by the alternator rebuilder guy to check our isolator... because *something* was backfeeding into our electrical system and burning out the alternators! (we burned out 3 inverters in less than a year).That had me really worried, because it was harming our inverter (a device that changes 12v DC power to 110V AC power) we use it to run things like our tv's, some of the lights, our coffee maker and grinder, curling iron etc. We can do without them, but it makes it much more comfortable to have them on board. Replacing the 2000 watt inverter would be a hit to the pocketbook as well, ACK!
We tested our isolator with a voltage meter and detected some inconsistencies between the posts. It was not isolating the charges correctly and seemed to be bleeding between posts inside somewhere and not working right.
Sooooooooo We ordered a new one!
The mail-lady brought Steveio his nice big box with his isolator!
This is a Happy Man!


The isolator has to be larger than the alternator's amp output.
So even if the old isolator had been good, we would have had to change it anyhow
to meet the higher output from the new alternator we had just installed.

Here is the old isolator... it is mounted on the wall in the engine compartment which is open to the dusty road and dirty diesel engine. That is probably 22 years of accumulated dirt on it. LOL... If there was a better spot to relocate it to, Steve will think about it. For now, he would just mount it where the old one is and use the same cables and wires.

He held the new one over the area where it would go...
just so I could take a pic!

Imagine that.. a man reading INSTRUCTIONS!
He doesn't do that too often.
But he had to be sure or else ruin both the isolator and alternator,
and probably our inverter too?

He hooked up the wires and double checked and triple checked each one....
- 2 wires on the left are to the chassis batteries and solenoid boost switch on the dash...
- (next post is skipped)
- the center post is the alternator and the engine clock.
- The far right post is for the chassis (house) batteries.
Steve then took out his voltage meter and tested while I fired up the engine.
I was ready to turn it off if anything was wrong or arcing or heating up.


Soooo we fired it up
and all systems are GO!
What a beautiful sight on our
computerized VMspec Silverleaf readout display.!!!
computerized VMspec Silverleaf readout display.!!!

Everything is working properly!
Whatever was back-feeding with the old isolator is now corrected.
Now our batteries will charge from the alternator while driving again.
Now our batteries will charge from the alternator while driving again.
But sadly, we discovered that the damage was done to our inverter as well. We ended up replacing that! Here is from that blog post:
~~~~~~~~
Items such as TVs, coffee maker, hair curling iron, microwave, and chargers for laptops and cellphones. Many of our light fixtures in the rig are already DC 12 volt, but some of them are AC 120v fixtures. The inverter gives us more comfortable RV living when we are out and about, especially in campgrounds without power pedestals. Or while boondocking out in the desert, or overnighting in a Walmart lot.
When we went out to the rig last summer to install our oven, we noticed our light bulbs in the AC fixtures were browning out really low, and then flared up really high to 180 plus volts! Then our Progressive Industries EMS electrical management system protection shut it down for good. I am so glad we didn't have a fire!
Being that our old inverter was at least twenty-two years old,
it died a sad death after many years of faithful service.
When we turned things on and noticed our lights were dimming down and browning out. That's not a good sign. Our power management system, a hard-wired Progressive Industries EMS kicked us out every time. Just like it is supposed to. Here is my blog post about when we installed it:

We would wait for it to reset, turn on one thing, even a small thing. like a light. Again it would kick us out as soon as we drew any power.
First of course we checked the normal things like the shore power coming from the cord, we checked the transfer switch, we checked all of the GFCI outlets.
We decided to unplug from shore power and just ran the generator and see what happened then. Same thing. Brown out and kick off by any thing running through the inverter was not holding up to snuff. Any type of a draw and the Progressive Industries EMS would kick it out.
I am happy to say at least our Progressive Industries EMS power management system was doing the correct thing by kicking out and not letting us harm our electronics.
So now we concentrated on the inverter. We checked the two circuit breakers on the inverter. Yes, I know the upper left white input button is broke, it has been broken off for a long time but still operates.

NOW things everything was running over bright and and buzzing and ready to burn out! It was like a power surge within our rig from the inverter! The last reading we got off the kilowatt device was 180+ volts! We shut it down and decided that was enough of that!!!

We were not about to destroy anything by letting it continue to run or start a fire. Now it was time to do some diagnosis. Steve hauled out his Fluke meter and we started researching diagrams and schematics.
With all of our testing throughout the complete line of power from our house to the power cord to supply to transfer switch, we realized our inverter was not operating properly.
Everything was fine up to it and everything was fine beyond it --- so the bad link was the Xantrax Freedom20D 2000 watt inverter itself. ACKKK! Those run about $1,000-2,000 to replace with a similar size.
Steve carefully removed the inverter cover. Inside it was brown all around the top of the main section and curled back plastic surface like it had overheated... DANG!

Steve removed the entire inverter and temporarily reconnected the AC lines together and capped off the DC hot line. Both Steve's Fluke meter and the kilowatt device are measuring the correct power. Whew! Now it is safe until we get a new inverter installed.


First of course we checked the normal things like the shore power coming from the cord, we checked the transfer switch, we checked all of the GFCI outlets.
We decided to unplug from shore power and just ran the generator and see what happened then. Same thing. Brown out and kick off by any thing running through the inverter was not holding up to snuff. Any type of a draw and the Progressive Industries EMS would kick it out.
I am happy to say at least our Progressive Industries EMS power management system was doing the correct thing by kicking out and not letting us harm our electronics.
So now we concentrated on the inverter. We checked the two circuit breakers on the inverter. Yes, I know the upper left white input button is broke, it has been broken off for a long time but still operates.

We checked all of the breakers in the power panel box.
We plugged back in --- oh NO!
NOW things everything was running over bright and and buzzing and ready to burn out! It was like a power surge within our rig from the inverter! The last reading we got off the kilowatt device was 180+ volts! We shut it down and decided that was enough of that!!!
This is a Kilowatt device that helps monitor power output at outlets.

I know the screen is blank, we shut down too quick
for me to take a pic of 180+ watt reading...
With all of our testing throughout the complete line of power from our house to the power cord to supply to transfer switch, we realized our inverter was not operating properly.
Everything was fine up to it and everything was fine beyond it --- so the bad link was the Xantrax Freedom20D 2000 watt inverter itself. ACKKK! Those run about $1,000-2,000 to replace with a similar size.
Steve carefully removed the inverter cover. Inside it was brown all around the top of the main section and curled back plastic surface like it had overheated... DANG!

I think we narrowly avoided
a big dangerous fire situation!!!
Steve removed the entire inverter and temporarily reconnected the AC lines together and capped off the DC hot line. Both Steve's Fluke meter and the kilowatt device are measuring the correct power. Whew! Now it is safe until we get a new inverter installed.

Steve did some research for a week or so, reading about new inverters. Our old one was 2000 watts and we really didn't need one quite that big. So we decided on a 1500 watt. Pure sine wave is nice, but we chose a modified sine wave instead, mostly for our budget. Our last inverter was modified sine wave and our two TVs, computers, tablets and other household appliances worked well, so we did not feel the need to upgrade to pure sine.
We also needed one with a transfer switch pass through, 3-stage charging system, hard-wired unit, and also a remote cord to a panel inside the rig to turn it on and off from the comfort of indoors. Sure beats having to go outside to open a compartment door to turn it off. I give all the specific details for the techie type readers at the end of this blog post.
We also needed one with a transfer switch pass through, 3-stage charging system, hard-wired unit, and also a remote cord to a panel inside the rig to turn it on and off from the comfort of indoors. Sure beats having to go outside to open a compartment door to turn it off. I give all the specific details for the techie type readers at the end of this blog post.
We ordered the inverter from CompSource and it came quickly in the mail in just three or four days.
And here he goes.....
A man reading instructions again!
I am SO PROUD of him.

Yes, that big huge thing by his feet is the inverter. I took care of the registration online and we both went over all of the details and the instructions before going out to start the installation.

Of course, I am the tool getter, gopher runner, and photographer for the blog. Steve gathered all of his tools and started wiring all the wires into the inverter in their correct holes on the bar.

Steve is very cautious with electricity, and of course all of the power was removed from both the DC and AC power feeds. Steve had gone to tech school for electrical training and also handled a lot of wiring in his job for the last 38 years. Not to mention building houses and remodeling, so electricity is nothing new to him. But it is never something to be taken likely, or done in a haphazard manner. Every connection was double and triple checked before we powered things up.

Once everything was connected in the inverter compartment, next he had to attach this big huge 250amp fuse. It comes in a nifty plastic housing to keep out the moisture, dirt and dust. It needs to be mounted within 18 inches of the batteries on the positive battery cable. Our inverter compartment is located on the opposite side of the rig, so Steve attached the fuse in the compartment underneath our bed, against the engine wall near our isolator unit.

He also ran the thermal sensor wire over to the batteries that tells the inverter in case things are overheating, it will shut down. I didn't get a picture of him doing that.
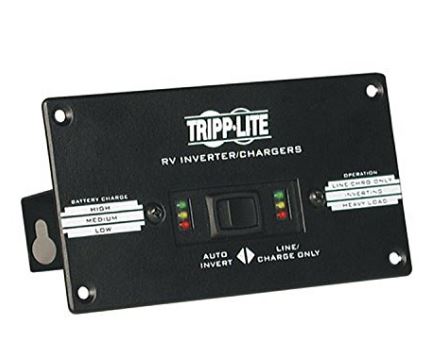
The last item to install is what's called the remote panel. It's mounted inside of the motorhome so we can turn the inverter on and off. We have been hoping the previous one from the Heart Interface 2000 inverter would work with it. But no, we had to order the one that corresponds with the Tripp Lite system. The plug ends were even different so we needed to order the correct one. For now we can operate it from outside with the on and off switch on the inverter itself.

Okay, here it is! All installed and mounted into place. Every connection is double checked and triple checked. We fired everything up from running it either via batteries, via generator, or from the shore power plug. Steve carefully measured the current flow with his voltmeter. Everything is operating properly as it should!

Here are the costs of what we purchased:
RV TRIPP LITE 1500W 12V DC TO AC INVERTER ISOBAR
pn: RV1512UL
$411.86 plus SHIPPING/HANDLING $38.00
T o t a l : $449.86
REMOTE PANEL: Tripp Lite APSRM4 Remote Control Module for RV-
TOTAL $88 W/FREE SHIPPING
FUSE: InstallGear 1/0 Gauge AWG In-Line ANL Fuse Holder with 250 Amp Fuse
$12.55 FREE SHIPPING
Here are the specs of the inverter from their website:
APS PowerVerter RV RV1512UL Power Inverter With Charger
| 1500 W Continuous Power / 3000 W Peak Power |
| Power Description: | |
| Input Voltage | 12 V DC 120 V AC |
| Input Voltage Range | 10 to 15 V DC |
| Output Voltage | 120 V AC ±5% Nominal 12 V DC Nominal |
| Frequency | 60 Hz ±0.3Hz |
| Input Current | 145 A @ 12 V DC 35 A @ 120 V AC |
| Load Capacity | 1500 W Continuous Power / 3000 W Peak Power |
| Waveform Type | Pulse-width Modulated Sine Wave |
| Switching Time | 6 ms |
| Environmental Conditions: | |
| Temperature | 32°F (0°C) to 104°F (40°C) Operating |
| Humidity | 0% to 95% Non-condensing Relative Humidity Operating |
| Physical Characteristics: | |
| Color | Gray |
| Height | 7.3" |
| Width | 8.5" |
| Depth | 17" |
| Weight (Approximate) | 40.20 lb |
- AC Output: 120 VAC nominal
- DC Charger Output: 12 VDC nominal
- DC Input: Requires 12 VDC input source capable of delivering 145 A
- AC Input: 120 VAC
- AC Input connection type: Hardwire
- DC Input connection type: Set of 2 DC bolt-down terminals
- AC surge suppression: 450 joules AC
- Cooling method: Fan
- Low voltage transfer to battery power: User configurable to 75V, 85V, 95V & 105V
- High voltage transfer to battery power: User configurable to 135V, 145V
- Moisture-resistant components for marine use or wet climates
- Temperature-sensitive charging and automatic generator-start capabilities
- Advanced 3-stage battery charger and selector switch for gel or wet cell batteries
- Allows unlimited runtime capability by allowing the use any number of user-supplied batteries
- Overload protection: Includes 25 A input breaker dedicated to the charging system and 20 A output load breaker
We can now turn it on and off from inside the motorhome. Also, Steve long ago installed a timer (similar to a hot tub timer) that we can set to turn it on and then it shuts off automatically after a period of time.

Handy for setting it on for watching tv in bed at night and falling asleep (my bad habit) and then the inverter shuts off and does not run all night.
~~~~~~~~~
I am so happy that Steve is able to do these repair and replacement projects on our motorhome. I shudder to think what it would cost if we had to bring it in somewhere to an RV dealer. Chances are, an RV dealer is not even experienced in how to install one of these. I guess I would almost look to a fleet installation company for inverters on things like ambulances or specialized delivery trucks or even sound system experts to install one.
~~~~~~~~~
We woke up to glazed roads and sidewalks. Schools were called off and traffic was pretty meager on the State Highway that runs past our house in town. Steve slipped and slided his way out to retrieve our trash cans after the garbage truck went through. He grabbed the neighbor lady's too. He is sweet like that.
He didn't have to drive for the county today, so we stayed home and cleaned house. Fun eh? By about 11 am the roads were clearing up and the temps rose. We were able to get to the post office and ship out the rug I had ready for a customer.
Then we headed over to the city hall to VOTE..... it's a Wisconsin Judicial Primary today, and we did our thing. It feels good.








 Posts
Posts

