I am going to start off the new year with posting three of our motorhome modifications at a time. I will post repairs, modifications, or neato things we have found for RVing. I have lots of pics in my files so I will do them in alphabetical order.
Underneath that stuff, I will post my regular daily stuff..... kinda sorta fun, eh?
So here it goes:
MOTORHOME MODIFICATIONS
STARTING WITH THE LETTER A
Awning Lights and Clips:
Just about every RV in a campground has awning lights attached to the valance of their awning. Sometimes called Party Lights. Our motorhome has a fabric awning... without a thick hemmed edge on the valance. It is not the thicker plastic coated type of awnings you see on many RVs. Thus it makes it more difficult to use regular clips or clothespins to hold on a string of awning lights. They just slide off the edge with the slightest movement.


Whatever the reason, we have replaced alternators five times over the years. It is NOT fun to be stranded. We have had to drive with holding down the ''boost'' button on the dash that connects our engine (chassis) batteries to the camping (coach) batteries and running the generator to keep up the charge level to get home. If too low of a battery charge, the transmission will not shift, its electronic. Nope not fun.
After the third one went out while down in Florida last winter, Steve even tried to rebuild it, but that didn't solve the intermittent charging problem either. It would fluctuate and not charge steady. Then he ordered a fourth alternator while in Florida to bolt up just so we could get home. That burned out in just 100 miles on the road.
Obviously, that still didn't solve the problem so we ran jumpers from coach batteries to chassis batteries to get home. We ran the generator the whole way for 1,300 miles. Whew.... And I might want to mention also that the inverter which changes our coach battery power from 12 volt DC to 120volt AC was acting goofy too.... Hmmmm?
This leads us to a sub subject also starting with the letter A is
Access to Our Engine Compartment:
When Steve does this kind of work, we are fortunate that our whole king sized bed lifts up for access to the engine compartment. Motorhomes with bedroom slides usually only have trap doors and acceess holes to reach things from above the engine. That is why many semi truck places do not want to work on motorhomes, or charge a higher labor rate per hour. We do not have a bedroom slide out unit, so our entire king bed lifts up insead.
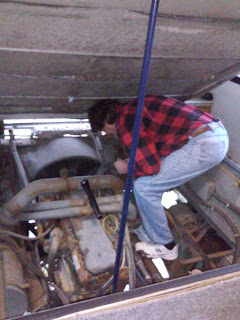

The compression struts have long ago given out, so he lifts up the bed and also supports it with an extra prop pole that is really a cargo retaining rod for delivery trucks (found at Harbor Freight around $15)


Okay.. back to the alternator and what we found out was REALLY the problem....
Once we got home, we chatted with a local guy who rebuilds alternators. He said we should replace the alternator again with a brushless larger one, they run in the $300 range but he had one on the shelf for $160. He said all the semi trucks with Cat engines were going to this one. It cost more but we decided to try it.

Since the fourth alternator was a fairly newly rebuilt, we were perplexed as to why it was not putting out enough amps. It was intermittent, sometimes 12 or 12.5... and other times 13 or higher. He said he would bench test that one for us.... and hooked it up. I got to watch and learn. It was not putting out a charge of course. He took off the rotor section to test and the regulator was shot as well as some other parts inside. All the diodes were burnt right off, like over fried from something back feeding!
He said to go home and test our isolator. That is an electrical unit that splits the power from the alternator and sends it either to the chassis batteries or the house batteries, but doesn't let them bleed over into each other. Well, Steve bypassed the isolator on the chassis battery post by putting all three wires onto one post just to hold them together.
BINGO! that was it! The isolator must have been malfunctioning and back feeding into our alternators and burning them out. The rebuild guy said that is how the others got fried. It made sense.
Nobody locally carries isolators, so we had to place an order on Amazon to get one delivered in a few days.
Here is the old isolator... it is mounted on the wall in the engine compartment which is open to the dusty road and dirty diesel engine. That is probably 20 years of accumulated dirt on it. LOL...
Over the years we have had various party light sets.... and we finally stumbled on a set of clips that worked with our awning.
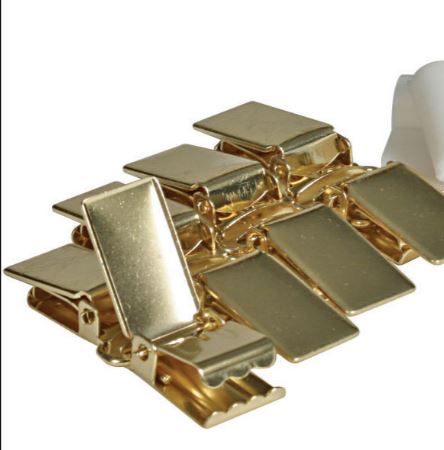
They are tiny double metal clasping types that are reminiscent of the kind our moms used to keep our mittens attached to our jacket cuffs so we didn't lose them! Made by Camco and sold in most RV stores, along with Walmart and Amazon too. Called Camco Lantern Snaps.
We also have some of the fabric with rubber glide tabs that slide into the groove of the awning roller, but using little S hooks was not practical either. We do use a few if we are hanging a spinning doo dad or a little sign.


I leave these Lantern Snaps attached permanently to the light sets (being careful to not snap through a wire) and just clamp them onto the awning when we put them up. Easy to take down in a rush for an oncoming storm, and you don't lose them on the ground because they are still snapped to the light wires yet.
We have had various light sets over the years, and just this past summer we found this pretty set at World Market on sale. It looks so cool and patriotic! They are glass, but we put them carefully in a tote when not in use. Each is an individual light bulb and we found clear replacements in case any break or burn out.... (1 filament burned out so far after a year of use) I like them because they are not garishly bright or a penetrating dazzle glare like LED types.

Kinda cute!

Alternator Woes:
Our motorhome with a 3126 Cat diesel engine has burned through FIVE alternators in the last 12 years since we have owned it.
- Some motorhome folks believe it is the added strain on the alternator of leaving in the morning and the added draw of having to charge up the camping (coach) batteries after being drained overnight while driving.
- Other motorhome owners say it is from not being used every day like a car alternator.
- Some motorhome folks say we need a larger one than what originally came in our rig, and to stop replacing it with the same size.
After the third one went out while down in Florida last winter, Steve even tried to rebuild it, but that didn't solve the intermittent charging problem either. It would fluctuate and not charge steady. Then he ordered a fourth alternator while in Florida to bolt up just so we could get home. That burned out in just 100 miles on the road.
Obviously, that still didn't solve the problem so we ran jumpers from coach batteries to chassis batteries to get home. We ran the generator the whole way for 1,300 miles. Whew.... And I might want to mention also that the inverter which changes our coach battery power from 12 volt DC to 120volt AC was acting goofy too.... Hmmmm?
This leads us to a sub subject also starting with the letter A is
Access to Our Engine Compartment:
When Steve does this kind of work, we are fortunate that our whole king sized bed lifts up for access to the engine compartment. Motorhomes with bedroom slides usually only have trap doors and acceess holes to reach things from above the engine. That is why many semi truck places do not want to work on motorhomes, or charge a higher labor rate per hour. We do not have a bedroom slide out unit, so our entire king bed lifts up insead.


The compression struts have long ago given out, so he lifts up the bed and also supports it with an extra prop pole that is really a cargo retaining rod for delivery trucks (found at Harbor Freight around $15)


Okay.. back to the alternator and what we found out was REALLY the problem....
Once we got home, we chatted with a local guy who rebuilds alternators. He said we should replace the alternator again with a brushless larger one, they run in the $300 range but he had one on the shelf for $160. He said all the semi trucks with Cat engines were going to this one. It cost more but we decided to try it.

Since the fourth alternator was a fairly newly rebuilt, we were perplexed as to why it was not putting out enough amps. It was intermittent, sometimes 12 or 12.5... and other times 13 or higher. He said he would bench test that one for us.... and hooked it up. I got to watch and learn. It was not putting out a charge of course. He took off the rotor section to test and the regulator was shot as well as some other parts inside. All the diodes were burnt right off, like over fried from something back feeding!
He said to go home and test our isolator. That is an electrical unit that splits the power from the alternator and sends it either to the chassis batteries or the house batteries, but doesn't let them bleed over into each other. Well, Steve bypassed the isolator on the chassis battery post by putting all three wires onto one post just to hold them together.
BINGO! that was it! The isolator must have been malfunctioning and back feeding into our alternators and burning them out. The rebuild guy said that is how the others got fried. It made sense.
Nobody locally carries isolators, so we had to place an order on Amazon to get one delivered in a few days.
Here is the old isolator... it is mounted on the wall in the engine compartment which is open to the dusty road and dirty diesel engine. That is probably 20 years of accumulated dirt on it. LOL...

NOCO IDG200HP $55.27 from Amazon


Steve hooked up the wires and double checked and triple checked each one....
- 2 wires on the left are to the chassis batteries and solenoid boost switch on the dash...
- (next post is skipped)
- the center post is the alternator and the engine clock.
- The far right post is for the chassis (house) batteries.
Everything is working properly... even the inverter!
Whatever was back-feeding with the old isolator is now corrected.
Whew.... and since then everything has been fine as frogs hair.
Here is my third A hint:
Awning Arm Trick for Cleaning:
Awning Arm Trick for Cleaning:
Cleaning an RV awning is not a fun job, but it needs to be done a couple times a year. We found out this little trick for making it easier. Of course you can lower your awning like this to scrub the underside.

But here is the trick to reach the topside. Unhook your awning arms where they attach to the side of the rig. Now carefully lower them down so they can slide underneath the body of your RV!

Now you can easily reach the topside surface, scrub it with a long handled broom or
brush on an extension pole, and easy to spray off with a hose!

P.S. We clean our fabric awning with mild car wash soap.
Some folks with the plastic coated awnings find that
Bleche-White automotive tire cleaner works well for them.
Some folks with the plastic coated awnings find that
Bleche-White automotive tire cleaner works well for them.
~~~~~~~~~
Now for some regular stuff.... I am feeling better and better as the weekend goes on. I think I have this bout of pneumonia licked (knock on wood).
We were amazingly warm yesterday, up to low 40's... and today will be the same. It was sooo warm that Steveio decided to wash the car and tracker right in our own driveway. We have an override valve on our exterior house faucet that allows us to run hot water out to the hose from the water heater in the house. This type of weather is something that doesn't normally happen in January in Wisconsin, that is for sure.
(look at that sad motorhome in the background....)

Big Lake Winnebago is still frozen over, but I would not trust the ice to go out on it.
(although a whole community of crazy ice fishermen do....)

It was so warm out with the sun shining, that the dogs and I sat out in the front porch for a while. It was almost 60 degrees in there with the sun's solar rays coming in. We love the front porch, and usually only use it as a 3 season room. This warm spell lets us enjoy a day or two out there in mid winter. A cup of coffee, the weekly paper, and a couple cuddle pups makes for an enjoyable afternoon.

Since it was so warm, I decided that those same cuddle pups could use a bath. They take a good half day or so to dry, and that would mean chilled dogs if it was sub zero going out for potty breaks. Taking advantage of the warm temps while we can, but they didn't really think so....

Just look at the ole "stink eye" coming from both of them! LOL!!!!

Steve lifts them out and we wrap them up in towels,
like a couple of green burritos on the floor.
It prevents their shaking off their coats and splashing water all over the laundry room.

They lay down like that for about 15 minutes and then get up
and want to roll around and act goofy---
racing around the house until they are dry.
Steve spent the evening with his brothers at a charity event hockey game up in Green Bay, supporting teachers and helping to donate for school supplies. Great cause and they had some good Brother Bonding Time together. While they were gone, I worked on my newest quilt..... I was tucked away in my sewing room for the evening with no interruptions. I had The Property Brothers playing on the tablet, and a couple doggies playing with toys at my feet.

My retreat- we made the extra bedroom into a sewing room for my quilting frame and machine

This is a coffee themed quilt, with center motifs of various coffee prints from fabric that I won in a drawing from a quilt shop in Clinton, WI called Twin Turtle Quilts http://www.twinturtlequilts.com
It is made in log cabin technique, and I am almost done with all 72 blocks. Here are five rows put together in strips of 9 blocks each. It will be 8 rows across when completed. and be a generous queen/king size. I might sell it, so if you are interested, email me at pfundt@gmail.com before I post it in my Etsy shop. Once I put them on there, they go fast!





 Posts
Posts

