Our Wonderful Followers who come back again and again to read about us...

Showing posts with label altering overhead tv cabinet. Show all posts

Friday, January 26, 2018

MOTORHOME MODIFICATIONS *C* Cabinet Redo, Lantern, Mat, Porch and Banana Bread

I am going to start off the new year with posting three of our motorhome modifications at a time. I will post repairs, modifications, or neato things we have found for RVing.  I have lots of pics in my files so I will do them in alphabetical order.

Underneath that stuff, I will post my regular daily stuff..... kinda sorta fun, eh?

So here it goes, we are up to the letter C now!

MOTORHOME MODIFICATIONS 
STARTING WITH THE LETTER C


Cabinet redo:
I know I kinda sorta touched on this cabinet topic a couple blogs back with Back Up Camera. Our motorhome has three nice dark plexiglass doors across the front of the motorhome.  Inside of each one is all of the surround sound system control deck, booster and amplifier for the sound system.  Plus other electronics: dvd player, vcr player, dvd storage, our household air fans and some other doo-dads.  They are major storage areas for us and all our "stuff".  We even mounted a clock with velcro to one of the doors, so it can removed to adjust time or change out the battery.

The far left part cabinet is a bit of a challenge.  Many Safari motorhome owners will call that cabinet that encloses the tv as a "headbanger"  or some other %*$@))&!! word.  Because it suspends down lower into the cockpit area, it is easy to knock your head against it when getting up from the driver's seat.


We long ago stopped using the big CRT television overhead as a main tv.  Instead, we mounted a slim LED flatscreen to a bracket suspending it from under the cabinets on the passenger side of the rig. It uses less power, and weighs less and has a much better/larger picture too.  So we are happy with this change, and can see the tv better from the loveseat on the opposite side.

(I LOVE Andy Griffith and Mayberry... 
playing dvds from a collectors set from daughter Heather) 


We sit here on the LazyBoy loveseat in comfort and watch the tv directly across from us. Much better than when it was located up over the driver's seat. 


Well, then why keep the big CRT tube type tv, you ask? Because it doubled as a back up camera screen for the built in camera system in the motorhome. It is used to watch the Tracker behind when towing, or when backing up in crowded areas, or even as a lookout if we hear something behind the rig in the middle of the night.  But kinda crazy to keep that big huge tv just for a backup monitor?

One fine day, Steveio's brain was a-working on this head-banging matter. After he had banged his head again, of course. He decided that if we order a nice small 7" monitor screen we can eliminate that tv.  Then he started thinking even more.... what about removing the cabinet, cutting it off at the top, and installing it back into place now flush with the others?  The front and underside surfaces are finished like the rest of the cabinets.  They are all solid wood, nothing paper particle board garbage like in our old Coachmen. These are western alder wood and such lovely pieces of cabinetry we don't want to wreck them or try to replace that one unit on the left.

Great thinking.... lots of work, but great thinking!   And since when did Steveio shirk from work???

He had the big tv out in no time, that was the "easy part"....  

Now we looked behind to realize that a whole slew of wires for all the electronics were not just behind the cabinet... 

Noooo.. they were through two holes that lined up between BOTH cabinets!  We would have to unhook each and every wire before we can detach the cabinet from the other one. I am talking about TWENTY different wires!


We photographed all of the wire connections for the surround-sound, booster, amplifier and camera/tv systems, and I carefully labelled each one before disconnecting them. Let's just hope we get each one hooked back up correctly when this job is done?

Now Steve could carefully unscrew all of the mountings to get this piece of cabinetry out of that section of the motorhome ceiling.  Whew... it worked!


(see the little hole near his right hand 
where all those wires went through?)


This is what it looks like behind there. 
All of those wires need to be fed back through a new hole
that would line up with other cabinet hole....
when the cabinet goes back into place, after it's alteration.
(See what I meant about the wires???)


Here is the cabinet after taken out of the rig.
He cut off the top sections to make it
now go back in flush along the bottom edge
with the rest of the cabinets. 

We removed the visors too....
We now use the wide powered windshield shade 
that goes across the entire width of the windshield 
as a visor instead.

The next step was to get a new piece of plexi for a matching door... and finding some matching hinges. The hinges are big black circles that extend through the glass to the outside and are a design feature.  Hmmmmm   Trying to match the same color, tone, shine of 20 year old plexiglass plus matching the type of hinges might be a bit tricky?  


Off to check on my Safari Group on Yahoo called SafariCoaches  One of the members, Bill Edwards, happened to have a door he had removed from his motorhome during a modification he made!  Complete with hinges and covers to match. He bundled it up with about a mile of bubble wrap, and shipped it to our home!   Yay! now we have a perfect match! Thanks Bill!!!


We had to do a few minor modifications of beefing up the wood on the left inside surface of the cabinet for the hinges to attach to. We had to remove the little tweeter speaker for the surround sound on the right to make a bit more clearance and shift it over about 1/2 an inch.


There!  Done! 


We also removed the clock from the third door 
and relocated it over to above the tv on the cabinets.


Sure looks great and improved our view out the front. 
Visually it makes our rig look wider....


but most of all, Steve won't injure his head anymore
on that "headbanger cabinet"!
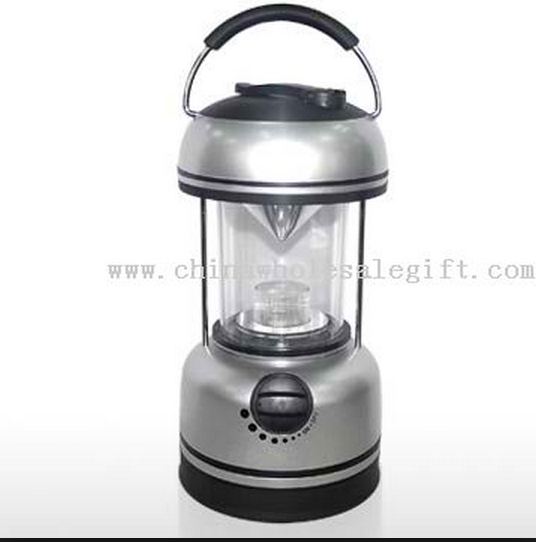

Camping Lantern:
We have had plenty of camping lanterns over the years... from Coleman white gas units with double mantles, smaller Coleman propane units with single mantles, or big battery units that ran off those huge 6v batteries, remember those?   

Well, now we have settled on this small LED lantern. It runs off a few AA batteries and the little LED lights reflect on the bright shiney silver point hanging down from the top.  It has brightness from low to high setting and the batteries last all summer long.  We take it out to set on the picnic table to play cribbage at night and it does not attract as many bugs as the old lanterns did.  We jokingly call it "Steveio's Manly Man Light" which was a tease because it was so small compared to the big huge lanterns we used to haul around.  But we like it.  A lot. 


Camping Mat:
Sadly I do not have a source for this mat any more. It came from an RV store about 20 years ago and we have not seen them since.  It's a rubbery mat similar to shelf liner but stronger.  It lets the water and sand fall through the little holes, but holds up well. 


It has gone through four teenagers, numerous dogs, poking legs of lawn chairs, drifting sparks from a campfire and countless days in the hot sun, night of freezing temps and frost and sometimes even snow, mud, rain, and gooey marshmallows.  We clean it by laying it out on the cement driveway and use the pressure washer on it with some Dawn dish soap in the reservoir.  Then we hang it up on the washline. Good to go again. 
Gosh this pic makes me want to go camping! 

~~~~~~~~

We woke up to mid 30's this morning and glorious sunshine streaming in.  Our front porch faces east, so it got a good dose of sunshine to warm it up.  By about 9 am it was VERY comfy out there...   enough to sit and read the paper, sip a cup of coffee and cuddle the dogs!


Our snow is almost all gone, 
just a few little bits of snowbank next to the road out front.


The doggers are keeping a watchful eye out for the mail lady,
or any other lucky dogs that happen to go by for a walk. 


Steveio had a chance to stop by for an extra cup of coffee 
in between runs of his elderly folks today. 
It's warm enough out on the porch for short sleeves! 


He hung out the American Flag and it was flapping in 
soft warm breezes blowing from the south.

As I type this now, the temps have risen to 47 degrees!!! 
 I think that may be a record? 

 Yup, we really miss not using the front porch in the winter months.
We are normally way below freezing, or even below zero. 
This strange January Thaw (the third one this month) 
is not normal for our winters in Wisconsin.


I had three mushy bananas this morning to whip up into some of my wonderful Auntie Lois's banana bread recipe. It ALWAYS comes out perfect!!! Never fails. 

AUNTIE LOIS BANANA BREAD


I added chocolate chips to the two metal pan loaves, and the glass pan is made regular, no nuts. You can be as creative or as plain as you want. But the main recipe is perfect every time and never sticks to the pan if you use non-stick cooking spray. Yummm the house smells so good!  It started to rain outside, so this is an extra special treat today.


Tuesday, January 23, 2018

MOTORHOME MODIFICATIONS *B* Batteries, Backup Camera Monitor and Basket

I am going to start off the new year with posting three of our motorhome modifications at a time. I will post repairs, modifications, or neato things we have found for RVing.  I have lots of pics in my files so I will do them in alphabetical order.

Underneath that stuff, I will post my regular daily stuff..... kinda sorta fun, eh?

So here it goes:


We are up to the letter B in my files of Motorhome Modifications. 
MOTORHOME MODIFICATIONS 
STARTING WITH THE LETTER B 

Batteries:
Before I even start talking about our battery set-up, please take the time to understand most battery systems on RVs by reading these two posts. They really helped us understand when we first started going to multiple battery banks and solar power setup.
links:


Each motorhome can have a different set up.  Our Safari Serengeti motorhome has four deep cycle 6 volt batteries hooked in series and in parallel to make a 12 volt system with 220 amp hours each.  This powers the camping house portion ''coach'' part of the system.  We also have two larger 12 volt batteries for the driving portion powering the engine and headlights etc. known as the ''chassis'' part of the system. 

We check them monthly for electrolyte level, and only add distilled water.  Once or twice a year we do a massive overcharge process called ''equalization'' to knock off the sulfate buildup on the plates. Our inverter has that feature to set it for an equalization process.  

Over the years, our batteries usually last about 5-6 years with careful maintenance. But our current set of four 6 volt deep cycle batteries are going on NINE years in February.  They are holding up well, so we will see how they go for another year or so? 

If you are curious as to how old your batteries are, here is a hint on reading the date code of a battery: 
1. How do you read the date codes on the batteries?
Negative Terminal- Shipping Date. This code indicates the month and year when the battery was shipped out of our factory. LETTER stands for the month, A to L (A=January, B=February, C=March, and so on); NUMBER is the last digit of the year.
    Example:
  • A battery with “G4” on the negative.
  • G4” means that it was shipped from our factory around July of 2014.

Maintaining the batteries is important, as well as being careful to NOT drain them down too far in between charge-up times. Called DOD, Depth of Discharge.  We try to never draw them down any lower than 30% from the top, meaning if we see 70% on our trimetric gauge,we need to get them charged or stop using too much power.  Fortunately we have solar that can charge them up, or fire up the generator to charge them up, or while driving the alternator charges them up... or, of course, plug into shore power and let the inverter charge them up. 


The deeper you draw down the battery bank, it also significantly shortens the overall life of your batteries.  This chart shows you an example: 


So if you drain them down to 50% or less, or almost dead, you might only get 200-300 recharge cycles in the life of the batteries before needing replacement.  That is less than a year if you draw them down every day.   

In contrast, if you only draw down 30% or less, you can expect to get 1200 to 1400 recharge cycles.... that can be 4 years or more.  (remember, I said ours are now 9 years old and still working fine!) 

Steve cleans the posts and checks our distilled water levels every month: 


Here is how they look and Steve keeps them cleaned up and makes sure there isn't any corrosion buildup on the posts. The whole drawer pulls out (with a bit of ooomph) and he can access most of the area for checking levels.  Some people put on devices to water the cells when they cannot reach the back caps. 


 A while back Steve decided that we might someday want to get six batteries for the coach area, when we added more solar to the roof (5 panels at 100 watts each)  So he made this handy dandy rack for back in the engine compartment to move the two driving (chassis) batteries back there.  But...  we never did buy any more coach batteries.  You should never mix old and new batteries together anyhow.  We found that we have more than enough power with the four batteries we presently have installed for the coach, so we never used the additional rack. Yet.


 Here is how our four 6 volt batteries are hooked up....


and how they could be IF we went to six of them. 


If an ANY time you need to replace your batteries, I strongly suggest you take multiple closeup photos of your original setup with a cell phone. Close up shots of each connection and what wires are on what post.  Then take time to label each wire with either a permanent marker or tape before removing each one. This insures proper reconnections without damaging any of your expensive components.

 If you have someone else do it, please be aware that their unfamiliarity with the intricate network of RV battery cables can be an expensive mistake!   Supervise them and don't take them at their word they will be just fine.  BEFORE you begin, be extra careful to be sure you label each wire and put each wire back correctly.  One crossed wire can goof up your whole electrical system!  There are sometimes extra small wires that also go on the posts along with the main cables. Those can control electronic shifting, computerized transmission operation, generator starting power, and the various charging methods of your batteries, (from inverter, alternator or generator). Our rig also has separate little fuse or shunt wires for the solar controller and trimetric monitor gauge that can be damaged if not put back into place correctly. 

Be sure you put each wire back exactly as it was or you will be pulling your hair out with problems. We haven't had it ourselves, because we are careful, but we have helped others sort out the mess when it was done incorrectly. 

The power we have on board allows us to easily operate either of our 2 tv's, lights, electrical outlets for various things like coffee maker, hair curling iron, recharging phones and laptops and short bursts on the microwave as needed. The biggest drain on batteries is the furnace fan motor.  We don't use ours often, instead we use a catalytic Olympian Wave 8 heater.  With our 5 solar panels on the roof, we are usually recharged back to 100% by mid morning the next day. 

Even if you don't boondock often like we do, you still need 12 volt DC power to run things even if you are plugged into a campground post for AC power.  The water pump, water heater, fridge, furnace and other items still need the DC portion to run the control boards and switches when plugged into AC shore power. So keep those batteries in tip top shape! 


Backup Camera Monitor Replacement:
This one is about our backup camera monitor.  The camera is working fine, even at 22 years old, and is located behind a little glass lens in the rear cap. Access is through a rear cabinet over our bed. We did replace the glass once, as the previous stuff was a plexi plastic that was scratched up. We use it to check on the Tracker as we tow it down the road, or to check while backing up into campsites.  Even while parked, we use it as a security set of eyes when boondocking and we want to see if someone is back there.


Our camera feed comes through to the tv up front over the drivers seat.  It worked out really well to see what is going on out back with a glance at the big screen overhead. But the problem is that the cabinet the tv is housed in hangs down so low over the driver's dash. It is commonly known as the ''Head Banger'' and Steve's head has enough lumps to prove it.  Soooooooooo 


You just KNOW that Steve has to make a change to it, don't you?  He removed the tv and the cabinet. He cut it down from the top edges to make it the same size as the other cabinets across the front of the rig.  A fellow Safari-owner had an extra smoked plexiglass door for us to cover up the existing hole. 
 No More ''Head Banger'' !!

We bought a lighter weight flat screen tv we hung from a bracket over on the side of the living area instead for better viewing than in the original position.

That leaves us with the dilemma of how to view the backup camera, since we removed the monitor source from overhead.  Steve rerouted the cable down from the top cavity along the padded covered windshield side post.  He found this great little LED monitor that runs off DC power from Amazon for $50.  Easy peasy!


 We positioned it between the two dash consoles.
We can swivel it for either the driver or passenger to view it.  
I seem to use it more from the passenger seat
to check on the Tracker being towed behind


Basket by the Door:
This may seem kinda lame, but how many of us have shoes piled up the door?  And dog leashes. And tie out ropes. And moccasins for Steve to wear inside when he drives.  Well, there have been a few times we have accidently tripped over them and almost fell down the stair well!  Also if you want to sit at the table and shove back the chair a bit, the legs end up knocking over the shoes or sticking inside of them and crooked seating etc.  So we keep a little basket by the door as a catch-all.  It is much safer and easy to pick up all at once for vacuuming underneath. And saves us from a broken neck. 


That is it for the three B's on today's blog. 

~~~~~~~~


We woke up to frozen ground, glazed roads, slight snow flurries and very very dangerous driving conditions.  Steve left extra early for his part time county transport job for the handicapped wheelchair folks.  He had to make a run to a near by town. He said between the icy roads and the high winds, it was difficult to keep the tall profile bus on the road. ACK!  He drove slow, arrived safe and delivered his elderly patron to the right place in time for their medical procedure.  He has a few more transports on and off during the day, but the roads now have cleared up enough with salt and brine to take care of the ice.

It's kinda dreary out, so I am holed up inside with some housework, some sewing and some computer stuff.  Tax time is coming and our information is trickling in to prepare our returns.  Not too exciting of a day, eh?   We will see what tomorrow will bring.