Our Wonderful Followers who come back again and again to read about us...

Sunday, October 25, 2020

Fixing Our Fireplace Screen

I was looking for a project to do today... Steve was busy watching the Packer Game.  

I found something that needed to be fixed, and it has been needing some special attention.  Here is the back story: 

We have this beautiful leaded glass fireplace screen. This is one of the first things Steve bought when we bought our house down in Chilton back in 2012. It's become  such a favorite decor item in the house, that when we moved here, we kind of decorated around it in the living room. We even chose hearth tiles that would complement the design in the glass.

A few months ago, our granddaughter Chelsea was sleeping on the floor in the living room. She was in a slippery sleeping nylon sleeping bag ---  and she is known to be a wiggle worm when she sleeps. 

During her slumber, she had pushed over against the screen, pushing it up against the fireplace during the night. She must have kept pushing and pushing on it until it was flat instead of in the tri-fold position. So it tipped over forwards and landed right on her head while she was sleeping!!! 

It's very heavy (about 40-50 pounds) and I heard a big WHUMP!   I got up and was totally panicked to see that she was laying there, holding her head and her mouth wide open in a silent cry.  The poor thing was only half awake and hurt!! I rushed to pick it up off of her, and made sure she was okay. She tried to be brave and not cry.  She had a knot on the head for the day and we pampered her with lots of attention and care and love.

She was more distressed that she had broken Grandpa's pretty fireplace screen. 

Just look at that! 
Her poor little head made that great big hole!


The backside of the leaded glass screen has an extra layer of some kind of heat resistant protective clear material to prevent the glass and lead from getting too hot. So it is not broken all the way through. The front surface is where the crack is.  I looked closely at it, and figured out I might be able to repair it.  It was worth a try.

So Steve carried it out for me into the garage, and laid it flat on the work table (where the motorhome window had been sitting for 30 days).  I gathered my tools and goggles and a protective glove for cutting things.


I carefully took a tiny screwdriver and worked out each little piece of broken glass to clear out that entire section. I was worried that it was sealed to the underneath layer, but it wasn't.  I was able to pull out each little piece of glass with the tip of a small jeweler's pliers.  I didn't want to scratch the underneath surface.


Bit by bit,
I was able pull each shard free
from the copper edging.


Steve popped out to see how it was going.  He ran a tiny screwdriver in each copper channel while I held the shop vac hose close by. All of the tiny broken pieces came out and flew up the hose.  This was working better than I had thought. 


I gave it one last good clean-up and then carefully bent over the edges of the copper foil leading material.  I figured if we secured it down safely with a bead of silicone, it would hold and not come further apart.  The shape of the missing piece didn't leave any big gaps of other neighboring pieces to fall out.  It seemed to be pretty secure leaving it this way.


Steve came back out during halftime to give me a hand. He got out some clear silicone caulk to run a bead around the edge. This will hide the copper foil section of the leaded glass framing all around that space. Plus it will seal it in and make sure everything stays secure. It looks white in the picture but it will dry clear.  Steve has the smooth steady hand for caulking.


I cleaned it up a little bit, and the rest will come off once it's clear and dry.  I think we did a great job together! 


Now you can't even tell it has been broken! Granddaughter Chelsea will be relieved to see that----  I will send her this blog so she can read about it. 


Steve carried it into the house, so it can dry in the warmth of the indoor temps.  The garage is down in the 40's today, so best to dry where the climate is more constant. 


There!  
Back to Normal! 


~~~~~~~~

Also, I was able to get a bottle of Howards Cutting Board Oil to seal the wood on the new oak cutting board for my sink!  It's food grade and will not turn rancid or harm the wood.  I did my old salad bowl too, which needed a new coat. I got that from some art collectors who traveled the world and had so many neat things. I have no idea what country this was from, but a lot of things at their auction were from Africa and South America.  I can tell it's handmade and probably old. 

This Howards mineral oil stuff is nice, and it is soaking in well. It says to give it 2 or 3 coats to properly seal new wood.    I also use the Howards Feed N Wax on my looms and spinning wheels. They have such nice products. 


Well, the Packer Game is still on,

they are winning 35-13. 


I might go take a nap.

Stay tuned for tomorrow.  Some exciting stuff going on with another contractor.  Time to get this stuff all done before the snow flies. 


Saturday, October 24, 2020

S. O. M. D. and B. A. G. D.

My Birthday is coming up next week....  so yesterday Steve said we could do a curbside pickup on some PRESENTS for ME!  Well, for both of us, but mostly me. 

He was up bright and early this morning to start opening up the boxes in the garage.  When he gets a project in his mind, he barely had time to glup down some coffee.  He wanted to Git Er Dun. 


This is my 
S. O. M. D. 
(Sink Of My Dreams!)


and our 
B. A. G. D. 
(Bad Ass Garbage Disposal)


About a year ago, I spied this lovely big single basin stainless steel sink with all the accompanying accessories, even the faucet, at Menards.  I fell in love with it, and wanted it.  


But... the sink we already had here was okay.  It was good enough.  It was a double bowl stainless steel, but only about 6" deep and not 9" like this one.  We are on a budget and only have so much for the things we need to do...  and this new sink wasn't a "need".  It was rather pricey... in the $300-400 range, even after the rebate.  So we put it on the back burner. 

Each time we would stop at the store, I would "VISIT" my sink and look at the one on display. I would try out the sprayer, touch the racks and cutting board, and look on the shelf to make sure they still had them in stock. I was worried about them being discontinued before I had the chance to buy one! That seems to happen to me.  If I don't buy something when I see it, later it goes out of stock or gets discontinued.  But I just couldn't justify in the budget to buy this sink all year long since we bought the house.  We had other things we needed to buy first.  

We were also missing the use of a garbage disposal, which we had them at our last three homes.  So we wanted one.  If we were going to add a disposal, it made sense to wait until we changed out the sink, right?   But.... we had other more important things to take care of first.  

Today was the day!!  I joined Steve in the garage and started unboxing each item.  The faucet is included, and I love it because it is tall and moves around and unhooks to spray around the sink. It doesn't have that crazy big industrial coil thing around the hose.  The other thing I liked was that it wasn't a "pull out" type that has to retract back into the cabinet base.  It's all there above the cabinet, and flexes around and hooks back to the support bracket with both a magnet and a hook device when not in use. 

The kit also included the bottom grid for the sink, a roll out sink drainer rack, a heavy oak wooden cutting board and a soap dispener.


PLUS... included was this wonderful rectangular strainer box that slides back and forth underneath the cutting board, making this a read food prep work station! 
 

Steve unpacked things one at a time,
all was carefully packaged around the sink....

Now for the sink!  
They had it pre-wrapped in a tyvek fabric type bag 
with a draw string, 
to prevent any scratches during shipping!!!


Oh my goodness, look at the pretty gleaming sink!!!  I am just so tickled about having all that wide open space of a single bowl.  I wash and rinse off a lot of large kettles, pressure cooker pots, cookie sheets and casserole dishes.  Most of them never fit in the double basin sink we had. Here was 33" of open space!  This was going to be nniiiiccceeee! 


While Steve was gathering tools and supplies. I was clearing out underneath the sink.  It's much easier to work when everything is out of the way.  A while back, Steve's dad had a dishwasher installed at his house, and gave us these two roll out cabinet shelves.  They work so well under our sink, to reach the cleaning supplies, even in the way back nether regions.  We had pre-measured to be sure the garbage disposal would not impede on the function of these sliding shelves.


I piled up all of the cleaning stuff in the laundry room.  Since winterizing the motorhome last week, we now have double cleaning supplies in the house for a while. Just about the time I get them all used up, it will be time to buy more for the motorhome again. LOL.  


Steve laid out all of his tools and went to work unhooking the old sink.  See? It's a perfectly fine sink, and I had no reason to really need a new one.  Just that I WANTED it and WAITED for it, and now my dreams were coming true!   LOL  What a guy.... 


We saw this next tip on You Tube:  Carefully release the old silicone sealant all around with a flat putty knife. If you pull upwards too hard without cutting the silicone, it can crack and pull up the top layer of laminate countertop material!   So he was able to get around three sides of the sink... but .... 


.... the far back side was too close to the pre-formed backspash to get the putty knife under the edge.  He tried and couldn't get it to release and we were afraid of cracking the laminate.   

So I pulled out my INGINILITY  (my dad's favorite word, mix of ingenuity and ability?)   I figured out a little L shaped shelf bracket and a needle nose vice grip, would make a perfect tool to slide along the last edge of the sink along the backsplash! 


IT WORKED!!!


We were able to lift out the old sink, faucets and all the plumbing still connected to it.  We are giving it to my brother to put in the cottage up north. It's perfectly good, and glad to see it get a new home. 

Now we brought the new sink into the house. I set it up on our four bar stools with a soft blanket underneath it.  We attached the disposal assembly to the drain area (using plumbers putty).    We assembled the faucet pieces into place with silcone, and the water lines with TFE paste instead of teflon tape, and attached the soap dispenser too. 


While we were busy doing all this work, I also was simmering up a big pot of beef minestrone soup.  I started with some tiny bits of tenderloin steak, leftover from cutting up bigger steaks for the freezer.  I hid one of Finnegan's antibiotic pills in a piece of raw tenderloin.  He has been fighting me on taking them each day. But today, wonder of wonders, he gulped down that piece of raw tenderloin, pill and all...  and never knew a thing! LOL  --- We took a soup break for lunch before the next step. 


The sink was ready to be installed now... the plumbing was in place, the wiring for the garbage disposal was done, and all he had to do was run a bead of silicone around the edge of the countertop.  (we had dry-fitted it first to be sure it would fit). 


Drumroll please.....


Next Steve had to hang the disposal on the bracket and complete the rest of the hook-ups.  I admit, I went and took a nap while he did this work.  I was glad he had all the parts on hand, and we didn't need to order things or do another curbside pickup.  We are avoiding stores at all costs if we can. 

Most disposals are 1/3 hp, or 1/2 hp, some are even 1 hp.  But this one....  this one... Steve picked out. It's the BAD ASS GARBAGE DISPOSAL at 1.25 horsepower!!! It was the biggest and baddest looking of all of them. It has a stainless steel inside chamber, not plastic, and stainless steel blades. It is sound insulated for less noise, and the bottom of the sink has an insulation panel for vibration as well.  This was gonna be COOL!   And he will enjoy using it I am sure. Kinda like Tim The Tool Man grunts as he was oogling it at the store.  How could I say no? 


After my nap, he gave me do the honor of running the water for the first time! Awww how sweet was that?  To the tune of Happy Birthday, I ran the water on both hot and cold, tried out the sprayer, and the garbage disposal too.  What a sweet song. 


Here is the roll out drying rack,
with rubber edges that sets in the ridge of the sink.

Perfect for drying out the parts of our 
coffee grinder on the coffee maker,
which we rinse out and dry daily.


Here is that stainless steel
strainer basket. 
It has rubber corners so it doesn't scratch the sink edge.
I am sure it will get a lot of use.


This is the oak cutting board. 
It sets in a higher up ridge, 
so the other things can slide underneath it.


I have to seal the cutting board with some food grade mineral oil, which I don't have yet.  I also saw on the website that I can order an extra cutting board for only $14.   So I might do that and store it away for years from now.  As one wears down, I can swap it out with a new one or have Steve sand one down after a while.  We will see. But for the price, I might as well order one now and keep it on hand. 

Here it is,
all together! 


The hose can pull away, and flex around, as well as the whole fixture can swivel side to side too.  The head has a switch to toggle between spray and stream.  The head can pull and move around, and clip back onto that support arm with both a magnet and a little tab to "hang" it into place.  I really like that it isn't a "pull down" type with a retracting hose underneath the cabinetry.  I like this much better. 


This is a tall soup pot, and easily it fits in the sink on the rack, and I am filling it with soapy water (after a spritz from the built in soap dispenser) to soak it a bit before tossing it in the dishwasher. 


The very last part was to arrange the cleaning supplies back underneath in the cabinets.  It felt good, the last step.  We started in the morning, and didn't finish up until after 4 p.m.  So it was a long long day.  Not that we worked on it all of the while, but it took time.  Steve had to run wiring to the breaker box, install an electrical outlet and switch, and drill a hole through the floor and cabinet base. We try to be prepared with all the tools, supplies and cleanup stuff on hand when we work on projects together. This went rather well, and only one little side step in figuring out how to cut through that silicone on the back section of the old sink.  The rest went easy! 


HAPPY BIRTHDAY TO ME 
HAPPY BIRTHDAY TO ME
HAPPY BIRTHDAY DEAR KAREN
HAPPY BIRTHDAY TO MEEEEEE


Thank you, dear Steveio, 
for the Sink Of My Dreams 
and your 
Bad Ass Garbage Disposal. 

Friday, October 23, 2020

MOTORHOME MODIFICATION - Repairing Blown Thermopane Windows PART TWO

This is the Part 2 followup blog post of the process of replacing our driver side window in the motor home. The two lower portions, one which is a slider, had blown their thermopane seals and were fogged up.

Here's the blog post of where we first attempted to open them up clean them and reseal them:

https://kareninthewoods-kareninthewoods.blogspot.com/2020/09/motorhome-modification-repairing-blown.html

But because the glass was etched, from the combination of the metallic spacer and some chemical reaction, we needed to have two new pieces made.

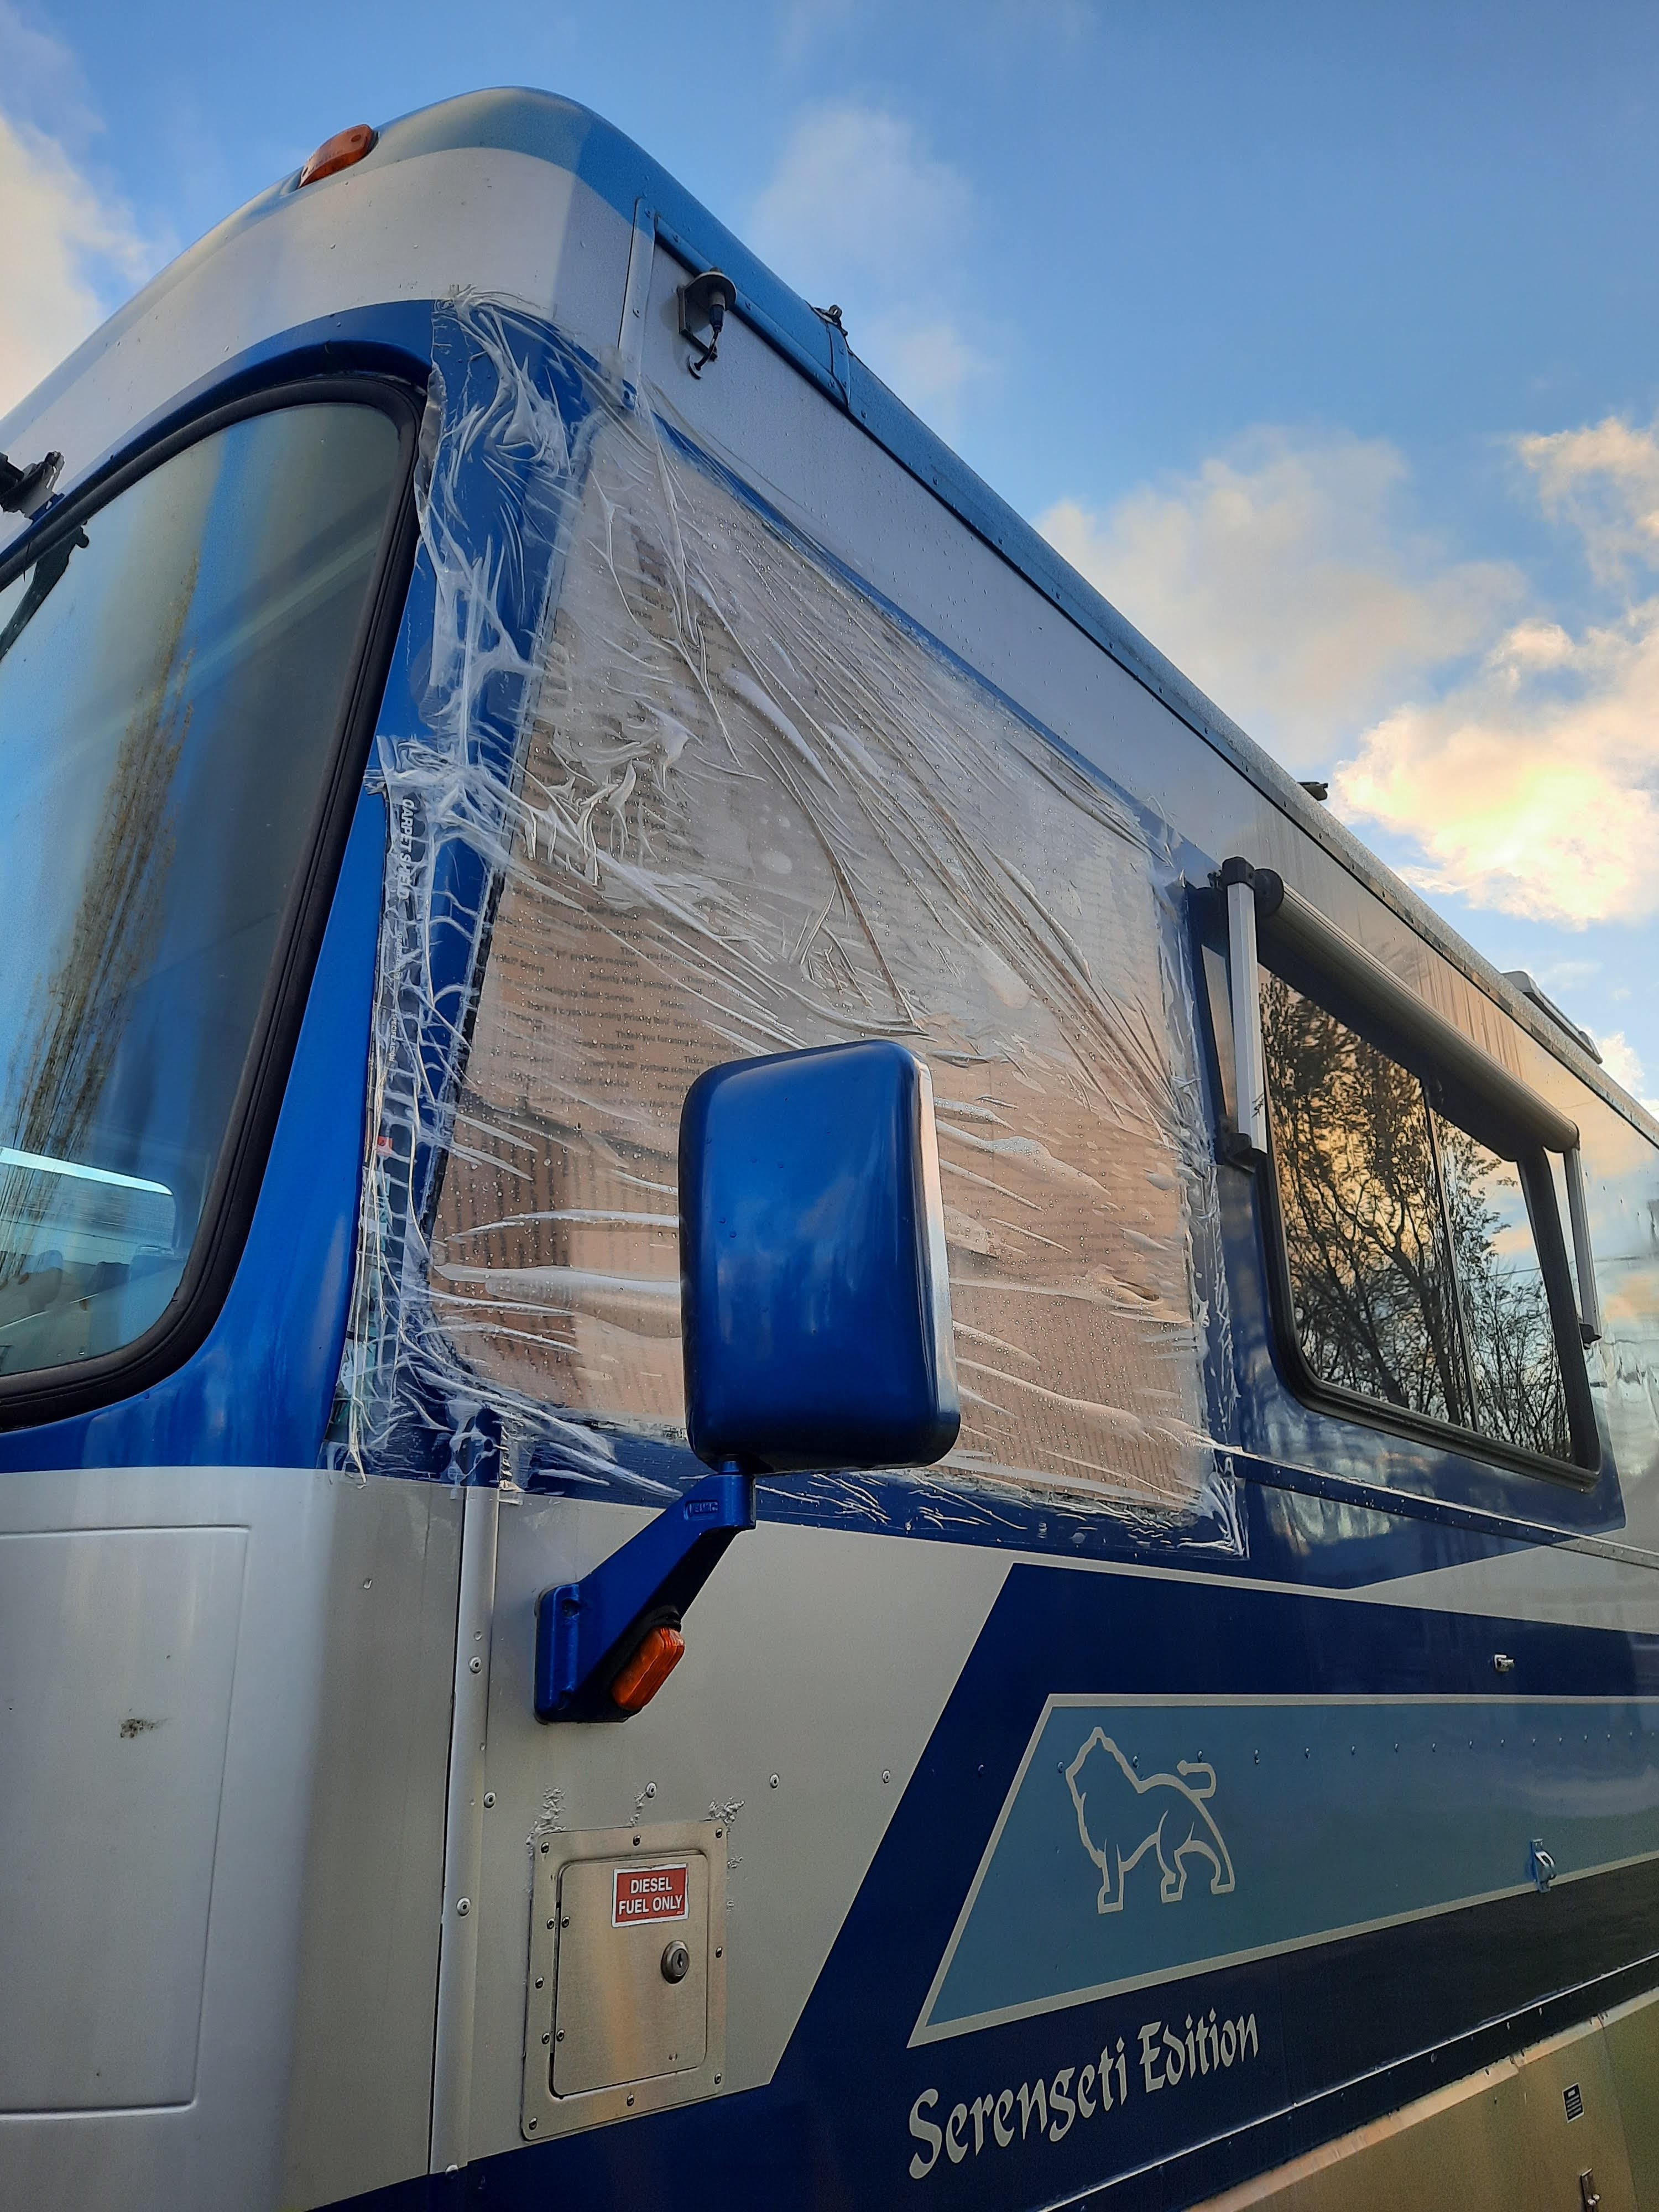
After Steve removed the window and took out the pieces, we had taped it up with a roll of this this carpet film used to protect flooring during open houses. It worked really well to seal off the entire opening of the motorhome window


We put a layer of cardboard from the inside to give it added strength and durability. Originally, we thought it would only be this way for a week or so. It held up well through rain and wind and even some sleet. For how long???  FOR 30 DAYS!


Little did we know, there was delay after delay. After multiple phone calls back and forth, the secondary glass place was finally able to create our pieces and have them shipped back to Packerland Glass in Green Bay. As soon as they arrived today, unloaded off the truck, we rushed right down there to pick them up.

Here are the labels from the windows themselves of what they created for us. We asked them create two thermopane pieces, with tinted glass. It needed to have a radius curve to the glass on one corner, to fit the frame.  We gave them our original pieces to make templates from. It is also tempered glass because it is for an RV window.


We were quite pleased with the bill. They had estimated $80 for each section and came through as promised.


As soon as we got home, Steve went right to work at putting the pieces back into the frame. It had been setting in the garage for 30 days. It was taking up a big spot of his work space area, and I'm sure he is glad to get it assembled and out of there.


After he put the pieces into place, and yes, they fit perfectly, then he had to add the 4 little screws back to where the two pieces of framework joined together. The heads of the screws are covered with silicone to prevent any leaks or any rust and corrosion. This space will be hidden away between the two layers of the interior and exterior walls once the window is in place. But it's just been best to make it as secure as possible and prevent any future problems. 


Here is the large window put back together. The two smaller sections are the ones that were rebuilt. One is permanently fixed to the front half and the other one is a slider window. This is important for things like pulling up to toll booths, or opening up to get directions, or hear someone when he is backing into camping spots. Previously they had been so messed up and foggy that it was becoming dangerous to even use them to view his side mirror while driving.


To reassemble of the window into the frame is one thing, but also we needed to have the proper materials to seal it back onto the motor home. We had pre-ordered a roll of the black butyl tape from Amazon. In contrast to the gray butyl tape which is not nearly as good, we've learned long ago the black is much better and stickier.

We have done this twice before ourselves, and also had the passenger side window completely redone by in Suncoast Designs in Hudson, FL a few years back.  So we know the best products to use. 

Now keep in mind, when we first did this we thought we would have warm weather while putting it back together ---  because we thought it would only be a week or so. That was back in September. Haha! 

Now it's down in the 30-degree range and we have had rain and storm and winds all last night and again today. But we needed to get this window back into place toot sweet. 

While in the warmth of the garage, Steve put a layer of the black butyl tape all the way around on the frame of the window before we carried it outside to actually physically put it on to the motorhome.


Carefully making sure to follow the frame with all the way around and not having it overlap to the outside.


It was getting colder, but tomorrow isn't going to get any warmer. So we needed to get this done and done quickly. Steve set up the ladder and first warmed up the entire window opening from the outside.

Using a heat gun and being sure to carefully not get too close. It was just enough to take the chill off and warm up the entire surface to get the butyl tape to adhere properly. But not let the heat ruin the paint or finish.


We then carried out the large combination window unit and brought it to the side of the motor home. With both of us pushing and hoisting we got it up and into place. Now it was my turn to stand on the outside and hold it tight against the exterior the motorhome while Steve went to the inside to start screwing down the inner frame to clamp it together into place.


I was able to grab the phone out of my pocket and take a little selfie with one hand while he was inside working around the whole frame with I don't know maybe 30 or 40 little screws.

(you can see our kids motorhome 
parked in front of ours 
for winter storage)

He used a little ratcheting box end socket with a tiny square head driver bit in the end of it.  This was the best way to get into the tiny spaces between the dash and the interior window frame.


While he was doing that on the inside, I was on the outside, standing on the ladder. (in the cold)  I was carefully going around and around the entire outside of the frame with the heat gun, this was keeping the window frame on the exterior side warm enough so the butyl tape would seal snugly. On the inside Steve kept tightening all the little screws alternating in various spots all the way around to pull the two pieces together evenly. The inside frame and the outside frame needed to meet perfectly to clamp the window into the opening.


I had to be careful to not let it get too close to the paint, but yet keep it close enough to warm the aluminum frame works from the outside. I kept checking with my hand to make sure it was warm to the touch. It seemed to be working well and I could see it drawing in tight as Steve kept tightening the screws from the inside. 

Around and around he went, giving each one a bit of additional tightening until each screw with snugged into space. I took a break and came inside to warm up. The temperature dropped down to 36 degrees and it was getting quite blustery and windy out there. Plus we were losing daylight. Steve had the inside job I had the cold outside job! 


I went back out to give it one more round of heat applied to the outside frame. Everything was snugging in well and it appears to have seated correctly in the open space.


Then Steve came out and took one final picture of me doing my job. It's not often that I get pictures of myself doing the work. So often people think Steve is the only one that does these projects, because he's the only one in the pictures. Well? That's because I'M the one usually taking the pictures!


But we do work together as a good team. And the window is in place. Darkness fell and we decided it was time to go in the house and get warmed up and eat some supper.

Tomorrow Steve will add one additional row of exterior clear UV silicone along the top edge of the window frame for an additional protection.

Also, stay tuned for our next project. 
It will be the S. O. M. D.