These are common words around our house. It usually means that Steve needs an extra set of hands, or a gopher to run and grab some tool while he's in the middle of doing something. Lol. Such is the case again. Steve needed me to hold the other end of some large panels of beadboard paneling coming through our table saw. This product is different than the beadboard slats we put on the walls in the bathroom. These are entire 4x8 sheets of paneling that he wanted to cut up.
I snapped this pic before he started actually running the saw so you can see why he needed an extra set of hands. As he feeds the wide sheet through the saw, he needs someone on the other end to hold it steady and not let them go crooked. That's my job.
After he made the first cut - then the second cut - then third and fourth pieces were a little more manageable. He has a set of tall red rollers that can help when doing this too. (you can see one in the foreground). But he likes having me out there on the catching end of the saw. It feels good to work in a team effort.
Soon he had four long pieces cut to just under 15 inches wide. So now what do you think this guy is up to?
He carried them all down to the basement and laid them across the sawhorses. I guess that means that it's my job to start painting them. They will need to be primed first and then get two coats of paint.
If you read my last few blogs you know that Steve is not happy with the modern looking hollow core MDF whatever PVC whatever doors that were put in various places in our house. They were done by the previous owner during remodeling. Steve has been slowly replacing the doors one at a time. First the Master bedroom, then the bathroom, and next the grandkids guest room. He has been restoring old vintage doors that he has been collecting on Facebook Marketplace. Soon all of the doors will be matching with the originals that were left in the house.
Soooooo of course, years ago in the late 1800's, they didn't have bi-fold closet doors. Heck, many houses didn't even have closets, just pegs on the wall to hang your Sunday Best clothes. It is impossible to get vintage bi-fold wooden doors to match what he has been doing.
Because he doesn't like the look of the modern bifold closet doors, he wants to cover them up. Yes, they look nice the way they are. They are nice and neat and white. But they are fake molded hollow core doors in a more modern design than what our house has throughout.
Here is the one on the she shed:
Here are the ones in the office:
I came up with another idea. Using the same beadboard paneling we used on walls in the grandkids' guest room, and on the pantry cabinet in the kitchen, we had a few sheets leftover to use to cover up these doors!
I didn't get a pic of the ones in our Master bedroom, because he already had them disassembled and down in the basement, ready to work on. Speedy Gonzales. He is going to glue down the new pieces of beadboard panels to the surfaces of the bifold doors. After that, he will securely nail them with the finish nailer and putty up the holes. Then he's going to run his electric router around the edges to trim them up a bit.
Next I will be able to go down and paint them. We are doing it down in the basement where it is warm enough for the paint to dry. Although the garage is pretty comfortable when the temperatures outside in the 30s the inside of the garage remains up in the 40s or low 50s. He fired up the Mr. Buddy heater yesterday in the garage and it was quite comfortable. But not to run it for hours in between coats of drying paint.
~~~~~~~~
While he was busy working on the closet doors, I was busy working in my she-shed. I made my little antique Singer Featherweight do a heavy duty job with some thick denim twill fabric. It easily sewed through three and four layers of this fabric like a workhorse!
My neighbor across the street had two of these little wire shopping carts. She needed to have some fabric liner bags made with handles. She needed something secure and heavy duty before she gives them as gifts to some other people at Christmas. They are going to use them for shopping at farmer's and flea markets. I used up some of this really cute pinstriped denim fabric that I had in my stash. I took some measurements and did a few creative cuts. I made some nice heavy duty handles and a double layered bottom surface. The entire bag can be lifted out and be carried separately if needed.
The top edges fold over and the little handles hold it into place. It really worked out better than I expected. The fabric is a lighter blue stripe similar to railroad engineer overalls.
Here are both of the little carts, ready for gift giving to my neighbor's friends. In return we bartered and she is bringing me some of her wonderfully delicious home canned bread and butter pickles! I sure love a good barter.
~~~~~~~~~~
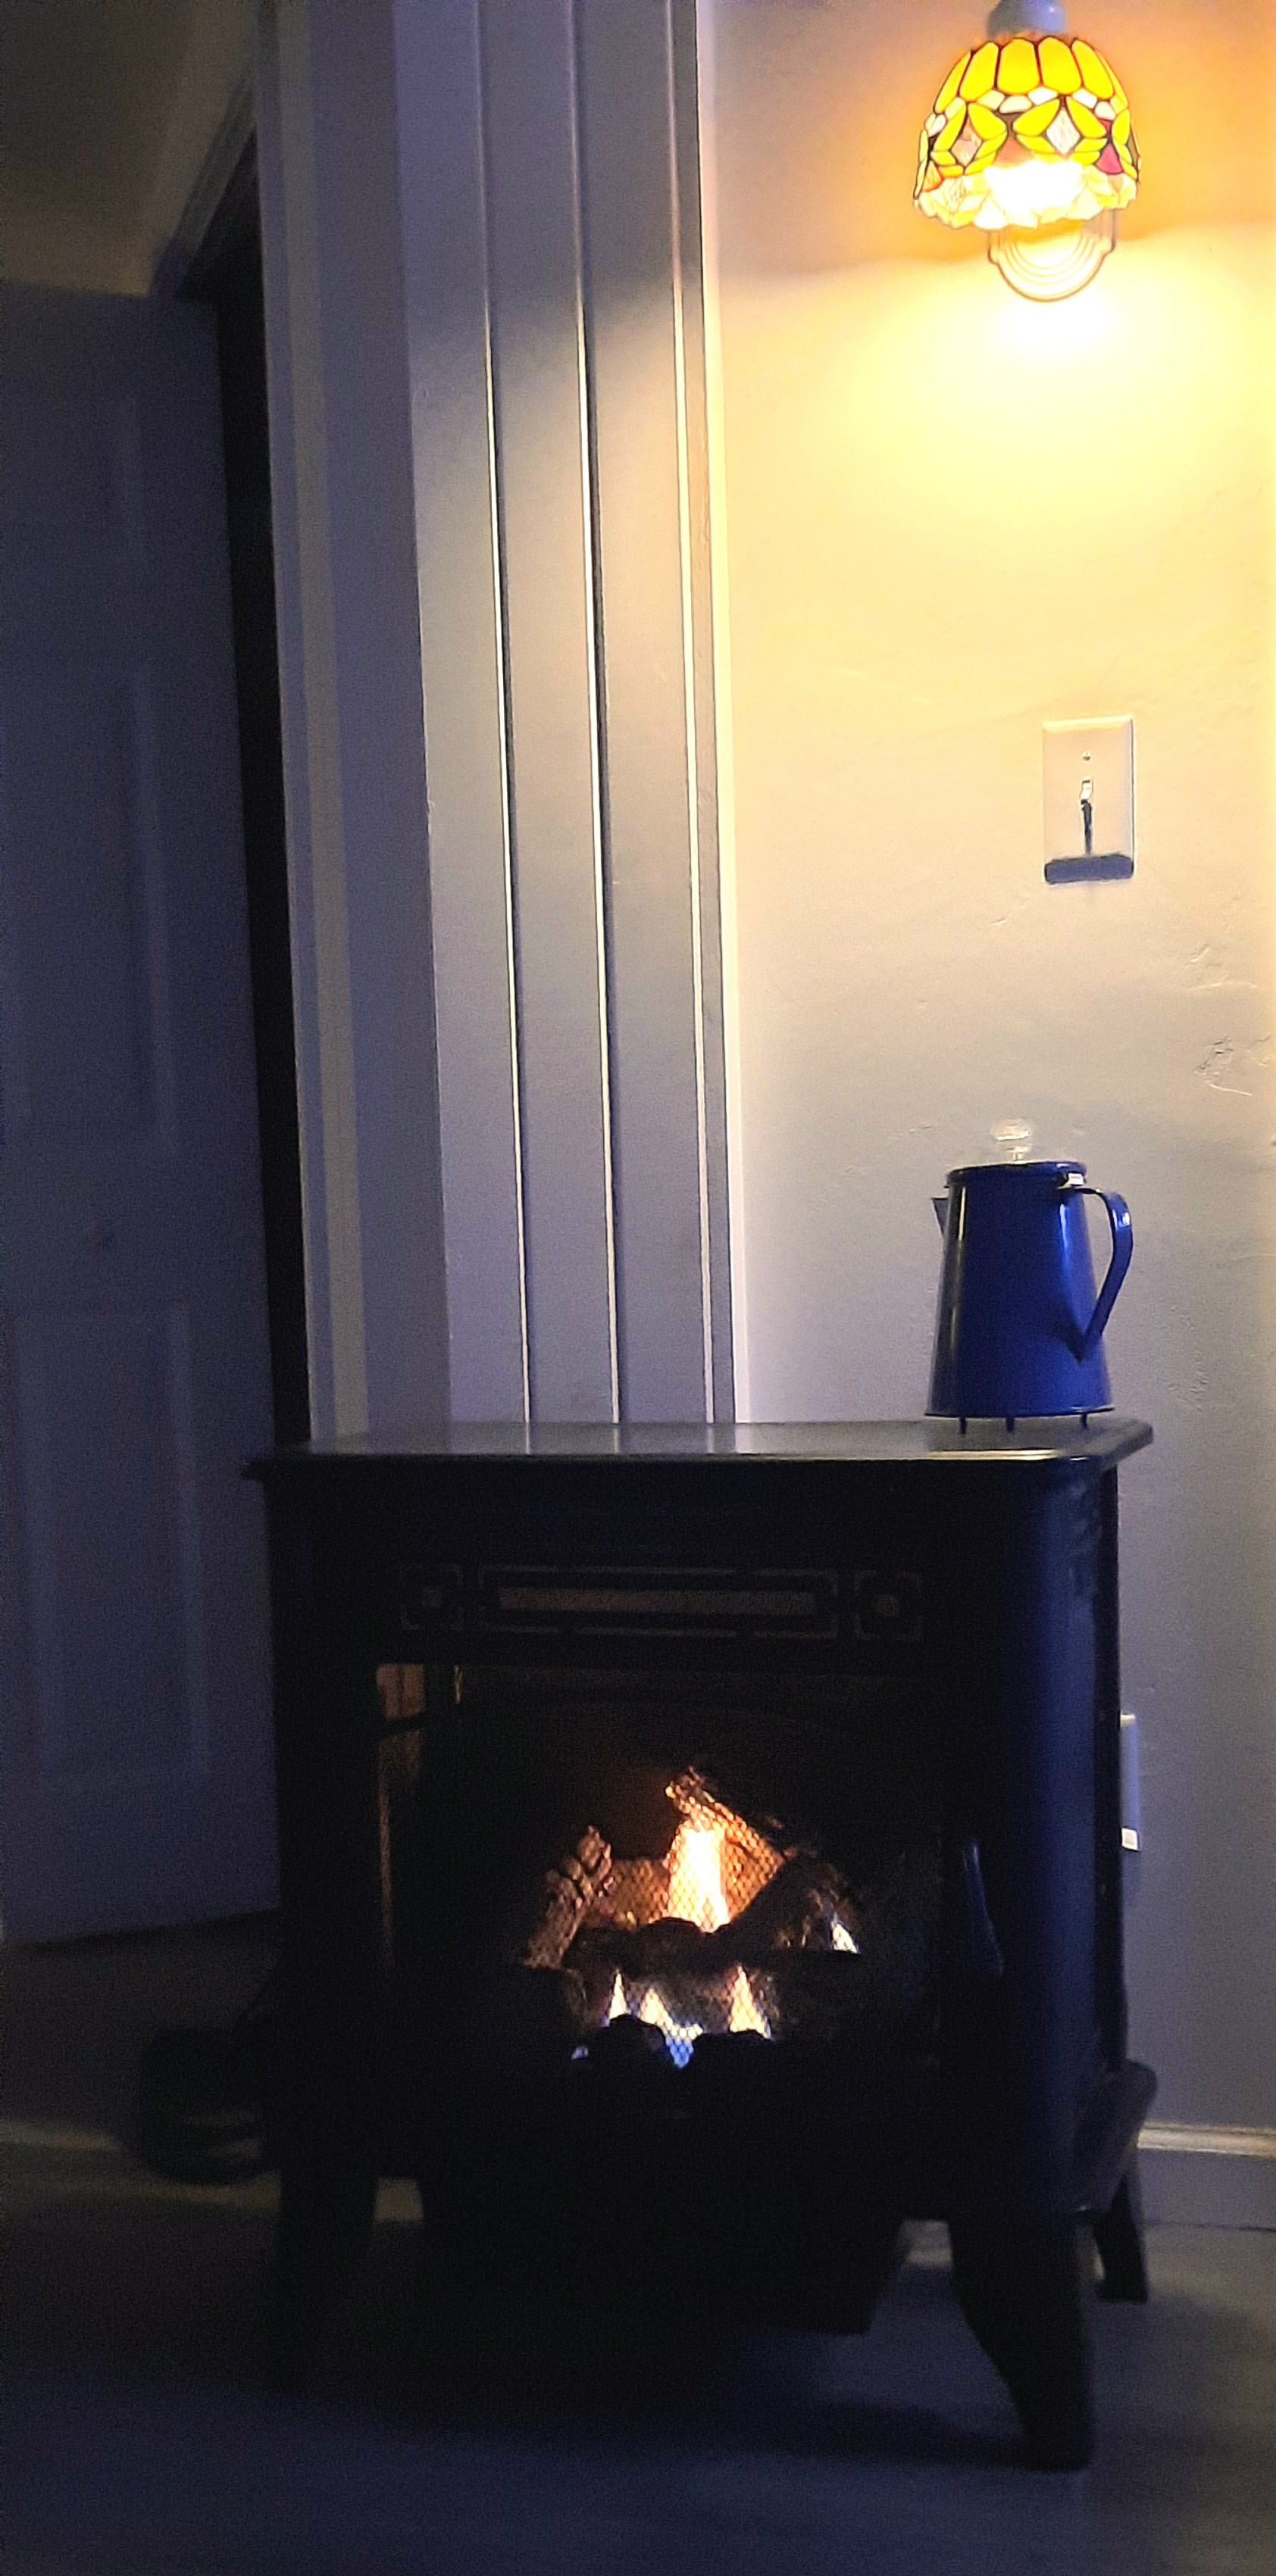
So after our busy day of projects, we curled up in front of the fire last night and watched some HGTV shows. That's where Steve and I get our ideas from you know! We love Bargain Block, Rehab Addict, Maine Cabin Masters and Home Town. Ya know, the ones where they REALLY do the work, and restore and reuse as much as they can of the original home. Not those "rip down, make it all new" type shows. Steve pops a bowl of popcorn and we snuggle in front of the fireplace in the She Shed to watch our shows.
~~~~~~~
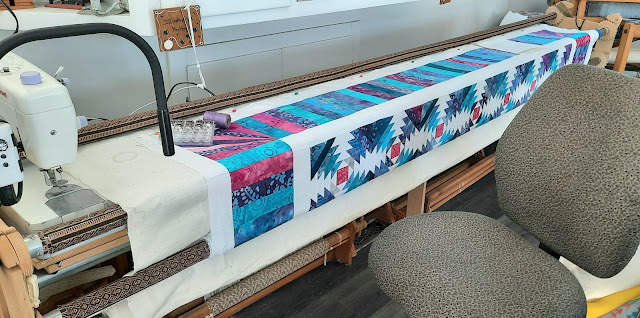
Today, I think I'm going to start doing the quilting the layers of swirling stitching on the frame of my newest quilt. I got it rolled on the big quilting frame two weeks ago, before I got sick. Each layer needs to be carefully rolled on with even tension and no wrinkles. The bottom layer is the backing, then there is the fuzzy cotton batting layer, and lastly, on top, is the carefully pieced quilt block layer.
Then they need to be pinned evenly to the leader fabric of the back roller before I can start stitching through all three layers. The big sewing machine glides around the surface, stitching it all together. I guide it with my hands on the downturned handles, held like a bicycle. I move it around, making the stitches as even as possible, not too fast or they are too far spaced apart. Not too slow, or they are crammed together and look ugly. I do not have a "stitch regulator" like bigger fancier machines. So it's all just me and my judgement on how and where to guide the stiches, and how fast or slow to go.
Here it is all ready to go.
Before I start, I service up the machine a little bit give it some fresh oil, take out any lint or fuzz, and put on a brand new needle. It's kind of like taking care of a car, you can't expect it to roll down the highway mile after mile unless you do some service in between at regular intervals.
I just love this pattern --- it's called "Pineapple". I started sewing this one when we were camping this past fall. Once it's finished I will list it for sale in my Etsy store.
I'm finally feeling good enough to get things done, so I'm going to get this one stitched up in the next few days. After it's done getting stitched, then I put the binding around the edges to complete the quilt. It feels so good to do that final process, like completing an artistic creation. I put the tag on the back as a signature and my quilt is done!
I also have four large quilt blocks that need to be quilted in layers into fabric to make some matching throw pillows. I will finish them up for the previous quilt I finished for on our own bed.
As I am typing this, I can hear Steve in the basement running his finish nailing gun. Guess that means I better go start painting???
Always a project, and it seems like there's never enough time!
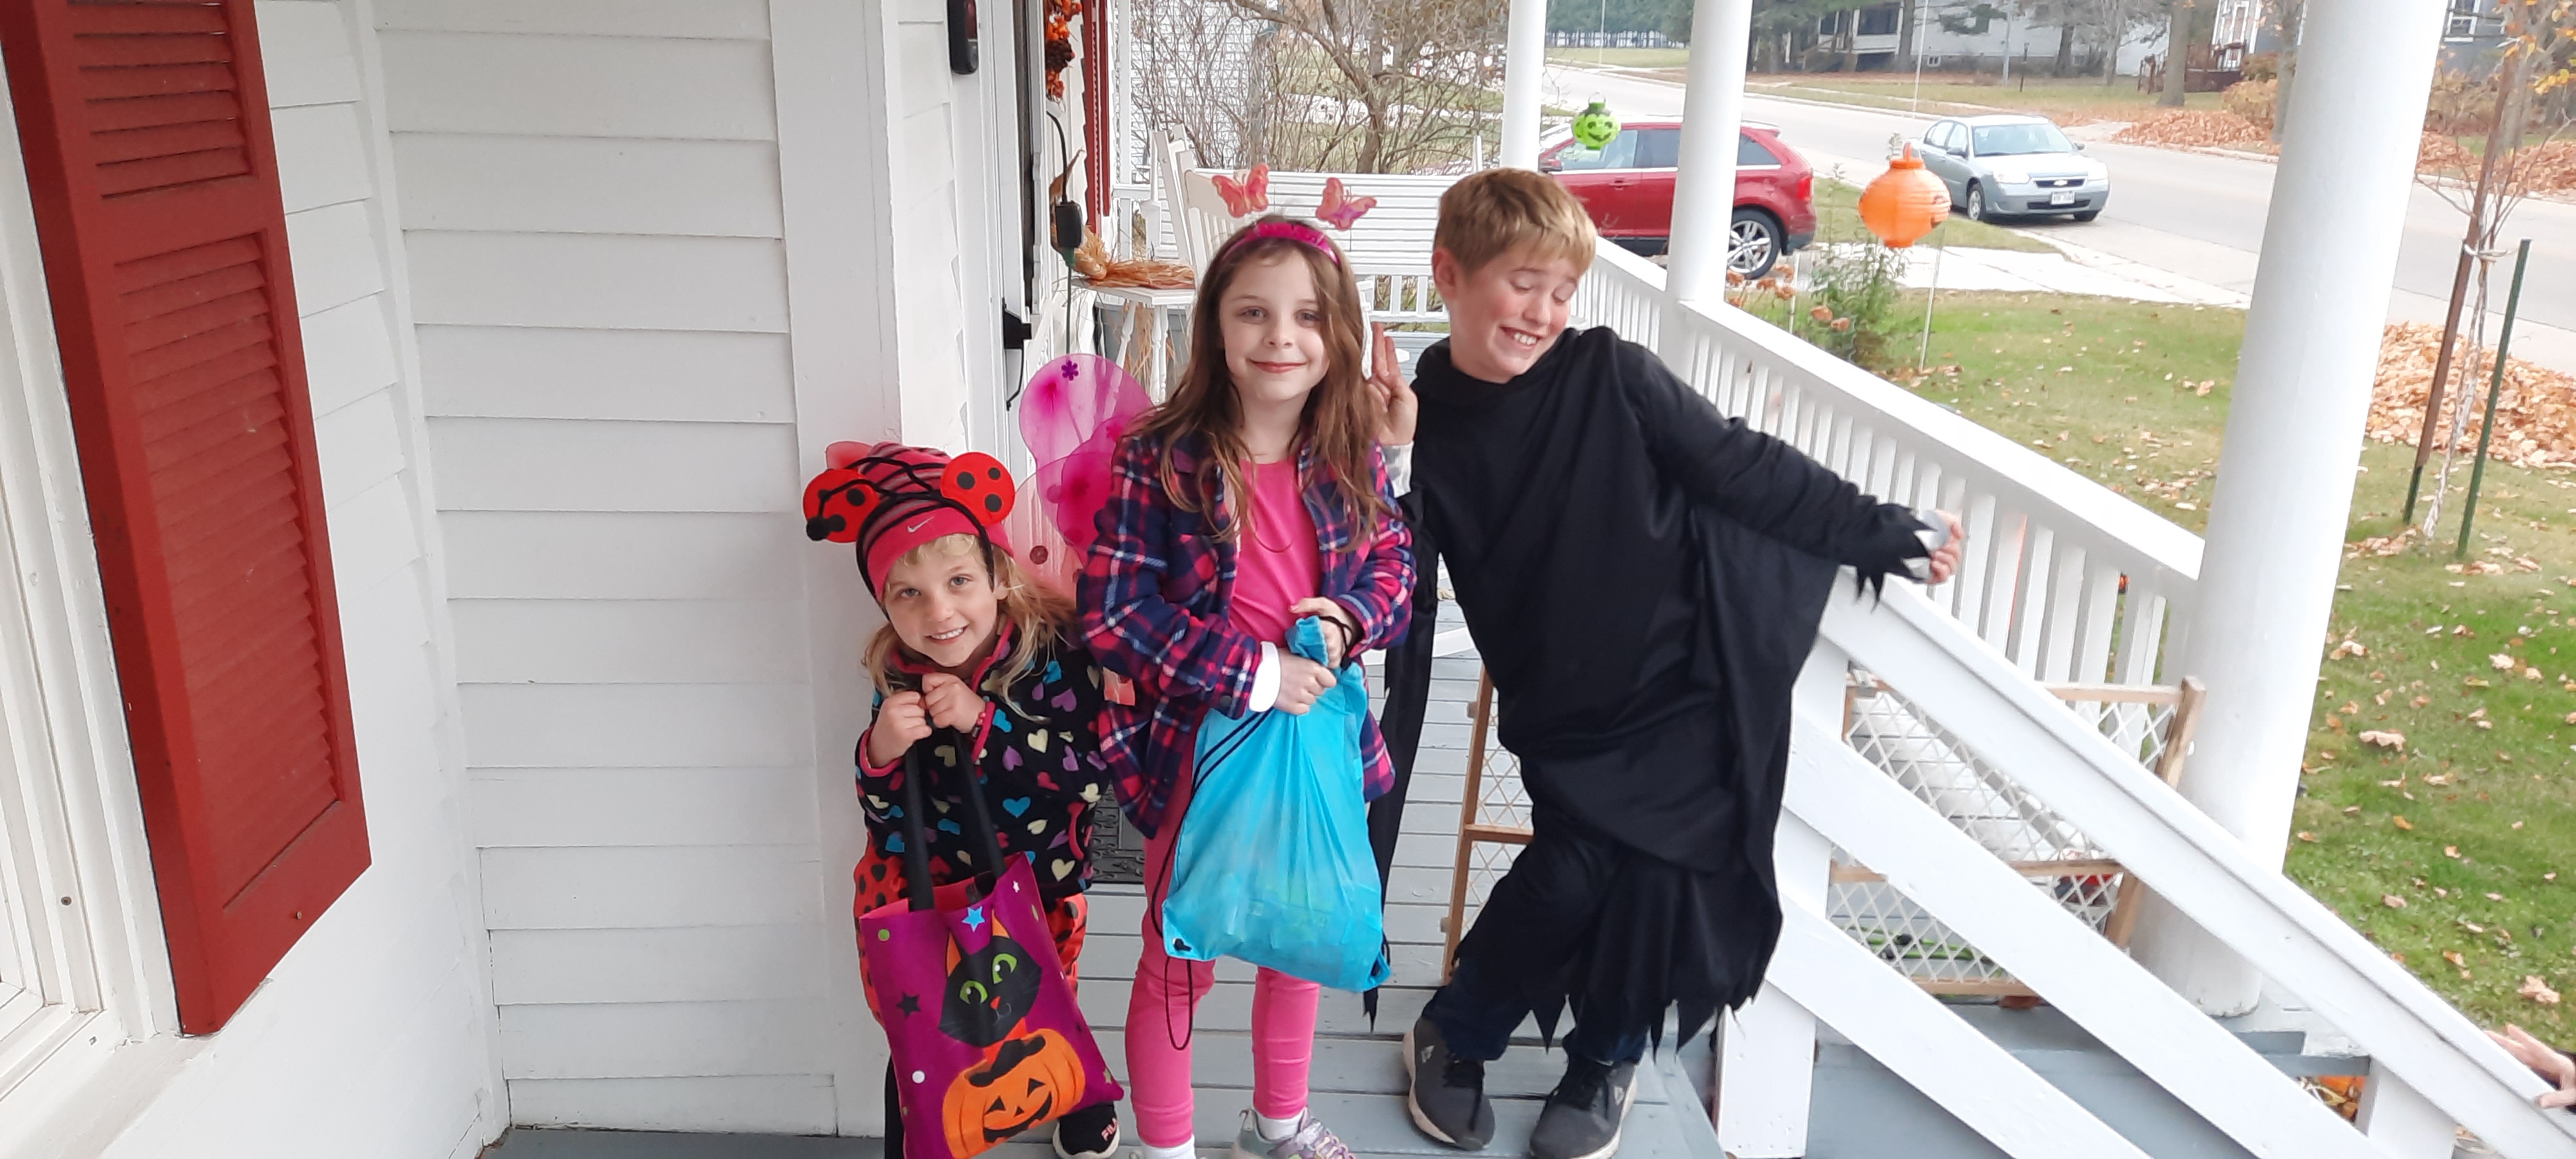
It was Sunday and our little town was having trick-or-treating on the Sunday instead of on the official date of Monday. We got everything ready and we were waiting on the front porch in our cute little hats. It was such a nice warm day, in the 60's. The kids could go in their costumes and not have to bundle up in winter jackets over the top. I remember slogging through snow on some Halloweens in the Upper Peninsula of Michigan when I was a kid.
The grandkids had come over earlier in the month and decorated the house for us with lit up pumpkins, strings of lights, and a few little cute things here and there. We don't ever do anything scary. Especially for the little toddlers and preschoolers. It makes it a nice safe friendly house to come trick or treating at.
We stocked up with a big bag of chocolate bars and a bag of Steve's favorite Smarties candies. That way when there's leftovers, it doesn't go to waste. Haha! We put the sign on the bucket in case we were in the house or doing something during the 3-hour span of trick-or-treating. Instead of just one piece we let them have two...
Our little scarecrow girl oversaw the bucket of candy.
She's so cute.
I did see on Jimmy Kimmel last night in some episodes where people were watching with their door cameras and other greedy people coming in emptying their entire unattended candy bowls! They would tell them to put it back so other people could have some! One woman (with her child right there) was taking ALL the candy. When she got caught, she remarked "oh we were just looking for a certain type of candy bar". Yeah right! Then why did you take ALL the candy and put it in your son's bucket? Some people can be so greedy. Ugh.
We put little Binney in charge of watching all of the trick-or-treaters. She just sits and watches them come and go. But she did get up and bark at two doggies that went by--- just to tell them that this was her house and they better not come in her yard. Otherwise, she is a big chicken.
As the trick-or-treating neared 6:00 p.m. our grandchildren started to arrive. Here is Chelsea, minus her costume mask, ready to dip into our candy bucket.
Clayton Whitney and Claire clomped up the steps in their costumes. They bypassed the candy bucket because they had plenty of their own already in their bags.
Daughter Heather caught up with her daughter Whitney, she wasn't in costume this year but they had a lot of fun going house to house around our little town. Almost all of the kids we saw were accompanied by parents. It was nice to see families out and about, having fun.
Daughter Erin with her nephew, our oldest grandson Jameson. Yes, even a freshman in high school can go out trick or treating in our town and get a bag full of good candy. We never denied the teenagers candy, it's better they do something fun and childlike instead of going out and making trouble!
Soon it was time for all the grandkids to spread out their candy on the floor and do their "trades"
They all managed to find some extra Twizzlers and Kit Kats for grandma, and some Smarties for Grandpa. They know what we like.
While the grandkids were busy doing their trades, I was getting out all of the makings that I had prepared during the day. We were going to have a taco bar for dinner. Something easy to make, and light on top of all of that candy that the kids ate already.
It's a lot of fun to just put out all the food on the island and let everybody make up their own tacos and dips the way they like it.
Everybody brought something to help out with the meal
and we had a good family celebration.
What were we celebrating?
My birthday of course!
My birthday is actually on Halloween the 31st. But because we were all together for trick or treating it ended at my house for a birthday celebration.
Earlier in the day, granddaughter Chelsea had baked a cake and decorated it herself. It was so wonderful to be honored with a homemade cake from my granddaughter. One candle was all I needed... But I have hit the big 62. Bring on the Social Security!
Everyone gathered round for the Happy Birthday song and bestowed me with beautiful thoughtful presents. It sure was a wonderful way to end the holiday. I am so blessed.
~~~~~~~
A couple blogs back, in the one about "mold", had to do with me making a mold of the wooden scroll work on my antique treadle machine parlor cabinet. The gal that I made the mold for has now sent back a photo. It worked out beautifully and now her cabinet has the matching stroll work on the left hand door!
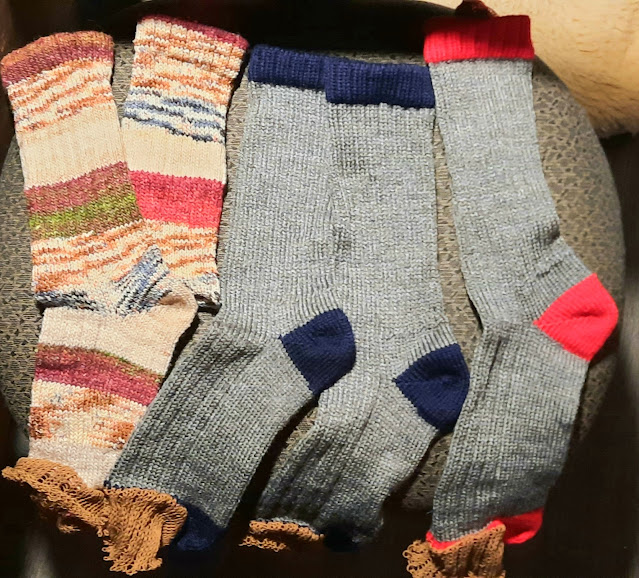
And the scrumptious lovely wool sock yarn that she sent to me as a thank you, has now been cranked up into some nice warm lovely fall socks. I use my circular sockknitting machine and do up a pair in about an hour.
Such lovely colors for autumn in Wisconsin.
~~~~~~~
On the quilting front, I finally finished up the stained glass quilt for the king size bed in our bedroom. I made it to match our stained glass light fixtures. This one I started in the spring, but finally got around to finishing it. We moved the bed around to a better position on an angle. Steve helped me move around the four watercolor leaf prints and put two other prints on the side wall. It's kind of hard to balance out wall decor with the bed on an angle. But it works out better for us in the room.
I made the quilt long enough to reach down on each side of the tall bed. I have to finish the binding yet on the sides, but for now I put it on the bed to see how it looked. I like it!
My next newest quilt I am working on is a pattern called pineapple blocks. I started putting the blocks together on my new handy dandy sewing room craft table that we bought on Thursday. It works out really well and helps me line things up to match while standing at a decent height, rather than crawling around on the floor.
This one is a fun pattern. I will make it into a queen size
and sell it in my Etsy store when done.
~~~~~~~~~
We are blessed again with some beautiful warm weather for the last few days in Wisconsin. Although it's supposed to turn very windy later today and might get up to three inches of rain overnight. Time to batten down the hatches.
Yesterday we did take a ride in the motorhome up to the next town of Peshtigo. They have the best price for bulk propane at their truck stop called Eagle Express. So we filled up the propane and topped off the diesel at $5.05 a gallon.
Now we are all set--- in case we decide to take off this winter and head south???
The sunshine streaming in the rig just made us want to keep going and going and going. But we don't want to miss Steve's Dad's 90th birthday party this month, nor the Christmas holidays with the grandkids. So we will wait for a good day in January and make a run for it if the roads are dry and clear.
We sure are taking our hibernation seriously in January. We really have been snuggled in and not doing much. Sorry, I let this blog slide for three whole weeks before I realized I haven't posted!
In the middle of the month on the 17th I held a meeting of our Home and Community Education group here at our home. It's a County Extension group commonly called The Homemakers. Steve calls it The Homewreckers! LOL Our membership numbers are down due to some people not feeling well, and doing social distancing to prevent the spread of covid. A few of them have traveled to the South as snowbirds, and one of our members happened to break a leg and now is at a rehabilitation center!
For the six who had made it here to our home, we had a delicous potluck meal and I had set up the dining table for our meeting after our dinner. It was a nice social event afterwards and it was really good to see some people again. Steve escaped to his brother's house down in Menasha for the day. Everybody is fully vaccinated and boosted, and practicing as much social distancing as possible. Hopefully, the numbers are falling now in Wisconsin and we can start doing things again. I had still kept all of the Christmas decorations up both inside and outside to have the house look it's best during our meeting. (plus it had been too danged cold outside to take them down yet).
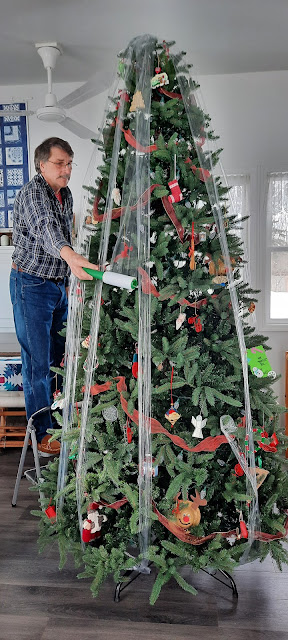
The next day after the meeting, Steve said it was time to start taking things down. We came up with a different idea this year for our 9 ft tall artificial tree. Instead of taking it apart into five individual pieces, which take up a lot of room on the shelves in the garage, we came up with a different idea. Someone else had mentioned doing this and I looked it up on YouTube. A lot of people have tried different techniques to do this, but we came up with a few of our own.
First we wrapped from the base of the tree stand up around the top and back down the base again in quadrants around the tree. About 10 good strands of this plastic rolled shrink wrap. It took two of us to get around the base and through the openings and back up again over the top.
It also took two people to do the next part. One to hold the tree and keep it from rotating while the other one used the wider roll of pallet shrink wrap to go around the tree. Around and around and around we went. Working as a pair to get the tree completely wrapped. The tree still has all of the ornaments and lights and ribbons all in place. We did remove a few precious glass ornaments, but the rest of them are wrapped right into the branches of the tree.
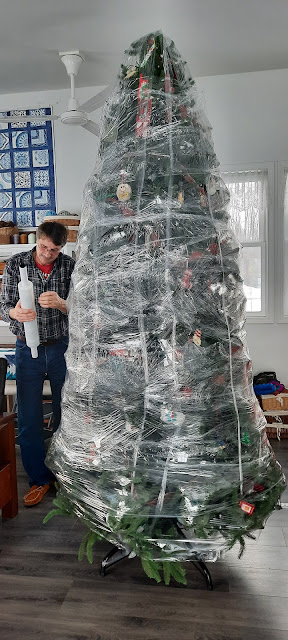
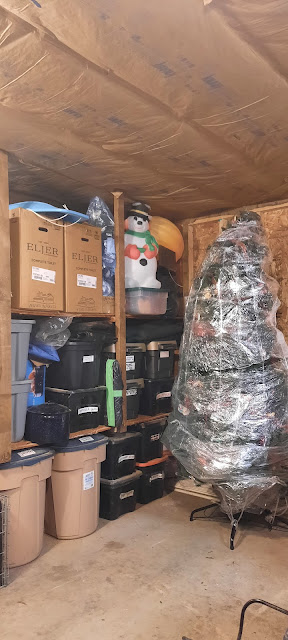
We squashed it as tight as we could around the bottom to get it narrow enough to fit through our 36 inch wide door. It was a squeeze, but we managed to get it out. By wrapping it from top to bottom first, that secured the tree to keep the center trunk pieces from coming apart as we brought it out to the garage. Once we got it into the garage, we stood it up right again and tucked it back into the corner. Hopefully it will stay nice over the rest of the winter and throughout the summer months. Next December we can carry it back in and carefully snip away the plastic with a scissors and be careful not cut into any of the wires or ornaments. A little fluffing to the branches and rearranging a bit and I think it will be just fine! Sure beats having to undecorate it all, take off the lights, then store everything away in totes.... Then take the tree apart in sections, wrap them all up in huge contractor garbage bags and stack them out on the shelf. The added plus is now there's more room on the shelves to put some of my other totes and organize the garage a little better! It's kind of the "overflow storage" for a lot of my weaving fabric and supplies.
(notice Steve's insulated ceiling in the garage!)
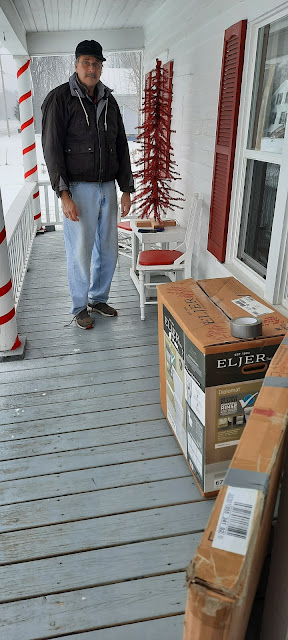
We had one warm day before the weather turned blastedly cold. It was about 35 degrees so we were able to get out and get the decorations off the front of the house. It was warm enough we really didn't even need to wear gloves so we could snip all of the ties that held everything into place.
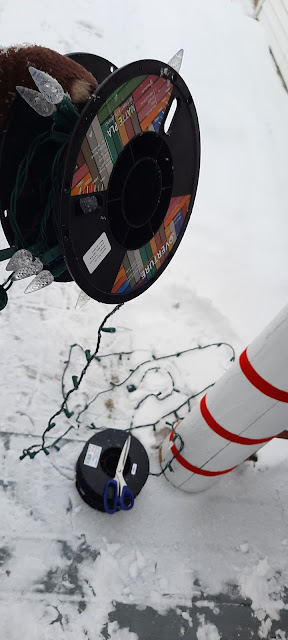
Our son-in-law, Jesse, does a lot of 3D printing. The raw material he uses comes on these big plastic spools. He saved us a bunch of them so we could wrap up our red velvet ribbons to save again. That is a lot better than just throwing it away and buying new stuff next year?
We carefully unwrapped all of the ribbon from the pillars and removed all of the lit garland from the railings. Everything is carefully layered in big boxes. The big snowflakes came down and were packed in a large flat box. The house looks so plain now!
The plastic spools even worked good to take off the outside lights that we had on the pergola and tiny tree. What a nice way to store them and they are tangle-free.
Now all of the decorations are stowed away and it's time to look ahead for the rest of the upcoming winter. The holidays are over and the dreary winter weather is going to set in. We have considered maybe going away to the desert for the rest of winter, but instead we are going to hang closer to home. I think we are going to plan on a trip this summer across the United States may be heading out west on US 2 and go all of the way to Washington State. In the meantime, we will hunker down and work on some winter projects.
~~~~~~~~~~
I am pleased to say that our removal of our electric water heater and our Christmas Present installation of our tankless natural gas water heater resulted in a $30 decrease in our electric bill last month! That is almost 33% of our entire monthly electric killowatt usage! We will get an even better figure on our savings by the next bill without the added Christmas lights on it. We didn't see much difference in the natural gas therms usage from last years bill, but we will compare them again on the next bill.
~~~~~~~~
The pineapple quilt that I was working on is finally fully assembled. I got it rolled up onto my big quilting frame with the backing and the batting in place. I wanted to pick up some variegated purple / pink / blue thread for the quilt so I'm waiting to get started until the new thread comes. This is a queen size that will be for sale in my Etsy shop soon.
I really try to discipline myself that I won't start another quilt until I finish the one I'm currently working on. It keeps me from getting too many projects going at the same time. Because I wasn't going to get the thread right away, I did start on the next quilt. Shame on me!
If you've been reading my blog for a while you know that all around my house I have stained glass light fixtures. Most of them are from the same line called Belle from Menards. I have 2 bedroom ceiling fixtures, a 5 shade chandelier in the kitchen, 3 wall sconces in the She Shed, 2 reading pole lamps and 3 table lamps in the bedroom and livingroom. They are throughout the house and I really enjoy them. I even have one hanging down as a pendant over my kitchen sink.
they are all like this:
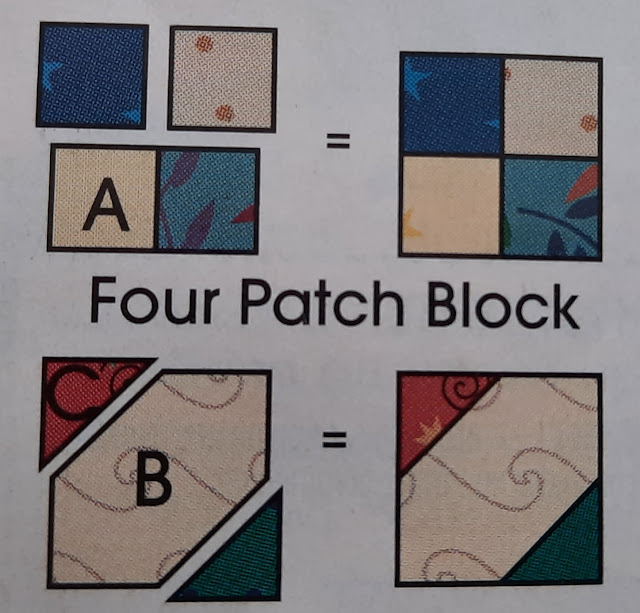
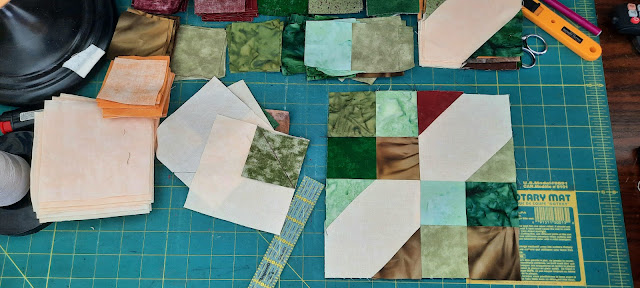
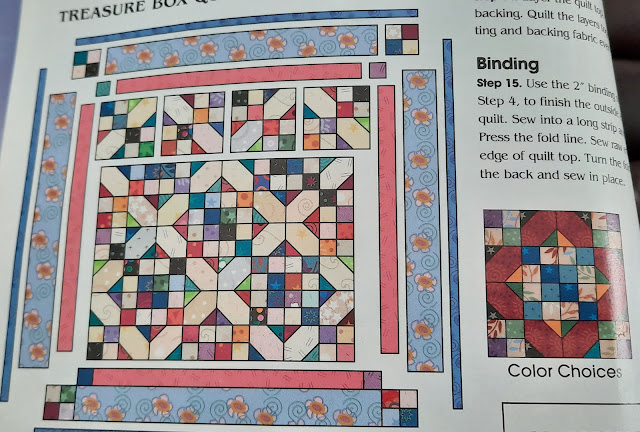
I had decided that I needed to make a quilt to match the light fixtures in the bedroom. Last summer after we installed the large window, the beautiful blue and white quilt on our king size bed looks out of place. So I decided to go through my stash of fabrics and pick out everything that was coordinating colors with this stained glass. I did have to make a run to a little quilt shop up in Marinette to pick out a few more coordinating fabrics. Other matching fabrics I had picked up last fall on our trip out to the Mississippi River along the western edge of Wisconsin. I had this quilt in mind, so I had set those fabrics aside as well. Now I had enough to begin. It's a very simple pattern, only utilizing these two blocks. It's how you put them together in a big array that makes the difference of the quilt!
I started cutting out squares, carefully measuring and arranging my supplies. I like to have everything pretty much arranged at my fingertips while I start creating. I'd rather have it all there then fly by the seat of my pants and run too short later. That way, if there's extra fabric I can always make some into throw pillows to put on the bed after the king size quilt is completed.
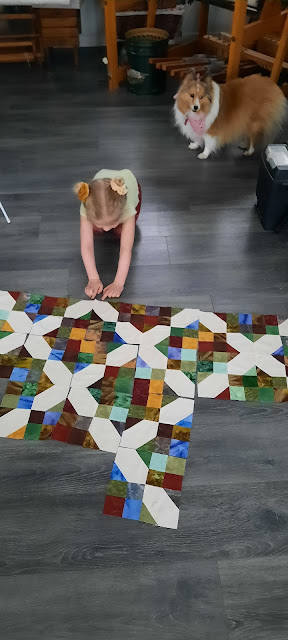
I got about 60 blocks sewn already. The littlest granddaughter Claire was over the other day, and she helped me arrange a few on the floor to get an idea of how it is going to work out. Of course, Binney had to oversee the whole process.
I won't start sewing them into strips until I get them all laid out. I am trying hard to not let any two of the same colors touch at any of the seams. So once I get it all laid out, I will carefully number each one by row and column before sewing them together.
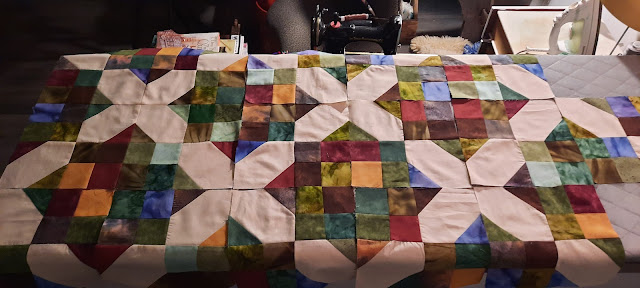
It will eventually end up looking like this... but king sized with a lot more blocks. Some nice borders and trim will round it off. I think I am going to like it. Then my sister wants my blue one for her king sized bed!
~~~~~~~~
The weather has been terribly cold, well below zero with awful wind chills. Claire's parents were going up to their cabin for the weekend, but they asked if she could kind of hang out here and stay warm with us. There would be no outside fun playing in the snow for her when the wind chills were twenty and thirty below zero!
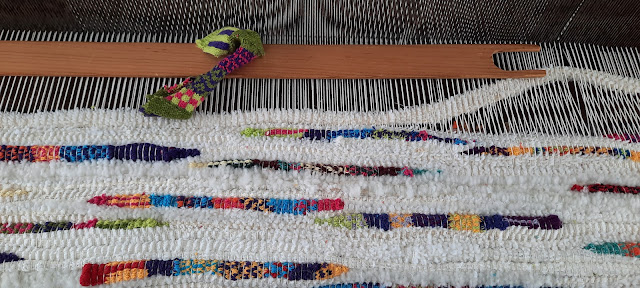
It was nice and cozy warm in the She Shed and she was helping me weave on the big Sanna Kangas Finlander Barn Loom. She sets her little butt on the bench right next to me, just like many many years ago when Ron Kangas sat his little butt next to his grandmother Sanna, and wove rugs during the Depression.
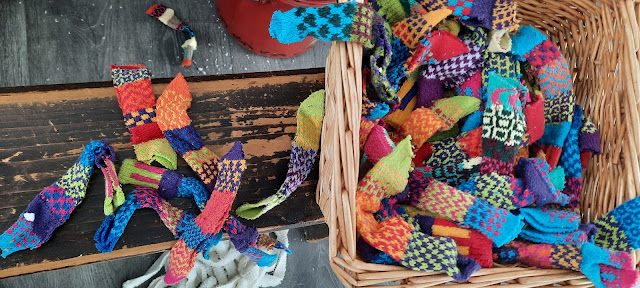
One of my fellow members of our Home and Community Education Group, Charlotte, (who is also my dear old neighbor from when we lived on the river) gave me two white chenille bedspreads. They're absolutely wonderful to weave into thick rugs, after they are cut into long pieces. The only problem is the chenille is fluffy and makes a bit of a mess. But we don't care. The design of this rug is strips of the white chenille and interspersed throughout the rug are laid in pieces of knit fabric we call "Caterpillars"! They are very similar in color to the book about The Very Hungry Caterpillar. A rug like this makes a great baby shower gift when accompanied by a copy of that very popular book. I plan to weave up 2 rugs, and give one to Charlotte. The other will be for sale in my Etsy shop.
The caterpillars are actually knit pieces of surplus sock fabric that a friend buys in bales from a company out in New York called Soulmate Sock Company. These are the defective socks that are sliced apart and sold as scrap. My friend Hilary at www.crazyasaloom.com sells these by the pound. I have a box full, and I cut them a little bit smaller than how they are originally shipped. I lay them in each open shed as I weave, and they create perfectly colorful caterpillars!
Here is a little YouTube that Steve shot of us while we are weaving. You can see how it's Claire's job to pick out the little caterpillars and decide which color is next, while I take care of the beating of the overslung beater on the heavy rug loom. I am so glad that all of my grandchildren enjoy helping me with weaving, spinning, quilting, or other fun projects in the She Shed. We are making memories.
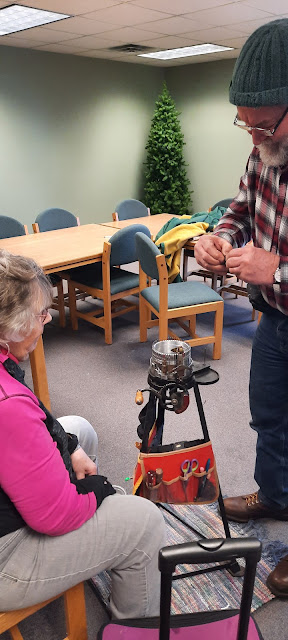
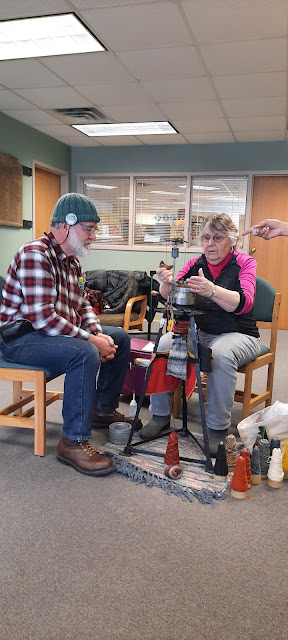
I did go to an antique sock cranking meeting last week.... It is held four times a year over in Oconto Falls. I'm glad that I did go, because a gentleman arrived from Escanaba for a first-time visit to our group. I had met him last fall when we were up there camping near the Escanaba State Fair. With the help of my sister, I had purchased my Singer Featherweight Sewing Machine from him. He restores them, as well as repairs other sewing machines. He has a fascination for the antique circular sock knitting machines and has restored a couple of them as well. I had invited him to come down from Escanaba which is about an hour and a half drive away to attend one of our meetings if he happened to want to join us. And he did! He brought along a very interesting friend by the name of Joanne who is also a very accomplished spinner and knitter. We had a great time visiting and he shared some projects with us.
He knit these sleeves on the sock machine
and stretched them over Christmas Ornaments!
We were able to share some patterns, sources, insights and ideas. Plus laugh a lot and go get some lunch nearby. It's a whole day spent with our circular sockknitting machines.
He also was able to repair one of the other member's malfunctioning sock knitting machine for her. She was delighted that he could just fix it on the fly and she was off and running again in no time with her cranky machine.
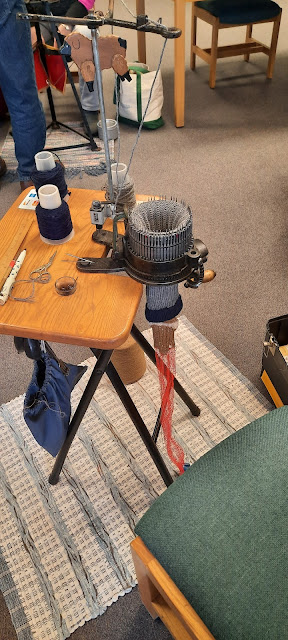
Here is my sockknitting machine. It's an oldie but a goodie. I can get a pair of socks done in about an hour, with no interruptions. But of course in a room of other knitters, that isn't so easily done. But we learn a lot and share sources of good yarns or parts or patterns.
I got a couple socks cranked up as well as a good day of fellowship and being out of the house for a bit.
~~~~~~~~
So basically that is how I was spending the month of January. Working on a couple quilts, working on some rugs, doing some knitting, and enjoying the warmth of inside of the house.
As for Steve, he was fiddling around with a few things in his garage and installed some new shop lights. He now has the entire ceiling of the garage insulated which makes it much warmer out there to work on things if we need to. The winds are no longer blasting in through the eaves along the soffits vents or the ridge vent along the top of the roof line. Nice! In the spring we will take care of hanging sheetrock on the ceiling to finish it off nicely.
So he was thinking it's time to start another project.
A couple months ago we picked up 18 bundles of new beadboard strips from a guy on Facebook Marketplace. They are 8ft long and we are going to cut them in half into 4 ft pieces. There is a section along the wall of the kitchen that we would like to cover in beadboard wainscoting 4 ft high. It will tie in the beadboard pantry cabinet we restored last summer and blend it more with the rest of the beadboard type cabinetry on the other side of the kitchen. I think it will draw it all together and coordinate it nicely. The top edge cap will have a bit of trim kind of like a plate rail and a bit of egg and dart molding underneath that will mimic the trim around all of our old fashioned window and door frames in the house.
He brought in a couple pieces to lay on each side of the pantry cabinet. Of course they will be about 10 inches higher because they will start at the edge of the baseboard molding. Also they will be sealed with shellac on all of the knots to prevent bleed through and then painted the same color as the cabinets and trim in our kitchen.
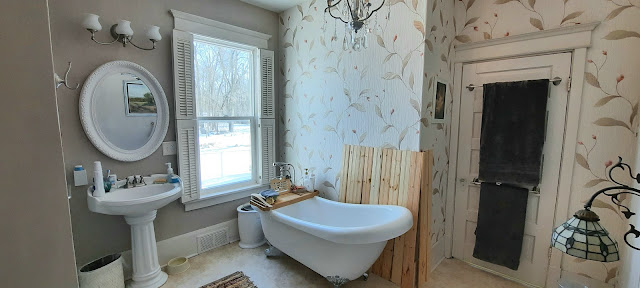
Then---- in the bathroom we are going to do the beadboard all around 4 feet high as well. I love a beadboarded bathroom. We had done beadboard in a varnished and stained type in the bathroom at our last house in Chilton. It gives such a beautiful old fashioned look to the bathroom.
This bathroom, we are going to install it and it will be painted to match. I think we're going to pull off the wallpaper on that one wall because that's too busy. I think I will like the plain clean lines of the beadboard. It will be good to get something on that wall along the side of the tub. When using the handheld shower, sometimes a tiny bit of overspray does hit the wall. I would rather it hits beadboard than the wallpaper. I'm not a fan of any wallpaper, especially in the bathroom. The wallpaper is starting to pull up a little bit on the corner near the window and I think I would prefer to get rid of it.
I got up my figures and Steve got out the tape measure and we figured out how many pieces we will need. It looks like we will have more than enough! That way if there are some pieces that have cracks or splits or big ugly knots, we can kind of cut around them and set those aside.
Steve started with one piece just to cut an outline of the lip edge of the windowsill and work to the right and then to the left. That is best to start with the hardest piece first and then work in each direction. The slabs of wood fit together with tongue and groove. We will be putting a white adhesive on the wall and then nailing them into place with his trim nail gun. Once all of the boards are up, I will shellac the knots and then give them two coats of my primer paint mix to make it all come together and it will look custom made!
That's as far as he got today--- one board --- because the football playoff games came on TV. This evening he is watching the second game of the day so I'd imagine we aren't doing anything more with the beadboard today or this evening. That's why I'm taking the time to write the blog while he is watching the TV.
Once the Packers lost last week and we're out of the playoffs, I kind of lose interest in any of the other playoff games. Although I will watch the Super Bowl, I'm just sad that the Packers aren't playing.
~~~~~~~~
February is going to be cold and I don't see much of a thaw coming. I think we will stay snuggled in nice and warm, put our feet up, and look out the windows of the She Shed at the snow.