Our Wonderful Followers who come back again and again to read about us...

Showing posts with label Our Old House. Show all posts

Thursday, September 13, 2018

Got Off Track Here! Shuttered Up

Wow... things got BUSY.... 

and now summer is over.  

The last few weeks I haven't been posting any blogs.
 
We hid out in the house with the central air on the hot humid days.
We have had visitors, and we have been visitors. 
We have babysat grandkids and spent time with parents.
We didn't get in ANY camping. Sigh. We were going to go this upcoming weekend, but plans changed with a health issue cropping up with some friends.

I can write about each of those to catch up in the next few days, and finish up my 3rd post about the things we changed in the house after buying my new chair.


But we DID do an "Our Old House" Project I can write about.

It's been such a hot and humid summer, that we really didn't work on any projects around the outside of our old house.  We wanted to, but the weather hasn't been cooperating.

The previous owners had put on vinyl siding which is rather plain and beige.  It's nice to have no maintenance, but even the aluminum wrap around the windows was also rather plain.  NO character.


See?


(we did add window boxes this past spring)


Finally, the humidity dropped, the weather was nice, and we dug around in the attic of the garage.  The previous owners had left behind a bunch of lumber and scrap wood up there.  There were a bunch of nice big long 1x10 planks that were in perfect condition.  I had a plan in mind---- and Steve agreed!


We hauled down the boards and I had made up a cut list after Steve helped measure six of the windows on our house. Steve choice was the six windows people can see from the road.  More on THAT later....

Using a template made from the cutout shape of the lattice fretwork under our front porch, we made up a design for our new shutters!  Steve also came up with the idea of a 2 inch block of blue on the top and bottom margins, and they also match with the trim blocks we painted on the front of the house earlier this spring.


He gave his nod of approval on the first cut out. 


Steve started cutting, I did the sanding, and soon I was able to coat each board with 2 coats of paint.  We added the blue blocks on each shutter to dress them up.


Soon the shutters were ready to hang!  We completed the six windows that Steve had decided that needed to be done.  That covered mostly the front, south side and two windows on the north side. 

We mounted them to the vinyl siding with little spacer blocks so they do not press down or impede on the vinyl siding.  The vinyl needs to contract or expand with the weather, so only attaching the shutters with two long screws and not tight to the vinyl was the best solution. I painted the heads of the screws so they didn't show too much.


Someone asked me why did we go to all the work to build our own shutters?  Why not just buy some and put them up?  Well, first of all, those would be just average vinyl shutters like everyone else has.... and second of all, at a cost of about $45 a window, times 6 windows... ack... $270.00???  Well, this wood was FREE and it was only our hard work to make them and put them up ourselves.

We were lucky with the upper windows, we could install them from inside of the house, by leaning out to mount the shutter on the outside.  Our old house windows still slide down from the top or up from the bottom.  Because they are still original wood and not painted shut.  Yes!


We got all six windows done and it sure looked nice.  Steve was satisfied with just doing the six windows that were visible from the road. While installing the 6 sets, we had a few neighbors stop and admire them, and even one lady whom I didn't even know stopped to comment about our window boxes as well.

I wanted all 14 windows to have shutters, so the house looked "complete".  Even Pops Pfundtner weighed in on the idea of all the windows needed shutters to look nice. 

(little did Steve know that the following weekend we would be buying MORE planks and making enough shutters to finish ALL the windows ALL the way around the house!)   But that wood was on sale for only $58.00.


We got them all cut out and sanded and painted in one morning. The weather was cooperating and we got 8 more pairs for the windows all ready.


We ran into one snag, we had to move a rain gutter downspout, so Steve had to borrow the neighbor's ladder to get up that high. I held it from below and had the phone ready to call 911 if he fell. We were hoping to do them all from inside the second story and avoid the ladder completely.  

I think we are getting too old for ladders! 


Soon the house was complete!  Ahhhh I think it's a little cutesy, but Steve agreed that it really dressed up the house from the plain beige vinyl. 


Here is the backside of the house, where we usually enter from. 
I am glad we put shutters on these windows too! 
They are the ones we see most often.
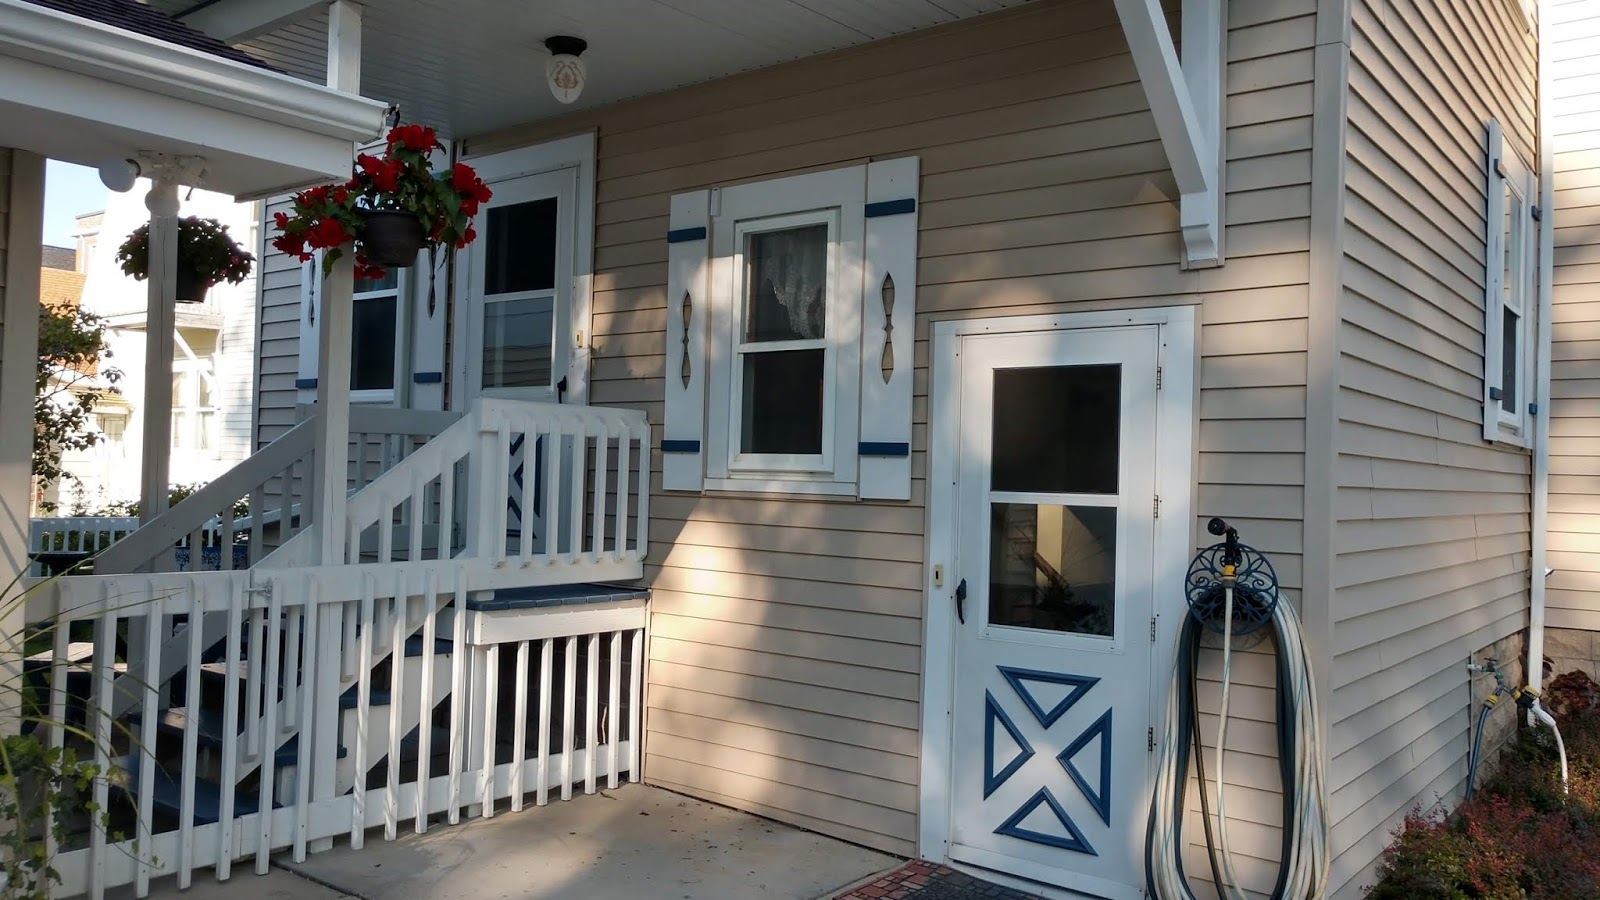

The north side of the house also has a big bay window.
I am going to add some little corbels under the overhang of the roof
around the bay window to dress that up later. 


This is the south side, the most boring big beige side. 
I am glad it's spiffied up now.  
This is the side we see each time we come up the driveway.


Here is the house from the last angle with the top shaker porch and side gate too.... I am really glad we went all the way around with the shutters. Steve agrees now that it looks better. It was worth it.


Hmmm I wonder how he feels about shutters on the windows of the garage? 

~~~~~~~~~

I will have some future blogs about changing the muffler on the motorhome. Steve just got it in the mail today from FedEX and the dogs were so excited to get some big boxes from the mailman. 


I will be posting about our camphosting at High Cliff State Park coming on Oct. 1st. And the big Halloween Celebration that is held there, this year it's the first weekend in October.

I will be posting about the quilt I have on the frame today. I started stitching some pretty hooks and swirls.  I think it will be kinda cute once I finish it.


Here is the stitching 
and here is the quilt top 
laid on the queen bed in our guest room.


I will be posting about our trip coming up in later October and into November to visit friends in Tennessee and then on to the folks in Florida.

I hope to just keep on posting!  
Gotta get on track! 


Thursday, May 24, 2018

Fan Fun with Ductwork in Our Old House

Before I start today's blog, I would like to give a big shout-out to our son Dan and his wife Heather on their 10th anniversary! They are the parents to our two wonderful grandchildren Allegra and Mason. We wish them a happy anniversary and hope they have a wonderful and exciting year ahead of camping and baseball and family events.


Okay, now on to my blog topic of the day.

Did you know that every time you have a 90-degree turn in your household heating or air conditioning ductwork, it can decrease your air flow by 33%? 

Our ductwork run that goes up to the second story in our master bedroom (and my sewing room), has THREE 90 degree turns. That means there's almost no air moving through that vent, even when the furnace or the central air conditioner is running. It's very weak compared to the other ductwork in the house.  We have tried turn down the air flow with the dampers in the other ducts somewhat, but that doesn't increase it up the one run to the master bedroom.  Ironically, that is also the longest and farthest run from the furnace blower. 

We don't notice it as much in the winter months, because heat rises up the stairwell in into our bedroom and we are quite comfortable. We turn down the heat at night to 50 degrees, and use an electric mattress pad heater. So no problem with the winter months. 

But in the summer months it's really hard to get the cool central air up into our bedroom. Especially in the evening and night during hot humid weather. The main floor is still cool from the air conditioning running all day which is where the thermostat is located. We just don't get enough cool air movement pushing up into our bedroom.

We have tried various fixes over the last five years:

First, we put a ceiling fan in the bedroom.  It moves the air, but it's HOT air. Compounded by the fact we don't have any cold returns on the second floor at all. The cool air from downstairs just doesn't get up to the second story too well.

Next, we put a window air conditioning unit up there to supplement the central air. Not only was it noisy but I didn't like the look of it on the outside front of the house. It only cooled the bedroom and we had to keep the door shut to the rest of the upstairs.  We had to fire it up about an hour before bedtime to cool off the room. And --- the rest of the upstairs is still hot and uncomfortable.

The third solution was to add a supplementary fan to our attic scuttle hole to help suck some of the hot air from along the ceiling out of the second story. Beyond that, in the attic we installed an attic vent fan to help expel it to the outside through the gable end grid. Although that helps some, it's still was not addressing the issue of not enough air blowing up through that duct to begin with. 

So we went on now to our newest solution and I think this one is a winner!

I read about these supplementary electric duct fans, and although Steve pooh-poohed my idea from the get-go, I persevered. I showed him plenty of information about how that duct to our master bedroom and sewing room is severely hampered because of the three 90 degree turns. There just isn't enough flow of air.  

He finally went along with my idea, after living here for 5 years with insufficient air conditioning going up to our bedroom.  YAY! by boosting the air flow to the upper floor, both of our open stairwells to the main floor will act as cold air returns. 

So we went to Menards and invested $28 for a duct fan booster unit and $22 for the supplementary pressure switch control box, I am willing to try for $50 to make a difference!!!

He had looked at the size of our duct downstairs and first thought it was 6in. So we bought the unit for a 6in.. We got home and realized, nope, the ductwork is bigger. So we went back and got the fan for the 8in. duct work. We came home and oops, again, wrong size, that one's too big!

Guess in 104 year-old homes, they had 7 inch duct work at that time????

Three times a charm! We went back and bought a unit that was adjustable between a 6 inch 7 inch or 8 inch ductwork. 


This can be installed and run continuously 24 hrs. a day.  But..... we would rather it kicks on and off with the central air when it blows.  Hmmmmmm

So they make this other piece to go along with it. It is a temperature sensitive switch controller unit. After the fan is inserted into the ductwork, you drill a hole about the size of a half-dollar into the ductwork and mount this box to it. As the furnace or AC blower air passes over that hole, it activates a switch that turns on the supplementary duct fan. Set it for cooling or heating and there is a dial to control the amount of time the fan runs with a high and low limit.


Now to start the installation:  here is the duct fan unit with a half circle of ductwork. That makes it adjustable from 6" to 8", of which we have 7".


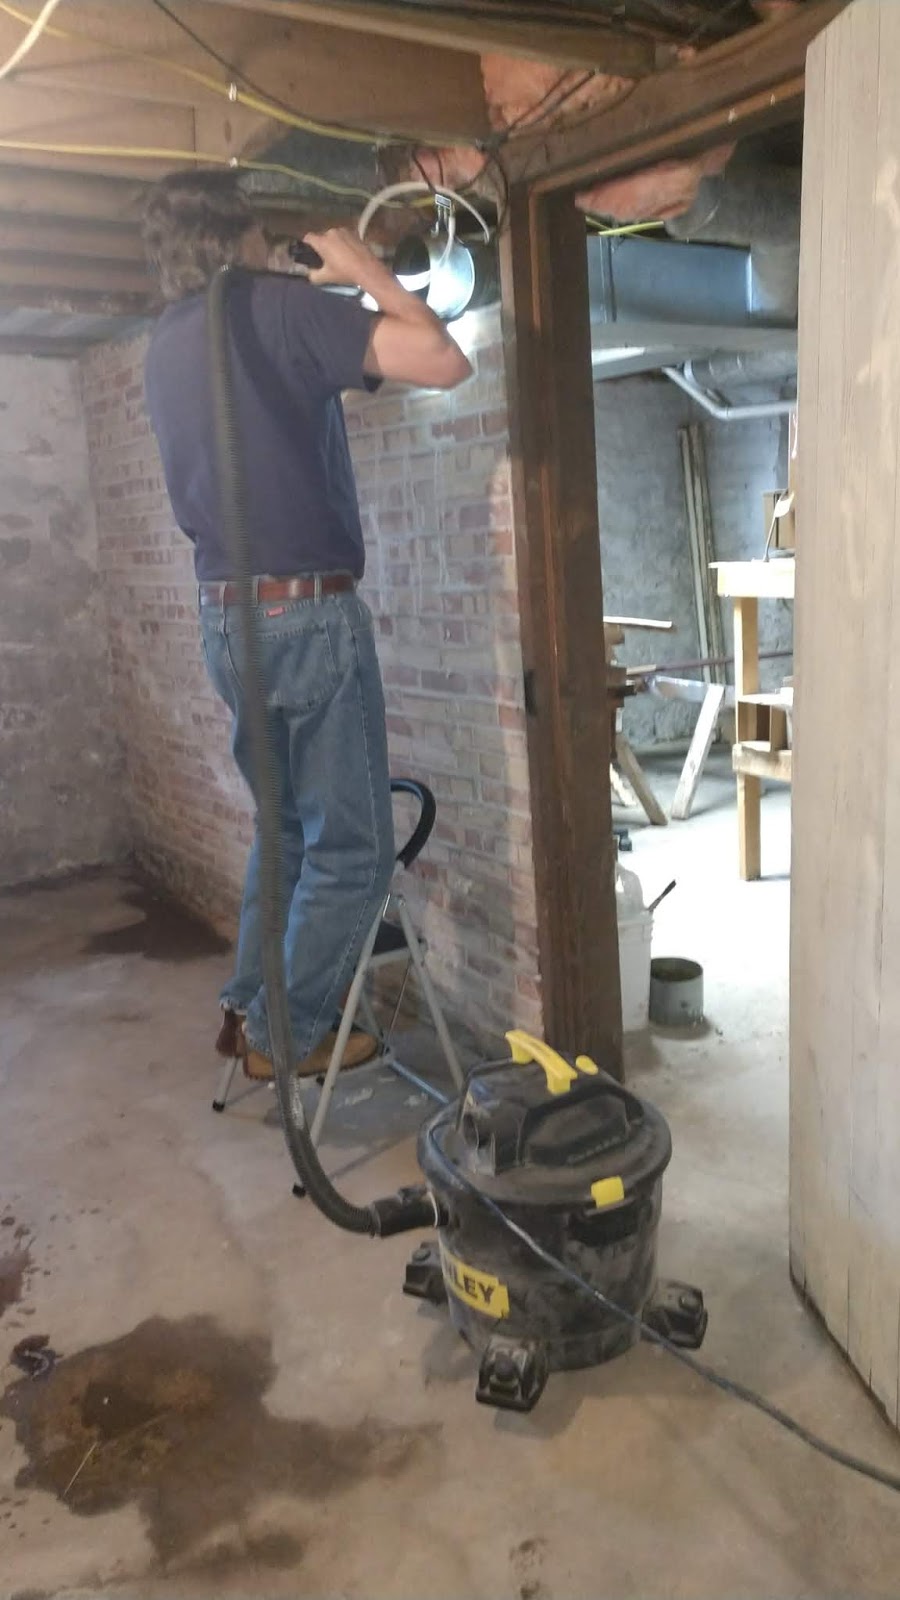
The fan is installed right into the ductwork. He removed the right duct pipe from the basement to install the fan in the best position. First by using a template, (which Steve hates using templates), he drew in the rectangle that needed to be cut out of our existing ductwork. Using a pair of tin snips, he carefully cut away the rectangle needed from our existing ductwork.


The is the first of three 90 degree angles of ductwork to our bedroom.  The other two are enclosed in the walls and floor between the first and second stories.  The duct transitions from a 7" circle to a 14" wide rectangle to boot.  This is the best place to insert the new duct fan, as it is close to an electrical outlet in the basement.


Before Steve reassembled the ductwork back into place, he decided to vacuum out the duct with the shop vac. It wasn't too dirty, but he since he had it apart, he might as well do it at the same time. 


He reassembled the duct work into place,
now with a rectangular hole cut into the side.

Using real "duct tape" he sealed off any corrugated areas that also leak air flow. The new fan slides right in and four self-tapping sheet metal screws hold it securely into place. He sealed it around the edges with more duct tape as well.


Now to add the temperature pressure switch to the duct, it has to be on the far side after the fan and furnace, not before it.  He only needed to drill a half-dollar sized hole in to the duct with a hole saw.  The orange box needs to be screwed tight to the duct and they recommend either some sponge gasket tape or a circle of caulk (non-hardening) to seal from the flat surface of the orange box to the round surface of the duct exterior.   He installed it tight and screwed it into place and plugged it all in.  


We followed the instructions and set the low and high limits and turned on our AC central unit to test it out.


WHEEEEEEEE!!!
We now have
 a nice strong noticeable blast of cold air 
coming up into our master bedroom!!!!!   

It is getting up in the mid 80's today and humid, so it's a great to test it all out.  We closed up the house and pulled the shades for added comfort, as well as slid down the storm windows over the screens on all of the windows for more insulation layers.  It's been 2 hours and the upstairs is nice and cool in the bedroom at 70 degrees, 

By George, I think we got it! 

~~~~~~~~~~

This morning, before it got too hot and humid, Steve and I went out to dig up some hostas.  Steve's brother Pete and wife Cindy built a new house. They are working on landscaping now, and would like any and all perennials we can split and share.  My hostas have gotten too large for their areas over the last five years, so they needed thinning out and splitting.  


We dug up 10 huge clumps of various types,
 and most of those can be split two or three times more.


I am running up to Menasha later today, so we loaded them into the car trunk and keeping them in the cool of the garage until I am ready to leave. They will have a busy memorial weekend getting them situated and planted in their new yard. 


It's now noon,
and the temps are up to 84
and humidity of  58%

ICK!

On edit---- it's now after 8 p.m. I'm very pleased to say that the downstairs temperature is 72 and the upstairs temperature is only 74! Usually there is a 10 degree difference between the downstairs and the upstairs. So it appears this supplemental Duct Fan is really doing its job to circulate the air throughout the house and get the cool air upstairs where it's needed the most. $50 well spent!!!

Tuesday, April 10, 2018

Our Old House Project

We got busy last week and over the weekend, so I didn't get any motorhome modification blogs done.  Instead we were taking care of a few things around the house...

Our Old House Projects are always a bunch of fun.  We fondly refer to our 104 year old home as Our Old House. We always try to make it nicer, but try to keep the original features and restore things that were changed over the years by the previous owners.

The back side of our house has three doors!  One is up on the back shaker porch for the second story.  The lower portion has two entrance doors. One on the right leads into the lower back hall and down to the basement, the other door on the left goes right into the kitchen from a walkup porch.

(pic from last summer) 

We don't often use the door on the right, because we prefer to enter the house up the back steps right into the kitchen.  Steve does like the door on the right for getting things up and down to the basement.

The back hall area was kinda sorta yucky with hokey white paneling from the 70's with brown streaks.  We pulled up one small section to peek behind, and there was cracked plaster behind it.  That is why they put it up in the first place. We are not about to tear it all off and re-plaster or sheetrock/drywall it.


Nope, not for a back hall, we never really see this part of the house much unless we were going down to the basement.  The underside of the servants stairs to the upper level had been painted a soft yellow....  but at one time it had also been deep rich brown stained and varnished wood!  The ceiling right by the back door also was lovely old stained and varnished beadboard.  I wish they were still that way.  Sigh.  I hate when people paint wood!


We keep our coats on hooks along one wall and our shoes and boots laying on the floor under the coats. It's kinda cluttered and messy, but hey, we don't often go in and out that way, so it didn't matter.  Or so I thought.   Steve thought otherwise! 

This photo was taken after we already straightened up a bit, and Steve removed a large yellow cleaning supply cabinet that had been resting on the ledge to the left.... 


He hung the cabinet down in the basement which made a lot more sense.  I keep all of our cleaning supplies, extra light bulbs and dog grooming stuff in there.  It didn't matter if it was down in the basement or on that ledge.


By moving that cabinet, it opened the space up nicely now with room to the left of the coats. Once we get the painting done, we can move the shoe rack, (really a bookcase) over to that ledge.


Steve had a day off driving the Old Fart Party Bus, so he cracked the whip and said "Git on yur paintin' clothes woman!"  and we were off and running before a second cup of coffee! He removed the coat rack to save for later.  It was still original wood work and original hooks, so we didn't want to get paint on it.


Steve hates painting and usually has me do the cutting in with a brush.  His knee was bothering him so he let me do all the down low cutting in and he did the standing up stuff.  He doesn't even need a ladder, so it was not too bad for him to do that part.  Once I got all the bottom cutting in done around the stairs and baseboards, he was ready to roll the first coat.  Ahhhh a soft buttery cream yellow (like our laundry room).


We had the first coat of paint on and drying before breakfast.  Steve took a break to cook up some eggs and bacon and his famous thin american fried sliced potatoes.  What a multi-tasker!


While he was doing that, I grabbed a brush and roller and went into our laundry room.  Last summer I had painted the entire laundry room, but left the backsplash unpainted. It is a sheet of Formica glued to the wall as a backsplash.  I didn't know if should paint that or not.  Steve said I could.  hmmmmm  I did paint one small section last year to see how it holds up, and it does.   Now was a chance to finish it up and complete my job from last summer.

BACKSPLASH BEFORE

BACKSPLASH AFTER 

I also re-hung the "HOME" print over the washer and dryer.  
This had been left by the previous owners and I like it. 
This room used to be her tiny kitchen, and we made it into a first floor laundry.


I was done with this quick project while Steve finished cooking our breakfast.  I think it looks much better with all the walls and backsplash matching.  We are not rubbing on the walls or really walking near the wall where the new paint is, so I think it will last.  I do have extra leftover paint to use for touchup if we need it.  Maybe someday we will rip down the Formica and replaster the wall?  For now, good enough.


After breakfast we got the second coat done.  I did a few touch-ups here and there afterwards. Before we knew it, we were removing our floor tarps and hanging the curtains back up.


 These pics look kinda white from the sunshine coming in,
but really it's a soft buttery yellow color. 

Steve put the wood strip with the coat hooks on it back into place. 
This had originally been in the half bath when it was a closet...
now we have it in the back hall for our coats. 
The shoe rack was moved to the flat area where the cabinet had been. 


DONE! 

That's it for today...
maybe tomorrow will be some more motorhome modifications
 or perhaps a cute adorable little granddaughter doing some sewing?
Here is a preview of why we were busy this weekend: 


Stay tuned!