Our Wonderful Followers who come back again and again to read about us...

Saturday, September 15, 2018

MOTORHOME MODIFICATION - Replacing Donaldson Muffler on Safari Motorhome

Motorhome maintenance is a must. Our rig is now 22 years old and needs regular service and strict vigilance of things that need replacement.  It's good to stay on top of things, and if you can fix it or replace it before it causes further damage.

We replaced the muffler back in April of 2009. Here is the blog post from that process:


Fast forward now nine and half years later-----  We noticed the motorhome was sounding a little louder. Although it's kind of hard to hear the noise back there in the engine area when you are riding 38 feet up in the front.

Nine and a half years is a pretty long life for a muffler, I guess. Considering that we live in Wisconsin with cold and damp and snow and salt and heat and humidity too.  Steve did a lot of research to find the best price on a replacement muffler. He checked high and low everywhere, with calling local dealers and shopping on the internet.

We needed the large Donaldson muffler and both of the mounting bands. You will see why in the pictures further down the line.  Here is where he placed the order from all the information and the link to their website:


4175 S FREMONT AVE, SUITE 102,
TUCSON, AZ 85714 
Tucson, AZ 85714 
Phone: 520-889-5781
tsparby@filterspro.com


H000349 MOUNTING BAND
$26.13 each - $52.26

DONALDSON MUFFLER
M120598 MUFFLER
$208.30

Subtotal: $260.56
Shipping: $45.13
Total: $305.69

from our local NAPA
1- 5" u bolt  7.49  733-5774
1-  4" u bolt  5.99   733-5775
$14.22 

from hardware store 
four bolts .73

The total replacement cost:
 $320.64

~~~~~~~

Steve figures the cost would have been in the $800.00 range to have it done somewhere. I am so glad he is able to do this work himself. I just merely help out, hand him parts, fetch tools, and hold things out of the way.

And take pictures of course!


Two certain little dogs were very excited to see such huge boxes come delivered by FedEx. It sure made their day!!  They sniffed and snorted and checked out these big intruders that got plopped in our front porch. 


Here is the beautiful shiny new muffler


Here's a close-up of the part number and also a shot of the U-bolts and the 2 really nice mounting bands. They are coated with a type of black substance that is a rust inhibitor of some sorts. You will see why that is needed on the pictures down below. The coating (which we didn't have on the bands before in 2009) is a really really really good idea!


We set up the work area underneath the motorhome with a yoga mat. It works very well on the gravel and rolls up out of the way to be stored in a basement compartment. 

Our mosquitoes here in Wisconsin are totally atrocious, horrible, and are swarming in such large amounts that it's not funny. We've had a lot of rain lately and we've got a super duper bumper crop that has hatched. I am not exaggerating, they are worse right now than any other time of the year, and worse than they have been in many years in the past. 

We set up two Thermacell units to create a dome around the entire work space. These things really work!  https://www.thermacell.com/    I'm not trying to sound like a commercial.  Without these, we could not stand it outside without being covered in thick welts and bites.  The thermacells work wonderfully and you don't have to slather any DEET or sprays on your skin or in your hair.


Steve also brought out the big guns. (His tools to work on the project.)  He knew that all of the bolts and nuts would be rusted tight, so he brought out his torch and tanks to cut them off. He also brought out his air compressor to run his air tools. Since he installed a power post pedestal in our yard, just like at the campgrounds. He is able to plug in his tools while working on the motorhome or anything else in the yard. Handy dandy!


Steve got to work cutting away the rusted up brackets and nuts and bolts. I was able to get this shot with sparks flying! Wheeee


It didn't take too long and he was able to cut it all free from the brackets attached to the frame. Then he could drop the old muffler and tailpipe right down onto the driveway. Clunk.


Wow... just look at that. Wherever the mounting bands were strapped around the muffler, that is where it rusted the worst. I am sure moisture hangs up between the band and the muffler shell, as well as road salt if we happened to have driven on Wisconsin winter roads. We have been known to do that a couple times... ahem.  But we usually try to spray it off as soon as possible. The danged road salt intrudes under the bands and hangs up in there.


That is why it's such a good idea
 that these new bands are coated
with this material to prevent rust.

Steve also had to torch off the U bolt clamps that hold the tail pipe to the muffler. He's going to reuse the tailpipe because it's still in good shape. The muffler, not so much.


Steve started to install the new bands and bolt them up into place on the brackets that are attached to the frame. It turns out that the old bands had holes 8 inches apart, and the new bands have holes only 6 inches apart. Drat!


He ended up drilling new holes in the brackets from above. It's pretty easy leaning down from inside of the motor home, with the raised bed to access the engine compartment. Once he had the new holes drilled in the frame brackets, he could go back underneath and bolt up these new handy dandy mounting bands.


Now it was time to slide in the muffler....
Wow, look how nice that slid into place. 
It was pretty easy I must say.


He clamped on the tailpipe and clamped the upper Inlet pipe with large U-bolts. One is a 4-inch and one is a 5 inch. Those are the ones he was able to get at the local Napa dealer.

My oh my, look at that. 
All nice and shiny and new and pretty.


And quiet!

~~~~~~~~~~

While we were busy working, these two little furballs were having a good time running around the backyard. I think they were running to avoid the mosquitoes who were chasing them.


They sure were having a good time. I kept snapping picture after picture. I thought it would be fun to capture their silliness.


They are quite experienced at driving the ball around the yard, 
just like it was a sheep that they are herding.


You can see how ferocious they look. They get a little wound up and carried away. Finnegan has his mouth wide-open biting at the ball. Binney has her mouth wide-open trying to chop on Finnegan. All she usually gets is a mouthful of fur. In between yap yap yap barking as they run around.


This is a good way to wear off their energy and burn up some steam. The mosquitoes have been so bad, I didn't even want to take them out for walks the last few days. We need a good hard freeze to kill the mosquitos off.


Their speed is amazing when they race around. I'm glad we put up the fence in our backyard. They are able to run, romp, play, and not have to drag a rope around with them attached to their collars.


Yep, I know I post a lot of pictures of my dogs. 
But after all, they are just so dang cute.


~~~~~~~~~~

I think tomorrow I will do a post about
The Bird Lady!!! 


Friday, September 14, 2018

It All Started With a Facebook Marketplace Post - PART THREE

Ahhhh back to blogging!

Last month, I had started a three part blog, and only wrote TWO of the parts!  Shame on me!  Here are the first two blogs:

and


Sooo???
Because we bought the chair, we moved the couch.
Because we moved the couch, we moved one loom (and sold the other).
Because we changed the seating, we recovered an ottoman and 2 footstools to make things match.

Now.... on to PART THREE! 

~~~~~~~~

Last month, in between doctor appointments, I had time to wander through a few thrift shops. I NEVER find good deals at Goodwill. That store always seems overpriced and too much profit is being made on the backs of donations and handicapped folks doing the work.  But I had time to waste... so I wandered through the one in Fond du Lac. Am I ever glad I did!

I saw these enormous heavy iron light fixtures, two of them ... for only $4.99 each!  Yes, I could not believe it! Only $4.99 each.  I called Steve to ask if this might be a thing we wanted, and he said sure. If we didn't like them, we could just resell them?  I said they looked old, but had modern grounded wiring in them.


 Okayyyyyy  So I bought them.  I had an "idea" of what I wanted to do with them.  

I didn't care for the beige/alabaster colored shade. That was too modern. They weren't cracked, it's just the manufacturing lines that look goofy on them.  The iron fixture itself was ornate and fancy and Mission Style enough to fit our decor and taste. 

(a little backstory here) A while back we had accidently ordered 2 more stained glass shades from Menards, thinking we were ordering the smaller 5" ones for our pendant lights. (which online said they were only $7.98 each)  They shipped me two of these large 15" ones instead!  I called them to fix the error, and they said I had to pay a 20% restocking charge!  I said no no noooo you don't understand---- these are the large $79.00 ones they shipped by accident.  They didn't care and said I had to pay $1.58 to return each of them.  Heck, I decided that I would just keep them at that price of only $7.98 each. We already have two lamps that match this same line of shades, as well as our livingroom ceiling fan and pendants in the kitchen.  I like things that match, ya know. 

Carefully tucked away in our storage area, these two extra leaded glass shades were just waiting for a day like today to "shine"!  We removed one of the beige alabaster shades and installed the leaded glass one. Wheeeeee! 


I just loved the heavy iron work of the frames
and the detailed little leaves on each of the arms. 


We put one up in the new-to-us Family Room, and stood back to admire our handiwork. WOW!  I just loved the reflection on the ceiling as well as how the light shines through the glass pieces. Yes, this is certainly better than the ceiling fan we had in there.  I hate ceiling fans anyhow.  We gave it to our nephew who just bought a house and needed one. 


We then had a choice to make.... where to put the other one?  We already had a very nice crystal light fixture we put in the foyer when we first bought the house (and fully rewired the whole house with the help of our electrician son-in-law)   I liked the fixture we had, but I liked these stained glass ones even more.  Plus... it would match and you can see each of the light fixtures from one room to the other.

My darling Steveio put the second one up in the foyer.


But, what to do with that nice crystal one that we had in the foyer?  It was the ONLY light fixture we paid full price for when we were re-wiring the house.  All the others were on sale or clearance.  It's nice and pretty and bling bling.  I opted to put it in our bedroom, but Steve said no, he likes the ceiling fan in there. *ugh*

Next best idea?  

The hallway upstairs at the top of the stairs!  


You see it as you come up the front staircase, 
and it still gives a bit of bling bling to the hall. 


Ahhhhh so there we have it, all electrified and illuminated and matchy matchy.  Hahahaaaa If we allowed designer people to come in here from HGTV to do a home makeover they would yank them all out and say we need to knock down walls, paint the woodwork, and get more "flow". No thanks. We like it this way.  

~~~~~~~

PS: today I hit some rummage sales in the next town over. It was their annual City Wide Sales. I found a beautiful brand new quilting kit from Bonnie Blue Quilting that retails for $99.00--- for only $5.00 !   It has all of the fabrics to complete this quilt in the kit, including 110 separate pieces of fabric, with no two prints the same! 


They also had another quilt that was just started --- someone completed some strip sets and four blocks and included all of the fabric to finish it, a Christmas Double Irish Chain pattern.  Only $3.00. 


Plus a brand new quilting tagging basting gun, in the package for only 25 cents.  They retail for $29.00 at Joann's. This is used to put quilts together with the backing and batting and hold it together instead of using pins.  When done, you snip off the little plastic tabs and remove them. Similar to a price tagging gun for clothing in retail stores.  This will be handy when I am quilting while travelling in our motorhome, when I don't have the big frame to roll my quilts onto. 


When I paid for my treasures, the seller said her mom would be happy to know that her quilting things were going to be used and loved. Awwwww I didn't ask if her mom was passed away, or just unable to keep on quilting.  Either way, I will finish up both quilts and enjoy the whole process. 


Thursday, September 13, 2018

Got Off Track Here! Shuttered Up

Wow... things got BUSY.... 

and now summer is over.  

The last few weeks I haven't been posting any blogs.
 
We hid out in the house with the central air on the hot humid days.
We have had visitors, and we have been visitors. 
We have babysat grandkids and spent time with parents.
We didn't get in ANY camping. Sigh. We were going to go this upcoming weekend, but plans changed with a health issue cropping up with some friends.

I can write about each of those to catch up in the next few days, and finish up my 3rd post about the things we changed in the house after buying my new chair.


But we DID do an "Our Old House" Project I can write about.

It's been such a hot and humid summer, that we really didn't work on any projects around the outside of our old house.  We wanted to, but the weather hasn't been cooperating.

The previous owners had put on vinyl siding which is rather plain and beige.  It's nice to have no maintenance, but even the aluminum wrap around the windows was also rather plain.  NO character.


See?


(we did add window boxes this past spring)


Finally, the humidity dropped, the weather was nice, and we dug around in the attic of the garage.  The previous owners had left behind a bunch of lumber and scrap wood up there.  There were a bunch of nice big long 1x10 planks that were in perfect condition.  I had a plan in mind---- and Steve agreed!


We hauled down the boards and I had made up a cut list after Steve helped measure six of the windows on our house. Steve choice was the six windows people can see from the road.  More on THAT later....

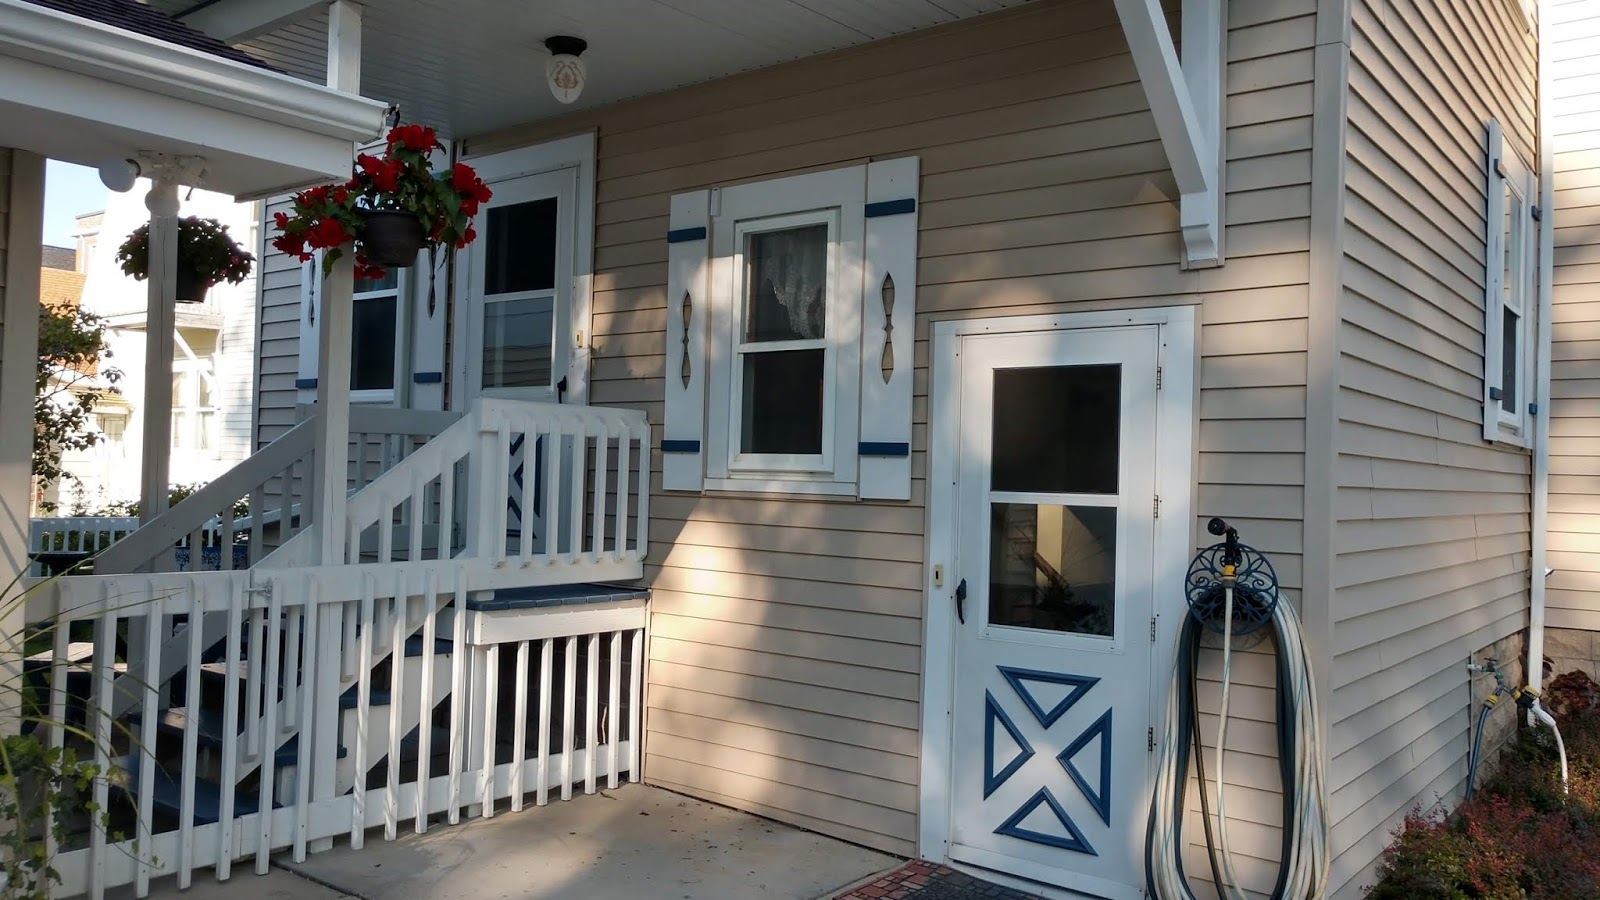
Using a template made from the cutout shape of the lattice fretwork under our front porch, we made up a design for our new shutters!  Steve also came up with the idea of a 2 inch block of blue on the top and bottom margins, and they also match with the trim blocks we painted on the front of the house earlier this spring.


He gave his nod of approval on the first cut out. 


Steve started cutting, I did the sanding, and soon I was able to coat each board with 2 coats of paint.  We added the blue blocks on each shutter to dress them up.


Soon the shutters were ready to hang!  We completed the six windows that Steve had decided that needed to be done.  That covered mostly the front, south side and two windows on the north side. 

We mounted them to the vinyl siding with little spacer blocks so they do not press down or impede on the vinyl siding.  The vinyl needs to contract or expand with the weather, so only attaching the shutters with two long screws and not tight to the vinyl was the best solution. I painted the heads of the screws so they didn't show too much.


Someone asked me why did we go to all the work to build our own shutters?  Why not just buy some and put them up?  Well, first of all, those would be just average vinyl shutters like everyone else has.... and second of all, at a cost of about $45 a window, times 6 windows... ack... $270.00???  Well, this wood was FREE and it was only our hard work to make them and put them up ourselves.

We were lucky with the upper windows, we could install them from inside of the house, by leaning out to mount the shutter on the outside.  Our old house windows still slide down from the top or up from the bottom.  Because they are still original wood and not painted shut.  Yes!


We got all six windows done and it sure looked nice.  Steve was satisfied with just doing the six windows that were visible from the road. While installing the 6 sets, we had a few neighbors stop and admire them, and even one lady whom I didn't even know stopped to comment about our window boxes as well.

I wanted all 14 windows to have shutters, so the house looked "complete".  Even Pops Pfundtner weighed in on the idea of all the windows needed shutters to look nice. 

(little did Steve know that the following weekend we would be buying MORE planks and making enough shutters to finish ALL the windows ALL the way around the house!)   But that wood was on sale for only $58.00.


We got them all cut out and sanded and painted in one morning. The weather was cooperating and we got 8 more pairs for the windows all ready.


We ran into one snag, we had to move a rain gutter downspout, so Steve had to borrow the neighbor's ladder to get up that high. I held it from below and had the phone ready to call 911 if he fell. We were hoping to do them all from inside the second story and avoid the ladder completely.  

I think we are getting too old for ladders! 


Soon the house was complete!  Ahhhh I think it's a little cutesy, but Steve agreed that it really dressed up the house from the plain beige vinyl. 


Here is the backside of the house, where we usually enter from. 
I am glad we put shutters on these windows too! 
They are the ones we see most often.


The north side of the house also has a big bay window.
I am going to add some little corbels under the overhang of the roof
around the bay window to dress that up later. 


This is the south side, the most boring big beige side. 
I am glad it's spiffied up now.  
This is the side we see each time we come up the driveway.


Here is the house from the last angle with the top shaker porch and side gate too.... I am really glad we went all the way around with the shutters. Steve agrees now that it looks better. It was worth it.


Hmmm I wonder how he feels about shutters on the windows of the garage? 

~~~~~~~~~

I will have some future blogs about changing the muffler on the motorhome. Steve just got it in the mail today from FedEX and the dogs were so excited to get some big boxes from the mailman. 


I will be posting about our camphosting at High Cliff State Park coming on Oct. 1st. And the big Halloween Celebration that is held there, this year it's the first weekend in October.

I will be posting about the quilt I have on the frame today. I started stitching some pretty hooks and swirls.  I think it will be kinda cute once I finish it.


Here is the stitching 
and here is the quilt top 
laid on the queen bed in our guest room.


I will be posting about our trip coming up in later October and into November to visit friends in Tennessee and then on to the folks in Florida.

I hope to just keep on posting!  
Gotta get on track!