Our Wonderful Followers who come back again and again to read about us...

Showing posts with label Progressive Industries EMS. Show all posts

Saturday, March 10, 2018

MOTORHOME MODIFICATIONS - *P* is Progressive Industries EMS Electrical Management System Hardwire

I am going to start off the new year with posting some of our motorhome modifications, a few at a time. I will post repairs, modifications, or neato things we have found for RVing.  I have lots of pics in my files so I will do them in alphabetical order.

Underneath that stuff, I will post my regular daily stuff..... kinda sorta fun, eh?

So here it goes, we are up to the letter P now!


MOTORHOME MODIFICATIONS 
STARTING WITH THE LETTER P


Progressive Industries EMS:
This installation was done in 2012.  
It is one of the best things we did to our motorhome's electrical system. 
This is the installation of our Progressive Industries EMS LCHW50 which is an Electrical Management System.  It protects our sensitive electronics inside of our motorhome from spikes, surges, low voltage brown-outs or even mis-wired posts in campgrounds.  (which happens more often than you think!)
In the past, we usually didn't camp much in places with hookups, instead we rely on our solar or at last resort, on our generator.  We did have some smaller Surge Guard portable surge protector units that just plug onto the cord. These work okay for spikes, but have no protection for low power brown-outs which can be just as bad.  The little units do not reset automatically either.  
So we decided to go with a hard-wired unit that is installed inside of a locked compartment.   They are more expensive, but worth it. 
You can buy an external 50 amp surge protector EMS that just plugs onto your cord out at the post, but we hear of those walking away... even with the little clip locks. It is sad that some people in campgrounds steal things.  So we decided to get the one that gets hard wired inside the compartment, as safe as we can get it. 

We ordered the EMS unit from Camping World where they were having a sale for $250.00. That was the best price around when we placed our order.  This is a hard-wired unit that needs to be installed carefully, with attention to each little step.  One mishap and we can ruin our electrical system.


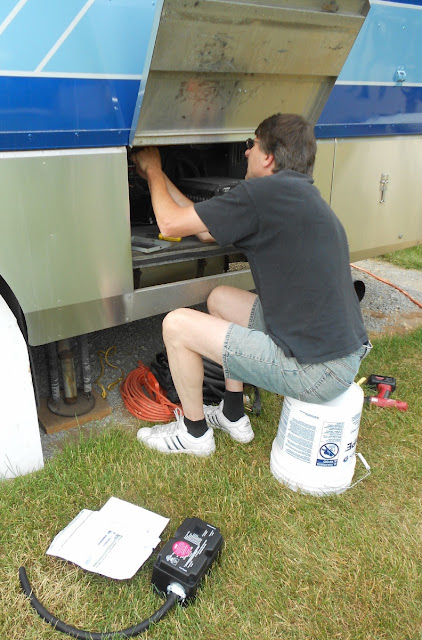
We read the directions from front to back, and Steve set up his work area.  I was his "gopher" for fetching tools.  Love his stool, eh?  He already attached another section of 4 strand heavy wire to the unit in preparation to install.  (I think it's number 6 wire)


First, we made sure the power was unplugged from the rig!  Then Steve removed the cover from our Automatic Transfer Switch.   He decided to install the EMS on the upside of the Transfer Switch to protect that, rather than downstream of the Transfer Switch (which would leave the switch vulnerable, but would protect the input from the generator)   We don't often run the generator, so didn't think it was as important to locate it there. 

Careful connections were made, with me double checking over his shoulder as he attached each wire.  Sometimes it helps to have two sets of eyes on a project as important as this.  Once the connections and ground was made in the Transfer Switch, then we wired up the connections and grounds in the EMS unit.  

Next he did the connections in the EMS unit, and then the actual digital readout device gets plugged into place.  We also had to determine if our air conditioners had a "delay" in restarting if they ever get turned off mid-cycle (they don't have that built-in feature) ...  so the EMS has the option of either:
  •  a 6 second delay (default setting)  
  •  or a 2 minute delay (by removing a jumper pin from the control board)  
to allow a delayed restart to protect the air conditioners if a shut down and restart ever happened.   Now we are all set. 


We doublechecked everything again and compared it against the diagrams in the instructions.  We stood back to admire our work.   Now it was time to plug it in!  We ran a "test" ... sure enough, it worked!   It read each leg of the 50amp connection and tested for any errors.   All is fine and it says that our garage power is clean.  (we already knew that).

We mounted it up into place on the side wall of our electrical bay.    Don't it look "purty"????   (the black box on the left is what we are gabbing about)   It had to go to the left of the Transfer Switch, as the wall on the right had incoming and outgoing wires for other items.


We put all of our other electrical gear back into the compartment.  We carry our main 50 amp cord --- a.k.a. The Snake.   Then a 25ft 50 amp extension, and a 30ft 30 amp extension, and even a plain old orange 10 gauge longer cord to use in a pinch.  Also a few dog bones and some adapters for various campground hookups.

There... all back together, good as new.       Or better than new!!!

Since that picture was taken 6 years ago,
we replaced our inverter, so here is a more current pic: 

We are comforted by the fact that we have done what we can to protect our electronics. Having everything in your rig blasted out by incorrect wiring is NOT fun, and has happened to two people we know of.  Mis-wired power posts and outlets can destroy everything in your rig.  

In doing park maintenance, Steve can't tell you how often people back into power posts, look around fast, and tip it back up again and hope nobody notices.  It can knock out connections inside, or make wires touch at broken connectors inside, not seen by the unsuspecting next camper arriving and plugging in on the site. 

When you start adding up the cost of replacing tvs, laptops, cell phones, control boards in all the appliances, light fixtures, etc. It is not something we want to ever have happen to us. 

~~~~~~~

We are PHONE-LESS this weekend!   I jokingly told my friends on Facebook to contact us via Smoke Signals! 

Two weeks ago, my faithful 2 year old Motorola Maxx 2 droid phone went whonkey after doing a new update.  Thankfully, it was under a protection plan, so Verizon replaced it free of charge.  They shipped the replacement phone to me 12 days ago, and all was good to go.  It did keep asking for an update, but I kept hitting the delay button.  It was explained to me that the new update was over stressing the processor in the 2 year old technology, so just don't update it until new patches from Motorola were in place.  For 9 days I kept hitting "delay 24 hours".  On the 10th day, it went ahead on it's own and updated! ACK!   Well, it went nuts again, totally dead when it was fully charged and would not reset or start up at all.  I tried all the suggested online fixes... nada. 

We drove into Appleton and went to Verizon.  After he fiddled with it for a while, he said it's DEAD.  Sooooo they are going to send a 3rd phone!   (free)  This time he said when the update screen comes up, just swipe and close it out and do not hit delay.  Leave it in the old version and it should be fine.  We are due for upgrade at the end of the month, so we will see if the 3rd phone works or keeps messing up.  They will do a trade-in in my favor at the end of the month on a 2 week old phone. LOL 

In the meantime, we have laptops and tablets and home internet.  Steve does not have a phone. After carrying around 2 phones at all times, and in the old days he had pagers for his job (and even now part time driving handicapped folks they have a phone while in the bus)  he doesn't want a phone of his own.  Sooooo we will be quiet and no phone ringing this weekend, at least until later Monday when the new one comes? 


Today was sunny and up about 38 degrees. We took the dogs for a nice long walk around the neighborhood.  It sure felt good, as the snow is melting and the sidewalks are clear for the most part.  Spring is in the air, and some of the willow trees have some buds on the branches.  Of course we can still get snow as late as April, but for now, we will enjoy some sunshine. 


Tuesday, January 26, 2016

REDUX- Motorhome Modifications - PROGRESSIVE INDUSTRIES EMS SURGE PROTECTOR


Since it's the boring winter months, and we are not travelling yet, I thought I would do some repeats of my most-read blog posts on RV repairs.  This one had almost 1,000 views when I first posted it. We installed our Progressive Industries EMS Surge Protector in June of 2012 and it works just great! 


Motorhome Modifications - PROGRESSIVE INDUSTRIES EMS SURGE PROTECTOR

Ahhhh a whole Saturday in front of us with NO plans other than working on our own projects.  Wheeeeee

First up on our list of items was installing our Progressive Industries EMS LCHW50 which is an Electrical Management System.  It protects our sensitive electronics inside of our motorhome from spikes, surges, low voltages or even mis-wired posts in campgrounds.  (which happens more often than you think!)

In the past, we usually didn't camp much in places with hookups, instead we rely on our solar or at last resort, on our generator.  We did have some smaller Surge Guard portable surge protector units that just plug onto the cord. These work okay for spikes, but have no protection for low power, (brown outs) which can be just as bad.  The little units do not reset either.  So we decided to go with a hard-wired inside unit.   They are more expensive, but worth it. 
You can buy a 50 amp surge protector EMS that just plugs onto your cord at the post, but we hear of those walking away.... even with the little clip locks. Sad that people in campgrounds steal things.  So we decided to get the one that gets hard wired inside the compartment, as safe as we can get it.

We ordered the EMS unit from Camping World where they were having a sale for $250.00 .. that was the best price around when we placed our order.  This is a hard-wired unit that needs to installed carefully, with attention to each little step.  One mishap and we can ruin our electrical system.

We read the directions from front to back, and Steve set up his work area.  I was his "gopher" for fetching tools, as his knee is giving him grief again.  Love his stool, eh?  He already attached another section of 4 strand heavy wire to the unit in preparation to install.  (I think it's number 6 wire)


First, we made sure the power was unplugged from the rig! ...   then Steve removed the cover from our Automatic Transfer Switch.   He decided to install the EMS on the upside of the Transfer Switch to protect that, rather than downstream of the Transfer Switch (which would leave the switch vulnerable, but would protect the input from the generator)   We don't often run the generator, so didn't think it was as important to locate it there. 


Careful connections were made, with me double checking over his shoulder as he attached each wire.  Sometimes it helps to have two sets of eyes on a project as important as this.  Once the connections and ground was made in the Transfer Switch, then we wired up the connections and grounds in the EMS unit.  

Once the connections were made in the EMS, the actual digital readout device gets plugged into place.    We also had to determine if our air conditioners had a "delay" in restarting if they ever get turned off mid-cycle (they don't have that built-in feature) ...  so the EMS has the option of either a 6 second delay (default setting)   or a 2 minute delay (by removing a jumper pin from the control board)   to allow a delayed restart to protect the air conditioners if a shut down and restart ever happened.   Now we are all set. 


We doublechecked everything again and compared it against the diagrams in the instructions.  We stood back to admire our work.   Now it was time to plug it in!  We ran a "test" ... sure enough, it worked!   It read each leg of the 50amp connection and tested for any errors.   All is fine and our garage power is clean.  (we already knew that)


We mounted it up into place on the side wall of our electrical bay.    Don't it look "purty"????   (the black box on the left is what we are gabbing about)   It had to go to the left of the Transfer Switch, as the wall on the right had incoming and outgoing wires for other items.


We put all of our other electrical gear back into the compartment.  We carry our main 50 amp cord --- a.k.a. The Snake.   Then a 25ft 50 amp extension, and a 30ft 30 amp extension, and even a plain old orange 10 gauge longer cord to use in a pinch.  Also a few dog bones (recognize that one, Dee and Jim?) and some adapters for various campground hookups.
There... all back together, good as new.       Or better than new!!!

We are comforted by the fact that we have done what we can to protect our electronics.  Having everything in your rig blasted out by incorrect wiring is NOT fun, and has happened to two people we know of.  Mis-wired power posts and outlets can destroy everything in your rig.  When you start adding up the cost of replacing tvs, laptops, cell phones, control boards in all the appliances, light fixtures, etc. It is not something we want to ever have happen to us. 


Saturday, June 16, 2012

Motorhome Modifications - PROGRESSIVE INDUSTRIES EMS SURGE PROTECTOR

Ahhhh a whole Saturday in front of us with NO plans other than working on our own projects.  Wheeeeee

First up on our list of items was installing our Progressive Industries EMS LCHW50 which is an Electrical Management System.  It protects our sensitive electronics inside of our motorhome from spikes, surges, low voltages or even mis-wired posts in campgrounds.  (which happens more often than you think!)

In the past, we usually didn't camp much in places with hookups, instead we rely on our solar or at last resort, our generator.  We did have some smaller Surge Guard portable surge protector units, but decided to go with a hard-wired inside unit.  Now that we will be full-time living in our rig, we will have more opportunity to be plugged in at various places.  Especially the rest of this summer, this fall, and perhaps next spring yet at our friend's cottage near Steve's work place.

We ordered the EMS unit from Camping World where they were having a sale for $250.00 .. that was the best price around when we placed our order.  This is a hard-wired unit that needs to installed carefully, with attention to each little step.  One mishap and we can ruin our electrical system.

We read the directions from front to back, and Steve set up his work area.  I was his "gopher" for fetching tools, as his knee is giving him grief again.  Love his stool, eh?  He already attached another section of 4 strand heavy wire to the unit in preparation to install.  (I think it's number 6 wire)


First, we made sure the power was unplugged from the rig! ...   then Steve removed the cover from our Automatic Transfer Switch.   He decided to install the EMS on the upside of the Transfer Switch to protect that, rather than downstream of the Transfer Switch (which would leave the switch vulnerable, but would protect the input from the generator)   We don't often run the generator, so didn't think it was as important to locate it there. 


Careful connections were made, with me double checking over his shoulder as he attached each wire.  Sometimes it helps to have two sets of eyes on a project as important as this.  Once the connections and ground was made in the Transfer Switch, then we wired up the connections and grounds in the EMS unit.  Once the connections were made in the EMS, the actual digital readout device gets plugged into place.    We also had to determine if our air conditioners had a "delay" in restarting if they ever get turned off mid-cycle (they don't have that built-in feature) ...  so the EMS has the option of either a 6 second delay (default setting)   or a 2 minute delay (by removing a jumper pin from the control board)   to allow a delayed restart to protect the air conditioners if a shut down and restart ever happened.   Now we are all set. 


We doublechecked everything and stood back to admire our work.   Now it was time to plug it in!  We ran a "test" ... sure enough, it worked!   It read each leg of the 50amp connection and tested for any errors.   All is fine and our garage power is clean.  (we already knew that)


We mounted it up into place on the side wall of our electrical bay.    Don't it look "purty"????   (the black box on the left is what we are gabbing about)   It had to go to the left of the Transfer Switch, as the wall on the right had incoming and outgoing wires for other items.


We put all of our other electrical gear back into the compartment.  We carry our main 50 amp cord --- a.k.a. The Snake.   Then a 25ft 50 amp extension, and a 30ft 30 amp extension, and even a plain old orange 10 gauge longer cord to use in a pinch.  Also a few dog bones (recognize that one, Dee and Jim?) and some adapters for various campground hookups.
There... all back together, good as new.       Or better than new!!!


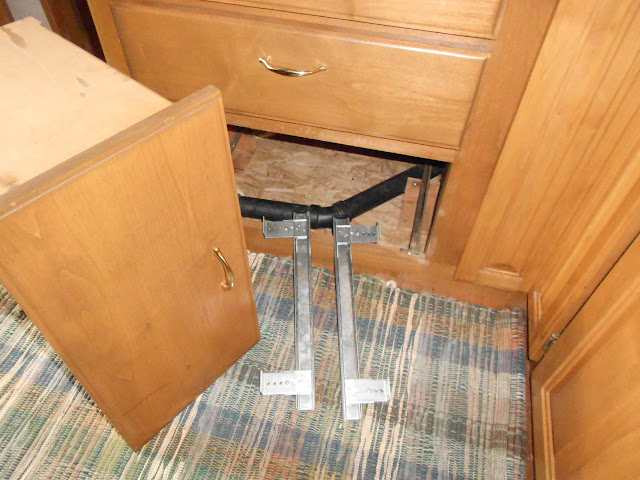
Another project that we are starting inside the motorhome is to replace two drawer slides on the bottom-most drawer in my kitchen.  This drawer is going to be holding a lot more heavy canned goods than before, and needed to be beefed up stronger.  Steve got some good heavy slides and measured to put them in place. They had to be set up higher to span over the piece of drain pipe that is under there from our sinks.  He made little wooden blocks to reinforce it better after I took this pic, so I don't have a finished photo.  After all, what good does it do to look at a closed drawer?   LOL


One item I have been working is in our three front overhead cabinets.  Originally our rig came with a 10 disc CD changer over the surround sound deck on the far left cabinet.  We never used it anymore, because I just plug our little MP3 player into the surround sound for music through the speakers.  We took the 10 disc player unit out and offered it to a fellow Safari-ite owner.   Now we have more room on the left to add our two DVD decks that we currently have in the house.  (I need one to play and one to record for my instructional DVD's that I sell on Ebay and my Etsy store).   The cabinet on the right now can hold my camera bag and our extra 12v fan.  

If you notice in the pics, we have a power strip mounted on the back wall (oops, it's somewhat crooked) ....   We plug all of our electrical componants and charging items into power strips.  Then we can turn on and off the strip with one button.  We don't like to run "phantom loads" from those appliances if we are just on the inverter. It is drawing juice needlessly from our batteries.  Example: if we are just watching the tv, why waste power going to the 2 dvd players and a couple chargers?   We are frugal boondockers this way.

The third cabinet on the right beyond those two now houses my computer printer, and some fat DVD and CD wallets.  I removed all of our DVDs and CDs from their plastic cases and put them in big 100 disc wallet cases.   I am glad the printer fits up there, because I bought it impulsively on sale and didn't measure accurately ahead of time.


On my side of the livingroom, I have now loaded up my very very very cherished Old McDonald's Farm and Cup-O's toys... among some other books, colors and games.  This farm was my Grandma Kafehl's toy she kept at her house when we were young children in the 1960's.  My children also played with it when we visited her in the 80's and 90's.  Now my grandchildren play with it in the 2000's.   Of course I will have to bring it along with me, and it really doesn't take up much space, does it?
The Cup-O's are from my friend Connie, who gave them to me when Erin was a baby.  They are from Discovery Toys and have worn well through the years, never losing a single stacking cup!  Now the grandchildren play with those and take them in the bathtub as a ritual.  Yes, our motorhome even has a bathtub!


While I was organizing cabinets, Steve was out in the garage replacing the water pump on our Saturn. It had started a little leak, and has gotten progressively worse over the last few weeks.  He got that all done now that the weather cooled down a bit. It has been so horribly hot lately he didn't want to start it in the garage.  But this afternoon he finished it up, and added more antifreeze to top it off after it was done.  This car has lasted a long, long time for us, and hope it lasts a few more years for Heather after we hit the road.  It was because of her that we got it in the first place at a very good price, and we are returning the favor by giving it back to her when we go on the road. It's a 1999 and has over 200,000 miles on it now, but going strong and hope it serves her well for a while.   They are saving for a house and don't really want new car payments at this time.


Later in the afternoon, it started to rain a little ..wheeeheeee we really needed it here in Wisconsin!   So while it was raining, we went down to my loom room and he helped me sort and stack and pack my totes.  My strong muscle man carried them all up and out to the motorhome to put in my compartments.  I will take a pic on Monday after he brings me home the labelling device so I can identify them properly.  

I think I will do a blog post on loading a motorhome and understanding all those UVH, CCC, GVWR, and GCWR.  

Right now, I think we need to take a drive for an ice cream cone! 


.