Since it's the boring winter months, and we are not travelling yet, I thought I would do some repeats of my most-read blog posts on RV repairs. This one had over 2,200 views when I first posted it. We installed our Olympian Wave 8 Catalytic Heater in Feb of 2010. We had to make a repair in 2011, so there are TWO blog posts here in the Redux.
Steveio has been doing upgrades to our motorhome to ward off his winter doldrums.
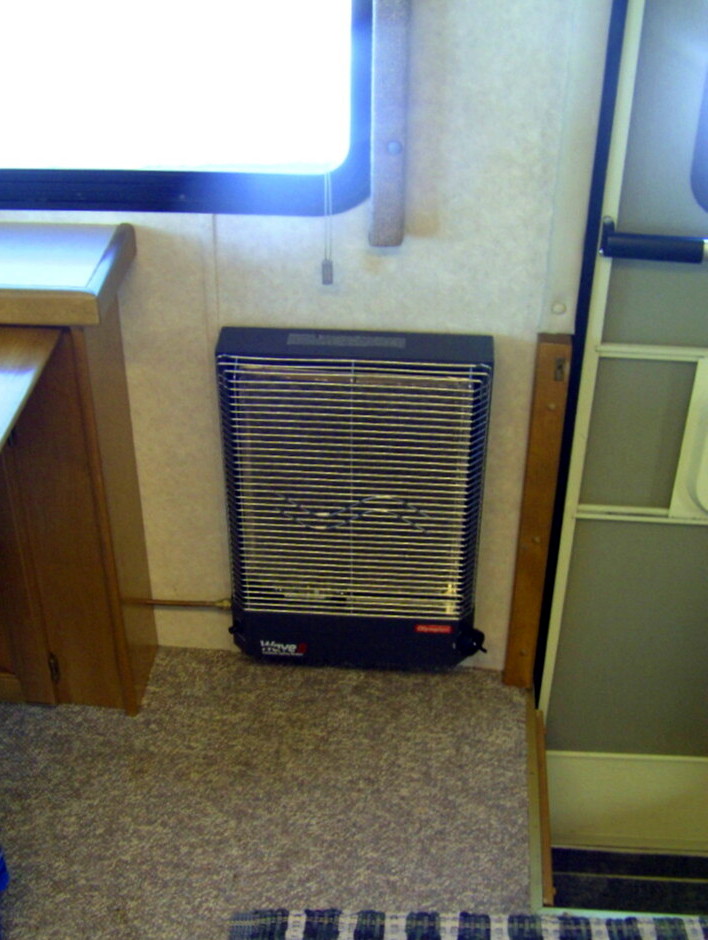
This is something he wanted to do for some time. He had the opportunity to purchase a new catalytic heater at a great price. They normally run $400-500, and he got it for less than half that price. This is a Wave 8 model from the Olympian heaters from Camco.

We do not like to use the big propane furnace that comes installed in most RV’s. Not only is it a waster of propane, but the blower unit really drains down the battery bank fast. Unless you are on shore power hookups, it really isn’t a good appliance to be using for the type of boondocking or rustic camping that we do.
The big furnace ducting on our motorhome is very inefficient and poorly planned. One duct actually goes OUT of the basement area, loops down through an open wheel well on the driver’s side with flexible hose, and then back IN again into the rig to heat the back bedroom. Needless to say, the air flow is almost non-existent at the bedroom vent, and even shutting down the vents in the front portion of the rig doesn’t help much either. The only time the big propane furnace would be needed is to keep the basement compartments heated in subzero temps, to prevent that holding tanks and water lines from freezing.
So, in not wanting to use the big LP furnace, we first did what most RVers do… we called on a buddy… Mr. Buddy!

In the past, we had piped in an extra propane line through the basement, over to the passenger side of the rig, up through the cabinet that is under our table (it contains the extra leaves for our table) … and added a shut off valve and flexible propane hose. Onto this hose we would hook our portable Mr Buddy heater. Because the Mr. Buddy can operate on high pressure propane tanks, it has a built in regulator. But so does the propane line in our rig. Guess we were being *double regulated* hee heee We needed to alter the Mr. Buddy by removing it’s built in regulator to let both Lo and HI settings work in our rig.
This setup has worked great for us for three years…. but ….. it is always either setting right on the table in the way… or setting on the floor on a metal cookie sheet while a certain dumb collie walks by and lets her tail get singed on it! Burning dog hair ---- ewwww stink!
These heaters are safe for RV use, but cracking open a window or vent is a must, as they do deplete the oxygen levels over time in a sealed rig.
~~~~~~
Our blogger buddies, Janna and Mike, http://tinteepeelogcabin.blogspot.com have a motorhome similar to ours. They just invested in a new heater while out west and installed it in a good spot on the wall next to the table. Soooo our brains were thinking: “Why can’t we do that too? We already have the propane piped over there!” Steveio started hunting and found a great deal on this one. It’s different than theirs is, but we used the same idea and the same spot. Our rigs have a lot of windows, which is nice, but very little wall space. This is about the only spot that would work for such an installation.
Now… my guy has a *thing* about using templates. He HATES them! But lo and behold, look at this:


Hmmmm
seems Old Dogs CAN learn New Tricks?
heh heh
He also hates instructions… so on any project we do, I am frantically reading before he jumps way ahead and does something he ain’t supposed to do yet….
We got the unit mounted correctly and decided we would later also remove the flip down step cover. (you can see the step cover in the above photos below, the wooden structure in the lower right hand corner that is between the wall and the door)
In the UP position, it’s a grab bar on the stair side and locks into place in vertical position along that wooden brown board you see next to the door. In the DOWN position, it’s a carpeted cover to prevent folks from falling into the stair well of 2 steps down when the unit is parked. (we never use it in the DOWN position) So we will remove this another day and tuck that carpet edge along the brass strip surrounding the stair well opening.


Okay… back to the Olympian installation…. here Steveio is flaring the copper pipe and drilling a hole through the cabinet to let the hookup attach to the heater.

I got to make sure it was *level* and he did the testing of all the flare fittings for leaks.

We later added a "sediment trap" per manufacturer's suggestion....


It lined up pretty well!
We lit ‘er up and filled the motorhome with heat in no time flat! It was 28 degrees when we went out there, and in no time we were up to 57 degrees! Now to put away all the tools (and we later removed that step cover)
We also made a vinyl protective cover for dust and debris.
I sewed little magnets around the edges
and it just clings into place.

Stay tuned: our next modification up our sleeves is four 100 watt solar panels installed once the sun shines and the snow melts and we can get up on the roof!
AND----- A year or so later, here is our second blog post about the heater... when we learned our lesson about keeping the heater covered when not in use, and pad contamination from junk in our propane lines!
MOTORHOME MODIFICATION - Repair of our Olympian Wave 8 heater
- Yup, sometimes things break.
- Sometimes they break because we didn't read the directions.
- Sometimes they break and need to be repaired, rather than just thrown out.
WE LOVE our Olympian Wave 8 propane catalytic ventless heater for the motorhome. It uses no electricity or battery power. It is very frugal on the propane use. It heats the rig up very well, and on 10 degree days, setting it on high it can just about cook you outta the motorhome. Although it is rated safe for indoors, we also crack open window for fresh air and have a working Co detector.
Here is a link to the blog when we first got it and installed it.
When we installed it in early 2010, the directions warned us to keep it covered when not in use. (we didn't) ... and we later found out that the dust out west in Arizona did what was called "pad poisoning" to the delicate fibery pad on the unit. We were in a number of dusty areas, and we waited out two dust storms besides. Even with the windows closed, you could taste dust in your mouth and feel it in your lungs. It did the damage on the heater for sure.
By the time we were driving near Quartzite, AZ last winter, the heater would barely function or throw off any heat. It would also kick off during operation for no reason. Rut Roh!
Plus, a combination of high altitude and possibly running our propane tank too low one time also caused debris to get into the inner workings of the heater when we were in Arizona. Although the desert was warm during the days, the nights were cold and we needed the heater at night.
From that point on, we knew we were heading up further north and needed heat while at the Grand Canyon and heat to get the rest of the way home... so we had to pick up another heater fast.
The Olympian heater is factory sealed and has to be sent in to the company for repairs. Kinda hard to do while travelling on the road. We could not afford another Olympian Wave 8 at the current price at an RV dealer in Quartzite ($550.00) but we did stop at a nice hardware store on the main drag and found a ProCom heater for only $175.00 that would work in the meantime. We installed it that very night in the same spot that the Olympian occupied.

Whew... we had heat again!
This ProCom heater is similar to the Mr.Heater Big Buddy heaters--- with a radiant design and square white brick units. 10,000 BTU on HI and 5,000 BTU on LOW. It works good and we used it the rest of the trip home, and all summer while camping.
But we had this $500+ Olympian sitting there in the garage all summer, needing repair.
I recently called Camco who makes the Olympian heater, and got the information for shipping it in, where they could examine our heater. I happened to send it in the empty box from the ProCom heater and added a note saying that we are using the ProCom in the meantime, but REALLY REALLY want our Olympian back! Just so they knew we were loyal customers. LOL
Sadly, the warranty does not cover "pad poisoning", nor debris that comes through the propane lines. And that is exactly what they diagnosed as the problem. So we were out of luck on a free repair under warranty. But they were very nice. The cost to replace the pad was $112 in parts and $48 labor estimate. I called them back on the phone with permission to proceed with the repairs and mentioned how much we loved our heater and how I blogged about it when we installed it, he later returned an email with a discount on our repair bill! How nice was that?
The heater was returned to us after repairs and we had it back here in 2 days!
The repair guy at the factory strongly suggested two items to prevent this happening again in the future.
One was to make a "sediment trap" to prevent unwanted gunk and debris from the propane tank to get into the heater. It has a much more sensitive orifice opening than regular RV appliances like the fridge, water heater and stove. He sent me this diagram:

He also strongly suggested that we get a cover for the unit when not in operation. They sell them for about $20-25 plus shipping, available at many RV stores. But I knew I could make something similar, and had Heather pick up some grey vinyl from Joann's on her way up here the next day. I sewed a nice cover with magnets all around for a tight fit. Steveio put a sediment trap on the line, installed the heater back where it belongs, and we were good to go! Ahhh that feels good!


And now it is 2016, the heater is still operating just perfectly. So my advice is that if you put one of these in, you put in a sediment trap on the propane line, and make or buy a cover for it. Learn from our bad choices, and then you can enjoy your heater!


I love, love, LOVE my Wave 3--I've had them in 3 different RVs now! I've got a freestanding one on legs with a cover and a quick disconnect so I can stow it in a cabinet when not in use. I tried one of the ProCom heaters last year and didn't like it nearly as much, so ended up Craigslisting it to buy another Olympian. I'd not heard of a sediment trap before, but that looks like a worthwhile new mini-project to add to my RV list. Thanks for the tip!
ReplyDelete