They are made by : MCD Innovations You can get either the solo shade, or a dual shade with a day/night design of two layers. We only wanted the solo shade in the heavy room darkening vinyl.
It has always bugged me to see rumpled curtains drawn across the front of lovely sleek stylish motorhome. See what I mean, in the windshield of our rig? And that is after hanging there a while. They are worse when first unstrapped from being pulled back while driving.
The first steps were to remove the old curtains and tracks. Also we had to remove my slide out laptop desk, as it had to be relocated forward a few inches for the final drop area of the powered shade.
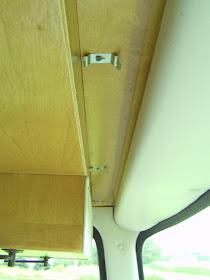
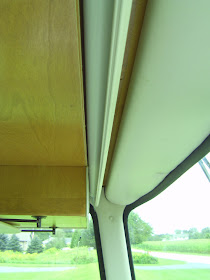
Next was to install the clips that hold the powered shade into place... we had a great recessed area between the cabinets and the padded vinyl windshield surround on the inside. When the shade is in it's fully UP position, you don't even see it.


There... all snapped up into place.
Next step is to drill out a hole in the dash and mount a DPDT toggle switch. This is just a momentary switch to power the shade either up or down by pushing on it. It is a center OFF and momentary in either direction for the up and down wires. We chose to install this kind of switch, so it will not to be left on where it will burn out the motor. I was nervous about Steve drilling into the plastic dash, but it went well and he fished the wires down, around and into place.
After a test--- it worked GREAT!
We repositioned the desk unit so the shade could drop fully down to the dash, by moving it about 2 inches forward and reinstalling it. My seat is adjustable so it really didn't change the distance between my seat and the desk. My laptop sits inside of here and it rolls out on a little tray when in use.
The shade can come down all of the way, or just part way as a long sun-visor instead of the two small ones that come standard on the rig. How often does the sun go down between those small visors and you have to lean over to drive or see something till the sun either sets, or you turn a corner and drive in a different direction? LOL
Soooo step one is done. Now for the side windows----
Mel and Paula had chosen to put up flexible fold up window blind units that can stow away when not in use. But Steveio thought: What about regular room darkening window shades on each side window? Off we went to town and picked up two heavy room darkening Levelor window blinds, 46 inchs long.
We mounted in the hardware and hung the rollers. It was a tight fit, and we had to remove the two boxes on each side of the cockpit seats to install the rollers. We had to reinstall those boxes because there were light fixtures mounted on them for the livingroom area. Once that was done, I took a pic. It's kinda showing a lot of light coming in the tiny gap between the side and front shades. But it was a strange picture taking situation, with the dark interior the camera kept focusing on the light coming in the slits. It really is very close, not a huge gap letting in light. This was really dark inside, so I turned on the inside lights to snap the pic.
The left side and right side
So the final result from the exterior is just what we were looking for:
My next blog will be the new power outlets Steveio is installing next to our kitchen table area. (Mel and Paula did this too) Steve is putting in a 120 Vac outlet for running items off the inverter. He is also installing a 12volt outlet in that area, mid coach, for plugging in our tire pressure monitor base. We are adding four more sensors for the toad (tow Tracker vehicle) and by moving the 12 volt base back further, we may eliminate the need for a repeater. We will see. Plus having the new outlets located there will allow us to use the computer at the table or in the recliner chair without stretching power cords all over.
Does anyone wanna buy a set of windshield curtains?
.


Wow! That made a huge difference in the front of your MH. We have the MCD duo shades on all our windows except the big front and driver/passanger sides. We opted to not do those due to cost etc. We have the outside sunshades. We love the MCDs!!
ReplyDeleteWith the black mesh down you can't see in the MH at all but we can see out. Then if I want total dark I can pull the other down. Yippee!!
I know you all will really enjoy that on the front. We sure need something there while driving.
Mike & Gerri (happytrails)
What a great mod, I used to love the busses that had the power shades like you said just push a button and the sun was gone. look's like you are working your way to another camping adventure, just got back from the Lake and I can't wait till I hitch up again. Be safe out there. Sam & Donna.
ReplyDeletelooks really nice...
ReplyDeleteVery, very nice guys--what will you do next??
ReplyDeleteWow! Those are nice! Great, clean lines. :)
ReplyDeleteYou guys are so handy! I'm always amazed when I read your posts as to what you will be doing next. The new shades look fantastic. I'm sure you'll be very happy with them.
ReplyDeleteLooks great, we are thinking about MCD shades for our Discovery.
ReplyDeleteWow! That looks really great. Well done!
ReplyDeleteMCD duo shades all around the coach are on our wish list. I've declared that as soon as a string breaks on our standard shades, I'm placing the order.
My scissors keep "accidently" getting oh so close to the strings! :-)
You are right about the old wrinkled curtains. Mine bother me too. Your new shade looks much better. You guys are both so handy.
ReplyDeleteGreetings fellow Safari owner. Nice job, and they look GREAT!!
ReplyDeleteI installed a set of Colorado SmartVisors. I used two 54 inch wide shades, and let them overlap in the center. I can drop one or both shades as needed for sun blocking, or both down to the dash for a complete close-off.
On mine, I left the curtains alone except for cutting the rails at the curve. The original curtains now pull out and meet the shades. They're easy to pull out that far, but were a royal pain to take around the entire front end. I do really like the look of your matching side shades though.
I like your laptop drawer. Did you make it?
This comment has been removed by a blog administrator.
ReplyDelete