Thursday, November 25, 2021

Flopped Turkey Day

Happy Thanksgiving! 

Yep, this Turkey Day is one big flop for us this year. Steve has been suffering from a cold all week long. Now he has passed it on to me.  We're both coughing and hacking all over the place and sneezing as well. We aren't sleeping good and have stayed in jammies the last 2 days. Not the type of company you would want at your Thanksgiving family gathering is it?

So we have forgone the invite to our wonderful Pfundtner Family Event down at brother Pete and sister-in-law Cindy's house in Menasha. 26 people (minus 2). We stayed home and dished up some homemade chicken veggie soup instead. Good for what ails you.


I did manage to whip up a couple pumpkin pies the day before to send along with our kids and grandkids. That was our promised contribution to the meal, so I managed to get them baked and didn't cough on a single one!  LOL   I kept one pumpkin pie for us here at home for Sunday. We are going to roast up a bird on Sunday and have the kids and grandkids come over and watch the Packer game. Hopefully by then we will be feeling better??


~~~~~~~~~

Since my last blog, I will catch things up on the status of the grandkids playroom. Remember, this is the little office that we removed everything and are making it into a playroom and sleepover room for the grandkids.

We got the room all ready with rosin paper on the floor and taped down a pathway back and forth to the front door. New drywall went up and we were ready. Our plaster guy Paul could walk back and forth on this path with buckets of plaster or drywall compound that he mixes outside at the faucet. The paper really helps to protect the hardwood floors during the work. 


There wasn't much to photograph during the process of working on the walls.  I wanted to stay out of Paul's way.  Steve helped and they got everything prepped and ready. Paul did the plastering in layers, going back and forth for a couple days. The one wall to the South (the one with the door and the light fixture) was in the roughest shape. We decided to forgo sheetrocking or plastering it, and instead used the beadboard paneling we had originally bought for that purpose. So it's our "Feature Wall" as they say on HGTV.  But the other three walls and ceiling were all done with fresh plaster.

After 2 days of drying, I felt it was ready to get the painting done.  We had three different partial cans with three different slightly different colors of taupe / beige from the previous owner. I think each time they went to the store for more paint they just picked out something that was close to the room before it. I decided to take all of the partial cans of taupe / beige color in the basement and mix them together.  So we dumped those three cans into a big bucket. Then I dumped in two partial cans of white paint that I had. Now that would lighten it up a bit.  We mixed it all together and it made the perfect color for that room. I had more than enough to paint the entire room and ceiling with two coats.  Didn't even need to go to the store for paint, by using up what we already had. Yay! 


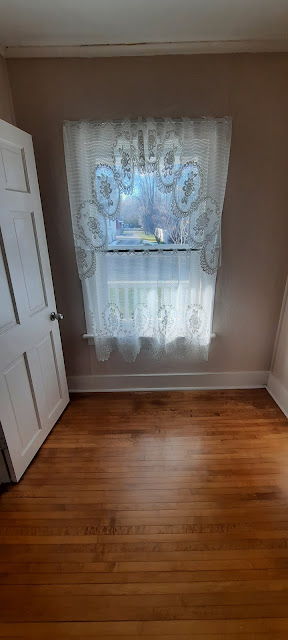
After it dried, the first thing I did was put up the lace curtains. It looks so nice and finished now. It's hard to take a decent picture of this room because it's very small. It's only 6 ft by 10 ft. So I have to use the wide-angle feature on my phone which kind of distorts it a little bit. It was nice to pull up the rosin paper and have the floors in perfect shape underneath. Even with all the punishment of the plaster and the sanding and the workboots and shoes, damp grass and rainy weather, carrying the buckets in and out added with the paint rollers and trays, the floor stayed in good shape, thank goodness.


Three of the grandkids didn't have school this week so they came to spend a day at our house and help us put together the playroom.

Now that the room was finally getting done, we knew the door had always been crooked and didn't fit the space well ever since we bought the house in 2019. Now that Steve has the electric planer he borrowed from his dad, it was time to straighten off the top of the door. Once he had it planed off then he used the sander to finish it and make it smooth. Clayton held the door tight between his legs while Steve worked up over head. Clayton really didn't mind the snowfall of wood saw dust falling down on his head...  silly kid. 


Now the door can shut correctly and fit into the frame properly. That was another one of those things that "bugged" Steve and he wanted to get around to fixing that door.  

Clayton got out the vacuum cleaner right away and started cleaning it up before sawdust got tracked all over around the house.  Give him a power tool or a motorized machine, and he is all for helping out. 


Now it was time to wire up the light fixture that we had bought last week from the local hardware store. (see my last blog about that). Steve gave a thorough explanation to nine-year-old Clayton about electricity and what they were going to be doing. Yes, the electricity was turned off when they were doing this. Steve taught him which wires connected together and what a ground was all about. Then how the wires went back down to the switch on the wall.  He showed him that the power comes to the switch first, then how the wires are inside of the wall leading up to the light fixture.


He very carefully helped to connect the wires and twist the wire nuts tight. Then they taped them securely. Once it was all done and mounted into place then Steve went back down to the breaker box and put the power back on.

Clayton was so proud of himself that he successfully helped wire a light fixture up! He will remember this (I hope) for the rest of his life. Learning that he needs to be careful and respect electricity, and double and triple check all of his connections before turning the breaker on.


While the guys were doing that project, Chelsea was busy labeling little plastic totes with various toys so the shelves could be a little more organized in the toy room.


As she labeled each box, it was little Claire's job to stack them up and to let us know what order they were in and what was in each box. These girls work together very well.


Now it was time for the big stuff to get moved into the room. The guys set up the frame for the full size box spring and mattress that would be going in the room. We needed to put the frame up on risers a little higher so it would clear the vent to let the heat and the air conditioning into the room. This is a really tight squeeze because the room is only six feet wide and that is where the bed is going to go right up against the walls on all three sides.


The kids helped Grandpa carry in the box spring. Everybody had to get their hands on it and help lift. It is actually pretty light. But it's nice to have the help. They sure enjoy being a part of it all.


Clayton kinda got on the wrong side of the box spring while guiding it into place. So then he had to crawl over the top of it before we could put the mattress down. I don't think he minded one bit.


Littlest Claire decided she needed to start dragging in the oriental rug that goes in the middle of the room. Look at that little girl dragging that great big heavy rug! 


Big Sister Chelsea and Big Brother Clayton helped out because that was a pretty heavy rug. Between the three of them, they were able to get it dragged in and rolled out and into place. That was an accomplishment of itself.


Next came the tall bookcase that the toys would be arranged on. The kids worked together to carry it all of the way from the corner of the dining room into the playroom. They had to be careful not to drag it on the floor or bump into any of the furniture on the way.


Soon it was time to fill the shelves with all the special toys that stay at Grandma's house. Claire arranged and rearranged them a couple of times until they were in places that suited her preferences. She arranged them in order of the things that she liked to play with the most on the top. Okay, that makes sense.


Chelsea and Clayton grabbed the big heavy Treasure Chest. This is a super heavy wooden trunk and it is full of DVDs of movies for the kids. That is going to set under the window and it can double as a seat for reading books. 


After they got everything into the room, 
all three kids had to collapse on the bed! 
Good job kids!


We sure appreciated their help. Now we will have this room available for sleepovers or for company. Steve and I hung up the Grandkids sign with all of the little names hanging underneath. This was a gift from our son-in-law Waylen and daughter Erin one year for Christmas. I think it's just totally adorable--- they made it themselves. The word GRANDKIDS is actually little nails wound with colored art wires to create the letters.


Again, I had to take the picture with the wide-angle feature which distorts the room. We still have to put the trim on around the inside door frame and mount the new door knob when it comes. The order has been back-ordered twice. I'm ready to cancel it tomorrow and order a different type of door knob if it doesn't come through. The company keeps sending me tracking numbers, but their boxes never arrived even at the post office or UPS to even get shipped out. They have my money, and just keep delaying the actual placement of the box at the UPS office (first invoice)  or the post office (second invoice) Something's getting stinky with that company. But I did find a backup set of similar door knobs directly from Amazon that I like just as well. So if I cancel this first order (who was an Amazon sub seller)  I will order the second set and hope they come. If I could find them locally, I would do just that.


The two stuffed sheltie dogs were brought in and stacked up on the little ottoman. The kids play with these a lot and sleep with them all of the time. I spread a quilt on the bed for now and added a few more things to the room. We have a couple more artwork items to hang on the back wall yet. Haven't gotten that far. We ran out of energy and that's when we got sick!


So we are just going to lay low here for a couple days and see how we feel by the weeknd. Today we didn't do much of anything, except watch football and lay around and sleep. That's totally not like us. We need to get feeling better before Sunday, so we can have a second trial run at our Family Turkey Day. 

~~~~~~~

On a serious note, let us be thankful for all that we have and hold tight in our hearts those who cannot be with us on such a special day. Many of us are missing family members, and it hurts our hearts to think of our loss on our first holidays without our mother.


Tuesday, November 16, 2021

Playing in the Playroom

We are still waiting for the door knobs to arrive. I am working on a stained glass idea for the transom.  Then we can finish up the French doors. 

In the meantime, Steve decided to move on to the next project on his list. He has this list of things in his head that he wants to get done. I don't add to the list, I don't ever make a "honey do" list. He's driven by his own crazy ideas of what he wants to do. 

This little room, which is only 10 ft by 6 ft, was used as an office. Well, now that we moved the office into the guest room with the new french doors, Steve wanted to work on the walls of this little room before we make it into the grandkids Play Room.  He grabbed his tape and now he could start Measuring Up.


There isn't much room, but there will be toys on a bookshelf on one wall, my steamer trunk under the window, and the double bed snugged up tight to the walls on three sides like a day bed with throw pillows. It will be great for sleepovers, and we can store things in the room later when they all grow up. 

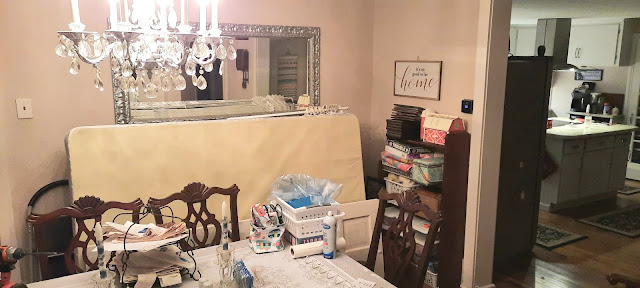
Again it was chop chop chop, crack the whip, and get everything pulled out of there and stacked up into the dining room.  Ugh... I just got it cleared out from the last big move while we were doing the office changeover. 


Our original plans were to cover the room with eight pieces of 4 x 8 sheets of beadboard paneling that we bought earlier this summer. Another one of his bargain Facebook Marketplace finds.

Once he started measuring up and checking the squareness of the corners and the walls, he came to a grim conclusion. Remember, old houses walls are never straight and things are never "square". He concluded that the walls were too crooked to put the straight vertical lines of beadboard on in that room. From top to bottom they were off as much as almost an inch. That would add really crazy beadboard lines to the corners where the panels would intersect. So that plan was out. 

On to plan B ---

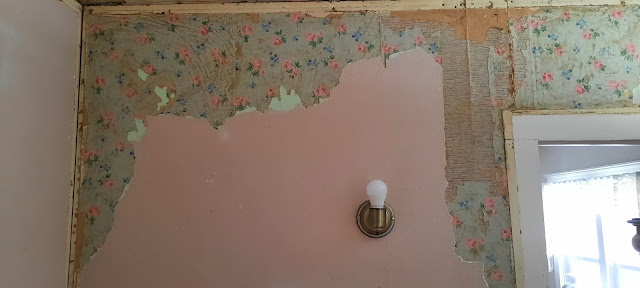
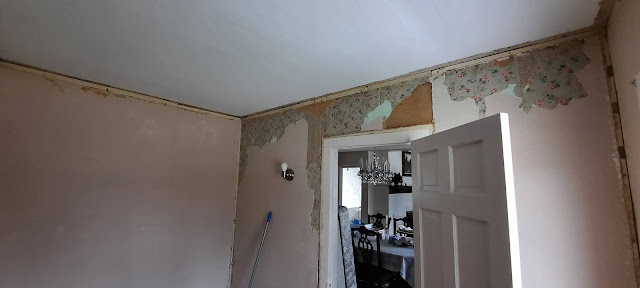
Do you see how rough this plaster is?
 Especially up around the doorframe? 

I had to take this photo on wide-angle view which kind of distorted a little. 

So we need to do something, and the plaster is very rough in that area.  Also on that wall, there is an electrical wall sconce. You can only turn it on and off by twisting the little knurled nut underneath the bottom of the sconce. I would like a switch on the wall by the doorway. So he said that was a good idea and he's going to take care of that at the same time.

It would be impossible to put a light fixture up into the ceiling at this time, because we had this whole section of the house blown with insulation. The roof line slopes so close there that it would mean crawling on hands and feet with about one foot of clearance to even get up there to wire in a light fixture. So I'm happy enough to just to have a wall switch instead of reaching up for the sconce light fixture. He said that's easy!  What a guy. 

The room is really cute, even though it's small. Here's the six-foot wall that's facing the front of the house and the front porch. We put the new window in last December, so really the only thing left in this room to do are the walls and some new crown moulding. The floors had all been refinished beautifully right before we bought the house.


P.S. when we ordered the door knobs for the new french doors, we also ordered a set for this door too.

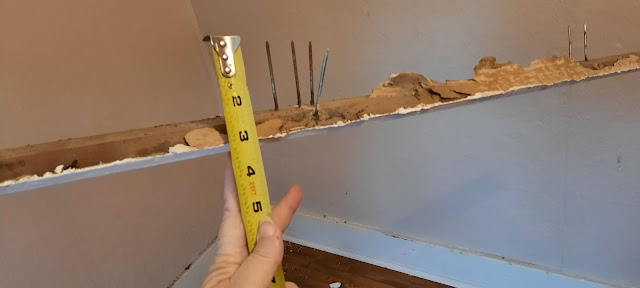
Steve started tearing off the top crown moulding trim. He really had to pry and pry and pry with his big pry bar. Want to know why? Well, just look at this! They used 3 inch sinker nails for rough construction to hold this trim up into place! Isn't that crazy? But I suppose, in the old days you used whatever nails you had around in your tool box or in your work shop when you were doing things.


Steve poked around on the different surfaces of the wall in that room. Some of the plaster on one wall was kind of loose so he decided to rip it down. I didn't even have a chance to get the floor covered with rosin paper. He started to make a mess!  Watch out.. it's Steveio Demo Day! 


Look at this naughty boy! He had all of the crown moulding ripped off where it met the ceiling. He also ripped some crazy quarteround trim off all of the corners. Pretty soon he started ripping any loose plaster off the wall. I think he looks happy?


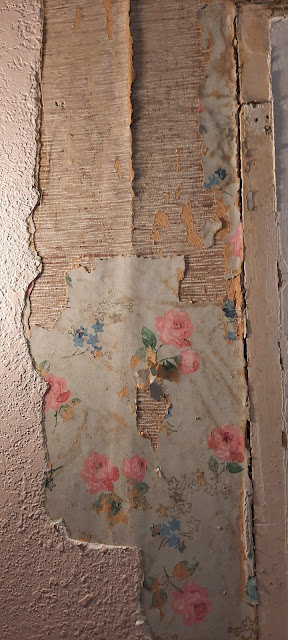
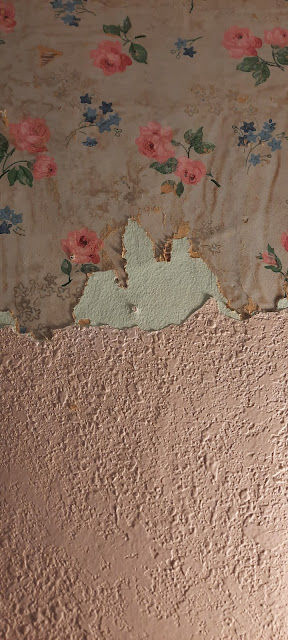
This is what he discovered underneath. Three layers of wallpaper! So someone plastered over the wallpaper with this texture splatter gun? It was just a thin layer and in some spots it had pulled away.


Kind of neat to look at the old wallpapers. First there was the brown stuff with the tiny white stripes, then on top of that was the blue floral with pink flowers, and then the one on top of that was a mint green. Very interesting. But also very messy!


I tried to keep one section of the vintage paper but most of it came off in little pieces. The layers of old wheat paste were discolored and disintegrating.  Why on earth someone would plaster over wallpaper with a texture splatter gun is beyond me. 


He only ripped free the loose stuff and got it back down to the base panel or wallboard or whatever it was mounted to. Behind that there was old plaster and lath strips that had cracked and crumbled away. That's why it had been covered up with some kind of wall board.  


That one wall was the worst wall around the doorway. The rest of the walls were still in pretty good shape. So he didn't have to rip it any further.  Now he went around securing any loose spots with more drywall screws, making contact to the studs and lathes underneath.  Soon nothing was loose or flexing. 


Well, he decided we are NOT going to mess with the beadboard paneling at all. Instead we are going to sheetrock the entire thing with new 3/8 inch thick drywall. He called up Paul, the young man we just had do the plaster in our bedroom, and prior to that he did our whole She Shed. Paul said that was just finishing up another job tonight and will be available in the morning! 

So guess where Steve is right now? He is off at Menards picking up all of the supplies needed to get everything ready. I guess tomorrow morning bright and early we are going to be redoing this cute little room.  Also, Steve was able to wire in the new light switch like I asked. 

Then.....  He said let's get a matching wall sconce, the same as what we used down in the She Shed.  I have one more special leaded glass shade for a wall sconce, and they only fit a certain type of light fixture housing. 

I called up the local True Value in Oconto Falls, to ask if they had any more of these particular wall sconces. I wanted the exact same one so my stained glass shade would fit. Well, dangnabbit, it turns out that they've been discontinued! 


Come to think of it, when I bought these first three fixtures (actually two years ago), they were the last three boxes left on the shelf. They had been marked down on clearance. One was white, one was brass, and one was rubbed oil rubbed bronze. When I bought them I painted all three white so they would match for the she shed.
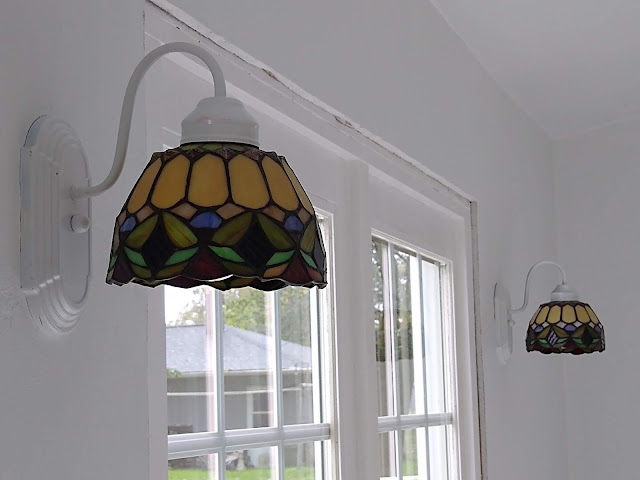

I was disappointed, but then the gentleman called me back 10 minutes later and told me they have one left without a box that had been a display model! Yay! He set it aside with our name on it and we will pick that up in the morning!!

He didn't even tell me what finish was on the one that we want to buy that he is holding for me. I don't care, because I will paint it anyhow. At least we have the same one that I know my leaded glass shade will fit just like these others. They are an unusual size and these light fixtures happen to have a big ceramic ring inside that screws around the bulb socket that holds these unusual sized lamp shades. There isn't any lip edge on the stained glass shades to hold into more traditional style light fixtures. 

So tomorrow, while the guys are busy working in the Play Room with the plastering, I will be running to the hardware store in Oconto Falls to get the light fixture. Thanks United True Value! You just got to love small towns and personal service.

I am gonna relax in the tub tonight while I have a bit of peace and quiet. Steve is gone getting our supplies and I think I need a little break.  ahhhhhh a glass of wine, soft music, maybe some soduko puzzles.  Relaxxxxxxx


Saturday, November 13, 2021

The Doors

The Doors.

Not The Doors rock band, you silly. This is about the french doors we are putting in our house. Steve decided to start the process of mounting the french doors into the frame. 

This is really his project, from start to finish. But I am here to help along the way. And take pictures! He is the one that didn't like the singular doorway that someone made out of this double wide opening years ago. So now that he removed that hodgepodge doorway, and we fixed the floor, it's time to mount the two french doors.  He carried them in before I even had a chance to get up, get dressed and have some coffee. 


We ordered these interesting hinges called "Swing Away" or " Offset Hinges" to allow the door to swing back beyond the plinth block down by the mop boards. 


Without these special hinges, the doors could only open about 90 or 100 degrees before hitting that trim wood. We would like them to open up a full 180 degrees and lay flat against the walls in the office if we want them to. It also saves on them getting accidentally pushed beyond their capacity, and straining the hinges or cracking the door frame wood.


Using his router, he carefully made a new mortise section for each hinge in the doorway framing. There had never been any hinges on this doorway before. So this was all new territory.  I stood with the shop vac hose nozzle set right next to the router, to keep down the sawdust in the house. He did pretty good for standing and holding the heavy router in a horizontal position to do such a precision cut.


Of course, now the problem with an old house, the openings and doorways and floors and walls are never square. We temporarily screwed in the hinges with one screw each to start holding the door in position.  Now he can level side to side, front to rear, and top to bottom.


Careful measuring, checking, leveling, and adjusting at the hinges is necessary to get them to swing just right and not be out of square.  The doors need to also meet up in the middle with just a perfect even gap, and also meet at the top and bottom.


Most people just buy a set of doors already set into a frame and hanging on hinges.  Not us. LOL...  It was time consuming work. We took the door off, carried it out to the front porch, and back in to put it back on a couple times, taking time to adjust things and plane it down just a little bit more with each try.


Steve borrowed this power planer from his dad earlier this week. (Thanks Dad P.!)  It sure was a lot easier than trying to do it by hand with a manual one.  We set each door out on the front porch against the railing to work on the edges.  Also to keep down the mess in the house. 


He took down the woods layers a little bit at a time from the edge of the first door and make sure it will open and close properly and fit right at the hinges and the center where the two doors meet. 


Once wood is cut off, it can't be put back on again!  So he worked a small bit at a time, trying to be as careful as he could be.  I was the "front door opener/door closer" person each time we carried them out and back in again. 


Steve was concerned that the planer may take off a little too much with each swipe. Once he got down to about where he wanted to be, he was getting worried. What he really needed was a belt sander. And can you believe it? He doesn't own a belt sander!

I never ever deny Steve the opportunity to buy new tools. He uses them for everything and it will come in handy again at another time, I am sure. Well...  we ran downtown to get our flu shots (more on that later), we buzzed next door to the little Ace Hardware store and picked up a inexpensive little Skil belt sander.


He said it doesn't need to be a high quality top of the line tool, we're not sure how often he'll ever use it. He got by this long without one. But it was needed for this project and it will serve its purpose and be easier on the budget.


Now he needed to carefully sand down any wood that was too high so each of the doors could fit the uneveness of the existing doorway.

It worked great 

and we got them both mounted perfectly!!!!


The Brass Black solution I ordered from Amazon came. I tried it on 2 sections of the brass caning. Nope, it doesn't do a thing, other than some blue colored run-off.  So we will settle for leaving the brass between the beveled glass panels (for now).  It's not what I wanted, but it's not that noticeable.  The beveled glass panes look so nice and they shine and glisten in the sunlight. 

The new glass door knobs are on their way! UPS says they were sent on Nov 4 from California and are still enroute. Somewhere. I hope soon....

Next comes the cross piece, called a transom.  Steve is measuring for that right now while I type this. Last night we ran and got some trim wood called "stop" material to make sure the doors aren't extended too far into the livingroom beyond their range.  That would result in cracking the wood of either the doors or the frame.  Once he gets the transom in on top, the stop material goes around the edges (so little grandkids can't over swing the doors in their opening).  

In the top transom space, I am working on a creative idea, using an old broken stained glass window that I am going to reconfigure and restore to fill up the space above. I am excited to start that, but can't until I have the exact dimensions of the transom opening. 

We look at the doors now, and they seem to be what the space needed, and they look like they were always meant to be there. I am glad that we changed that room over to an office.  I have a few ideas of what I want to do in there yet.  And the old office will soon be a more "fun" bedroom for the grandkids. 


As for our flu shots, it was one year to the date that we got them last year.  We go to our local pharmacy and they run it through our health insurance prescription card, so there isn't any out of pocket fee to us. 

I was teasing Steve that he flinched wriggled and squiggled and was being a big baby....


I swear that I see HUGE crocodile tears coming out of those baby blues.  My friend Ida said he was only faking it so he could get a lolly pop!!


I took my shot with a smile, but you can't see it under my mask.  Yes, we still mask up wherever we go. And we wash our hands with sanitizer as soon as we get back into the car.  Even though we are both fully vaccinated, we set the appointment to get our covid booster shots in 2 weeks.  I have to wait 90 days from when I got my monoclonal antibody IV after getting covid in early September.  Hope that the booster can protect us for the rest of the winter. 


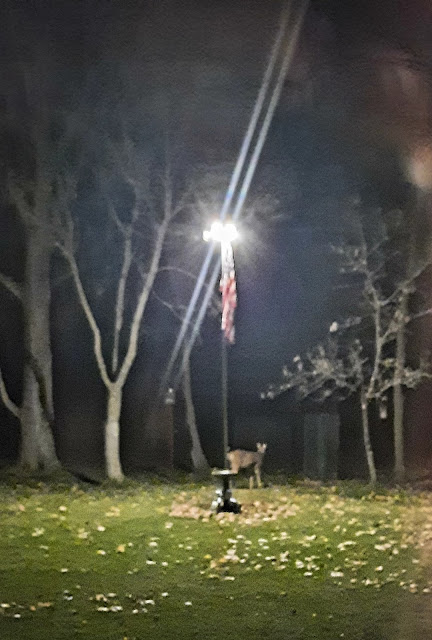
After supper last night, Binney was all excited to see one of her big brown friends come into the yard.  The deer have been hiding since bow season began, so we haven't had too many come in. The gun hunting season starts on Nov 20, so we will see even less during that time. This one had been drinking out of the bird bath.  Blurry pic, sorry.


Once all of the excitement died down of her backyard visitor, then Binney decided it was cold enough to come up and cuddle with me and my quilt in the She Shed. She is doing quite well being an "only dog" since losing Finnegan.  It will be a year in January that he is gone. Sigh. 


We watched some HGTV shows and waited for the forecasted snow to start.  It never did.  But tonight we might get a few inches, which will be fun for tomorrow's Packer Game. It's always more fun to watch it when they play in snow.

Today I have a pork roast to pop in the oven, and maybe bake a pumpkin pie. I want to try out a new recipe before Thanksgiving, so this is far enough in advance to have some pie and not be sick of it near the end of the month. LOL.