Tuesday, March 27, 2018

MOTORHOME MODIFICATIONS - *S* is Steps and Stained Glass RV Window

I am going to start off the new year with posting some of our motorhome modifications, a few at a time. I will post repairs, modifications, or neato things we have found for RVing.  I have lots of pics in my files so I will do them in alphabetical order.

Underneath that stuff, I will post my regular daily stuff..... kinda sorta fun, eh?

So here it goes, we are up to the letter S now!


MOTORHOME MODIFICATIONS 
STARTING WITH THE LETTER S


Steps Updating:

Steve had removed the icky fake indoor/outdoor carpeting covering our steps a few years back. Not only did it look terrible, but it traps in the moisture and makes the metal on the stairs rust. 


Look at how icky they are! 


I ground off all the loose metal and rust
using a special grinding wheel and tool 
for paint. (we used it on the logs of our house)


Using a foam brush,
and Rustoleum paint,
I put on two thick coats of paint,
letting it dry in between coats.


Steve installed two nice polished aluminum 
stair tread/bull nose pieces 
ridged for traction on the stairs.  


It matches with the aluminum lower portions of our motorhome and works very well. But the black portions do need the touch-up every other year or so.  It's a real improvement of what we had to begin with. 


Stained Glass Window Insert:
We were down in Arizona in 2011, and took some day trips into Mexico at Los Algodones for some dental work.  

While there, we found this wonderful vendor stand of stained glass panels for RV door windows.  We know some other RVers have gotten panels in the $70-80 range.  So we knew her first price of $130 US was negotiable.  In Mexico, everything seems to be negotiable. 

We walked away, promising to come back after the dentist was done.  She REALLY wanted to make her first sale of the day she said, and dropped it to $90 US.  But we left.  We told her we had a dentist to pay for first.  LOL 

in mexico day 21


She had some lovely patterns
and we mostly liked the blue oblong design
over her shoulder

in mexico day 23

The variety of patterns and colors was amazing
just about any subject or style.

in mexico day 20

I got my dental work finished, and next was Steve’s turn. While I was waiting for him, I ran to the drug store and shopped at a vendor with some souvenirs for the grandkids.  But then I went BACK past the stained window gal.  I said I would come back, right?  She now dropped the price to $70 US because I came back when I said I would.  But…. I told her I still had to pay the dentist, and would not know how much extra cash money I could spend.  I walked away again.   I wandered a bit and explored one more block around on my own. 

On the way back to the dentist, I again saw the stained window gal.  Now she dropped the price to $60 US.  This time I said yes, I would buy the window that we had looked at.  

As she was wrapping it up, she looked closely at it and saw a crack in the corner!   OH MY!   I am so glad she saw it and was honest enough to tell me.   

So now I had to decide on another window…   and she dropped the price to only $55 US because of my dismay!  She was so worried to lose a sale, and knew I could go to one of other vendors and might find that blue one I had my heart set on.   We settled on another, same pattern but all clear, no blue.  The $55 US exchanged between us, after starting at $130.00.  She carefully wrapped it up in sturdy cardboard and thanked me twice for coming back.


Darling Steveio went to work putting in our stained glass window!   He used some clear Pro Flex rv caulk and we bought a sheet of unbreakable polycarbonate clear plastic to reinforce it from a hardware store.  

mexican souvineers0_1  mexican souvineers2_1


mexican souvineers3_1


mexican souvineers4_1  mexican souvineers0

Once he fitted it into place, 
he screwed the framing back on to hold it. 

mexican souvineers15

It sure looks pretty!  It is patterned enough for privacy, but also lets in light and sparkles in the sunshine.  The one with the blue would have been nice, but settling on the bargain price we are happy with the clear border just as well.


Monday, March 26, 2018

MOTORHOME MODIFICATIONS - *S* is Spare Tire Carrier

I am going to start off the new year with posting some of our motorhome modifications, a few at a time. I will post repairs, modifications, or neato things we have found for RVing.  I have lots of pics in my files so I will do them in alphabetical order.

Underneath that stuff, I will post my regular daily stuff..... kinda sorta fun, eh?

So here it goes, we are up to the letter S now!


MOTORHOME MODIFICATIONS 
STARTING WITH THE LETTER S


Spare Tire Carrier:

WE MADE THIS MODIFICATION ABOUT 10 YEARS AGO.


Our purpose of carrying along a spare tire is one subject that is sometimes given a bit of debate on the RV lists.  Many folks just pay an Emergency Roadside Service fee to come and change a tire.  That is well and good.  But consider the difficult process of locating a spare when yours is shredded to ribbons on the highway… well, that is another story~! 

Trying to get a tire delivered to you roadside on a weekend can be a daunting task. Especially on the side of an interstate.  The sooner you get it changed and moved off the road, the better.  At this time in our lives, with Steve still in the work-a-day world yet, our only time to get away IS the weekends. So that greatly increases the probability of having a tire emergency on a weekend.  Tires for our rig run in the $500-600 range. We hear tales of gouging where people are being upcharged another $200-300 just to get the tire, not even counting the hefty roadside fee they charge to the policy or roadside assistance company. 

And then… there is the ever-so-predictable increased price gouging that occurs where you will end up paying ANY price just to get a tire of any quality on a Sunday evening.

Many RVer’s do not have the tools, strength or knowledge to change a 22.5 semi truck sized tire anyhow, so they take their chances and call an Emergency Road Service.  Steveio is able to change these tires himself, and he carries an on board air compressor, air tools, a Nut Buddy device, and a big breaker bar.  

We do have Emergency Roadside Assistance on our insurance. We also decided we are going to carry a spare tire on a rack on the front of the motorhome.  This will free up a lot of room in the basement storage area.  With an added bit of ingenuity, Steveio figured out a good way to lift or lower the tire from the rack... you have to read down to the end to see! 

Plus the added weight to the front of the rig helps with handling, as Safari’s are notorious for being back heavy.  Unless we are riding with tanks full of propane, full fuel and full fresh water (all which are located in the front) we do feel a difference in handling. The weight of this spare tire can help offset the weight. The 22.5 tires weigh over 150 pounds.

He measured carefully and made up this rack bracket himself.

 It bolts right to the frame inside of the fiberglass cap.


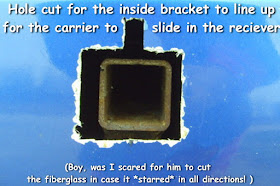
Then he cut the hole through the fiberglass.. drilling pilot holes first and using a sawsall to cut the lines.  I held my breath the entire time!  


Now he slid in the support bar for the tire. It is securely bolted into the receiver portion, just like a hitch. He put the rim on to see how it would look.


(he said these are locking nuts that won’t rattle loose from vibrations)


In this next pic, Steve got the tire mounted on the rim
and lifted up into place. 


Wanna see his cool invention
to lift or lower the tire
from the rack? 


IT'S A BOAT WINCH!     
  

The winch doesn't stay there all the time,
it stows away and he will only take it out if we 
need to get the tire off the rack. 


Now our spare tire is mounted on the rim
and securely put into place. 


I bought some really heavy silver vinyl naugahyde that is exterior boat cushion grade to make a fitted spare tire cover.  The silver color goes nicely with the stainless steel side doors and trim.


~~ I added the cover a few days later ~~

We will also have to relocate the front license plate bracket.  In Wisconsin, we do have to display a front license plate. We will put the license plate bracket to one side. 


~~~~~~~~

Steve helped his dad with some more projects on Saturday. I was too far under the weather to go along, with this danged head cold. I didn't want to pass it on to his brother, sis in law, or dad, so I stayed home with the dogs. 

Sunday was a lazy day here, and we hung around the house without doing a lot of anything.  I feel like a slug, but starting to clear up the head. At least it didn't get into the lungs (so far).  Megadosing on Vitamin C, taking Airborne and Mucinex D to fight things off.  

Looking forward to Easter this upcoming Sunday. We are hosting our family at the local little deli Hilde's Bakery and Deli in Chilton. We get over 2 dozen family members attending, too many for in one house.  She lets us set up our own family decorations on her long banquet tables in her dining area. Our guests are treated to a fine meal and dessert and beverages of their choices. She does a great job! 

Saturday, March 24, 2018

MOTORHOME MODIFICATIONS - *S* is Solar Panel Installation on our Motorhome

I am going to start off the new year with posting some of our motorhome modifications, a few at a time. I will post repairs, modifications, or neato things we have found for RVing.  I have lots of pics in my files so I will do them in alphabetical order.

Underneath that stuff, I will post my regular daily stuff..... kinda sorta fun, eh?

So here it goes, we are up to the letter S now!


MOTORHOME MODIFICATIONS 
STARTING WITH THE LETTER S


Solar Panel Installation:

 We installed solar panels and equipment in April 2010


THE COSTS ARE LISTED 
AT THE END OF THE BLOG

On our Safari motorhome, we originally had two OEM solar panels… one 75 watt for the big coach batteries and a smaller one for maintaining the chassis batteries.   This setup was enough to top off our four golf cart batteries, with frugal usage we could go many days with it.  But we decided to “Solar Up” with more…   and be more livable and downright extravagant once we are done!  LOL

We removed the old panels, as it’s never good idea to mix sizes.  All panels should be the same wattage. Sold the old ones off on Ebay.


THE EQUIPMENT:
We purchased four 100 watt Siemens panels,  a Blue Sky MPPT solar controller, a Trimetric gauge, and all the various cords and accessories to go along with it.  We already have four 6volt golf cart batteries installed.


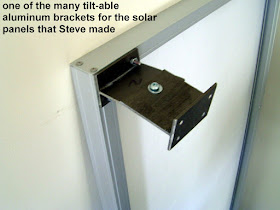
Steve made the mounting brackets out of heavy aluminum, and made them so supplementary metal rods can be wingnutted onto them to tilt them in the winter months if needed.  The panels will ride flat the rest of the year, and only add the tilting rods if we deem it necessary. He pre-fitted the brackets while the panels were still on the ground, rather than waiting till they were up on the roof.


Let’s all sing together that James Taylor favorite:  
Up On A Roof…………….


And I gingerly crawled up the ladder to assist.    I HATE heights….ack!  First step was to hook the four panels together into pairs of two.


Now they had to be wired up together and then joined to the two 8 gauge cords


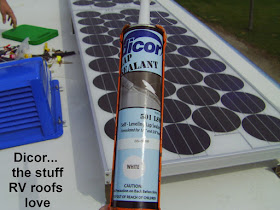
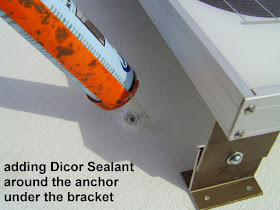
Next comes the time to flip all four of the panels over and install the brackets to the roof… ohhh drilling holes in a roof can be VERY SCARY!    Once a hole is drilled, you can’t  UNdrill it!


We used some rather unique fasteners.   Before you get too excited seeing “plastic”, calm down.  It’s only temporary nylon guides that hold the metal toggle into place … read on:


Ahhhhh  now look at that !  (about four hours later)

Well, not quite.   Now Steveio had to hook up the wires in the solar controller and 30 amp fuse box.  Then hook the Trimetric gauge back up to the shunt and it *should* work…..


Now it’s time to get on the roof and drill down, and pull through the heavy gauge wires for the panels.  Steve carries along this ladder in our rig, an Xmas present from moi.


WIRING:
We chose a location on the roof for the panels that would not have them shadowed by any objects on the rooftop, such as roof vents and air conditioners. The slightest shadow can hamper the panel's output.   We plan to face the front of the rig east as much as possible when choosing parking spots, so the panels are running lengthwise along our south side (passenger side) of the rig.  We already try to park this way in the hot summer to keep our fridge on the north side cooler by being in the shade.

On the passenger side of the rig is a perfect spot to run the wires down through a hole Steve will drill in the roof, through an access panel in the closet that reveals a chase for other wiring and the plumbing vent from our washer/dryer unit.   Directly below this closet is the basement compartment where the solar controller will be located.


The location of the solar controller is very important.  The closest spot located to the batteries is the most desirable.  But it also needs to be in a protected compartment.  This one is the closest, just on the other side of the wheel well.  Once the controller is mounted here upright, the main heavy welding cable will go around the wheel well and connect to the shunt and the batteries right behind the wheel well.


He got the solar controller mounted, wires and ground all hooked up too.


(this next photo added later .. now it's correctly wired and labelled and marked)


We cut out a section of wall and installed the Trimetric Monitor gauge and the 500amp shunt used to monitor the battery condition.


The gauge is mounted in our kitchen, and the shunt is mounted under the bed close to the batteries on the negative line.  Special wires come back to the wall panel.


Voila! It works!  This is like “Command Central” for seeing how many volts you have in your batteries, how many amps are being used, how much is being charged etc.


Weeeeeheeeeeee it all works!   
And even in cloudy afternoon sky in April we are pulling 20 amps.  
Ain’t that something?


*~*~*~*~*~*~*~*~*~*~*~*~*~*~*~*~*~*~*~


P.S.  We find our solar panels give us ample power to do most everything we wish when boondocking (other than run the microwave or vacuum cleaner)    We run the tv's, my curling iron, recharge our cell phones and cameras, run the Galaxy Tablet, and any of the lights and water pump etc. as needed.  We have to remember to start up our  on board Onan generator once a month to exercise it, because we don't often need it now that we are solared up.


Three helpful links we found when exploring all our solar options were: 


(NOTE: SINCE THIS POST, STEVE RAN ACROSS ONE MORE 100 WATT PANEL THAT MATCHED OUR OTHER FOUR, SO NOW WE HAVE FIVE PANELS UP ON THE ROOF) 


About a year afterwards: 

Steve had the chance to buy one more solar panel that matched our other ones.  (we already have four 100 watts Siemens panels on the roof)    Here is the panel and he got right up there and ready to work!!!

Next, he had to tilt up the set of panels to access the connector box underneath.  Our four panels are tiltable with brackets that can hold up at any angle to collect the sun's rays in the winter, if need be.  But we have never had to do that. The newest panel that he is installing is on a fixed bracket that will lay flat. That bracket is from the old panel and needed a bit of alteration, but he made it work.


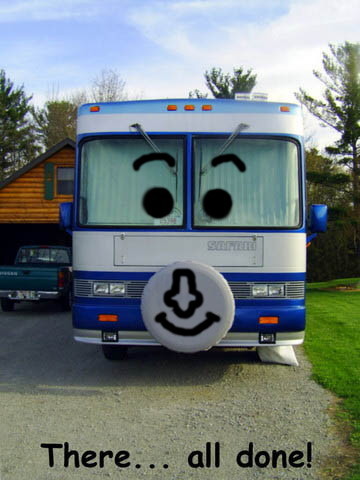
There... all done!   Wasn't that easy?  LOL ...  

You can also see the little 10 watt solar panel that is used to maintain the two driving (chassis) batteries. 

While up on the roof, Steveio also checked over all the seams and edges and vents, looking for any potential problem spots for leaks or damage over the winter.   

COSTS OF OUR SOLAR INSTALLATION:

We removed the old 75 watt solar panel and controller, sold them on Ebay for $262  

We already owned four 6 volt marine batteries @ $87.50 EACH  $369

4 100 WATT SIEMENS SOLAR PANELS, (used total $894

BLUE SKY 50 MPPT SOLAR CONTROLLER, (used $268

NEW TRIMETRIC GAUGE, SHUNT, THERMO SENSOR, 
FROM ALT ENERGY SOLUTIONS (new $234 )

BREAKER BOX WITH FUSES ($24

STEVE MADE THE BRACKETS AND USED 4 ga and 8 ga CABLES FOR CONNECTION  (APPROX VALUE $200)

ONE ADDITIONAL MATCHING PANEL ADDED LATER: (used $65)

TOTAL: $1,792.00 after subtracting the sale of the old OEM panel and controller


Quiet, renewable, reliable energy
being able to boondock in comfort
.... priceless!